1.3 - 路径跟踪控制算法(以PurePursuit和DWA为例) - Python运动规划库教程(Python Motion Planning)
前序教程请参照专栏,如您是从0开始阅读,可以直接跳到Python运动规划库教程(Python Motion Planning)-0-简介与安装。
使用局部路径跟踪控制器之前需要先用全局路径规划器规划一条参考路径。路径规划器在栅格地图坐标系上计算得到的点序列。然而,控制器使用的是世界坐标系中的浮点数坐标。我们需要将规划路径点序列从地图坐标系转换到世界坐标系再输入控制器。
path_world = map_.path_map_to_world(path)
print(path_world)
打印规划结果:
[(5.5, 5.5), (5.5, 6.5), (5.5, 7.5), (5.5, 8.5), (5.5, 9.5), (5.5, 10.5), (5.5, 11.5), (5.5, 12.5), (6.5, 13.5), (6.5, 14.5), (6.5, 15.5), (7.5, 16.5), (7.5, 17.5), (8.5, 18.5), (9.5, 18.5), (10.5, 19.5), (11.5, 19.5), (12.5, 19.5), (13.5, 19.5), (14.5, 19.5), (15.5, 19.5), (16.5, 19.5), (17.5, 19.5), (18.5, 19.5), (19.5, 19.5), (20.5, 19.5), (21.5, 19.5), (22.5, 18.5), (23.5, 17.5), (24.5, 16.5), (25.5, 15.5), (26.5, 14.5), (27.5, 13.5), (28.5, 12.5), (29.5, 11.5), (30.5, 11.5), (31.5, 12.5), (32.5, 12.5), (33.5, 13.5), (34.5, 14.5), (35.5, 15.5), (36.5, 16.5), (37.5, 17.5), (38.5, 18.5), (39.5, 19.5), (40.5, 20.5), (41.5, 21.5), (42.5, 22.5), (43.5, 23.5), (44.5, 24.5), (45.5, 25.5)]
创建库中自带的玩具级物理仿真器进行快速验证:
dim = 2
env = ToySimulator(dim=dim, obstacle_grid=map_, robot_collisions=False)
往仿真器中添加机器人。
对于2D机器人,其位姿是一个3D向量 ( x , y , θ ) (x, y, \theta) (x,y,θ),包括世界坐标系中的2D位置 ( x , y ) (x, y) (x,y)和1D方向角 θ \theta θ。动作的最小值和最大值是 ( a x , a y , ω ) (a_x, a_y, \omega) (ax,ay,ω)的范围,其中 ( a x , a y ) (a_x, a_y) (ax,ay)分别表示机器人坐标系中的2D线加速度和1D角加速度。在机器人坐标系中,x轴方向为机器人的正方向。
robots = {
    "1": CircularRobot(dim=dim, radius=1, pose=np.array([5.5, 5.5, 0]), vel=np.zeros(3),
                action_min=np.array([-2, -2, -3.14]), action_max=np.array([2, 2, 3.14]), color="C0", text="1"),
    "2": DiffDriveRobot(dim=dim, radius=1, pose=np.array([5.5, 5.5, 0]), vel=np.zeros(3),
                action_min=np.array([-2.82, 0, -6.28]), action_max=np.array([2.82, 0, 6.28]), color="C1", text="2")
}
添加控制器。
在2D环境中,控制器的观测空间和动作空间分别为世界坐标系中机器人的
(
x
,
y
,
θ
)
(x, y, \theta)
(x,y,θ)位姿和机器人坐标系中机器人的
(
a
x
,
a
y
,
ω
)
(a_x, a_y, \omega)
(ax,ay,ω)加速度。路径跟踪控制器需要路径规划器规划的路径来跟随。如果需要,您还可以设置控制器的max_lin_speed(最大线性速度)、max_ang_speed(最大角速度)、goal_dist_tol(目标距离误差阈值)或goal_orient_tol(目标方向误差阈值)等参数。
对于某些控制器(如APF、DWA),需要更多参数,如obstacle_grid和robot_model。在PurePursuit和PID中,这两个参数可以设置为None。但为了便于使用,我们已传入这两个参数。更多详细信息,请参阅API参考部分。
controllers = {}
for rid, robot in robots.items():
    obs_space, act_space = env.build_robot_spaces(robot)
    controllers[rid] = PurePursuit(obs_space, act_space, env.dt, path_world, robot_model=robot, obstacle_grid=map_, max_lin_speed=3, max_ang_speed=3.14)
    env.add_robot(rid, robot)
启动仿真并渲染。
可视化工具具有许多可自定义的参数。您可以根据需要自行设置。例如,如果您想显示esdf地图,请将show_esdf设置为True。此处我们将其设置为False。
obs, _ = env.reset()

vis = Visualizer2D()
vis.render_toy_simulator(env, controllers, steps=300, show_traj=True, show_env_info=True, grid_kwargs={"show_esdf": False})
vis.plot_path(path, style="--", color="C4")
vis.show()
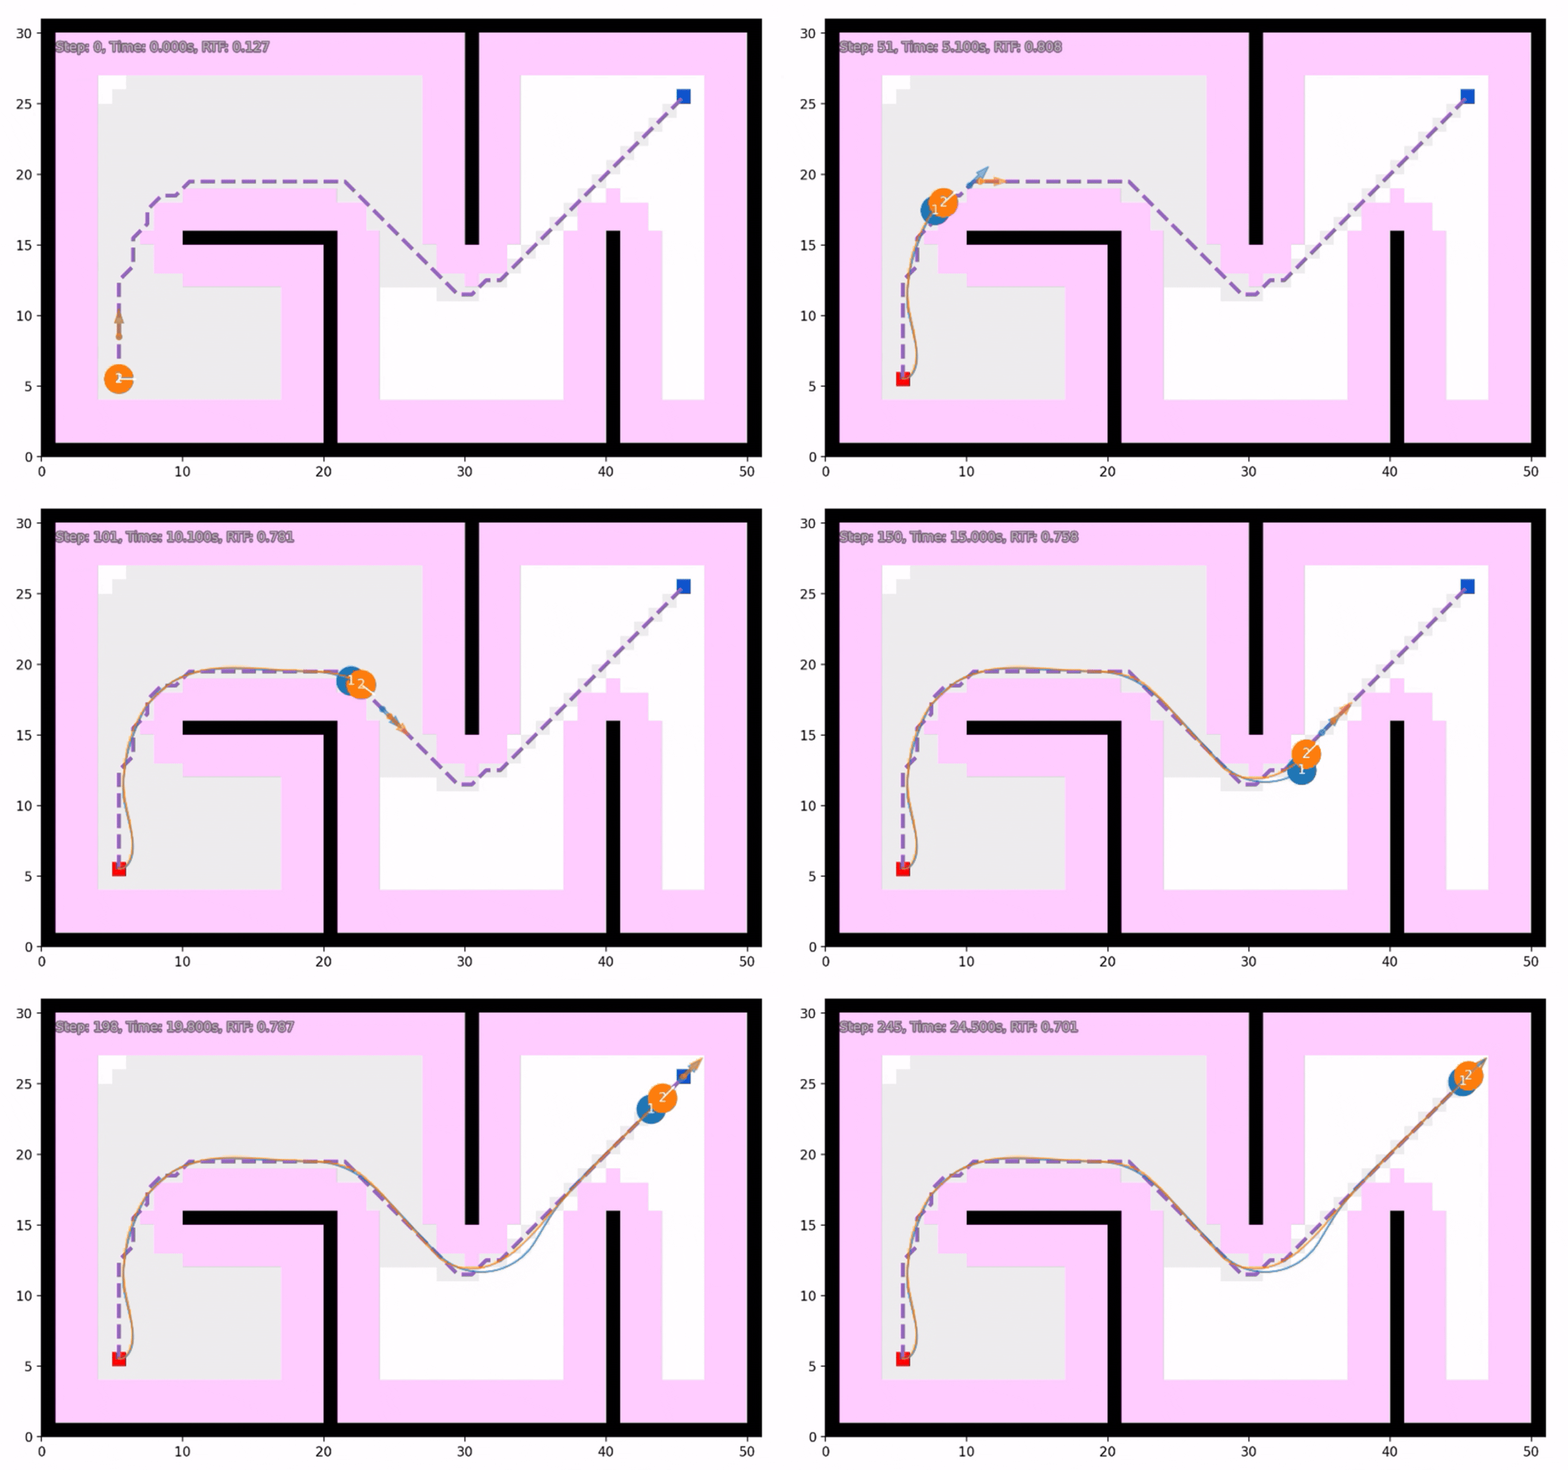
打印轨迹摘要信息。
for rid in robots:
    ctrl = controllers[rid]
    print(rid, ":", vis.get_traj_info(rid, path_world, ctrl.goal, ctrl.goal_dist_tol, ctrl.goal_orient_tol))
vis.close()
打印结果(navigation_error表示最终位置与目标位置之间的距离。对于DTW和nDTW,请参阅General Evaluation for Instruction Conditioned Navigation using Dynamic Time Warping。success表示机器人最终成功停在目标区域。oracle_success表示机器人在某个时刻到达过目标区域。其他类似指标的字面含义):
1 : {'traj_length': 64.05713763788278, 'navigation_error': 0.473638728677913, 'DTW': 154.19064862854037, 'nDTW': 0.6021756607338876, 'success': True, 'dist_success': True, 'oracle_success': True, 'oracle_dist_success': True, 'success_time': 23.3, 'dist_success_time': 23.3, 'oracle_success_time': 20.8, 'oracle_dist_success_time': 20.8}
2 : {'traj_length': 61.7926006243001, 'navigation_error': 0.10272721999078314, 'DTW': 106.21020400009954, 'nDTW': 0.7051281842674489, 'success': True, 'dist_success': True, 'oracle_success': True, 'oracle_dist_success': True, 'success_time': 22.0, 'dist_success_time': 22.0, 'oracle_success_time': 20.400000000000002, 'oracle_dist_success_time': 20.400000000000002}
完整的可运行代码:
import random
random.seed(0)

import numpy as np
np.random.seed(0)

from python_motion_planning.common import *
from python_motion_planning.path_planner import *
from python_motion_planning.controller import *

map_ = Grid(bounds=[[0, 51], [0, 31]])

map_.fill_boundary_with_obstacles()
map_.type_map[10:21, 15] = TYPES.OBSTACLE
map_.type_map[20, :15] = TYPES.OBSTACLE
map_.type_map[30, 15:] = TYPES.OBSTACLE
map_.type_map[40, :16] = TYPES.OBSTACLE

map_.inflate_obstacles(radius=3)

start = (5, 5)
goal = (45, 25)

map_.type_map[start] = TYPES.START
map_.type_map[goal] = TYPES.GOAL

planner = AStar(map_=map_, start=start, goal=goal)
path, path_info = planner.plan()
map_.fill_expands(path_info["expand"])  # for visualizing the expanded nodes

path_world = map_.path_map_to_world(path)
print(path_world)

dim = 2
env = ToySimulator(dim=dim, obstacle_grid=map_, robot_collisions=False)

robots = {
    "1": CircularRobot(dim=dim, radius=1, pose=np.array([5.5, 5.5, 0]), vel=np.zeros(3),
                action_min=np.array([-2, -2, -3.14]), action_max=np.array([2, 2, 3.14]), color="C0", text="1"),
    "2": DiffDriveRobot(dim=dim, radius=1, pose=np.array([5.5, 5.5, 0]), vel=np.zeros(3),
                action_min=np.array([-2.82, 0, -6.28]), action_max=np.array([2.82, 0, 6.28]), color="C1", text="2")
}

controllers = {}
for rid, robot in robots.items():
    obs_space, act_space = env.build_robot_spaces(robot)
    controllers[rid] = PurePursuit(obs_space, act_space, env.dt, path_world, robot_model=robot, obstacle_grid=map_, max_lin_speed=3, max_ang_speed=3.14)
    env.add_robot(rid, robot)

obs, _ = env.reset()

vis = Visualizer2D()
vis.render_toy_simulator(env, controllers, steps=300, show_traj=True, show_env_info=True, grid_kwargs={"show_esdf": False})
vis.plot_path(path, style="--", color="C4")
vis.show()

for rid in robots:
    ctrl = controllers[rid]
    print(rid, ":", vis.get_traj_info(rid, path_world, ctrl.goal, ctrl.goal_dist_tol, ctrl.goal_orient_tol))
vis.close()
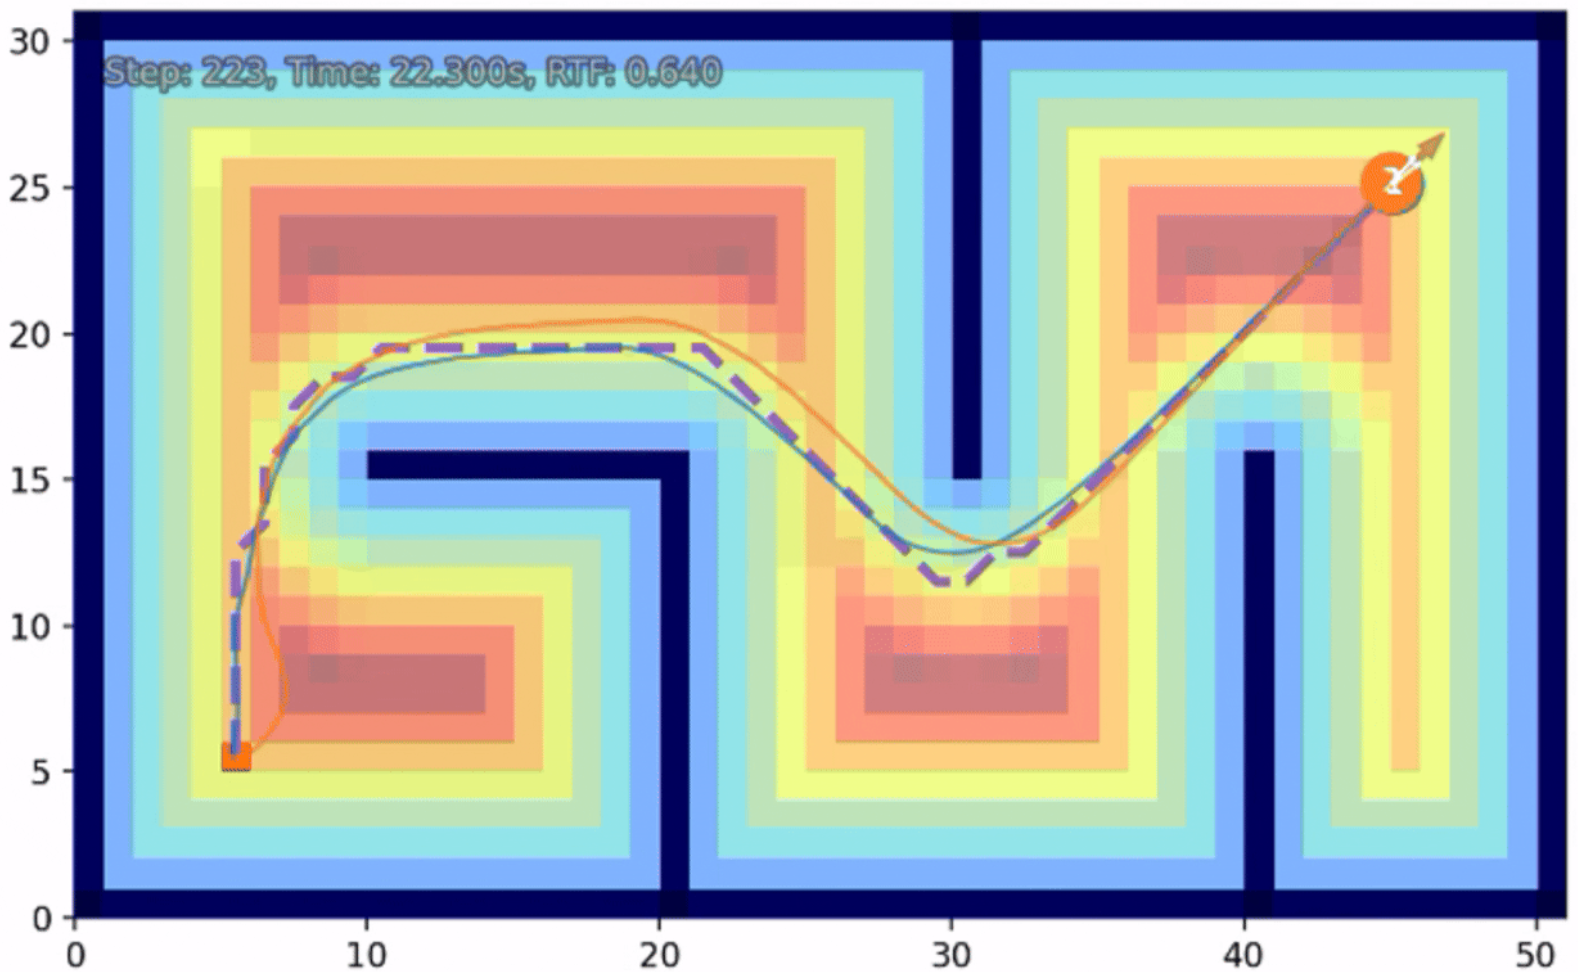
以下是另一个控制器DWA的示例,该示例使用ESDF(欧几里得符号距离场)来计算到障碍物的距离。您可以通过将参数show_esdf设置为True来可视化ESDF。
import random
random.seed(0)

import numpy as np
np.random.seed(0)

from python_motion_planning.common import *
from python_motion_planning.path_planner import *
from python_motion_planning.controller import *

map_ = Grid(bounds=[[0, 51], [0, 31]])

map_.fill_boundary_with_obstacles()
map_.type_map[10:21, 15] = TYPES.OBSTACLE
map_.type_map[20, :15] = TYPES.OBSTACLE
map_.type_map[30, 15:] = TYPES.OBSTACLE
map_.type_map[40, :16] = TYPES.OBSTACLE

map_.inflate_obstacles(radius=3)

start = (5, 5)
goal = (45, 25)

map_.type_map[start] = TYPES.START
map_.type_map[goal] = TYPES.GOAL

planner = AStar(map_=map_, start=start, goal=goal)
path, path_info = planner.plan()
print(path)
print(path_info)
map_.fill_expands(path_info["expand"])  # for visualizing the expanded nodes

path_world = map_.path_map_to_world(path)
print(path_world)

dim = 2
env = ToySimulator(dim=dim, obstacle_grid=map_, robot_collisions=False)

robots = {
    "1": CircularRobot(dim=dim, radius=1, pose=np.array([5.5, 5.5, 0]), vel=np.zeros(3),
                action_min=np.array([-2, -2, -3.14]), action_max=np.array([2, 2, 3.14]), color="C0", text="1"),
    "2": DiffDriveRobot(dim=dim, radius=1, pose=np.array([5.5, 5.5, 0]), vel=np.zeros(3),
                action_min=np.array([-2.82, 0, -6.28]), action_max=np.array([2.82, 0, 6.28]), color="C1", text="2")
}

controllers = {}
for rid, robot in robots.items():
    obs_space, act_space = env.build_robot_spaces(robot)
    controllers[rid] = DWA(obs_space, act_space, env.dt, path_world, robot_model=robot, obstacle_grid=map_, max_lin_speed=3, max_ang_speed=3.14)
    env.add_robot(rid, robot)

obs, _ = env.reset()

vis = Visualizer2D()
vis.render_toy_simulator(env, controllers, steps=300, show_traj=True, show_env_info=True, grid_kwargs={"show_esdf": True})
vis.plot_path(path, style="--", color="C4")
vis.show()

for rid in robots:
    ctrl = controllers[rid]
    print(rid, ":", vis.get_traj_info(rid, path_world, ctrl.goal, ctrl.goal_dist_tol, ctrl.goal_orient_tol))
vis.close()
如需了解更多路径跟踪控制器及其参数,请参阅官方教程文档中的API Reference部分。

Agent 垂直技术社区,欢迎活跃、内容共建。
更多推荐



 15
15 0
0- 0


 已为社区贡献2条内容

所有评论(0)