Vue3 Router高级用法—菜单动态渲染
在许多系统中,通常都需要设计菜单栏,而菜单栏的选项是基于路由渲染的,如果将菜单栏写死,那么需要增加新菜单时,需要修改菜单栏代码,这就比较麻烦,因此可以对菜单栏进行封装,基于路由动态渲染菜单栏,这样只需要添加新的路由即可(这是必要操作)。
1 定义路由规则
import { createRouter, createWebHistory } from 'vue-router'
// 创建路由实例
const router = createRouter({
  // 路由模式:历史模式,特点是路由后面不带#号
  history: createWebHistory(),
  // 在这个数组中进⾏路由规则的详细配置
  routes: [
    {
      // 根路径(根路径重定向到/login路径)
      path: '/',
      redirect: '/login'
    },
    {
      // 登录页
      path: '/login',
      component: () => import('@/views/login/index.vue')
    },
    {
      // 系统主⻚
      path: '/',
      component: () => import('@/layout/index.vue'),
      // 路由嵌套(二级路由)
      children: [
        {
          // ⽤户管理,
          path: '/user',
          component: () => import('@/views/user/user.vue'),
          meta: {
            title: '用户管理',
            icon: 'user'
          }
        },
        {
          // 系统管理
          path: '/system',
          meta: {
            title: '系统管理',
            icon: 'system'
          },
          children: [
            {
              // 平台账号设置
              path: '/system/account',
              component: () =>
                import('@/views/system/Account/index.vue'),
              meta: {
                title: '平台账号设置',
                icon: 'tree'
              }
            },
            {
              // 字典设置
              path: '/system/dictionary',
              component: () =>
                import('@/views/system/Dictionary/index.vue'),
              meta: {
                title: '字典设置',
                icon: 'table'
              }
            },
            {
              // 参数设置
              path: '/system/parameter',
              component: () =>
                import('@/views/system/Parameter/index.vue'),
              meta: {
                title: '参数设置',
                icon: 'form'
              }
            },
            {
              // 字典详情页
              path: '/system/dictionaryDetail',
              component: () =>
                import('@/views/System/Dictionary/Detail.vue'),
              hidden: true
            }
          ]
        }
      ]
    },
    {
      // 401错误页
      path: '/401',
      component: () => import('@/views/error/401.vue')
    },
    {
      // 404错误页
      path: '/:pathMatch(.*)*',
      component: () => import('@/views/error/404.vue')
    }
  ]
})
export default router
这里使用了嵌套路由(children):外层是布局组件Layout,表示一级路由,内层是具体页面,表示二级路由。meta字段是自定义的数据容器,用来存放菜单需要的信息:
title:显示菜单文字
icon:显示图标名称(配合<svg-icon>使用)
而属性hidden: true:控制是否在菜单中隐藏该路由(比如字典详情页不需要出现在菜单里,而是由字典设置页的数据点击后进入)
2 计算需要在菜单栏显示的路由
在具体的菜单组件页:
<script setup>
  import { useRouter, useRoute } from 'vue-router'
  import { computed } from 'vue'
  // router 是路由实例
  const router = useRouter()
  // route 是当前显示/激活 的路由规则对象(代表的某个具体的路由规则)
  const route = useRoute()
  // 计算得到需要展示的 Layout 下的所有路由规则
  const showRoutes = computed(() => {
    // 筛选得到 Layout 路由规则
    const [layoutRoute] = router.options.routes.filter(
      (route) => route.children
    )
    // 获取 Layout 路由的 children
    const layoutChildren = layoutRoute.children
    // 过去掉 layoutChildren 下 hidden 为 true 的路由(hidden为true代表隐蔽)
    // 展示的路由结果
    const newChildren = []
    for (let i = 0, length = layoutChildren.length; i < length; i++) {
      const item = layoutChildren[i]
      // 如果没有隐藏属性
      if (!item.hidden) {
        // 如果配置了 children ,并且 children 里有路由规则
        if (item.children && item.children.length > 0) {
          const childrenList = []
          // 遍历内层 children,做同样的处理
          for (let j = 0, len = item.children.length; j < len; j++) {
            const child = item.children[j]
            if (!child.hidden) {
              childrenList.push(child)
            }
          }
          item.children = childrenList
        }
        // 添加值结果数组
        newChildren.push(item)
      }
    }
    // 返回展示的结果作为 showRoutes 的值(计算属性内部必须有返回值)
    return newChildren
  })
  console.log(`output->`, showRoutes.value)
</script>
使用computed响应式地计算出要展示的菜单数据,筛选规则包括:
(1)找到包含children的根布局路由(即/下的主结构)
(2)过滤掉hidden: true的一级和二级菜单(如/System/Dictionary/Detail.vue不出现在菜单中)
(3)返回干净的、可用于渲染的路由列表
注意:为何用 computed?因为路由一旦改变或初始化完成,就需要立刻重新计算一次菜单内容,且结果依赖响应式数据(路由状态),所以computed是最佳选择。
3 菜单栏渲染
    <!-- 左侧菜单 -->
    <el-menu :default-active="route.path" router>
      <template v-for="item in showRoutes" :key="item.path">
        <!-- 有子菜单用 el-sub-menu 这套结构 -->
        <el-sub-menu :index="item.path" v-if="item.children">
          <template #title>
            <svg-icon :name="item.meta.icon" />
            <span class="title">{{ item.meta.title }}</span>
          </template>
          <el-menu-item
            v-for="subItem in item.children"
            :key="subItem.path"
            :index="subItem.path"
          >
            <svg-icon
              v-if="subItem.meta.icon"
              :name="subItem.meta.icon"
              :color="route.path === subItem.path ? '#0FA1FE' : ''"
            />
            <span class="title">{{ subItem.meta.title }}</span>
          </el-menu-item>
        </el-sub-menu>
        <!-- 没有子菜单,直接用 el-menu-item 这套结构 -->
        <el-menu-item :index="item.path" v-else>
          <svg-icon
            :name="item.meta.icon"
            :color="route.path === item.path ? '#0FA1FE' : ''"
          />
          <span class="title">{{ item.meta.title }}</span>
        </el-menu-item>
      </template>
    </el-menu>
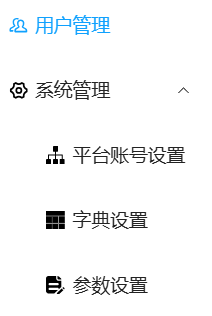
在组件中,利用v-for遍历showRoutes(经过处理后的可见路由),根据是否有children自动判断是一级菜单还是可展开的二级菜单(v-if和v-else),使用Element Plus的<el-menu>组件构建标准菜单UI,:index="xxx"和router模式结合,实现点击跳转,:color实现当前路由对应菜单的高亮显示。
最终效果如下所示:

Agent 垂直技术社区,欢迎活跃、内容共建。
更多推荐


 8
8 0
0- 0


 已为社区贡献1条内容

所有评论(0)