从源码到架构:React useActionState 深度剖析
一、为什么 useActionState 值得深入分析?
在 React 19 之前,处理一个带有异步提交、loading 状态、错误处理的表单,我们需要这样写:
- 1
- 2
- 3
- 4
- 5
- 6
- 7
- 8
- 9
- 10
- 11
- 12
- 13
- 14
- 15
- 16
- 17
- 18
- 19
- 20
- 21
- 22
- 23
- 24
- 25
- 26
- 27
- 28
- 29
- 30
- 31
function OldForm() { | |
const [isLoading, setIsLoading] = useState(false); | |
const [error, setError] = useState(null); | |
const [result, setResult] = useState(null); | |
const handleSubmit = async (e) => { | |
e.preventDefault(); | |
setIsLoading(true); | |
setError(null); | |
try { | |
const formData = new FormData(e.target); | |
const res = await submitToServer(formData); | |
setResult(res); | |
} catch (err) { | |
setError(err.message); | |
} finally { | |
setIsLoading(false); | |
} | |
}; | |
return ( | |
<form onSubmit={handleSubmit}> | |
<input name="email" /> | |
<button disabled={isLoading}> | |
{isLoading ? '提交中...' : '提交'} | |
</button> | |
{error && <p className="error">{error}</p>} | |
{result && <p className="success">{result.message}</p>} | |
</form> | |
); | |
} |
三个 useState、一个 try/catch/finally、一个 e.preventDefault()——这是每一个 React 开发者都写过无数遍的样板代码。而 React 19 给出的答案是:
- 1
- 2
- 3
- 4
- 5
- 6
- 7
- 8
- 9
- 10
- 11
- 12
- 13
- 14
- 15
- 16
- 17
- 18
- 19
- 20
- 21
- 22
- 23
function NewForm() { | |
const [state, formAction, isPending] = useActionState( | |
async (prevState, formData) => { | |
const res = await submitToServer(formData); | |
return { success: true, message: res.message }; | |
}, | |
{ success: null, message: '' } | |
); | |
return ( | |
<form action={formAction}> | |
<input name="email" /> | |
<button disabled={isPending}> | |
{isPending ? '提交中...' : '提交'} | |
</button> | |
{state.message && ( | |
<p className={state.success ? 'success' : 'error'}> | |
{state.message} | |
</p> | |
)} | |
</form> | |
); | |
} |
一个 Hook,三个返回值,零样板代码。这不是简单的语法糖——它背后是一套完整的 Action 驱动状态管理架构。理解了 useActionState,我们就理解了 React 19 对"副作用即状态"这一理念的全部思考。
二、从 useFormState 到 useActionState
useActionState 的前身是 React Canary 版本中的 useFormState。React 团队在正式发布时将其重命名,这个决策背后蕴含着深刻的设计思考。
useFormState 的问题在于:它把自己框死了。 "Form" 这个词暗示它只能用于表单场景,但实际上这个 Hook 的能力远不止于此。任何需要"执行一个副作用,然后基于结果更新状态"的场景,都可以用它来处理。React 团队意识到了这个命名上的局限,做出了一个看似微小实则关键的决定——将其更名为 useActionState。
这个改名反映了 React 19 的一个核心设计理念:Action 不只是表单的专利,它是一种通用的异步状态变更模式。 在 React 19 的语义体系中,"Action"指的是任何可能产生副作用并导致状态变更的函数调用。它可以是表单提交、按钮点击、数据同步,甚至是一个定时器触发的操作。useActionState 是这个 Action 体系的基础设施之一,与 useTransition、useOptimistic、useFormStatus 共同构成了完整的 Action 工具链。
从 useFormState 到 useActionState 的演进,本质上是从"数据驱动"到"意图驱动"的范式转变。前者关注的是"表单有什么数据",后者关注的是"用户想做什么"。这种视角的转换,让 API 的抽象层级提升了一个维度。
三、API 表面:简洁之下的设计
3.1 函数签名
- 1
- 2
- 3
- 4
- 5
function useActionState<S, P>( | |
action: (state: Awaited<S>, payload: P) => Awaited<S> | Promise<Awaited<S>>, | |
initialState: Awaited<S>, | |
permalink?: string | |
): [Awaited<S>, (payload: P) => void, boolean]; |
这个签名中有几个值得注意的设计细节:
泛型 <S, P> 的双参数设计。S 代表状态类型,P 代表 payload 类型。S 被 Awaited<> 包裹,意味着状态可以是 Promise<T> 类型——Action 返回的 Promise 会被自动解包。这个设计让同步和异步 Action 在类型层面保持统一。
action 的第一个参数是 prevState。这和 useReducer 的 reducer 函数签名一脉相承,但有一个关键区别:useReducer 的 reducer 是纯同步函数,而这里的 action 可以是异步函数。React 内部会自动处理 Promise 的解析和状态的更新。
permalink 参数。这是一个容易被忽略但设计精巧的参数。它用于 Server Components 场景,告诉 React 这个 Action 修改的是哪个页面的数据。在流式 SSR 中,React 会利用这个信息在服务端渲染时就展示 Action 的结果,而不需要等待客户端 hydration 完成。
3.2 三个返回值
- 1
const [state, dispatch, isPending] = useActionState(action, initialState); |
| 返回值 | 类型 | 说明 |
|---|---|---|
state | Awaited<S> | Action 的最新执行结果,初始为 initialState |
dispatch | (payload: P) => void | 触发 Action 的函数,payload 会作为第二个参数传给 action |
isPending | boolean | 是否有正在执行的 Action |
isPending 的实现尤为巧妙。它不是简单的"Action 是否正在运行"标志,而是基于 React 的 Transition 机制实现的。当 Action 在 Transition 中执行时,isPending 会自动变为 true,在 Transition 完成后变为 false。这意味着它天然与 React 的并发渲染特性集成,能够在长时间运行的 Action 期间保持 UI 的响应性。
四、源码剖析:Hook 协作的秘密
这是本文最核心的部分。我们将深入 React 源码(packages/react-reconciler/src/ReactFiberHooks.js),看看 useActionState 到底是如何实现的。
4.1 整体架构
useActionState 的核心秘密在于:它不是一个 Hook,而是三个 Hook 的协作体。
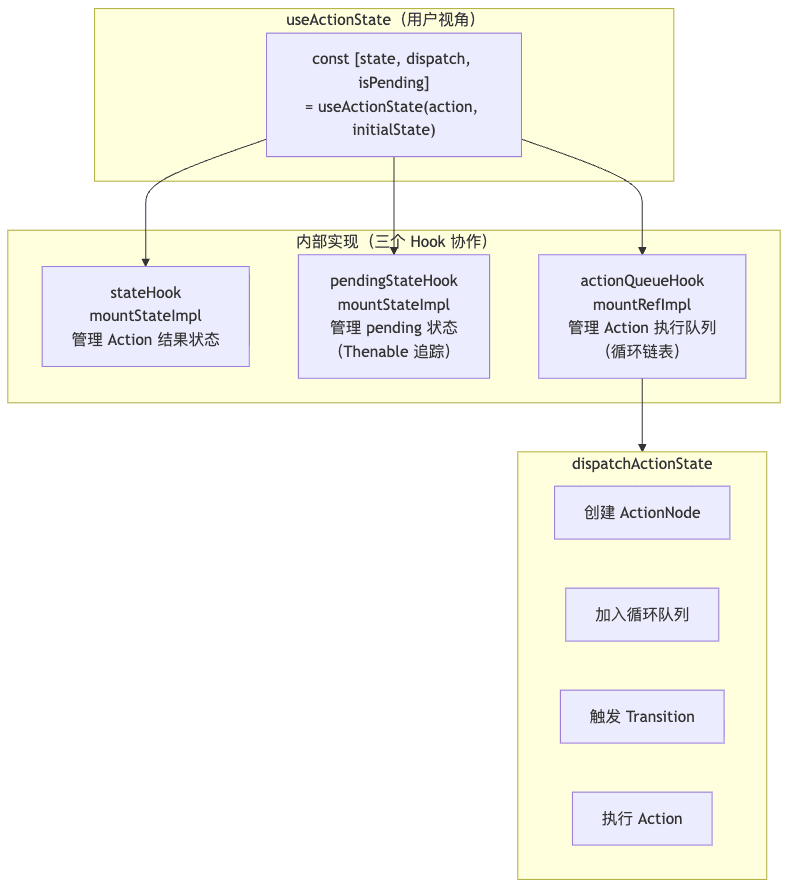
当我们在组件中调用 useActionState 时,React 内部会创建三个独立的 Hook 实例,它们各自管理不同的职责:
- stateHook:存储 Action 的执行结果,本质上是
useState的底层实现 - pendingStateHook:追踪 pending 状态,使用 Thenable 模式实现细粒度的异步追踪
- actionQueueHook:管理 Action 的执行队列,使用循环链表实现高效的入队和出队
4.2 mountActionState:初始化的精密工程
让我们看看首次渲染时的源码:
- 1
- 2
- 3
- 4
- 5
- 6
- 7
- 8
- 9
- 10
- 11
- 12
- 13
- 14
- 15
- 16
- 17
- 18
- 19
- 20
- 21
- 22
- 23
- 24
- 25
- 26
- 27
- 28
- 29
- 30
- 31
- 32
- 33
- 34
- 35
- 36
- 37
- 38
- 39
- 40
- 41
- 42
- 43
- 44
- 45
- 46
- 47
- 48
- 49
- 50
- 51
- 52
// packages/react-reconciler/src/ReactFiberHooks.js | |
// 一个恒等 reducer——直接返回新状态 | |
function actionStateReducer<S>(oldState: S, newState: S): S { | |
return newState; | |
} | |
function mountActionState<S, P>( | |
action: (Awaited<S>, P) => Awaited<S>, | |
initialStateProp: Awaited<S>, | |
permalink?: string | |
): [Awaited<S>, (P) => void, boolean] { | |
// Hook 1: 状态 Hook —— 存储 Action 结果 | |
const stateHook = mountStateImpl<Awaited<S>>(initialStateProp); | |
const setState = stateHook.queue.dispatch; | |
// Hook 2: Pending 状态 Hook —— 追踪异步执行状态 | |
// 使用 Thenable 模式,类似 Transition 的 pending 追踪 | |
const pendingStateHook = mountStateImpl<Thenable<boolean> | boolean>(false); | |
const setPendingState: boolean => void = | |
dispatchOptimisticSetState.bind(null, pendingStateHook.queue, false); | |
// Hook 3: Action 队列 Hook —— 管理执行队列 | |
const actionQueueHook = mountRefImpl<ActionStateQueue<S, P> | null>(null); | |
const actionQueue = actionQueueHook.mutableRef; | |
// 初始化队列 | |
if (actionQueue.current === null) { | |
actionQueue.current = { | |
action: action, | |
state: initialStateProp, | |
pending: null, // 循环链表的头指针 | |
}; | |
} | |
// 创建 dispatch 函数 | |
const dispatch = dispatchActionState.bind( | |
null, | |
actionQueue.current, | |
setState, | |
setPendingState, | |
action, | |
permalink | |
); | |
// 计算 isPending | |
const isPending = | |
pendingStateHook.memoizedState !== false && | |
pendingStateHook.memoizedState !== null; | |
return [stateHook.memoizedState, dispatch, isPending]; | |
} |
这段代码有几个值得深入分析的细节:
actionStateReducer 是一个恒等函数。它直接返回 newState,不做任何计算。这意味着 useActionState 的状态更新不是通过 reducer 逻辑推导出来的,而是由 Action 函数直接决定的。这与 useReducer 形成了鲜明对比——useReducer 的状态是新状态由旧状态和 action type 推导而来,而 useActionState 的状态是 Action 函数的返回值。这个设计选择反映了两种不同的状态管理哲学。
pendingStateHook 使用 dispatchOptimisticSetState。这不是普通的 setState,而是 React 内部的乐观更新机制。当 Action 开始执行时,pending 状态会被设置为一个 Thenable 对象(一个具有 then 方法的对象),而不是简单的 true。React 的并发渲染器能够识别 Thenable 对象,并在其 resolve 时自动触发重新渲染。这种设计让 isPending 的更新与 React 的调度系统深度集成,而不是简单地设置一个布尔值。
actionQueue 使用 mountRefImpl 而非 mountStateImpl。这是一个关键的设计决策。队列的变更不应该触发重新渲染——只有队列中 Action 的执行结果才应该触发渲染。使用 Ref 来存储队列,确保了队列操作(入队、出队)不会导致不必要的渲染。
4.3 循环链表:Action 队列的数据结构
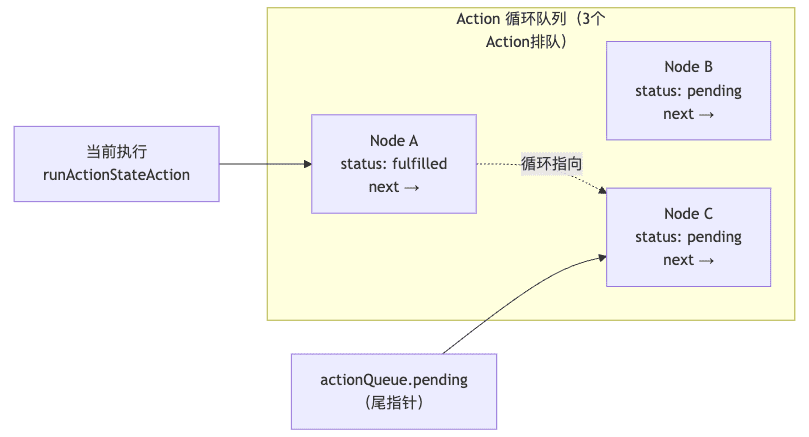
useActionState 的 Action 队列使用了一个循环单向链表(Circular Singly Linked List)来实现。这是一个在算法面试中经常出现的数据结构,React 团队将其应用到了实际的工程问题中。
- 1
- 2
- 3
- 4
- 5
- 6
- 7
- 8
- 9
- 10
- 11
- 12
- 13
- 14
- 15
- 16
- 17
// Action 队列节点的数据结构 | |
interface ActionStateQueueNode<S, P> { | |
action: (state: Awaited<S>, payload: P) => Awaited<S>; | |
payload: P; | |
nextState: Awaited<S> | null; // Action 执行后的结果 | |
status: 'pending' | 'fulfilled' | 'rejected'; | |
value: Awaited<S> | null; | |
then: Thenable<Awaited<S>>['then'] | null; | |
next: ActionStateQueueNode<S, P> | null; // 指向下一个节点 | |
} | |
// Action 队列的数据结构 | |
interface ActionStateQueue<S, P> { | |
action: ((state: Awaited<S>, payload: P) => Awaited<S>) | null; | |
state: Awaited<S>; | |
pending: ActionStateQueueNode<S, P> | null; // 队列尾指针 | |
} |
为什么选择循环链表而不是数组或普通队列?有三个原因:
O(1) 的入队和出队操作。在循环链表中,入队只需要将新节点链接到尾节点的 next,并更新尾指针;出队只需要将尾节点的 next 指向第二个节点。不需要像数组那样进行元素移动或扩容。
天然的空队列判断。当队列中只有一个节点时,last.next === last,这个条件可以用来判断"这是最后一个 Action"。当队列为空时,pending === null。
内存效率。不需要预先分配固定大小的数组,也不需要在队列增长时进行扩容复制。每个节点只在需要时创建,Action 完成后可以被垃圾回收。
五、dispatchActionState:触发 Action 的完整链路
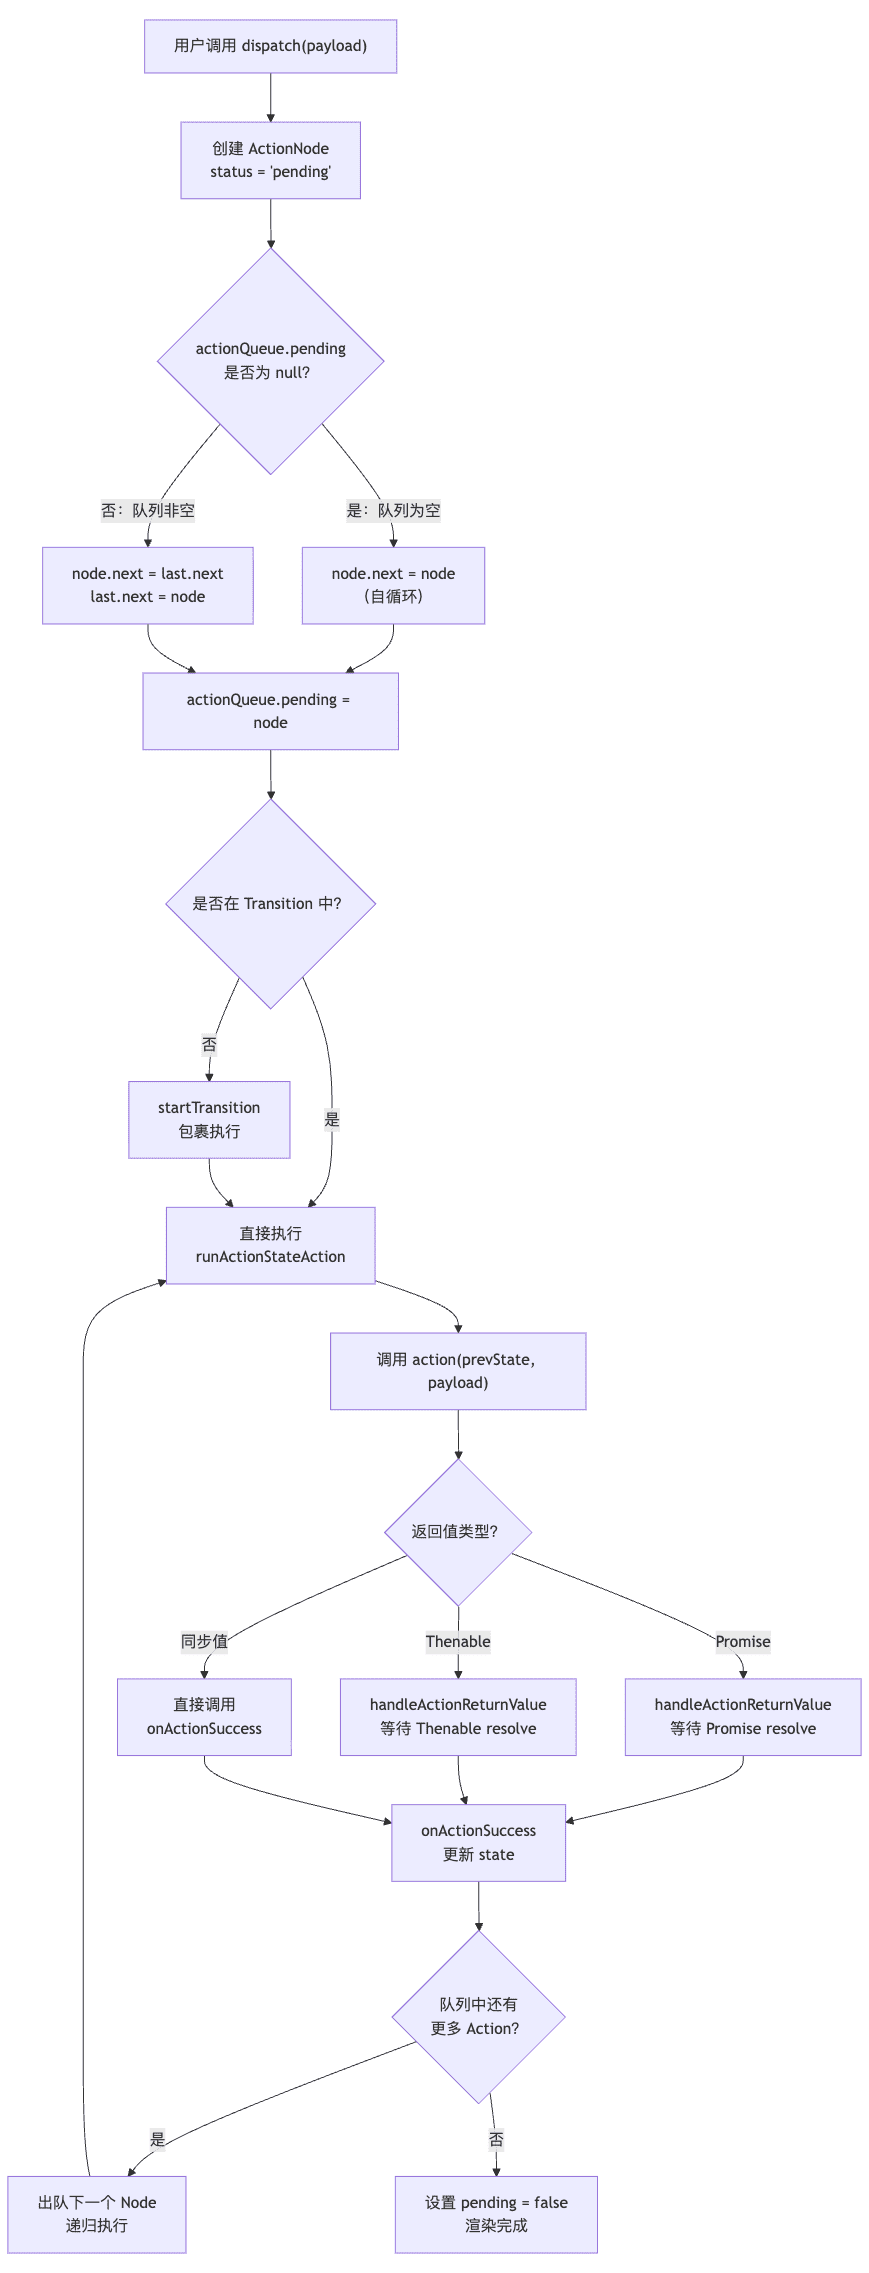
当用户调用 dispatch(payload) 时,到底发生了什么?让我们追踪完整的执行链路。
5.1 dispatchActionState 源码
- 1
- 2
- 3
- 4
- 5
- 6
- 7
- 8
- 9
- 10
- 11
- 12
- 13
- 14
- 15
- 16
- 17
- 18
- 19
- 20
- 21
- 22
- 23
- 24
- 25
- 26
- 27
- 28
- 29
- 30
- 31
- 32
- 33
- 34
- 35
- 36
- 37
- 38
- 39
function dispatchActionState<S, P>( | |
actionQueue: ActionStateQueue<S, P>, | |
setState: (newState: Awaited<S>) => void, | |
setPendingState: (isPending: boolean) => void, | |
action: (Awaited<S>, P) => Awaited<S>, | |
permalink: string | undefined, | |
payload: P | |
) { | |
// 1. 创建 Action 节点 | |
const node: ActionStateQueueNode<S, P> = { | |
action: action, | |
payload: payload, | |
nextState: null, | |
status: 'pending', | |
value: null, | |
then: null, | |
next: null, | |
}; | |
// 2. 加入循环队列(O(1) 操作) | |
const last = actionQueue.pending; | |
if (last === null) { | |
// 队列为空,自循环 | |
node.next = node; | |
} else { | |
// 插入到尾部 | |
node.next = last.next; | |
last.next = node; | |
} | |
actionQueue.pending = node; | |
// 3. 设置 pending 状态 | |
setPendingState(true); | |
// 4. 在 Transition 中执行 Action | |
startTransition(() => { | |
runActionStateAction(actionQueue, node); | |
}); | |
} |
注意第 4 步:Action 总是在 startTransition 中执行。这确保了 Action 的状态更新被标记为低优先级的 Transition 更新,不会阻塞用户的高优先级交互(如输入、点击)。这是 React 19 "非阻塞 UI" 理念在 useActionState 中的具体体现。
5.2 runActionStateAction:执行引擎
- 1
- 2
- 3
- 4
- 5
- 6
- 7
- 8
- 9
- 10
- 11
- 12
- 13
- 14
- 15
- 16
- 17
- 18
- 19
- 20
- 21
- 22
- 23
- 24
- 25
- 26
- 27
- 28
- 29
- 30
- 31
- 32
- 33
- 34
- 35
function runActionStateAction<S, P>( | |
actionQueue: ActionStateQueue<S, P>, | |
node: ActionStateQueueNode<S, P> | |
) { | |
const action = node.action; | |
const payload = node.payload; | |
const prevState = actionQueue.state; | |
if (node.isTransition) { | |
// 恢复原始的 Transition 上下文 | |
const prevTransition = ReactSharedInternals.T; | |
const currentTransition = ({}: any); | |
ReactSharedInternals.T = currentTransition; | |
try { | |
const returnValue = action(prevState, payload); | |
const onStartTransitionFinish = ReactSharedInternals.S; | |
if (onStartTransitionFinish !== null) { | |
onStartTransitionFinish(currentTransition, returnValue); | |
} | |
handleActionReturnValue(actionQueue, node, returnValue); | |
} catch (error) { | |
onActionError(actionQueue, node, error); | |
} finally { | |
ReactSharedInternals.T = prevTransition; | |
} | |
} else { | |
try { | |
const returnValue = action(prevState, payload); | |
handleActionReturnValue(actionQueue, node, returnValue); | |
} catch (error) { | |
onActionError(actionQueue, node, error); | |
} | |
} | |
} |
这段代码中最精妙的部分是 Transition 上下文的恢复。当 dispatch 在一个已有的 Transition 中被调用时(例如通过 <form action> 触发),React 会保存当前的 Transition 上下文(ReactSharedInternals.T),在 Action 执行时恢复它,执行完毕后再还原。这确保了嵌套 Transition 的正确性——内层 Action 能够感知到外层 Transition 的存在,从而正确处理 pending 状态和优先级。
ReactSharedInternals.T 和 ReactSharedInternals.S 是 React 内部的全局状态槽位,分别存储当前 Transition 实例和 Transition 完成回调。这些是 React 调度系统的核心内部 API,正常情况下开发者不应该直接访问它们。但在 useActionState 的实现中,React 团队需要操作这些底层 API 来确保 Action 执行与 Transition 系统的正确集成。
六、异步处理:Thenable 追踪
handleActionReturnValue 是 useActionState 处理异步 Action 的核心函数。它需要处理三种情况:同步值、Promise、Thenable。
- 1
- 2
- 3
- 4
- 5
- 6
- 7
- 8
- 9
- 10
- 11
- 12
- 13
- 14
- 15
- 16
- 17
- 18
- 19
- 20
- 21
- 22
- 23
function handleActionReturnValue<S, P>( | |
actionQueue: ActionStateQueue<S, P>, | |
node: ActionStateQueueNode<S, P>, | |
returnValue: Awaited<S> | Promise<Awaited<S>> | |
) { | |
if (typeof returnValue === 'object' && returnValue !== null) { | |
if (typeof returnValue.then === 'function') { | |
// Promise 或 Thenable —— 异步处理 | |
returnValue.then( | |
(nextState: Awaited<S>) => onActionSuccess(actionQueue, node, nextState), | |
(error: mixed) => onActionError(actionQueue, node, error) | |
); | |
} else { | |
// 同步对象值 | |
const nextState = (returnValue: any); | |
onActionSuccess(actionQueue, node, nextState); | |
} | |
} else { | |
// 同步原始值 | |
const nextState = (returnValue: any); | |
onActionSuccess(actionQueue, node, nextState); | |
} | |
} |
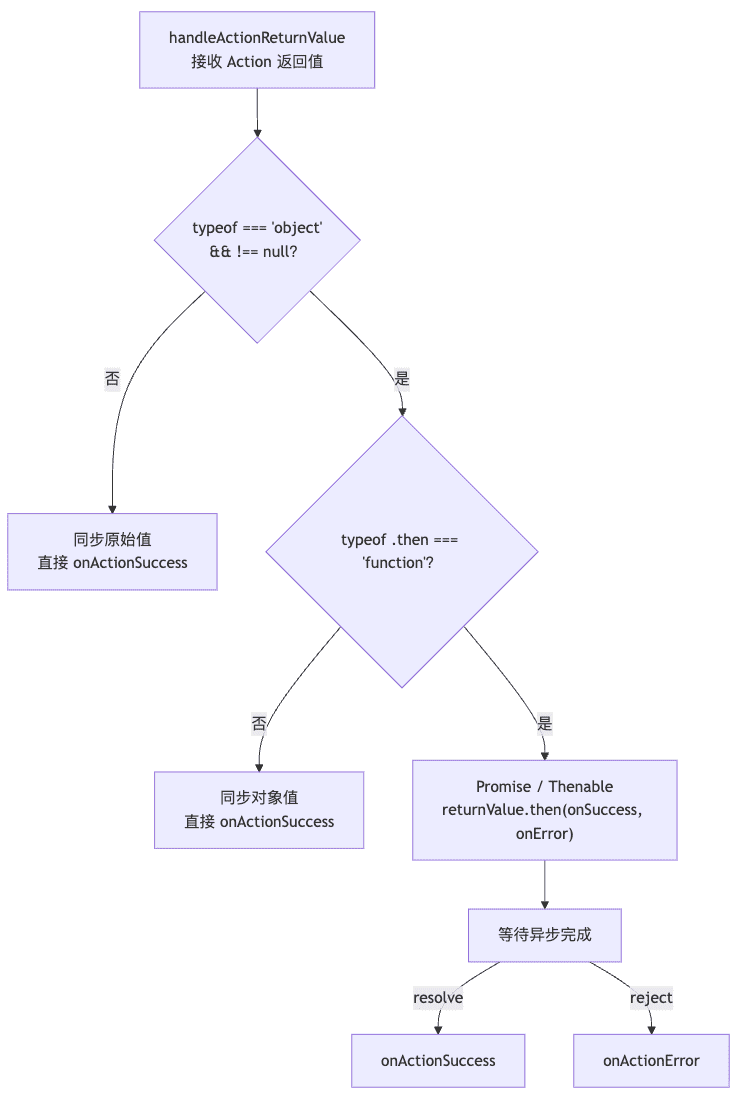
这里有一个容易忽略但极其重要的设计:useActionState 检查的是 then 方法的存在,而不是 instanceof Promise。这意味着它能够处理任何 Thenable 对象,不仅仅是原生 Promise。这个设计选择与 React 18 引入的 Thenable 概念一脉相承——React 的并发特性(如 Suspense、Transition)都基于 Thenable 协议而非 Promise API,因为 Thenable 是一个更通用的异步协议。
6.1 onActionSuccess:成功后的连锁反应
- 1
- 2
- 3
- 4
- 5
- 6
- 7
- 8
- 9
- 10
- 11
- 12
- 13
- 14
- 15
- 16
- 17
- 18
- 19
- 20
- 21
- 22
- 23
- 24
- 25
- 26
- 27
- 28
- 29
function onActionSuccess<S, P>( | |
actionQueue: ActionStateQueue<S, P>, | |
actionNode: ActionStateQueueNode<S, P>, | |
nextState: Awaited<S> | |
) { | |
// 1. 标记节点为已完成 | |
actionNode.status = 'fulfilled'; | |
actionNode.value = nextState; | |
notifyActionListeners(actionNode); | |
// 2. 更新队列的状态快照 | |
actionQueue.state = nextState; | |
// 3. 从循环队列中出队,并执行下一个 | |
const last = actionQueue.pending; | |
if (last !== null) { | |
const first = last.next; | |
if (first === last) { | |
// 这是队列中最后一个 Action | |
actionQueue.pending = null; | |
} else { | |
// 移除头节点,更新尾指针 | |
const next = first.next; | |
last.next = next; | |
// 递归执行下一个 Action | |
runActionStateAction(actionQueue, next); | |
} | |
} | |
} |
注意第 3 步的递归调用:当一个 Action 完成后,它会自动触发队列中的下一个 Action。这就是 useActionState 实现"顺序执行"的机制——即使我们快速点击了提交按钮三次,三个 Action 也会按照顺序依次执行,每个 Action 都能拿到前一个 Action 的执行结果作为 prevState。
6.2 onActionError:错误的级联处理
- 1
- 2
- 3
- 4
- 5
- 6
- 7
- 8
- 9
- 10
- 11
- 12
- 13
- 14
- 15
- 16
function onActionError<S, P>( | |
actionQueue: ActionStateQueue<S, P>, | |
actionNode: ActionStateQueueNode<S, P>, | |
error: mixed | |
) { | |
actionNode.status = 'rejected'; | |
actionNode.value = error; | |
notifyActionListeners(actionNode); | |
// 关键:将 action 设为 null,阻止后续 Action 执行 | |
actionQueue.action = null; | |
actionQueue.pending = null; | |
// 错误沿 Fiber 树向上传播 | |
throw error; | |
} |
当 Action 抛出异常时,onActionError 会将 actionQueue.action 设为 null。这个操作的效果是阻止队列中所有后续 Action 的执行。这是一种"快速失败"(fail-fast)策略——一旦某个 Action 失败,后续的 Action 即使已经入队也不会被执行,因为它们可能依赖于失败 Action 的结果。
七、updateActionState:更新时的 Hook 一致性
React 的 Hooks 系统要求 Hook 的调用顺序在每次渲染时保持一致。useActionState 在更新时的实现确保了这一点:
- 1
- 2
- 3
- 4
- 5
- 6
- 7
- 8
- 9
- 10
- 11
- 12
- 13
- 14
- 15
- 16
- 17
function updateActionState<S, P>( | |
action: (Awaited<S>, P) => Awaited<S>, | |
initialState: Awaited<S>, | |
permalink?: string | |
): [Awaited<S>, (P) => void, boolean] { | |
// 按照挂载时的顺序恢复三个 Hook | |
const stateHook = updateWorkInProgressHook(); | |
const pendingStateHook = updateWorkInProgressHook(); | |
const actionQueueHook = updateWorkInProgressHook(); | |
return updateActionStateImpl( | |
stateHook, currentStateHook, | |
pendingStateHook, currentPendingStateHook, | |
actionQueueHook, currentActionQueueHook, | |
action, initialState, permalink | |
); | |
} |
updateWorkInProgressHook() 是 React Hooks 系统的核心函数,它按照 Fiber 节点上 Hook 链表的顺序依次恢复每个 Hook 的状态。由于 mountActionState 按照固定顺序创建了三个 Hook(stateHook → pendingStateHook → actionQueueHook),updateActionState 必须以相同的顺序恢复它们。如果顺序不一致,React 会抛出"Hooks 顺序错误"的异常。
updateActionStateImpl 还会处理一个重要的边界情况:Action 函数的更新。如果组件重新渲染时传入了不同的 action 函数,updateActionStateImpl 会更新 actionQueue.action 的引用,确保后续的 dispatch 使用最新的 action 函数。这种"函数引用更新"的模式在 React 内部很常见,useEffect 和 useCallback 也采用了类似的策略。
八、架构全景:useActionState 在 React 19 生态中的位置
理解了 useActionState 的内部实现后,让我们把它放到 React 19 的整体架构中来看。
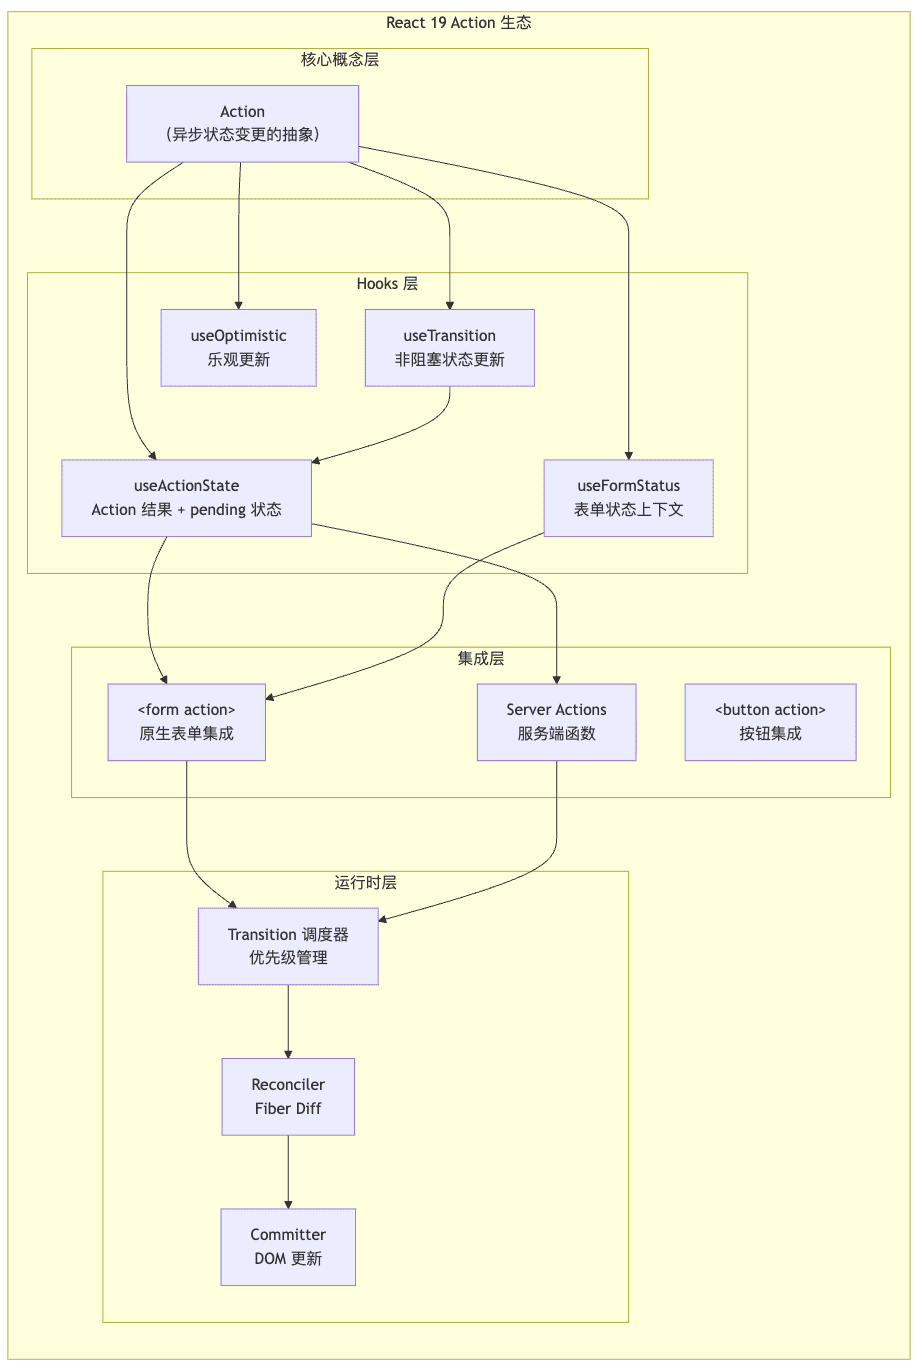
在这个架构图中,我们可以看到 useActionState 处于一个承上启下的关键位置:
向上,它为开发者提供了简洁的 API,隐藏了异步状态管理的复杂性。开发者只需要定义 Action 函数和初始状态,剩下的交给框架。
向下,它依赖 useTransition 的调度能力来管理更新的优先级,依赖 Reconciler 来处理新旧状态的差异,依赖 Committer 来将变更应用到 DOM。
横向,它与 useOptimistic 和 useFormStatus 形成互补。useOptimistic 负责在 Action 执行期间显示乐观的 UI 状态,useFormStatus 负责在表单子组件中访问父级表单的提交状态。三者配合使用,可以构建出完整的表单交互体验。
与 Server Actions 的集成是 useActionState 最重要的架构特性之一。当 Action 函数是一个 Server Action(通过 "use server" 指令标记的函数)时,useActionState 能够在服务端渲染阶段就执行 Action 并将结果包含在初始 HTML 中。这意味着用户在页面加载时就能看到 Action 的结果,而不需要等待客户端 JavaScript 加载和执行。这种"服务端优先"的策略是 React 19 全栈架构的核心优势。
九、举一反三:从源码推导行为
深入理解源码的最大价值在于:我们可以从实现推导出行为,而不是死记硬背 API 文档。 让我们用几个实际场景来验证这一点。
9.1 快速连续点击:队列的顺序保证
- 1
- 2
- 3
- 4
- 5
- 6
- 7
- 8
- 9
- 10
- 11
- 12
- 13
- 14
- 15
- 16
- 17
function Counter() { | |
const [count, dispatch, isPending] = useActionState( | |
async (prev, delta) => { | |
await new Promise(r => setTimeout(r, 1000)); | |
return prev + delta; | |
}, | |
0 | |
); | |
return ( | |
<div> | |
<p>Count: {count}</p> | |
<p>Pending: {isPending ? 'yes' : 'no'}</p> | |
<button onClick={() => startTransition(() => dispatch(1))}>+1</button> | |
</div> | |
); | |
} |
快速点击两次 "+1",两次 dispatch 会被依次加入循环队列。第一个 Action 完成后(count 变为 1),第二个 Action 才开始执行(基于 prevState=1,结果为 2)。isPending 在整个过程中保持 true。
这个行为完全可以从源码推导出来:dispatchActionState 将每个 dispatch 包装为一个 ActionNode 并加入循环队列,onActionSuccess 在当前 Action 完成后递归调用 runActionStateAction 执行下一个。队列的 FIFO 顺序保证了 Action 的执行顺序与 dispatch 的调用顺序一致。
9.2 错误传播:快速失败的连锁效应
- 1
- 2
- 3
- 4
- 5
- 6
- 7
- 8
- 9
- 10
- 11
- 12
- 13
- 14
- 15
- 16
- 17
- 18
- 19
function Form() { | |
const [state, formAction, isPending] = useActionState( | |
async (prev, formData) => { | |
const name = formData.get('name'); | |
if (!name) throw new Error('Name is required'); | |
return { submitted: true, name }; | |
}, | |
{ submitted: false, name: '' } | |
); | |
return ( | |
<ErrorBoundary fallback={<p>Something went wrong</p>}> | |
<form action={formAction}> | |
<input name="name" /> | |
<button disabled={isPending}>Submit</button> | |
</form> | |
</ErrorBoundary> | |
); | |
} |
当 Action 抛出异常时,onActionError 会将 actionQueue.action 设为 null,阻止后续排队的 Action 执行。错误会沿 Fiber 树向上传播,直到被最近的 Error Boundary 捕获。同时,isPending 会被重置为 false,确保 UI 不会永久卡在 loading 状态。
9.3 Transition 约束:为什么必须在 Transition 中调用?
如果直接调用 dispatch 而不包裹在 startTransition 中,且不通过 <form action> 传递,React 会抛出错误:
- 1
An async function with useActionState was called outside of a transition. |
从源码可以理解这个约束的原因:isPending 的正确性依赖于 dispatchOptimisticSetState,而这个函数需要在 Transition 上下文中才能正确工作。没有 Transition 上下文,React 无法追踪 pending 状态的变化,也无法正确地将状态更新标记为低优先级。这不是一个任意的限制,而是架构上的必然要求。
9.4 与 useReducer 的对比:何时选择哪个?
| 维度 | useReducer | useActionState |
|---|---|---|
| 状态计算 | 纯同步 reducer | 可以是异步函数 |
| 更新触发 | dispatch({type: 'X'}) | dispatch(payload) |
| Pending 追踪 | 需要手动实现 | 内置 isPending |
| 错误处理 | 在 reducer 中处理 | 自动传播到 Error Boundary |
| 队列管理 | 无(每次 dispatch 立即执行) | 内置顺序队列 |
| 适用场景 | 复杂的同步状态逻辑 | 异步 Action、表单提交、数据变更 |
一个实用的判断标准:如果我们的状态更新涉及 I/O 操作(网络请求、数据库写入、文件读写),使用 useActionState;如果只是纯计算逻辑,使用 useReducer。

Agent 垂直技术社区,欢迎活跃、内容共建。
更多推荐

 5
5 0
0- 0


 已为社区贡献1条内容

所有评论(0)