【从零吃透 YOLO 目标检测:原理演进 + PyTorch 代码全流程详解】
目录
1. 两阶段检测(代表:Faster R-CNN、Mask R-CNN)
YOLO(You Only Look Once)是计算机视觉领域最经典、最实用的单阶段目标检测算法,凭借速度快、端到端、易部署霸榜工业实时检测场景。本文结合课件与源码,从基础概念→v1~v4 演进→YOLOv3 核心原理→完整代码流程一站式讲透,新手也能直接跟着跑通项目。
一、先搞懂:目标检测的两大流派
目标检测算法分为两阶段(two-stage)和单阶段(one-stage),YOLO 属于后者。
1. 两阶段检测(代表:Faster R-CNN、Mask R-CNN)
- 流程:先生成候选框 → 再对框分类回归
- 优点:检测精度高
- 缺点:速度慢,通常只有 5 FPS,难以实时
2. 单阶段检测(代表:YOLO 系列)
- 流程:直接用一个网络回归出目标位置 + 类别
- 优点:极快,适合实时检测
- 缺点:早期精度略低(后续版本已大幅改善)
YOLO 核心思想:把检测变成回归问题,只看一次就完成检测
二、YOLO 核心评价指标
训练和评估模型全靠这几个指标
1.IoU(交并比)
IOU = 交集面积/并集面积
一般 IoU>0.5 才算有效检测。
2.精确率 Precision
你检测出来的结果里,对了多少
Precision=TP/(FP+TP)
3.召回率 Recall
真实目标里,你找到了多少:
Recall=TP/(TP+FN)
4.mAP(平均精度均值)
所有类别 AP 的平均值,检测精度最核心指标,越大越好。
5.FPS
每秒处理图片数,衡量速度。
三、YOLO 系列演进:从 v1 到 v4 到底升级了啥?
YOLO 每一代都在解决上一代的痛点,进化路线非常清晰。
1. YOLOv1:开山之作
- 把图像分成 7×7 网格,目标中心落在哪格,哪格负责预测
- 网络:24 卷积层 + 2 全连接层
- 输出:7×7×30(2 个框 + 20 类)
- 优点:速度快(45 FPS)
- 缺点:重叠目标、小目标检测差,每个网格只能预测一类
2. YOLOv2(YOLO9000):全面变强
- 加入 Batch Normalization,mAP 提升 2%
- 高分辨率训练(448×448)
- Anchor 先验框 + K-means 聚类,更贴合数据集
- 主干:Darknet-19,去掉全连接层
- 支持多尺度训练,小目标明显改善
3. YOLOv3:工业界最稳版本(本文重点)
- 主干:Darknet-53 + 残差连接,更深更稳
- 3 尺度检测:13×13 / 26×26 / 52×52,分别检测大 / 中 / 小目标
- 9 个先验框,按尺度自动分配
- 用 Logistic 替代 Softmax,支持多标签分类
- 速度与精度平衡最好,工程首选
4. YOLOv4:集大成者
- 数据增强:Mosaic 四图拼接、CutMix、DropBlock
- 结构:CSPDarknet53 + SPP + PANet
- 损失:CIoU Loss(重叠 + 中心距 + 长宽比)
- 后处理:DIOU-NMS,重叠目标不丢框
四、YOLOv3 核心原理
1. 网络结构:全卷积 + 多尺度融合
- 没有池化、没有全连接,全部卷积
- 下采样靠 stride=2 卷积
- 深层特征上采样 → 拼接浅层特征 → 兼顾大小目标
2. 先验框设计
- COCO 数据集 K-means 聚类出 9 种先验框
- 分配规则:
- 13×13:大框 → 检测大目标
- 26×26:中框 → 检测中目标
- 52×52:小框 → 检测小目标
3. 输出格式
每个尺度输出:
N*3*(4+1+C)
• 4:框坐标 x,y,w,h
• 1:置信度(是否有目标)
• C:类别概率
4. 损失函数(三部分)
1. 坐标损失:框位置准不准
2. 置信度损失:区分有无目标
3. 分类损失:类别对不对
五、YOLOv3 PyTorch 代码全流程
整体流程
数据标注 → 配置修改 → 模型构建 → 训练 → 评估 → 推理检测
步骤 1:数据标注(Labelme)
给图片中的物体打框,让模型学习目标位置。
1. 安装:pip install labelme pyqt5 pillow
2. 启动:cmd 输入 labelme
3. 标注矩形框,保存为 JSON 格式
步骤 2:标签格式转换
把 Labelme 的 (x1,y1,x2,y2) 转为 YOLO 需要的 归一化中心坐标 (x,y,w,h)。
• 运行工具:json2yolo.py
• 输出:labels/目录下的 .txt 标签文件
import json
import os
#文件代码功能:是将labelme打标产生的json文件转换为yolo所能识别的标准格式txt。
# name2id = {'dog':0,'cat':1,'Fire extinguisher':2,'Hook':3,'Gas cylinder':4}
name2id = {'dog': 0, 'cat': 1}  # json中有多少个类型,这里就定义多少个


def convert(img_size, box):#对标签坐标  做 单位化
    dw = 1. / (img_size[0])
    dh = 1. / (img_size[1])
    x = (box[0] + box[2]) / 2.0 - 1
    y = (box[1] + box[3]) / 2.0 - 1
    w = box[2] - box[0]
    h = box[3] - box[1]
    x = x * dw
    w = w * dw
    y = y * dh
    h = h * dh
    return (x, y, w, h)


def decode_json(json_floder_path, json_name):
    # 转换好的标签路径
    txt_name = '..\data\\custom1\\labels\\train\\' + json_name[0:-5] + '.txt'
    txt_file = open(txt_name, 'w')
    json_path = os.path.join(json_floder_path, json_name)
    data = json.load(open(json_path, 'r', encoding='utf-8'))
    img_w = data['imageWidth']
    img_h = data['imageHeight']
    for i in data['shapes']:
        label_name = i['label']
        if (i['shape_type'] == 'rectangle'):
            x1 = int(i['points'][0][0])
            y1 = int(i['points'][0][1])
            x2 = int(i['points'][1][0])
            y2 = int(i['points'][1][1])
            bb = (x1, y1, x2, y2)
            bbox = convert((img_w, img_h), bb)  #
            txt_file.write(str(name2id[label_name]) + " " + " ".join([str(a) for a in bbox]) + '\n')
    txt_file.close()


if __name__ == "__main__":
    # json文件的路径
    json_floder_path = '../data/custom1/jsons'
    json_names = os.listdir(json_floder_path)
    for json_name in json_names:
        decode_json(json_floder_path, json_name)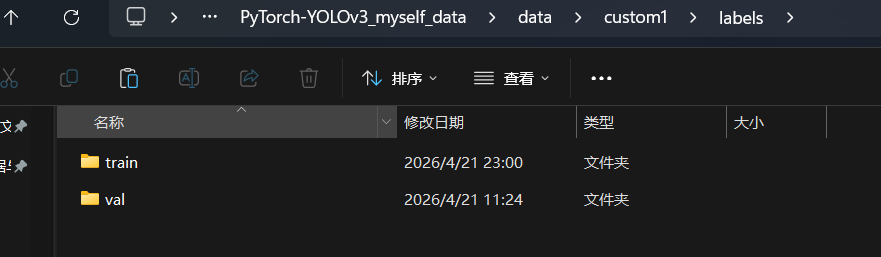
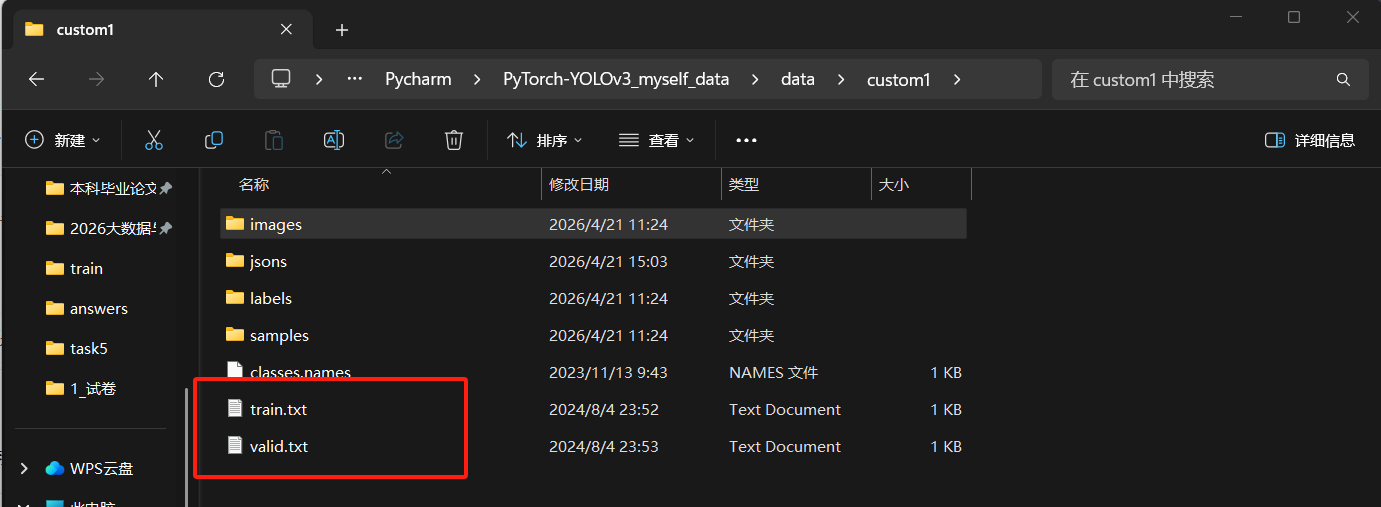
步骤 3:修改 4 个关键配置
让模型适配你的自定义数据集。
1. classes.names:写类别名(如 person, animal)
2. custom.data:设置类别数、训练 / 验证集路径
3. yolov3-custom.cfg:自动生成,适配类别数
4. train.txt / val.txt:写入图片路径
步骤 4:模型构建(models.py)
核心文件,负责搭建网络。
1. create_modules:解析 .cfg 构建网络层
2. 卷积块:Conv2d + BN + LeakyReLU
3. Route 层:特征拼接(concat)
4. Shortcut 层:残差连接
5. YOLOLayer:检测层,计算损失、输出预测框
步骤 5:模型训练(train.py)
用数据集更新网络权重,学到检测能力。
1. 加载配置与数据集
2. 初始化 Darknet 模型 + 加载预训练权重
3. 优化器:Adam
4. 前向传播 → 计算损失 → 反向传播 → 更新参数
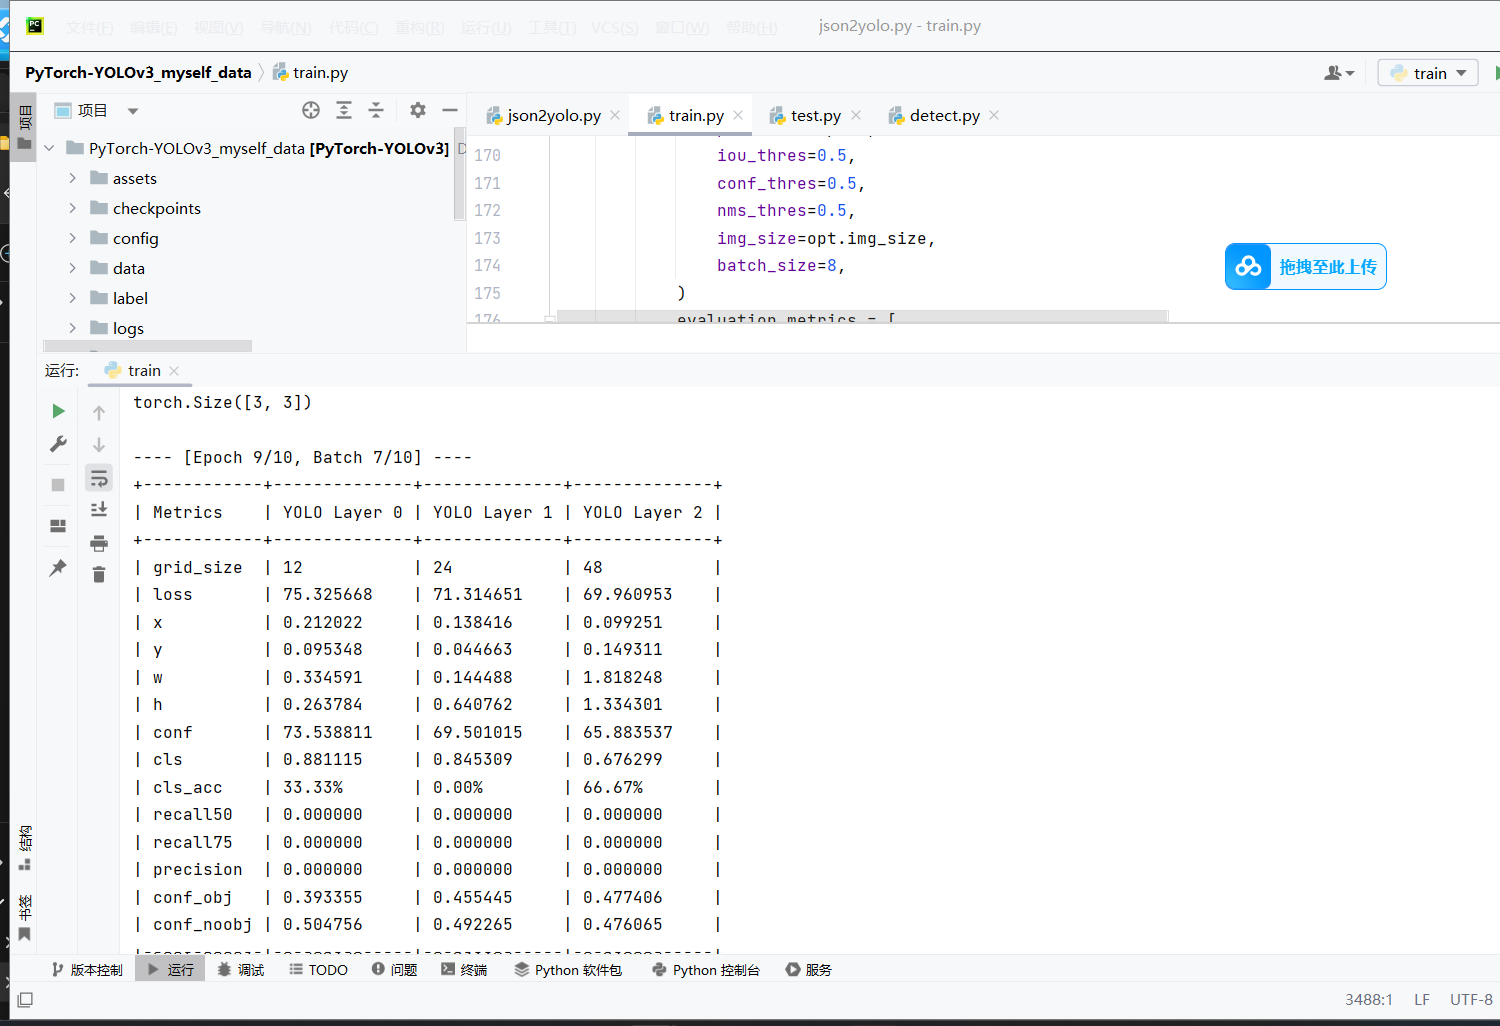
5. 每轮评估 mAP、精确率、召回率
6. 保存权重到 checkpoints/
from models import *
from utils.logger import *
from utils.utils import *
from utils.datasets import *
from utils.parse_config import *
from test import evaluate

import warnings
warnings.filterwarnings("ignore")

from terminaltables import AsciiTable

import os
import time
import datetime
import argparse

import torch
from torch.utils.data import DataLoader
from torch.autograd import Variable

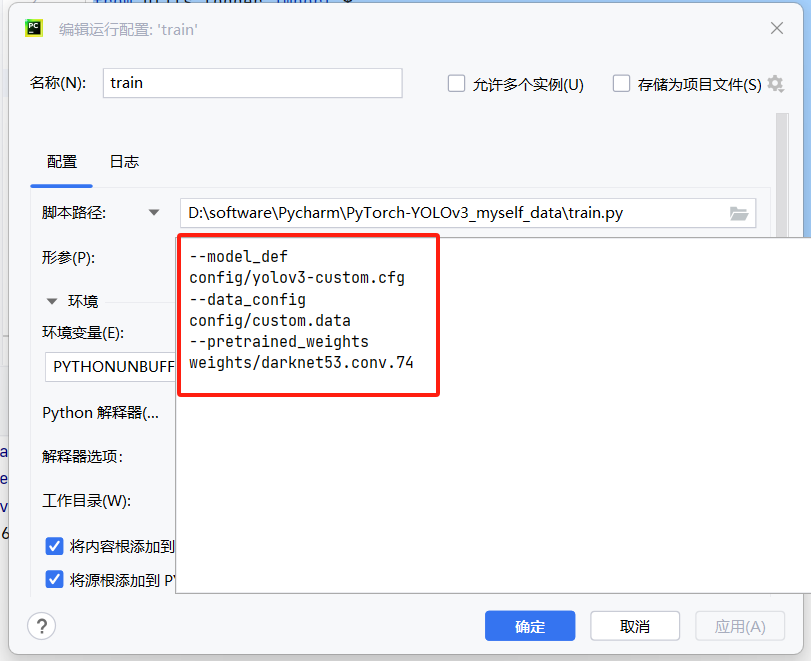
"""配置参数:
--model_def
config/yolov3-custom.cfg
--data_config
config/custom.data
--pretrained_weights
weights/darknet53.conv.74
"""
if __name__ == "__main__":
    parser = argparse.ArgumentParser()
    parser.add_argument("--epochs", type=int, default=10, help="number of epochs") #训练次数
    parser.add_argument("--batch_size", type=int, default=1, help="size of each image batch")   #batch的大小
    parser.add_argument("--gradient_accumulations", type=int, default=1, help="number of gradient accums before step")#在每一步(更新模型参数)之前累积梯度的次数”
    parser.add_argument("--model_def", type=str, default="config/yolov3.cfg", help="path to model definition file") #模型的配置文件
    parser.add_argument("--data_config", type=str, default="config/coco.data", help="path to data config file") #数据的配置文件
    parser.add_argument("--pretrained_weights", type=str, help="if specified starts from checkpoint model") #预训练文件
    parser.add_argument("--n_cpu", type=int, default=0, help="number of cpu threads to use during batch generation")#数据加载过程中应使用的CPU线程数。
    parser.add_argument("--img_size", type=int, default=416, help="size of each image dimension")
    parser.add_argument("--checkpoint_interval", type=int, default=1, help="interval between saving model weights")#隔多少个epoch保存一次模型权重
    parser.add_argument("--evaluation_interval", type=int, default=1, help="interval evaluations on validation set")#多少个epoch进行一次验证集的验证
    parser.add_argument("--compute_map", default=False, help="if True computes mAP every tenth batch")
    parser.add_argument("--multiscale_training", default=True, help="allow for multi-scale training")#允许多尺寸特征图融合的训练
    opt = parser.parse_args()
    print(opt)

    logger = Logger("logs")#日志文件

    device = torch.device("cuda" if torch.cuda.is_available() else "cpu")

    os.makedirs("output", exist_ok=True)
    os.makedirs("checkpoints", exist_ok=True)

    # Get data configuration
    data_config = parse_data_config(opt.data_config)
    train_path = data_config["train"]
    valid_path = data_config["valid"]
    class_names = load_classes(data_config["names"])

    # Initiate model
    model = Darknet(opt.model_def).to(device)
    model.apply(weights_init_normal)#model.apply(fn)表示将fn函数应用到神经网络的各个模块上,包括该神经网络本身。这通常在初始化神经网络的参数时使用,本处用于初始化神经网络的权值

    # If specified we start from checkpoint
    if opt.pretrained_weights:
        if opt.pretrained_weights.endswith(".pth"): #用于检查字符串是否以指定的后缀结束。如果字符串以指定的后缀结束,则返回True,否则返回False。
            model.load_state_dict(torch.load(opt.pretrained_weights))
        else:
            model.load_darknet_weights(opt.pretrained_weights)

    # Get dataloader
    dataset = ListDataset(train_path, augment=True, multiscale=opt.multiscale_training)
    dataloader = torch.utils.data.DataLoader(
        dataset,
        batch_size=opt.batch_size,  #1个样本打包成一个batch进行加载
        shuffle=True,               #对数据进行随机打乱,
        num_workers=opt.n_cpu,      #用于指定子进程的数量,用于并行地加载数据。默认情况下,num_workers的值为0,表示没有使用子进程,所有数据都会在主进程中加载。当设置num_workers大于0时,DataLoader会创建指定数量的子进程,每个子进程都会负责加载一部分数据,然后主进程负责从这些子进程中获取数据。
                                    # 使用子进程可以加快数据的加载速度,因为每个子进程可以并行地加载一部分数据,从而充分利用多核CPU的计算能力。但是需要注意的是,使用子进程可能会导致数据的顺序被打乱,因此如果需要保持数据的原始顺序,应该将shuffle参数设置为False。
                                    # num_workers的值应该根据具体情况进行调整。如果数据集较大,可以考虑增加num_workers的值以充分利用计算机的资源。但是需要注意的是,如果num_workers的值过大,可能会导致内存消耗过大或者CPU负载过重,从而影响程序的性能。因此,需要根据实际情况进行调整。
        pin_memory=True,            #指定是否将加载进内存的数据的指针固定(pin),这个参数在某些情况下可以提高数据加载的速度。
                                    # 当设置pin_memory=True时,DataLoader会将加载进内存的数据的指针固定,即不进行移动操作。这样做的目的是为了提高数据传输的效率。因为当数据从磁盘或者网络等地方传输到内存中时,如果指针不固定,可能会导致数据在传输过程中被移动,从而需要重新读取,浪费了时间。而固定指针可以避免这种情况的发生,从而提高了数据传输的效率。
                                    # 需要注意的是,pin_memory参数的效果与操作系统和硬件的性能有关。在一些高性能的计算机上,固定指针可能并不会带来太大的性能提升。但是在一些内存带宽较小的计算机上,固定指针可能会显著提高数据加载的效率。因此,需要根据实际情况进行调整。
        collate_fn=dataset.collate_fn,
                                    # collate_fn是一个函数,用于对每个batch的数据进行合并。这个函数的输入是一个batch的数据,输出是一个合并后的数据。
                                    # collate_fn函数的主要作用是对每个batch的数据进行预处理,例如将不同数据类型的张量合并成一个张量,或者对序列数据进行padding操作等。这样可以使得每个batch的数据格式一致,便于模型进行训练。
                                    # 在默认情况下,collate_fn函数会将每个batch的数据按照第一个元素的张量形状进行合并。例如,如果一个batch的数据中第一个元素的张量形状是[
                                    # 3, 224, 224],那么collate_fn函数会将该batch的所有数据都调整为这个形状。
    )

    optimizer = torch.optim.Adam(model.parameters())

    metrics = [
        "grid_size",
        "loss",
        "x",
        "y",
        "w",
        "h",
        "conf",
        "cls",
        "cls_acc",
        "recall50",
        "recall75",
        "precision",
        "conf_obj",
        "conf_noobj",
    ]

    for epoch in range(opt.epochs):
        model.train()
        start_time = time.time()
        for batch_i, (_, imgs, targets) in enumerate(dataloader):
            batches_done = len(dataloader) * epoch + batch_i

            imgs = Variable(imgs.to(device))    #Variable类是PyTorch中的一个包装器,它将张量和它们的梯度信息封装在一起。当我们对一个张量进行操作时,PyTorch会自动地创建一个对应的Variable对象,其中包含了原始张量、梯度等信息。通过使用Variable,我们可以方便地进行自动微分和优化。
            targets = Variable(targets.to(device), requires_grad=False)
            print ('imgs',imgs.shape)
            print ('targets',targets.shape)
            loss, outputs = model(imgs, targets)
            loss.backward()

            if batches_done % opt.gradient_accumulations:
                # Accumulates gradient before each step
                optimizer.step()
                optimizer.zero_grad()

            # ----------------
            #   Log progress
            # ----------------

            log_str = "\n---- [Epoch %d/%d, Batch %d/%d] ----\n" % (epoch, opt.epochs, batch_i, len(dataloader))

            metric_table = [["Metrics", *[f"YOLO Layer {i}" for i in range(len(model.yolo_layers))]]]

            # Log metrics at each YOLO layer
            for i, metric in enumerate(metrics):
                formats = {m: "%.6f" for m in metrics}
                formats["grid_size"] = "%2d"
                formats["cls_acc"] = "%.2f%%"
                row_metrics = [formats[metric] % yolo.metrics.get(metric, 0) for yolo in model.yolo_layers]
                metric_table += [[metric, *row_metrics]]

                # Tensorboard logging
                tensorboard_log = []
                for j, yolo in enumerate(model.yolo_layers):
                    for name, metric in yolo.metrics.items():
                        if name != "grid_size":
                            tensorboard_log += [(f"{name}_{j+1}", metric)]
                tensorboard_log += [("loss", loss.item())]
                logger.list_of_scalars_summary(tensorboard_log, batches_done)

            log_str += AsciiTable(metric_table).table
            log_str += f"\nTotal loss {loss.item()}"

            # Determine approximate time left for epoch
            epoch_batches_left = len(dataloader) - (batch_i + 1)
            time_left = datetime.timedelta(seconds=epoch_batches_left * (time.time() - start_time) / (batch_i + 1))
            log_str += f"\n---- ETA {time_left}"

            print(log_str)

            model.seen += imgs.size(0)

        if epoch % opt.evaluation_interval == 0:
            print("\n---- Evaluating Model ----")
            # Evaluate the model on the validation set
            precision, recall, AP, f1, ap_class = evaluate(
                model,
                path=valid_path,
                iou_thres=0.5,
                conf_thres=0.5,
                nms_thres=0.5,
                img_size=opt.img_size,
                batch_size=8,
            )
            evaluation_metrics = [
                ("val_precision", precision.mean()),
                ("val_recall", recall.mean()),
                ("val_mAP", AP.mean()),
                ("val_f1", f1.mean()),
            ]
            logger.list_of_scalars_summary(evaluation_metrics, epoch)

            # Print class APs and mAP
            ap_table = [["Index", "Class name", "AP"]]
            for i, c in enumerate(ap_class):
                ap_table += [[c, class_names[c], "%.5f" % AP[i]]]
            print(AsciiTable(ap_table).table)
            print(f"---- mAP {AP.mean()}")

        if epoch % opt.checkpoint_interval == 0:
            torch.save(model.state_dict(), f"checkpoints/yolov3_ckpt_%d.pth" % epoch)
# 典型训练命令
python train.py --model_def config/yolov3-custom.cfg --data_config config/custom.data --pretrained_weights weights/darknet53.conv.74
步骤 6:模型评估(test.py)
测试模型在验证集上的精度。
• 计算:Precision、Recall、AP、mAP
• 输出每类检测效果,判断模型是否训练合格
from __future__ import division

from models import *
from utils.utils import *
from utils.datasets import *
from utils.parse_config import *

import os
import sys
import time
import datetime
import argparse
import tqdm

import torch
from torch.utils.data import DataLoader
from torchvision import datasets
from torchvision import transforms
from torch.autograd import Variable
import torch.optim as optim


def evaluate(model, path, iou_thres, conf_thres, nms_thres, img_size, batch_size):
    model.eval()

    # Get dataloader
    dataset = ListDataset(path, img_size=img_size, augment=False, multiscale=False)
    dataloader = torch.utils.data.DataLoader(
        dataset, batch_size=batch_size, shuffle=False, num_workers=1, collate_fn=dataset.collate_fn
    )

    Tensor = torch.cuda.FloatTensor if torch.cuda.is_available() else torch.FloatTensor

    labels = []
    sample_metrics = []  # List of tuples (TP, confs, pred)
    for batch_i, (_, imgs, targets) in enumerate(tqdm.tqdm(dataloader, desc="Detecting objects")):

        # Extract labels
        labels += targets[:, 1].tolist()
        # Rescale target
        targets[:, 2:] = xywh2xyxy(targets[:, 2:])
        targets[:, 2:] *= img_size

        imgs = Variable(imgs.type(Tensor), requires_grad=False)

        with torch.no_grad():
            outputs = model(imgs)
            outputs = non_max_suppression(outputs, conf_thres=conf_thres, nms_thres=nms_thres)

        sample_metrics += get_batch_statistics(outputs, targets, iou_threshold=iou_thres)

    # Concatenate sample statistics
    true_positives, pred_scores, pred_labels = [np.concatenate(x, 0) for x in list(zip(*sample_metrics))]
    precision, recall, AP, f1, ap_class = ap_per_class(true_positives, pred_scores, pred_labels, labels)

    return precision, recall, AP, f1, ap_class


if __name__ == "__main__":
    parser = argparse.ArgumentParser()
    parser.add_argument("--batch_size", type=int, default=8, help="size of each image batch")
    parser.add_argument("--model_def", type=str, default="config/yolov3-custom.cfg", help="path to model definition file")
    parser.add_argument("--data_config", type=str, default="config/custom.data", help="path to data config file")
    parser.add_argument("--weights_path", type=str, default="checkpoints/yolov3_ckpt_1.pth", help="path to weights file")
    parser.add_argument("--class_path", type=str, default="data/classes.names", help="path to class label file")
    parser.add_argument("--iou_thres", type=float, default=0.5, help="iou threshold required to qualify as detected")
    parser.add_argument("--conf_thres", type=float, default=0.001, help="object confidence threshold")
    parser.add_argument("--nms_thres", type=float, default=0.5, help="iou thresshold for non-maximum suppression")
    parser.add_argument("--n_cpu", type=int, default=8, help="number of cpu threads to use during batch generation")
    parser.add_argument("--img_size", type=int, default=416, help="size of each image dimension")
    opt = parser.parse_args()
    print(opt)

    device = torch.device("cuda" if torch.cuda.is_available() else "cpu")

    data_config = parse_data_config(opt.data_config)
    valid_path = data_config["valid"]
    class_names = load_classes(data_config["names"])

    # Initiate model
    model = Darknet(opt.model_def).to(device)
    if opt.weights_path.endswith(".weights"):
        # Load darknet weights
        model.load_darknet_weights(opt.weights_path)
    else:
        # Load checkpoint weights
        model.load_state_dict(torch.load(opt.weights_path))

    print("Compute mAP...")

    precision, recall, AP, f1, ap_class = evaluate(
        model,
        path=valid_path,
        iou_thres=opt.iou_thres,
        conf_thres=opt.conf_thres,
        nms_thres=opt.nms_thres,
        img_size=opt.img_size,
        batch_size=8,
    )

    print("Average Precisions:")
    for i, c in enumerate(ap_class):
        print(f"+ Class '{c}' ({class_names[c]}) - AP: {AP[i]}")

    print(f"mAP: {AP.mean()}")
步骤 7:推理检测(detect.py)
用训练好的模型做实际预测,画出框。
1. 加载训练好的权重
2. 读取图片 / 视频
3. 模型前向推理
4. NMS 非极大值抑制去重框
5. 保存带检测框的结果图到 output/
from __future__ import division

from models import *
from utils.utils import *
from utils.datasets import *

import os
import sys
import time
import datetime
import argparse
from PIL import Image
import torch
from torch.utils.data import DataLoader
from torchvision import datasets
from torch.autograd import Variable

import matplotlib.pyplot as plt
import matplotlib.patches as patches
from matplotlib.ticker import NullLocator

if __name__ == "__main__":
    parser = argparse.ArgumentParser()
    parser.add_argument("--image_folder", type=str, default="data/samples", help="path to dataset")
    parser.add_argument("--model_def", type=str, default="config/yolov3.cfg", help="path to model definition file")
    parser.add_argument("--weights_path", type=str, default="weights/yolov3.weights", help="path to weights file")
    parser.add_argument("--class_path", type=str, default="data/coco.names", help="path to class label file")
    parser.add_argument("--conf_thres", type=float, default=0.8, help="object confidence threshold")
    parser.add_argument("--nms_thres", type=float, default=0.4, help="iou thresshold for non-maximum suppression")
    parser.add_argument("--batch_size", type=int, default=1, help="size of the batches")
    parser.add_argument("--n_cpu", type=int, default=0, help="number of cpu threads to use during batch generation")
    parser.add_argument("--img_size", type=int, default=416, help="size of each image dimension")
    parser.add_argument("--checkpoint_model", type=str, help="path to checkpoint model")
    opt = parser.parse_args()
    print(opt)

    device = torch.device("cuda" if torch.cuda.is_available() else "cpu")

    os.makedirs("output", exist_ok=True)

    # Set up model
    model = Darknet(opt.model_def, img_size=opt.img_size).to(device)

    if opt.weights_path.endswith(".weights"):
        # Load darknet weights
        model.load_darknet_weights(opt.weights_path)
    else:
        # Load checkpoint weights
        model.load_state_dict(torch.load(opt.weights_path))

    model.eval()  # Set in evaluation mode

    dataloader = DataLoader(
        ImageFolder(opt.image_folder, img_size=opt.img_size),
        batch_size=opt.batch_size,
        shuffle=False,
        num_workers=opt.n_cpu,
    )

    classes = load_classes(opt.class_path)  # Extracts class labels from file

    Tensor = torch.cuda.FloatTensor if torch.cuda.is_available() else torch.FloatTensor

    imgs = []  # Stores image paths
    img_detections = []  # Stores detections for each image index

    print("\nPerforming object detection:")
    prev_time = time.time()
    for batch_i, (img_paths, input_imgs) in enumerate(dataloader):
        # Configure input
        input_imgs = Variable(input_imgs.type(Tensor))

        # Get detections
        with torch.no_grad():
            detections = model(input_imgs)
            detections = non_max_suppression(detections, opt.conf_thres, opt.nms_thres)

        # Log progress
        current_time = time.time()
        inference_time = datetime.timedelta(seconds=current_time - prev_time)
        prev_time = current_time
        print("\t+ Batch %d, Inference Time: %s" % (batch_i, inference_time))

        # Save image and detections
        imgs.extend(img_paths)
        img_detections.extend(detections)

    # Bounding-box colors
    cmap = plt.get_cmap("tab20b")
    colors = [cmap(i) for i in np.linspace(0, 1, 20)]

    print("\nSaving images:")
    # Iterate through images and save plot of detections
    for img_i, (path, detections) in enumerate(zip(imgs, img_detections)):

        print("(%d) Image: '%s'" % (img_i, path))

        # Create plot
        img = np.array(Image.open(path))
        plt.figure()
        fig, ax = plt.subplots(1)
        ax.imshow(img)

        # Draw bounding boxes and labels of detections
        if detections is not None:
            # Rescale boxes to original image
            detections = rescale_boxes(detections, opt.img_size, img.shape[:2])
            unique_labels = detections[:, -1].cpu().unique()
            n_cls_preds = len(unique_labels)
            bbox_colors = random.sample(colors, n_cls_preds)
            for x1, y1, x2, y2, conf, cls_conf, cls_pred in detections:

                print("\t+ Label: %s, Conf: %.5f" % (classes[int(cls_pred)], cls_conf.item()))

                box_w = x2 - x1
                box_h = y2 - y1

                color = bbox_colors[int(np.where(unique_labels == int(cls_pred))[0])]
                # Create a Rectangle patch
                bbox = patches.Rectangle((x1, y1), box_w, box_h, linewidth=2, edgecolor=color, facecolor="none")
                # Add the bbox to the plot
                ax.add_patch(bbox)
                # Add label
                plt.text(
                    x1,
                    y1,
                    s=classes[int(cls_pred)],
                    color="white",
                    verticalalignment="top",
                    bbox={"color": color, "pad": 0},
                )

        # Save generated image with detections
        plt.axis("off")
        plt.gca().xaxis.set_major_locator(NullLocator())
        plt.gca().yaxis.set_major_locator(NullLocator())
        filename = path.split("/")[-1].split(".")[0]
        plt.savefig(f"output/{filename}.png", bbox_inches="tight", pad_inches=0.0)
        plt.close()
# 典型推理命令
python detect.py --model_def config/yolov3-custom.cfg --checkpoint_model checkpoints/yolov3_ckpt_100.pth --class_path data/custom/classes.names
YOLO 系列是单阶段目标检测的标杆,从 v1 开创范式,到 v3 成熟落地,再到 v4 集大成,始终围绕速度与精度平衡迭代。

Agent 垂直技术社区,欢迎活跃、内容共建。
更多推荐


 7
7 0
0- 0


 已为社区贡献7条内容

所有评论(0)