零基础也能看懂!手把手教你搭建B站自动回复机器人
零基础也能看懂!手把手教你搭建B站自动回复机器人
本教程从「什么是Python」讲起,带你一步步理解整个项目的每一行代码。
全文包含完整代码展示和中文逐行注释。
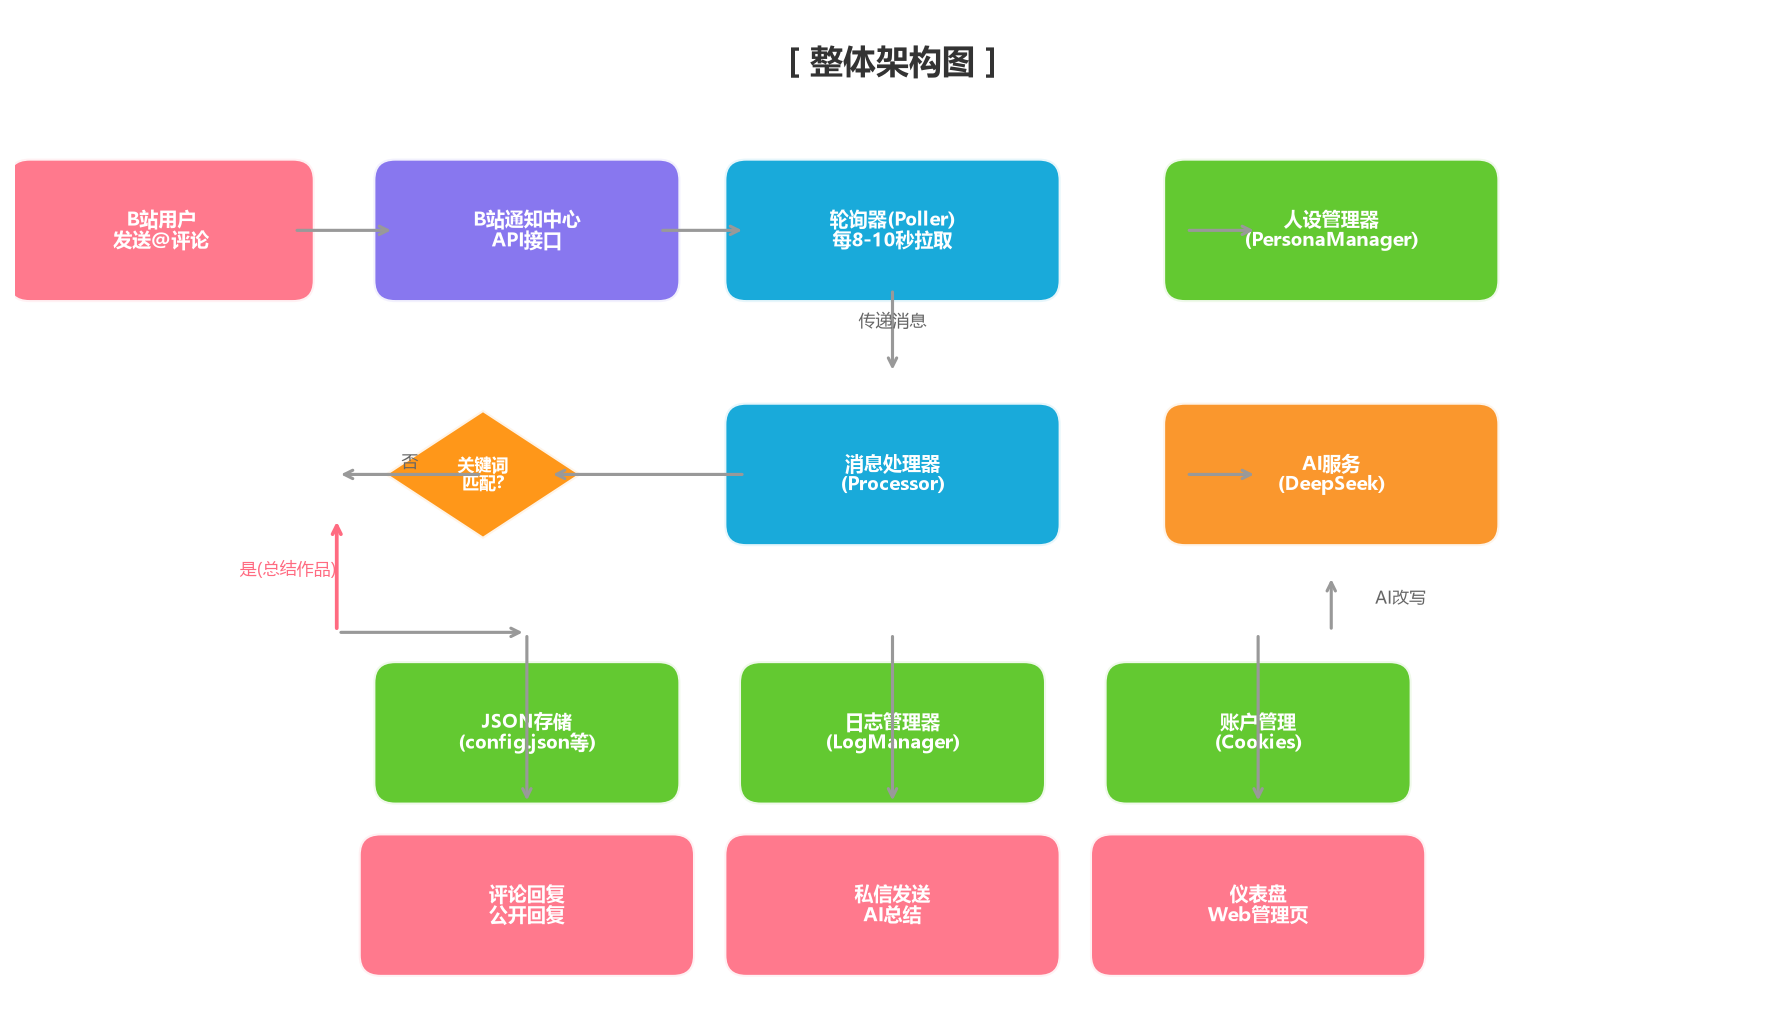
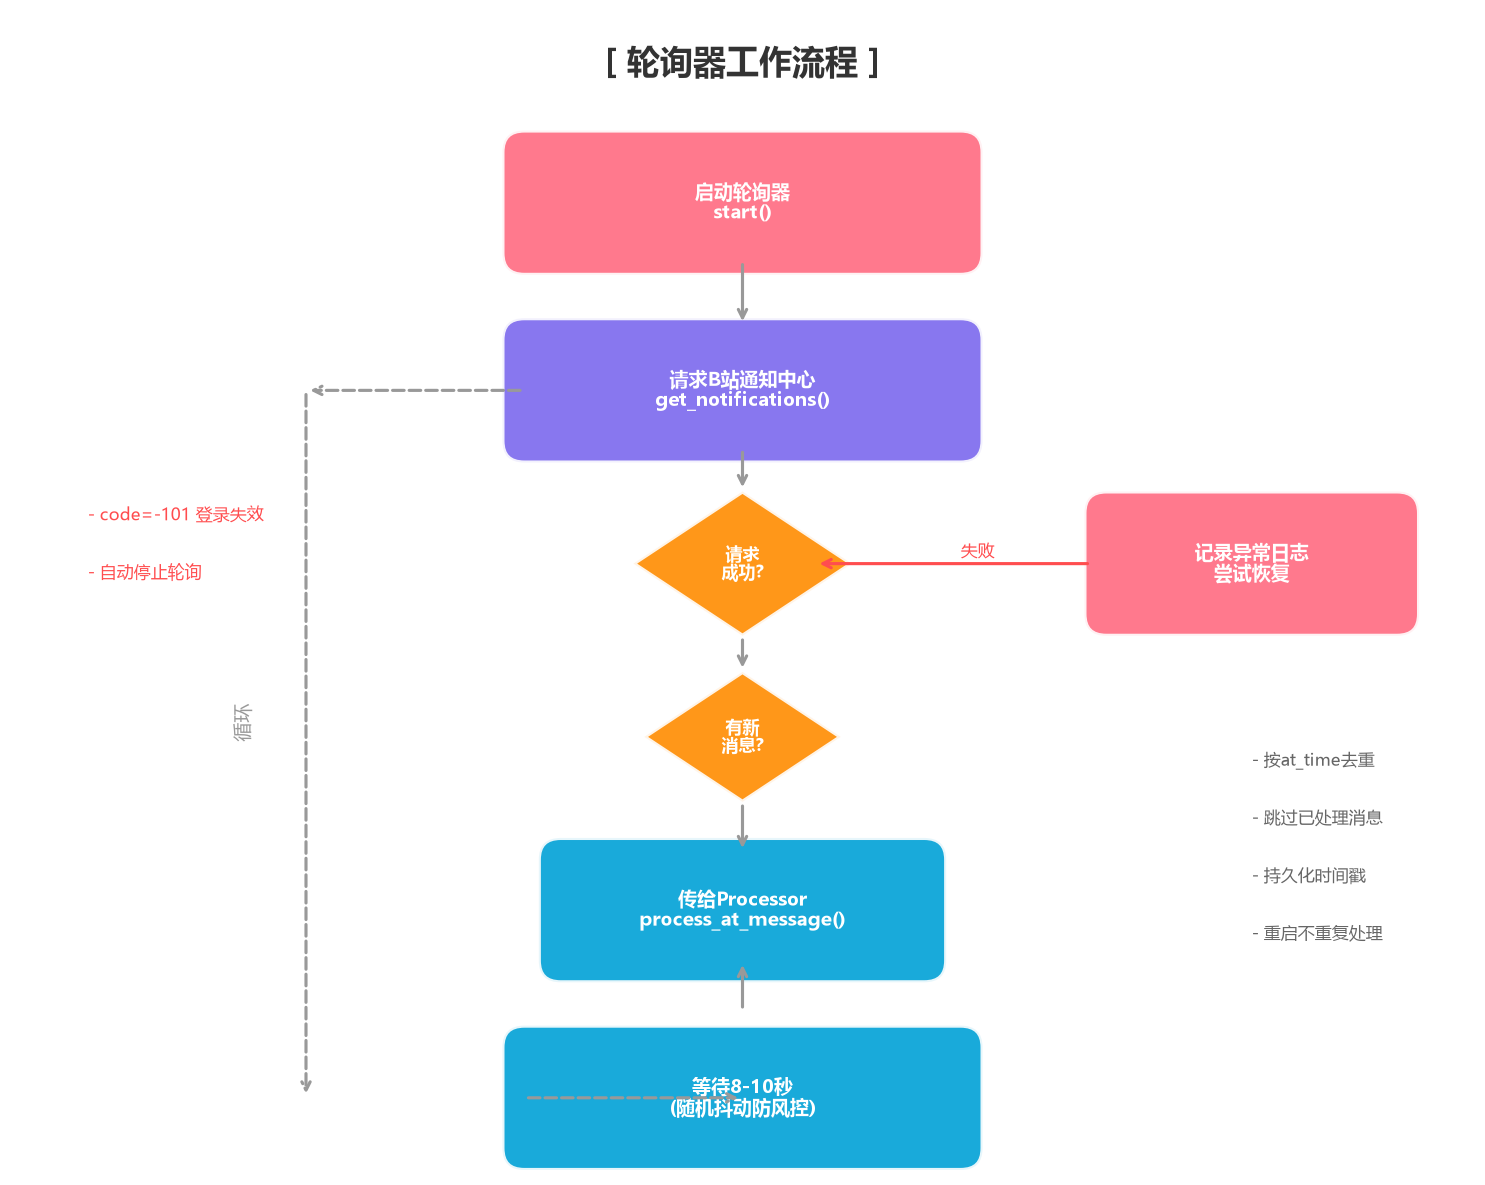
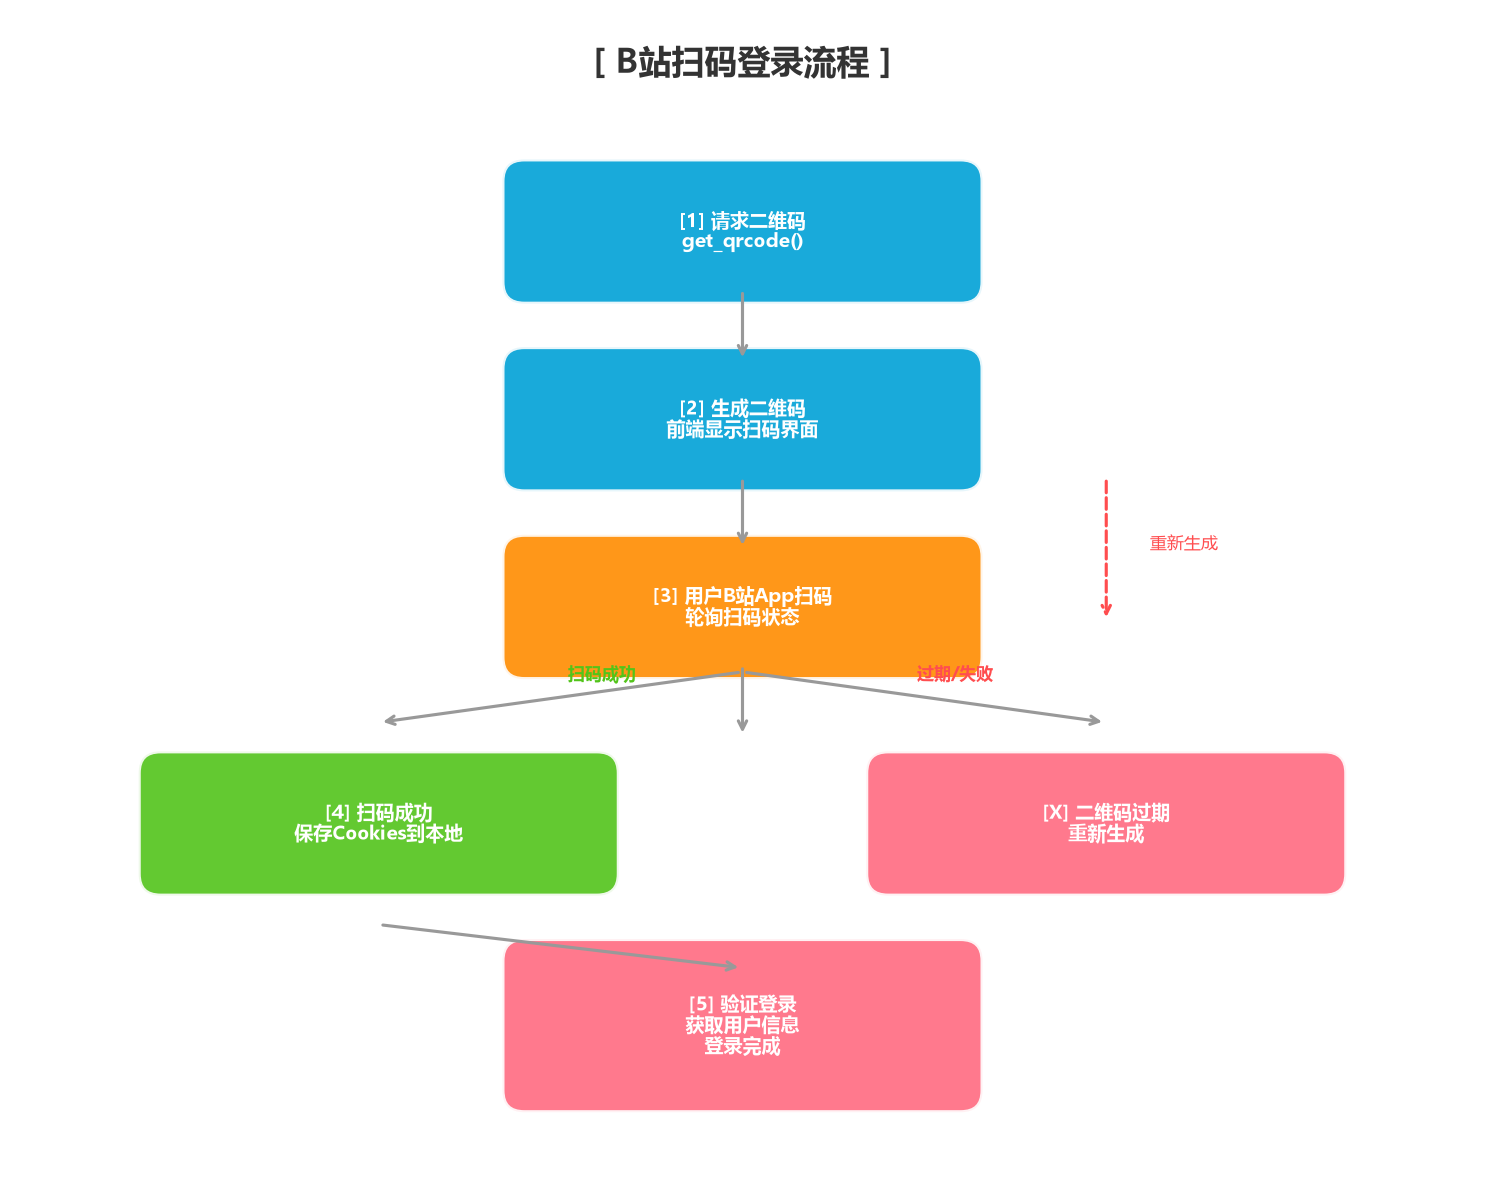
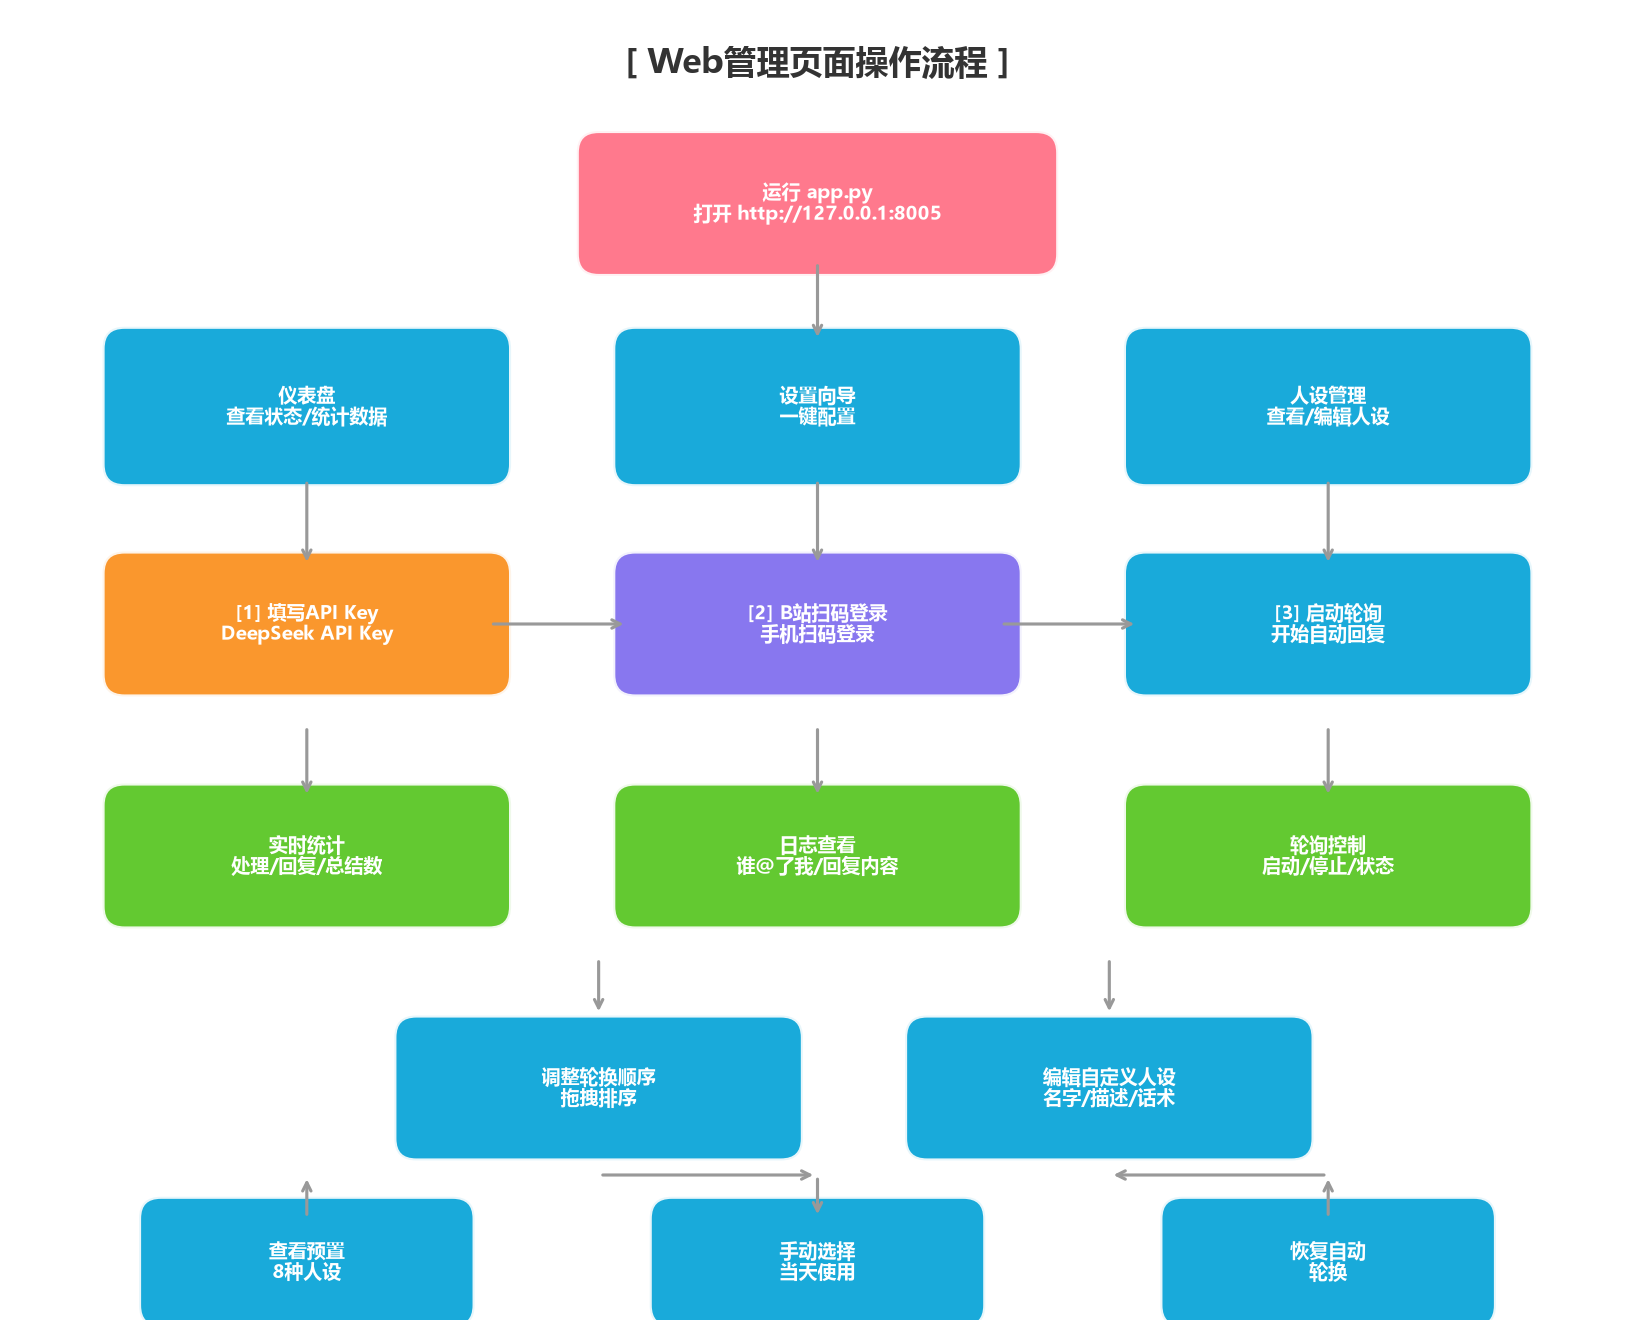
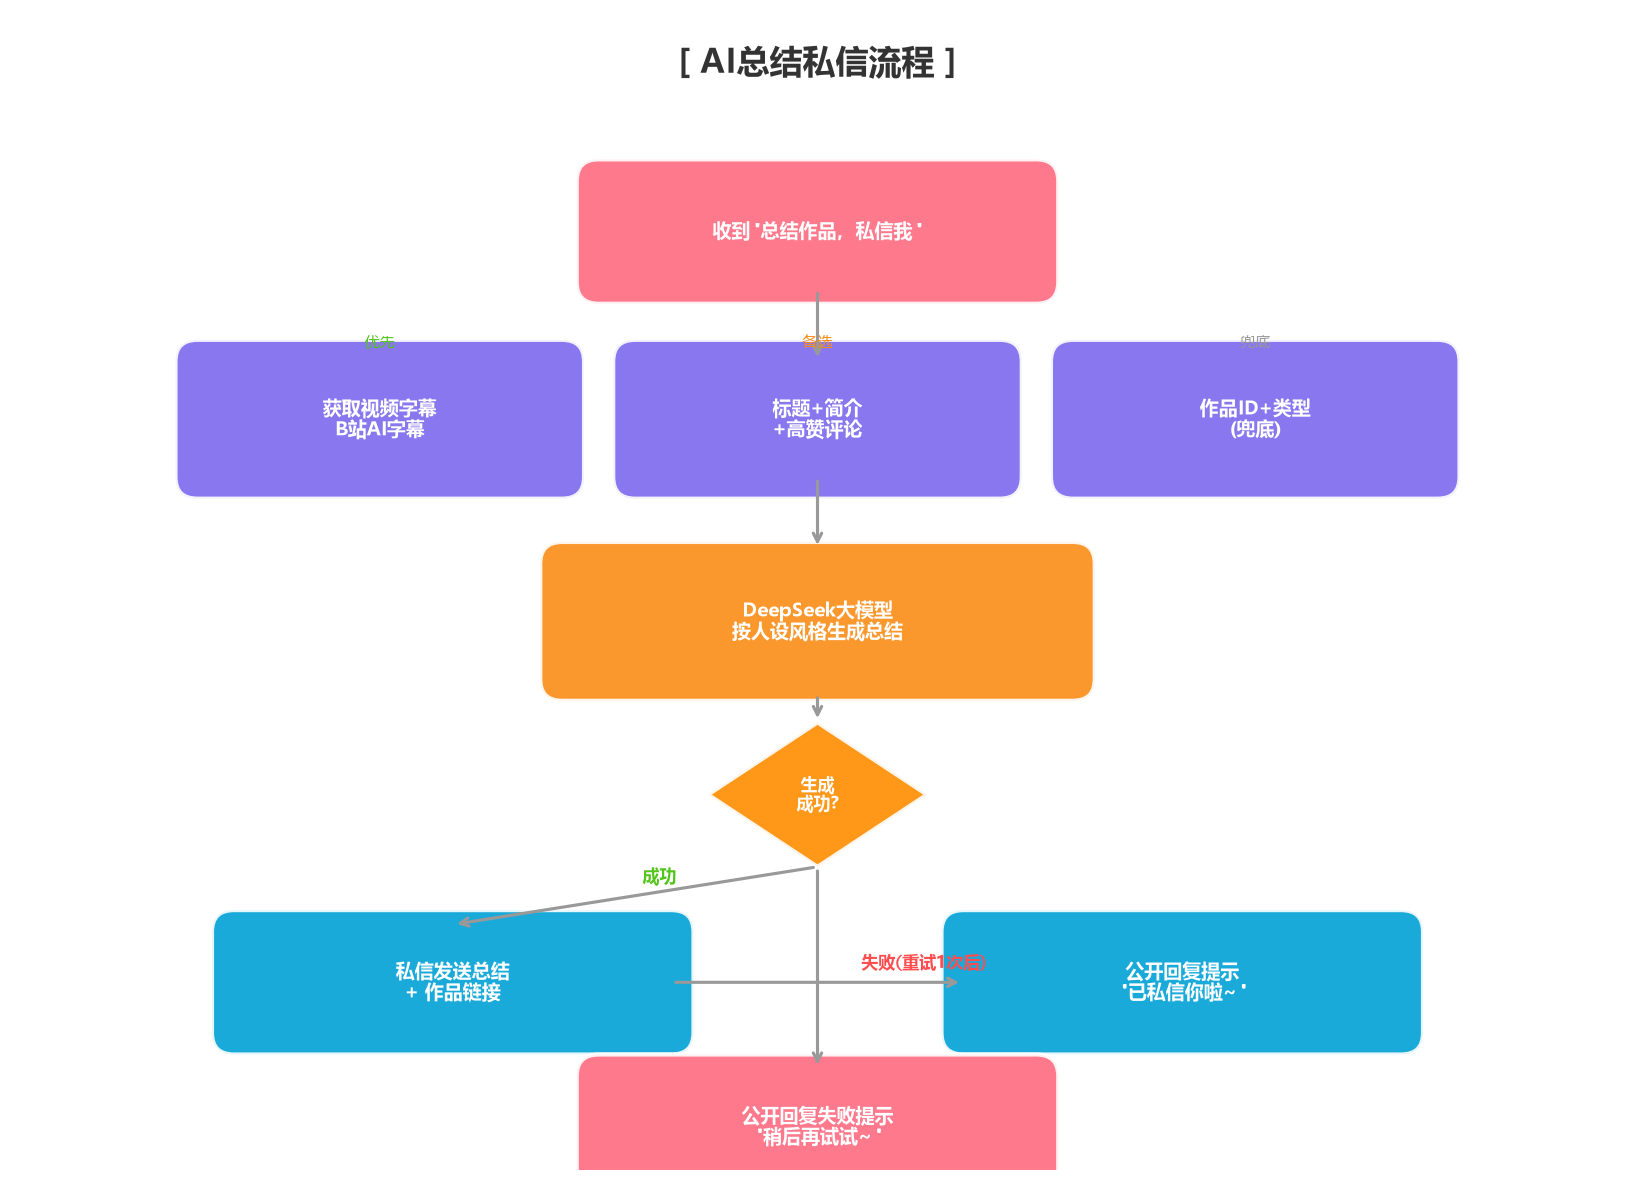
由于输入法原因,流程图放在文章最后
目录
1. 项目概览
1.1 这个项目是做什么的?
用大白话讲: 你是B站UP主,每天有很多粉丝在评论区@你。你不可能24小时在线回复。
这个机器人帮你自动回复——粉丝@你,它判断是不是粉丝、是不是要求总结视频,然后自动回复。
它能做4件事:
| 功能 | 效果 |
|---|---|
| 自动回复@评论 | 粉丝评论@你时,自动按人设风格回复 |
| AI总结视频 | 有人说「总结作品,私信我」,AI生成总结私信发送 |
| 切换人设风格 | 8种回复语气(沙雕/傲娇/治愈/佛系等)自动轮换 |
| Web管理页面 | 浏览器打开一个页面就能控制一切 |
1.2 技术栈
| 技术 | 用途 |
|---|---|
| Python 3.12+ | 编程语言 |
| Flask 3.0+ | Web框架,提供API接口 |
| Requests | HTTP库,跟B站和DeepSeek通信 |
| DeepSeek API | AI大模型,生成回复和总结 |
| B站API | 获取通知、发评论、发私信 |
| JSON文件 | 存储配置和日志 |
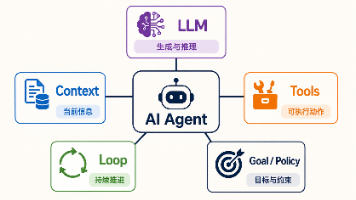
1.3 整体架构
2.2 安装Python
- 打开 https://www.python.org/downloads/
- 点击「Download Python 3.12.x」
- 安装时务必勾选 Add Python to PATH(否则后面会报错)
- 一路Next完成
验证安装:打开命令提示符(Win+R → cmd → 回车)
`ash
python --version
看到 Python 3.12.x 就成功了。

### 2.3 pip换源(加速下载)

pip是Python的包管理器。换源后下载更快:

`ash
pip config set global.index-url https://pypi.tuna.tsinghua.edu.cn/simple
2.4 安装依赖
`ash
cd BiliReplyWeb
pip install -r requirements.txt
依赖只有3个:
- flask -- Web框架
- flask-cors -- 跨域支持
- requests -- HTTP请求

### 2.5 验证启动

`ash
python app.py
看到 Web UI 地址输出即成功。
3. 项目文件结构逐层解析
3.1 目录树
BiliReplyWeb/
  app.py              -- 程序入口(双击运行的文件)
  config.py           -- 所有配置集中管理
  requirements.txt    -- 依赖清单
  core/               -- 核心业务逻辑
    bilibili_api.py   -- B站API封装
    ai_service.py     -- DeepSeek AI服务
    persona_manager.py-- 人设管理
    poller.py         -- 轮询器
    processor.py      -- 消息处理器
  storage/            -- 数据持久化
    config_manager.py -- 配置读写
    account_manager.py-- 账户管理
    log_manager.py    -- 日志管理
  web/                -- Web管理界面
    server.py         -- Flask服务器
    static/           -- 前端文件
  data/               -- 运行生成的数据
    config.json       -- 配置
    cookies.json      -- 登录凭证
    logs.json         -- 日志
核心文件概览:
| 文件 | 一句话说明 |
|---|---|
| app.py | 程序入口,启动Web服务器 |
| config.py | 集中管理所有配置和数据文件路径 |
| bilibili_api.py | 封装所有B站接口的「电话总机」 |
| ai_service.py | 调用DeepSeek AI的「大脑接线员」 |
| persona_manager.py | 管理8种人设的「人格仓库」 |
| poller.py | 定时检查B站消息的「哨兵」 |
| processor.py | 处理消息、判断粉丝、分发任务的「指挥官」 |
| storage/config_manager.py | 读写配置文件的「管家」 |
| storage/account_manager.py | 安全保存登录凭证的「保险箱」 |
| storage/log_manager.py | 记录所有操作的「黑匣子」 |
| web/server.py | 提供Web API的「前台服务员」 |
3.2 app.py:程序入口
# -*- coding: utf-8 -*-
# """哔哩哔哩智能回复助手 - 入口文件"""
import sys
import os

# 处理Windows控制台中文乱码
if sys.stdout.encoding and sys.stdout.encoding.lower() != 'utf-8':
    try:
        sys.stdout.reconfigure(encoding='utf-8', errors='replace')
    except:
        pass

# 把项目根目录加入Python搜索路径
sys.path.insert(0, os.path.dirname(os.path.abspath(__file__)))

# 导入Web服务器的启动函数
from web.server import run_server

if __name__ == '__main__':
    print('=' * 46)
    print('  BiliReplyBot - Bilibili Smart Reply Assistant')
    print('  Web UI: http://127.0.0.1:8005')
    print('  Press Ctrl+C to stop')
    print('=' * 46)
    run_server()
逐行解释:
- 第8-12行:如果命令行输出编码不是UTF-8,强制改成UTF-8,防止中文乱码
- 第15行:把项目根目录加入Python搜索路径,让import能找到其他模块
- 第18行:从web/server.py导入run_server函数(只导入,不立即执行)
- 第20行:if name == ‘main’ 确保只有直接运行app.py时才执行下面代码
- 第21-26行:打印启动信息,然后调用run_server()启动Web服务器
3.3 config.py:配置中心
# -*- coding: utf-8 -*-
# """配置文件"""
import os
from pathlib import Path

BASE_DIR = Path(__file__).parent
DATA_DIR = BASE_DIR / 'data'
DATA_DIR.mkdir(exist_ok=True)

WEB_HOST = '127.0.0.1'
WEB_PORT = 8005

BILI_API_BASE = 'https://api.bilibili.com'
BILI_PASSPORT_BASE = 'https://passport.bilibili.com'
USER_AGENT = 'Mozilla/5.0 (Windows NT 10.0; Win64; x64) ... Safari/537.36'

POLL_INTERVAL_MIN = 8
POLL_INTERVAL_MAX = 10

DEEPSEEK_API_URL = 'https://api.deepseek.com/v1/chat/completions'
SUMMARY_MAX_TOKENS = 1000
SUMMARY_TIMEOUT = 60
SUMMARY_RETRY = 1

MAX_LOG_ENTRIES = 500
PERSONAS_COUNT = 9
PERSONAS_FILE = BASE_DIR / 'web' / 'static' / 'personas.json'

DEFAULT_CONFIG = {
    'api_key': '',              # DeepSeek API密钥
    'poll_interval': 10,        # 轮询间隔
    'daily_reply_limit': 100,   # 每日回复上限
    'keyword_enabled': True,    # 是否启用关键词检测
    'public_reply_template': '已私信你啦~快去查看吧!',
    'current_persona_id': None, # 当前人设ID
    'manual_persona_date': None,# 手动选择人设的日期
    'cookies': None,            # B站登录Cookie
    'poller_running': False     # 轮询器是否正在运行
}

CONFIG_FILE = DATA_DIR / 'config.json'
COOKIES_FILE = DATA_DIR / 'cookies.json'
LOGS_FILE = DATA_DIR / 'logs.json'
config.py要点:
- Path(file).parent 获取config.py所在目录的父目录,即项目根
- BASE_DIR / ‘data’ 使用pathlib拼接路径,等价于 BASE_DIR + ‘/data’
- DEFAULT_CONFIG 是配置模板,首次启动时写入data/config.json
- 所有「固定配置」集中在这里,方便修改
4. B站API封装 (core/bilibili_api.py)
4.1 什么是API?
API(应用程序接口)是程序与服务之间的「通信协议」。
- 你的程序问B站:『最近有人@我吗?』
- B站API返回:『有,请看这些数据』
4.2 Session和Cookie
- Session:一次对话。程序跟B站建立Session后,多次请求共享状态
- Cookie:身份凭证。登录成功B站给你一个Cookie,下次请求带上它,B站就知道你是谁了
4.3 基础设置
import json
import time
import requests
from config import BILI_API_BASE, BILI_PASSPORT_BASE, USER_AGENT

SESSION = requests.Session()
SESSION.headers.update({
    'User-Agent': USER_AGENT,
    'Referer': 'https://www.bilibili.com',
    'Origin': 'https://www.bilibili.com'
})
逐行解释:
- requests.Session() 创建一个会话对象,自动管理Cookie
- headers.update(…) 设置请求头,模拟浏览器访问
- User-Agent:告诉B站「我是一个正常浏览器」,防止被拦截
- Referer/Origin:HTTP协议中的来源标识,B站检查这些字段
4.4 扫码登录
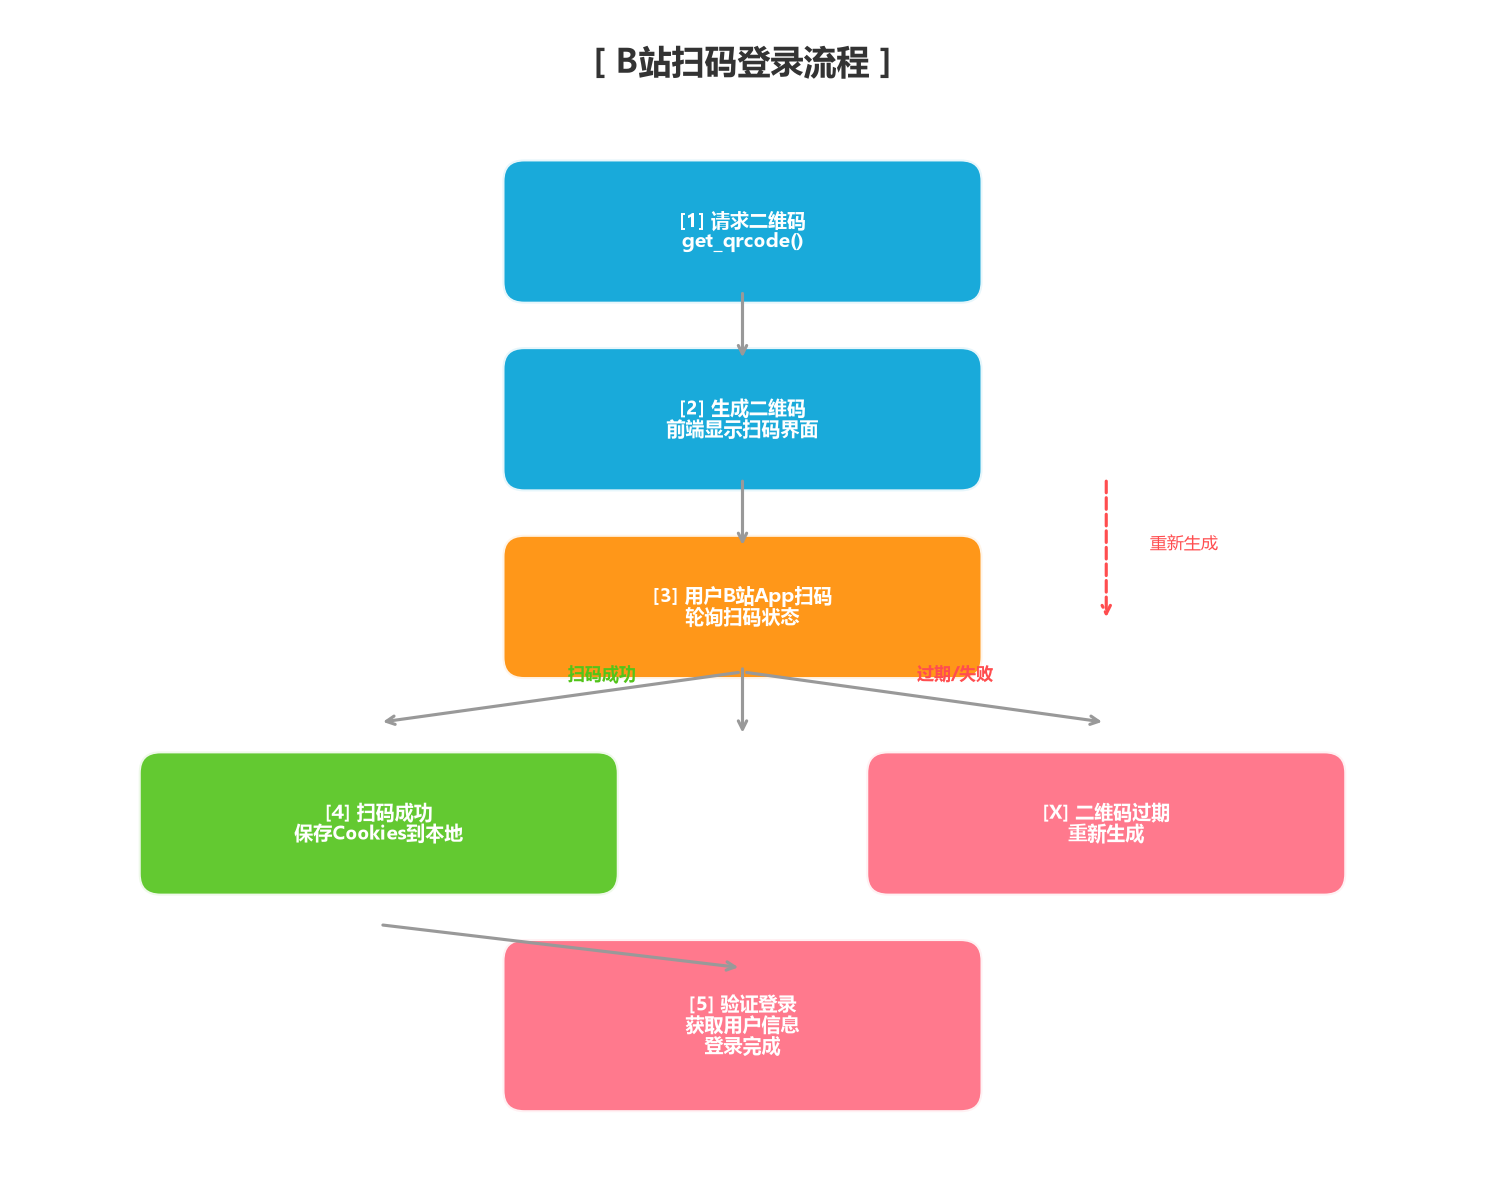
def get_qrcode() -> dict:
    """获取二维码登录信息"""
    url = f"{BILI_PASSPORT_BASE}/x/passport-login/web/qrcode/generate"
    r = _req("GET", url)
    return r.json()

def poll_qrcode(qrcode_key: str) -> dict:
    """轮询扫码状态,返回 {json, cookies}"""
    url = f"{BILI_PASSPORT_BASE}/x/passport-login/web/qrcode/poll"
    r = _req("GET", url, params={"qrcode_key": qrcode_key})
    return {
        "json": r.json(),
        "cookies": dict(r.cookies.get_dict())
    }
扫码登录原理:
- get_qrcode() 调用B站接口,获取一个二维码图片URL和唯一key
- 前端显示二维码,用户用B站App扫码
- poll_qrcode(key) 不断轮询B站:用户扫码了吗?
- 扫码成功后,B站返回cookies,保存即可
4.5 消息轮询
def get_notifications(cookies: dict, page=1) -> dict:
    """获取@我的通知"""
    s = requests.Session()
    _set_cookies(s, cookies)
    params = {"type": 1, "platform": "web", "pn": page, "ps": 20}
    r = _req("GET", f"{BILI_API_BASE}/x/msgfeed/at", session=s, params=params)
    return r.json()
参数说明:type=1获取@通知,pn页码,ps每页条数
4.6 粉丝判断
def check_follow(cookies: dict, target_uid: int) -> bool:
    """判断是否关注了我(遍历分页)"""
    nav = get_nav_info(cookies)
    if nav.get("code") != 0:
        return False
    my_uid = nav['data']['mid']

    s = requests.Session()
    _set_cookies(s, cookies)
    pn = 1
    while True:
        params = {"vmid": target_uid, "psize": 50, "pn": pn}
        r = _req("GET", f"{BILI_API_BASE}/x/relation/followings", session=s, params=params)
        data = r.json()
        if data.get("code") != 0:
            return False
        items = data.get("data", {}).get("list", [])
        for item in items:
            if item.get("mid") == my_uid:
                return True
        if len(items) < 50:
            break
        pn += 1
        if pn > 10:
            break
    return False
原理:翻对方关注列表找自己UID,最多查10页*50人=500人
4.7 回复评论
def reply_comment(cookies, oid, content, type_id=1, root=0, parent=0):
    """回复评论/动态"""
    s = requests.Session()
    _set_cookies(s, cookies)
    s.headers.update({"Content-Type": "application/x-www-form-urlencoded"})
    csrf_token = cookies.get("bili_jct", "")

    data = {
        "oid": oid,
        "type": type_id,
        "message": content,
        "root": root,
        "parent": parent,
        "csrf": csrf_token
    }
    r = _req("POST", f"{BILI_API_BASE}/x/v2/reply/add", session=s, data=data)
    return r.json()
CSRF是安全令牌。B站要求每个写操作都带上bili_jct。
4.8 发送私信
def send_private_msg(cookies, receiver_uid, content):
    """发送私信"""
    s = requests.Session()
    _set_cookies(s, cookies)
    s.headers.update({"Content-Type": "application/x-www-form-urlencoded"})
    csrf_token = cookies.get("bili_jct", "")

    data = {
        "msg_sender_uid": 0,
        "receiver_id": receiver_uid,
        "receiver_type": 1,
        "msg_type": 1,
        "content": json.dumps({"content": content}, ensure_ascii=False),
        "csrf": csrf_token
    }
    try:
        r = _req("POST", f"{BILI_API_BASE}/x/session/send", session=s, data=data)
        result = r.json()
        if result.get("code") == 0:
            return result
    except:
        pass
    try:
        r2 = _req("POST", f"{BILI_API_BASE}/x/msgfeed/send", session=s, data=data)
        return r2.json()
    except:
        pass
    return {"code": -1, "message": "私信发送失败"}
关键点:content需json.dumps包装成JSON字符串,这是B站API格式要求
4.9 字幕获取
def get_video_subtitle(cookies, bvid):
    """获取B站AI字幕文本"""
    s = requests.Session()
    _set_cookies(s, cookies)
    r = _req("GET", f"{BILI_API_BASE}/x/web-interface/view",
             session=s, params={"bvid": bvid})
    data = r.json()
    if data.get("code") != 0:
        return ''
    sub_urls = data.get("data",{}).get("subtitle",{}).get("subtitles",[])
    if not sub_urls:
        return ''
    sub_url = sub_urls[0].get('subtitle_url', '')
    if sub_url.startswith('//'):
        sub_url = 'https:' + sub_url
    try:
        r2 = _req('GET', sub_url)
        sub_data = r2.json()
        parts = sub_data.get("body", [])
        text = ' '.join([p.get('content', '') for p in parts])
        return text[:2000]
    except:
        return ''
两步过程:1)查视频信息找字幕链接 2)下载字幕拼接成文本
5. AI智能回复 (core/ai_service.py)
5.1 什么是大模型API?
大模型(如DeepSeek)像一个超级聪明的AI。
你给它一段文字,它返回一段有逻辑的回答。
- 你问:「总结这个视频内容」
- AI返回:「本视频讲述了……的核心要点……」
要使用需要先注册DeepSeek账号,获取API Key:
https://platform.deepseek.com/
5.2 核心调用函数
import requests, json, time
from config import DEEPSEEK_API_URL, SUMMARY_MAX_TOKENS, SUMMARY_TIMEOUT

def _call_deepseek(api_key, messages, temperature=0.7, max_tokens=1000):
    """调用DeepSeek API的核心函数"""
    if not api_key:
        return ''

    headers = {
        "Authorization": f"Bearer {api_key}",  # API认证
        "Content-Type": "application/json"
    }
    payload = {
        "model": "deepseek-chat",              # 模型名
        "messages": messages,                   # 对话历史
        "temperature": temperature,             # 创造力(0-2)
        "max_tokens": max_tokens                # 最大回复长度
    }
    try:
        r = requests.post(DEEPSEEK_API_URL,
                          headers=headers,
                          json=payload,
                          timeout=SUMMARY_TIMEOUT)
        data = r.json()
        if "choices" in data and len(data["choices"]) > 0:
            return data["choices"][0]["message"]["content"].strip()
        return ''
    except Exception as e:
        raise Exception(f"DeepSeek API调用失败: {str(e)}")
参数解释:
- Authorization: Bearer + API Key 是标准的API认证方式
- temperature=0.7:0=保守稳定,1=有创意,2=天马行空
- max_tokens=1000:限制AI生成的最大字数(中文约600-800字)
- messages:对话结构 [{“role”:“system”,“content”:“指令”}, {“role”:“user”,“content”:“问题”}]
5.3 生成视频总结
def generate_summary(api_key, source_text, persona_style):
    """生成带人设风格的视频总结"""
    system_prompt = f'''你是一个B站UP主"龙哥"的AI智能回复助手。
    请根据提供的视频内容,生成一段作品总结。
    要求:
    1. 用第三人称客观总结作品核心内容
    2. 包含作品链接引导
    3. 语气风格符合以下人设:{persona_style}
    4. 字数控制在1000字以内
    '''

    messages = [
        {"role": "system", "content": system_prompt},
        {"role": "user", "content": f"请总结:\n\n{source_text}"}
    ]
    return _call_deepseek(api_key, messages, temperature=0.8)
Prompt工程: 给AI的「指令」很关键。这里告诉AI:
- 你是谁(UP主龙哥的助手)
- 你要做什么(总结作品)
- 你的风格(按人设)
- 有什么限制(1000字以内)
5.4 按人设生成回复
def generate_persona_reply(api_key, user_message, persona_name, persona_desc):
    """用AI按人设生成一条回复"""
    system_prompt = f'''你是一个B站UP主"龙哥"的AI智能回复助手。
    你的回复风格人设是:
    【名称】{persona_name} 【描述】{persona_desc}
    要求:
    1. 回复要符合上述人设风格
    2. 必须针对用户评论具体内容回应
    3. 语气自然,有互动感
    4. 字数控制在50字以内
    '''
    messages = [
        {"role": "system", "content": system_prompt},
        {"role": "user", "content": f"用户评论:{user_message}\n\n请回复:"}
    ]
    return _call_deepseek(api_key, messages, temperature=0.9, max_tokens=200)
5.5 测试API连接
def test_api_connection(api_key):
    """测试API连接是否正常"""
    if not api_key or len(api_key) < 10:
        return {"success": False, "message": "API Key 无效"}
    try:
        start = time.time()
        result = _call_deepseek(api_key, [
            {"role": "user", "content": "回复连接测试四个字"}
        ], temperature=0, max_tokens=20)
        elapsed = int((time.time() - start) * 1000)
        if result:
            return {"success": True, "message": f"连接成功!延迟{elapsed}ms"}
        return {"success": False, "message": "API返回为空"}
    except Exception as e:
        return {"success": False, "message": str(e)}
6. 人设管理系统 (core/persona_manager.py)
6.1 什么是人设?
人设就是回复的语气风格。同一个意思用不同方式说出来:
| 风格 | 效果 |
|---|---|
| 沙雕风 | 哈哈哈哈这波操作太下饭了! |
| 傲娇风 | 才、才不是在蹲你直播呢! |
| 治愈风 | 慢慢来,你已经很棒了~ |
| 佛系风 | 放平心态,时间会给你答案。 |
6.2 8种预置人设
| 编号 | 名称 | 描述 |
|---|---|---|
| 1 | 落井下石前女友风 | 互损督促学习 |
| 2 | 幽默活泼沙雕风 | 欢乐整活 |
| 3 | 傲娇二次元风 | 嘴硬心软 |
| 4 | 文艺清新治愈风 | 诗意疗愈 |
| 5 | 抽象整活乐子风 | 网络热梗 |
| 6 | 萌系黏人治愈风 | 软萌可爱 |
| 7 | 沉稳成熟御系风 | 温暖导师 |
| 8 | 冷淡佛系松弛风 | 佛系不摆烂 |
| 9 | 自定义人设 | 你来定义 |
每种人设都预置了20条回复话术,存储在 web/static/personas.json
6.3 核心代码
import json, random, threading
from datetime import date
from config import PERSONAS_FILE

class PersonaManager:
    """人设管理器:自动轮换、手动覆盖、自定义编辑"""

    def __init__(self, config_manager):
        self._config = config_manager
        self._lock = threading.Lock()
        self._personas = []
        self._load_personas()

    def _load_personas(self):
        """从配置文件加载人设"""
        if PERSONAS_FILE.exists():
            with open(PERSONAS_FILE, "r", encoding="utf-8") as f:
                self._personas = json.load(f)
        else:
            self._personas = self._default_personas()
            self._save_personas()
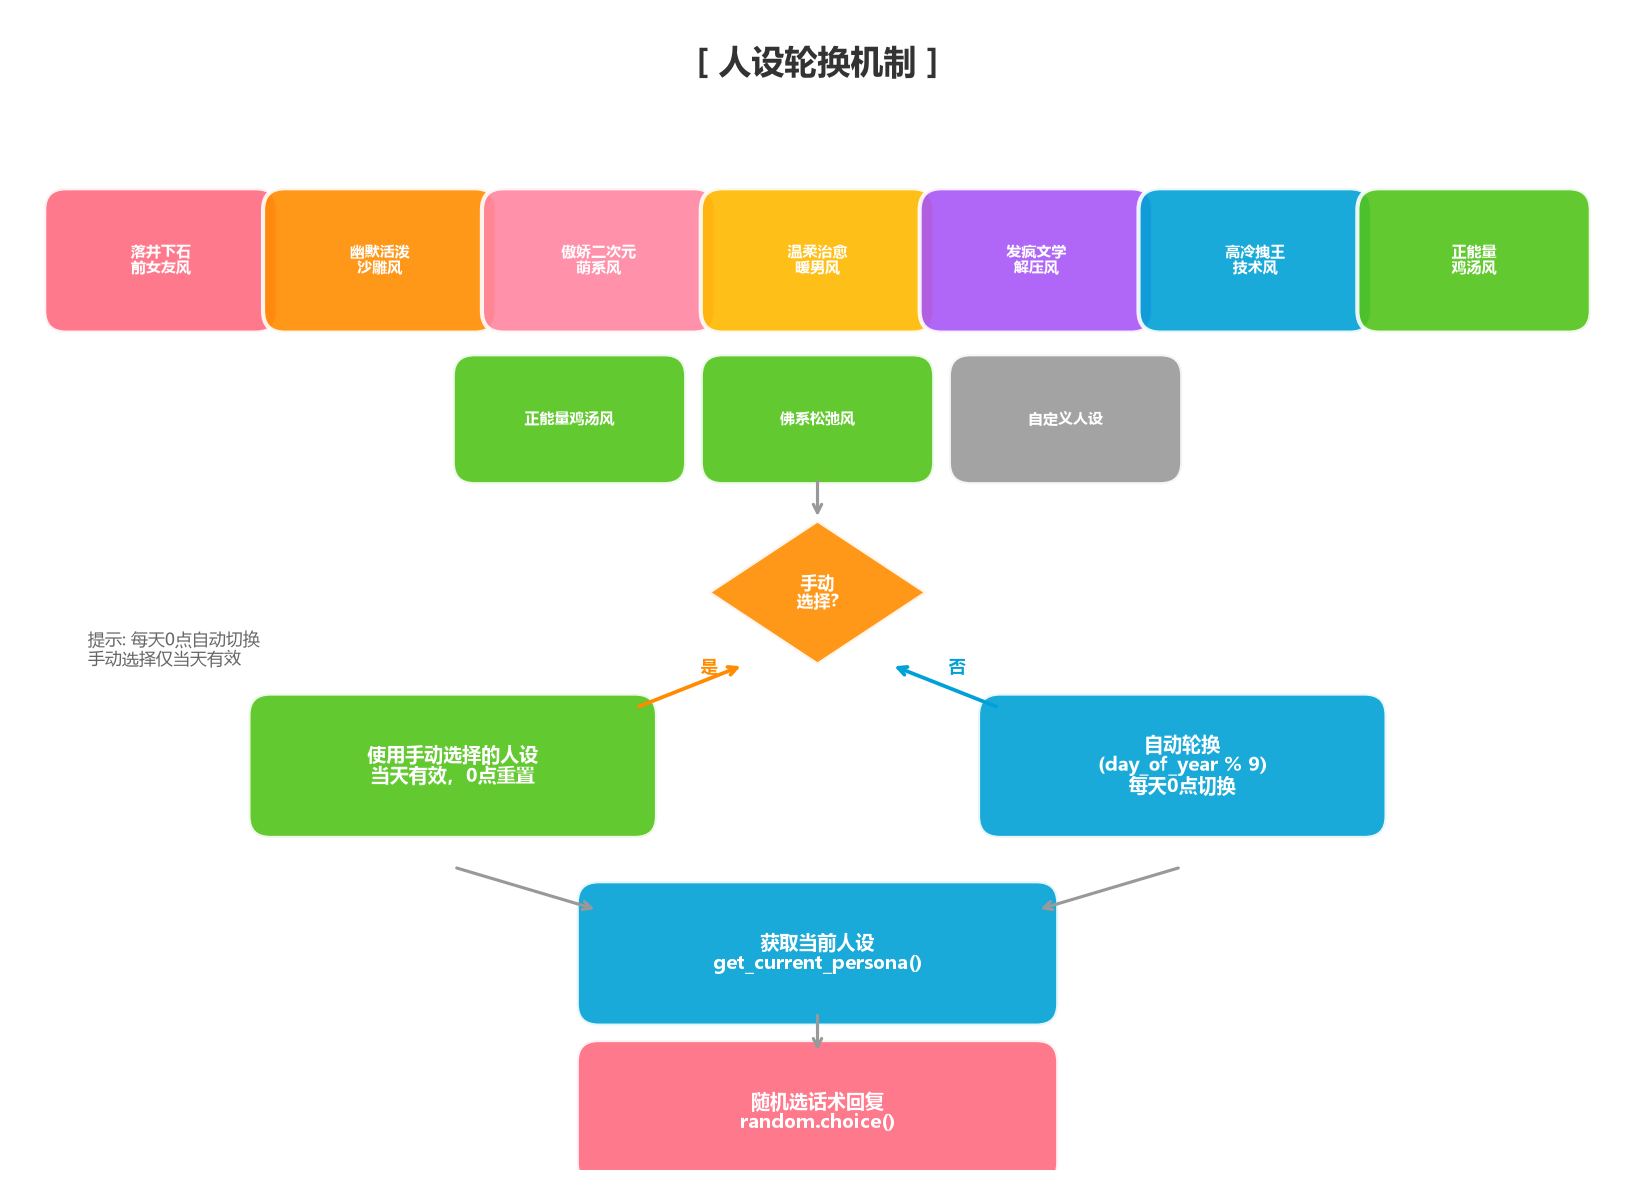
6.4 人设轮换机制

def get_current_persona(self):
    """获取当前生效的人设"""
    today = date.today().isoformat()
    manual_date = self._config.get("manual_persona_date")
    manual_id = self._config.get("current_persona_id")

    # 如果今天手动选择过人设,用选中的
    if manual_date == today and manual_id:
        p = self.get_persona(manual_id)
        if p:
            return p

    # 自动轮换:按一年中的第几天计算
    count = self.persona_count()
    if count == 0:
        return self._default_personas()[0]
    day_of_year = date.today().timetuple().tm_yday
    auto_id = ((day_of_year - 1) % count) + 1
    return self.get_persona(auto_id) or self._personas[0]
自动轮换原理:
- 获取今天是今年的第几天(1月1日=1,12月31日=365)
- 用这个数字取模人设数量:(day-1) % 总人数 + 1
- 结果:365天循环一遍,每天自动切换一个人设
6.5 手动覆盖
def set_manual_persona(self, persona_id):
    """手动选择当天人设"""
    today = date.today().isoformat()
    self._config.set_multi({
        "current_persona_id": persona_id,
        "manual_persona_date": today
    })
手动选择后记录日期。当天内保持手动人设,次日自动恢复轮换。
6.6 更新人设
def update_persona(self, persona_id, data):
    """更新一个人设(名称、描述、回复列表等)"""
    with self._lock:
        for i, p in enumerate(self._personas):
            if p["id"] == persona_id:
                p.update(data)
                self._personas[i] = p
                self._save_personas()
                return True
        return False
6.7 随机回复
def get_random_reply(self, persona_id=None):
    """从预置回复里随机选一条"""
    p = self.get_persona(persona_id) if persona_id else self.get_current_persona()
    if p and p.get("replies"):
        return random.choice(p["replies"])
    return "谢谢你的评论~"
没有API Key时,程序从预置话术中随机选一条回复。每套人设20条。
7. 消息处理流水线 (core/processor.py)
这是整个项目最核心的文件——消息处理器。

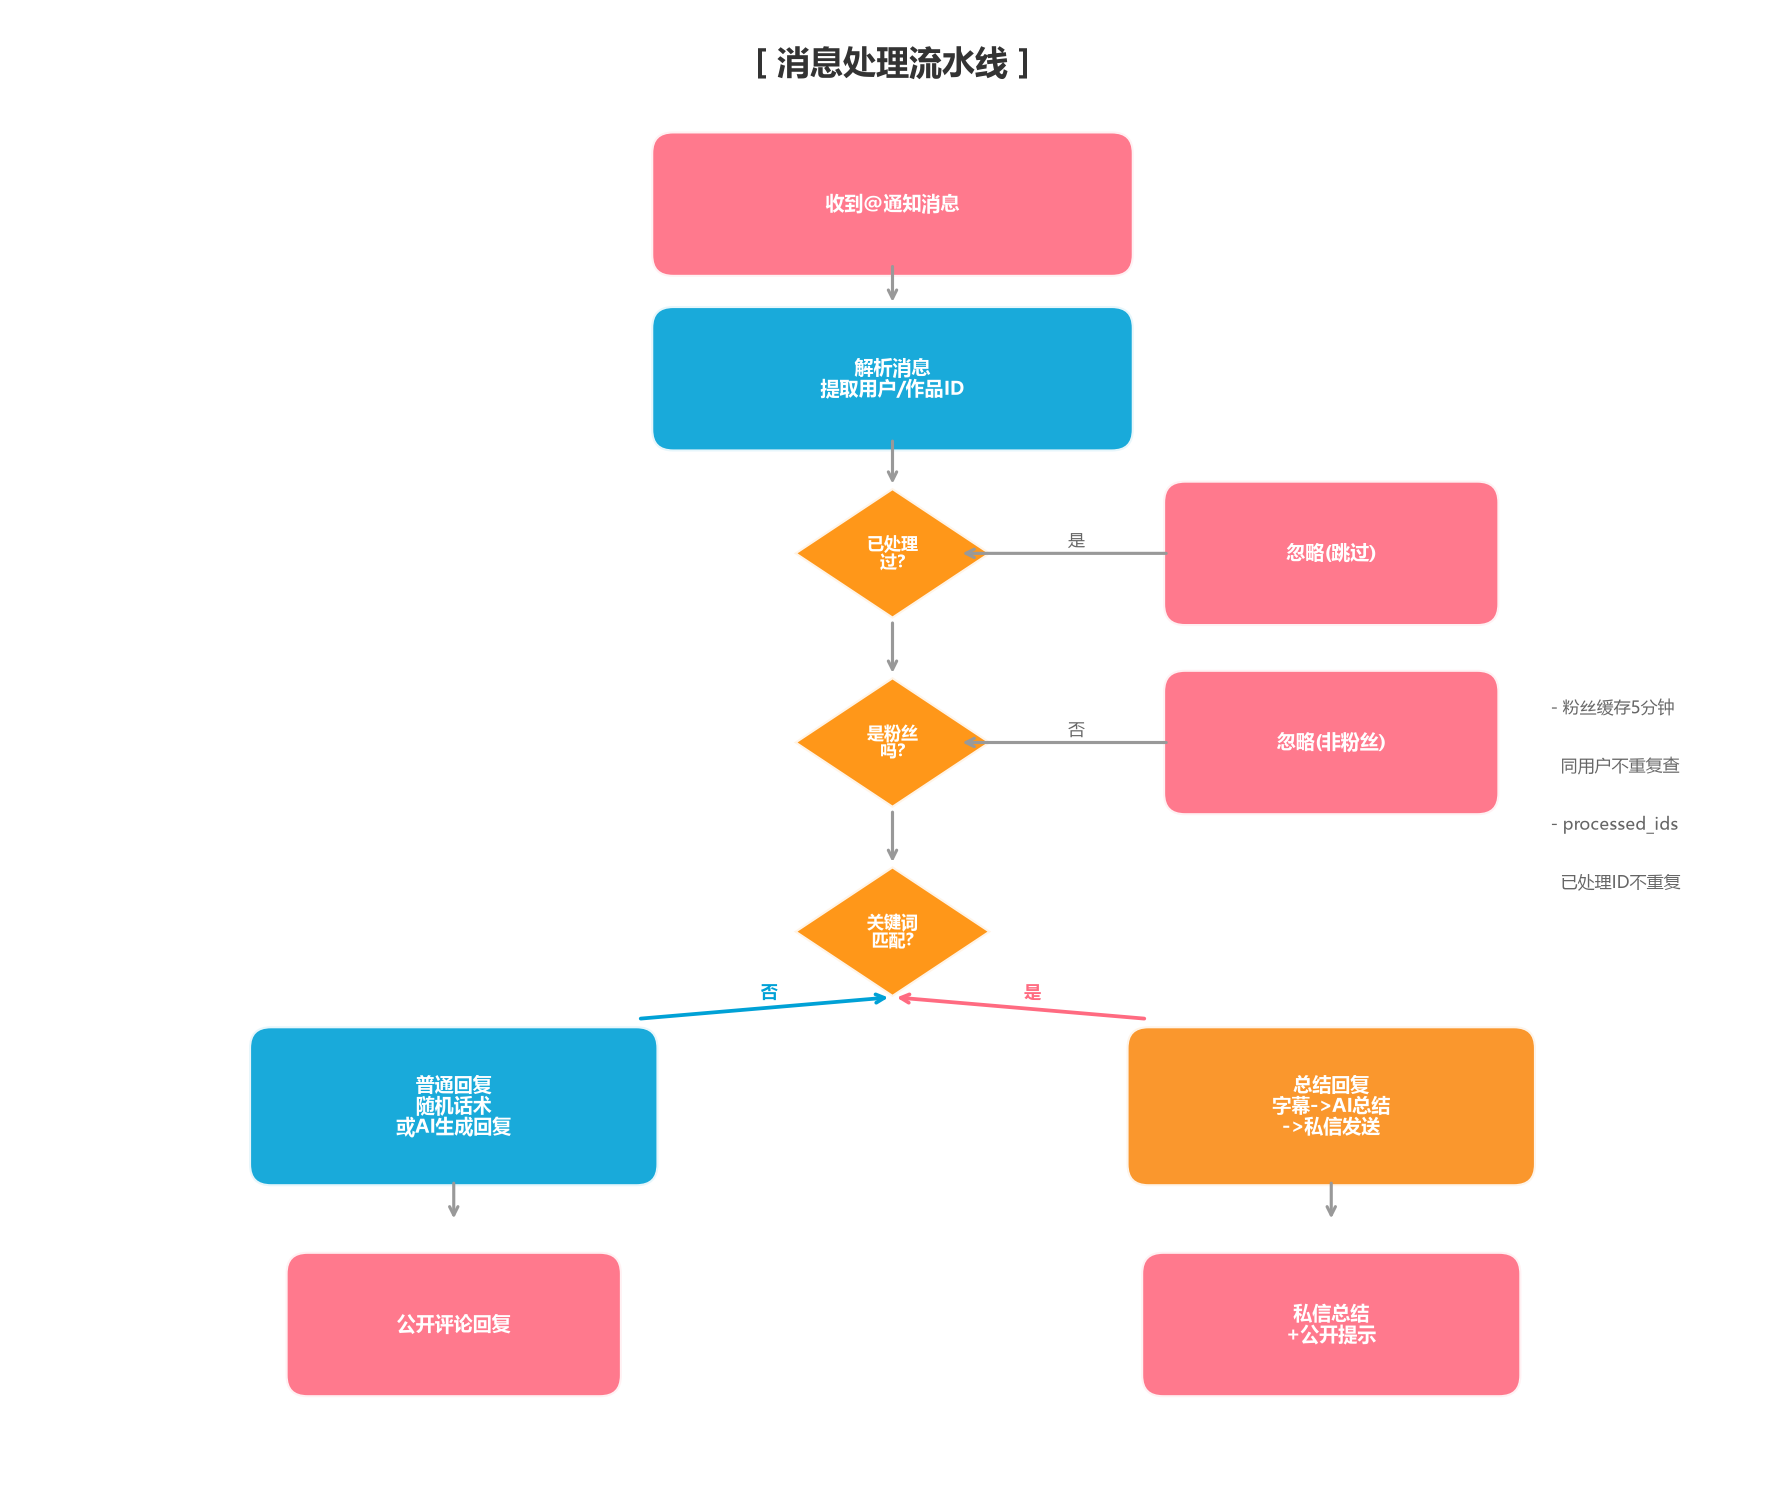
处理流程:
收到@消息
    |
解析消息(谁@的?说了什么?在哪个视频下?)
    |
判断是不是粉丝(查对方关注列表,5分钟缓存)
    |      |
非粉丝->忽略    粉丝->检测关键词
                    |        |
            包含"总结"-> AI总结流程
            不包含    -> 普通回复流程
7.1 构造函数
class MessageProcessor:
    def __init__(self, config_mgr, account_mgr, persona_mgr, log_mgr):
        self.config = config_mgr    # 配置管理器
        self.account = account_mgr  # 账户管理器
        self.persona = persona_mgr  # 人设管理器
        self.log = log_mgr          # 日志管理器
        self._processed_ids = set() # 已处理消息ID去重
        self._fan_cache = {}         # 粉丝缓存

    def cleanup_cache(self):
        """清理超过5分钟的粉丝缓存"""
        now = time.time()
        expired = [uid for uid, (_, ts) in self._fan_cache.items()
                   if now - ts > 300]
        for uid in expired:
            del self._fan_cache[uid]
构造函数接收4个管理器(依赖注入)。cleanup_cache 每轮轮询后调用一次。
7.2 消息解析
def process_at_message(self, at_item):
    """处理一条@消息"""
    msg_id = at_item.get("id")
    if msg_id in self._processed_ids:
        return {"action": "ignored", "reason": "已处理过"}
    self._processed_ids.add(msg_id)

    cookies = self.account.get_cookies()
    if not cookies:
        return {"action": "failed", "reason": "未登录"}

    # 从@消息中提取关键信息
    user_info = at_item.get("user", {})
    item_obj = at_item.get("item", {})
    uid = user_info.get("mid", 0)
    uname = user_info.get("nickname", "未知用户")
    raw_text = item_obj.get("source_content", "")
    if not raw_text:
        raw_text = at_item.get("content", {}).get("message", "")

    # 获取视频/动态ID
    oid = item_obj.get("subject_id", 0)
    if not oid or not str(oid).isdigit():
        oid = item_obj.get("source_id", 0)
    try: oid = int(oid)
    except: oid = 0

    type_id = item_obj.get("business_id", 1)
    return self._route_message(cookies, uid, uname, oid, type_id,
                               raw_text, at_item)
解析的5个关键字段:
- uid:用户B站UID
- uname:用户名
- raw_text:评论内容
- oid:作品ID
- type_id:类型(1=视频, 12=动态)
7.3 路由分发
def _route_message(self, cookies, uid, uname, oid, type_id, raw_text, at_item):
    # 1. 粉丝判断
    if not self._check_is_fan(cookies, uid):
        log_msg = {"t": time.strftime("%H:%M:%S"),
                   "u": uname, "m": raw_text[:50],
                   "s": "已忽略(非粉丝)", "type": "info"}
        self.log.add(log_msg)
        return {"action": "ignored", "reason": "非粉丝"}

    # 2. 关键词检测
    if self._is_summary_keyword(raw_text):
        return self._handle_summary_request(...)

    # 3. 普通回复
    return self._handle_normal_reply(...)
7.4 粉丝缓存
def _check_is_fan(self, cookies, uid):
    """检查是否是粉丝,带5分钟缓存"""
    now = time.time()
    if uid in self._fan_cache:
        is_fan, ts = self._fan_cache[uid]
        if now - ts < 300:  # 5分钟内不重复查
            return is_fan
    try:
        is_fan = check_follow(cookies, uid)
    except:
        is_fan = False
    self._fan_cache[uid] = (is_fan, now)
    return is_fan
缓存设计:同用户5分钟内多次@,只查一次粉丝状态,减少B站API调用。
7.5 关键词检测
_SUMMARY_KEYWORDS = [
    "总结", "总结作品", "总结视频", "总结一下",
    "私信我", "私聊我"
]

def _is_summary_keyword(self, text):
    if not self.config.get("keyword_enabled", True):
        return False
    for kw in self._SUMMARY_KEYWORDS:
        if kw in text:
            return True
    return False
7.6 普通回复
def _handle_normal_reply(self, cookies, uid, uname, oid,
                          type_id, raw_text, comment_rpid):
    api_key = self.config.get("api_key")
    p = self.persona.get_current_persona()

    # 有API Key -> AI生成
    reply_text = ""
    if api_key:
        try:
            reply_text = generate_persona_reply(
                api_key, raw_text,
                p.get("name", "默认"),
                p.get("desc", ""))
        except:
            pass

    # 失败或没Key -> 随机话术
    if not reply_text:
        reply_text = self.persona.get_random_reply()

    # 发评论回复
    try:
        result = reply_comment(
            cookies, oid, reply_text, type_id,
            root=comment_rpid, parent=comment_rpid)
        if result.get("code") == 0:
            self.log.add({"type": "success", "s": "回复成功"})
            return {"action": "replied"}
    except:
        pass
    self.log.add({"type": "fail", "s": "回复失败"})
    return {"action": "failed"}
7.7 AI总结流程

def _handle_summary_request(self, cookies, uid, uname, oid,
                              type_id, raw_text, at_item, comment_rpid):
    api_key = self.config.get("api_key")
    p = self.persona.get_current_persona()

    # Step 1: 从@消息提取BV号
    item_uri = at_item.get("item", {}).get("uri", "")
    bvid = ""
    if "BV" in item_uri:
        import re
        bv_match = re.search(r"BV[a-zA-Z0-9]+", item_uri)
        if bv_match:
            bvid = bv_match.group()

    # Step 2: 获取视频内容(字幕)
    source_text = ""
    if type_id == 1:  # 视频
        video_info = get_video_info(cookies, bvid)
        sub_text = get_video_subtitle(cookies, bvid)
        if sub_text:
            title = video_info.get("title", "")
            source_text = f"标题:{title} 内容:{sub_text}"

    # Step 3: AI生成总结(重试1次)
    summary_text = ""
    for attempt in range(2):
        try:
            style = f"名称:{p.get(chr(39)+chr(39)+name+chr(39)+chr(39))}"
            summary_text = generate_summary(api_key, source_text, style)
            if summary_text: break
        except:
            if attempt == 0: time.sleep(1)

    # Step 4: 私信发送 + 公开提示
    if summary_text:
        link = "https://www.bilibili.com/video/" + bvid
        dm = send_private_msg(cookies, uid, "作品总结:" + summary_text)
        if dm.get("code") == 0:
            hint = random.choice(p.get("replies", ["已私信你啦~"]))
            reply_comment(cookies, oid, hint, type_id)
            return {"action": "summarized"}

    # 失败处理
    reply_comment(cookies, oid, "抱歉,总结遇到点问题~", type_id)
    return {"action": "failed"}
AI总结4个步骤:
- 提取BV号:从@消息的URI中提取视频ID
- 获取视频内容:通过B站API获取字幕/标题/简介
- AI总结:调用DeepSeek分析内容生成总结(最多重试1次)
- 私信发送:总结通过私信发送,评论区回复提示
8. 后台轮询器 (core/poller.py)
8.1 什么是线程?
线程让程序同时做多件事。就像你一边听歌一边写作业:
- 主线程:Flask Web服务器(提供网页服务)
- 后台线程:Poller(定时检查B站消息)

8.2 完整代码
import time, random, threading
from core.bilibili_api import get_notifications
from core.processor import MessageProcessor

class Poller:
    """后台轮询器"""

    def __init__(self, config_mgr, account_mgr, processor, log_mgr):
        self.config = config_mgr
        self.account = account_mgr
        self.processor = processor
        self.log = log_mgr
        self._running = False
        self._thread = None
        self._last_at_time = 0        # 最后处理的消息时间戳
        self._processed_ids = set()    # 已处理消息ID
        self._stats = {
            "start_time": None,
            "total_processed": 0,    # 轮询总次数
            "total_replied": 0,      # 已回复数
            "total_summarized": 0,   # 已总结数
            "total_failed": 0,       # 失败数
            "total_ignored": 0       # 忽略数
        }
8.3 启动与停止
def start(self):
    """启动轮询线程"""
    if self._running:
        return False
    self._running = True
    self._stats["start_time"] = time.time()

    # 从配置文件恢复上次处理时间戳
    saved = self.config.get("last_at_time", 0)
    if saved > 0:
        self._last_at_time = saved  # 重启:处理关机期间来的消息
    else:
        self._last_at_time = time.time()  # 首次:只处理启动后的消息

    # 创建守护线程(主程序退出时自动结束)
    self._thread = threading.Thread(
        target=self._run, daemon=True, name="poller"
    )
    self._thread.start()
    return True

def stop(self):
    """停止轮询"""
    self._running = False
daemon=True 表示守护线程——主程序退出时自动结束,不会残留。
8.4 主循环
def _run(self):
    """轮询主循环"""
    while self._running:
        sleep_time = 10
        try:
            cookies = self.account.get_cookies()
            if not cookies:
                time.sleep(5)
                continue

            # 随机抖动:8-12秒不等,更像真人
            interval = self.config.get("poll_interval", 10)
            jitter = random.uniform(-2, 2)
            sleep_time = max(5, interval + jitter)

            # 获取@消息
            result = get_notifications(cookies)
            if result.get("code") == 0:
                items = result.get("data", {}).get("items", [])
                self._stats["total_processed"] += 1

                if items:
                    # 记录本轮最高时间戳
                    batch_max = max(it.get("at_time", 0) for it in items)
                    for item in items:
                        # 跳过已处理过的旧消息
                        if item.get("at_time", 0) <= self._last_at_time:
                            continue
                        # 交给消息处理器
                        proc_result = self.processor.process_at_message(item)
                        action = proc_result.get("action", "")
                        if action == "replied":
                            self._stats["total_replied"] += 1
                        elif action == "summarized":
                            self._stats["total_summarized"] += 1
                        elif action == "failed":
                            self._stats["total_failed"] += 1
                        elif action == "ignored":
                            self._stats["total_ignored"] += 1

                    # 更新最后处理时间并持久化
                    if batch_max > self._last_at_time:
                        self._last_at_time = batch_max
                        self.config.set("last_at_time", batch_max)

            elif result.get("code") == -101:
                # -101 = 登录失效
                self.log.add({"m": "B站登录状态已失效",
                             "s": "请重新登录", "type": "fail"})
                self._running = False
                continue

            # 清理缓存
            self.processor.cleanup_cache()

        except Exception as e:
            self.log.add({"m": f"轮询异常: {str(e)}",
                         "s": "自动恢复中", "type": "fail"})

        time.sleep(sleep_time)
8.5 5个关键设计
1. 随机抖动(防风控)
jitter = random.uniform(-2, 2)
sleep_time = max(5, interval + jitter)
间隔不是固定的10秒,而是8-12秒随机,不像机器人在访问。
2. 时间戳去重
程序记住最后处理的消息时间戳,下次只处理更新的。
重启程序也能从 config.json 恢复进度。
3. 登录失效检测
B站API返回code=-101表示Cookie过期,自动停止轮询。
4. 异常捕获
即使网络出错也不会崩溃,记录日志后继续运行。
5. 统计信息收集
@property
def stats(self):
    """获取统计数据"""
    s = dict(self._stats)
    if s["start_time"]:
        s["uptime"] = int(time.time() - s["start_time"])
    return s
Web页面实时显示:轮询次数、已回复、已总结、失败数、运行时长。
9. 数据持久化 (storage层)
9.1 JSON vs 数据库
本项目使用JSON文件存储数据,而不是数据库:
| 对比 | JSON文件 | 数据库 |
|---|---|---|
| 优点 | 简单、文件可读、秒级启动 | 性能好、支持复杂查询 |
| 缺点 | 数据量大时慢 | 需要安装服务、配置复杂 |
| 适用 | 小项目、配置、日志 | 大数据、多人并发 |
9.2 ConfigManager — 配置管理器
import json, threading
from config import CONFIG_FILE, DEFAULT_CONFIG

class ConfigManager:
    """JSON持久化配置管理器,线程安全"""

    def __init__(self):
        self._lock = threading.Lock()       # 线程安全锁
        self._config = dict(DEFAULT_CONFIG)  # 用默认配置初始化
        self._load()                          # 从文件加载配置

    def _load(self):
        """从config.json加载配置"""
        if CONFIG_FILE.exists():
            try:
                with open(CONFIG_FILE, "r", encoding="utf-8") as f:
                    data = json.load(f)
                    for k in DEFAULT_CONFIG:
                        if k in data:
                            self._config[k] = data[k]
            except (json.JSONDecodeError, IOError):
                pass

    def _save(self):
        """保存配置到文件"""
        with open(CONFIG_FILE, "w", encoding="utf-8") as f:
            json.dump(self._config, f, ensure_ascii=False, indent=2)

    def get(self, key, default=None):
        with self._lock:
            return self._config.get(key, default)

    def set(self, key, value):
        with self._lock:
            self._config[key] = value
            self._save()  # 每次修改立即写入文件

    def set_multi(self, mapping: dict):
        """批量更新配置"""
        with self._lock:
            self._config.update(mapping)
            self._save()
为什么用Lock?
因为Poller线程和Web线程可能同时读写配置(并发操作),Lock保证同一时刻只有一个线程操作数据。
每次set就立即_save — 即使程序崩溃也不会丢失最新配置。
9.3 AccountManager — 账户管理器
class AccountManager:
    """B站登录状态管理"""

    def __init__(self):
        self._lock = threading.Lock()
        self._cookies = None
        self._login_info = {}
        self._load()

    def _load(self):
        """从cookies.json加载"""
        if COOKIES_FILE.exists():
            try:
                with open(COOKIES_FILE, "r", encoding="utf-8") as f:
                    data = json.load(f)
                    self._cookies = data.get("cookies")
                    self._login_info = data.get("login_info", {})
            except:
                pass

    def save_cookies(self, cookies, login_info=None):
        """保存B站登录凭证"""
        with self._lock:
            self._cookies = cookies
            if login_info:
                self._login_info = login_info
            self._save()

    def get_cookies(self):
        with self._lock:
            return dict(self._cookies) if self._cookies else None

    def is_logged_in(self):
        return self._cookies is not None

    def clear(self):
        """退出登录,清除Cookie"""
        with self._lock:
            self._cookies = None
            self._login_info = {}
            if COOKIES_FILE.exists():
                COOKIES_FILE.unlink()  # 删除文件
cookies.json结构:
{
  "cookies": {
    "bili_jct": "xxx",    // CSRF令牌(评论/私信用)
    "SESSDATA": "xxx",    // 会话令牌(登录凭证)
    "DedeUserID": "xxx"   // 用户ID
  },
  "login_info": {
    "uname": "龙哥",
    "uid": 123456,
    "face": "https://..."
  }
}
3个关键的Cookie字段:
- bili_jct:安全令牌,发评论和私信时必带
- SESSDATA:登录凭证,证明你已经登录
- DedeUserID:你的B站用户ID
9.4 LogManager — 日志管理器
class LogManager:
    """日志管理器,最多保留500条"""

    def __init__(self):
        self._lock = threading.Lock()
        self._logs = []
        self._load()

    def add(self, log_entry):
        """添加一条日志"""
        with self._lock:
            self._logs.append(log_entry)
            # 超过500条时丢弃最老的
            if len(self._logs) > MAX_LOG_ENTRIES:
                self._logs = self._logs[-MAX_LOG_ENTRIES:]
            self._save()

    def get_recent(self, count=50):
        """获取最近N条日志"""
        with self._lock:
            return list(self._logs[-count:])
每条日志包含5个字段:
{
  "t": "14:30:25",     // 时间
  "u": "程序员小张",    // 用户名
  "m": "龙哥这代码报错了", // 消息内容
  "s": "回复成功",      // 状态
  "type": "success"    // 类型: success/fail/info
}
环形缓冲区设计: 最多500条,超过自动丢弃最老的。不会无限占用硬盘。
10. Web管理界面 (web/server.py)
10.1 Flask是什么?
Flask是Python最流行的Web框架之一。用Python写网页接口的工具。
你把Python代码写好,Flask把它变成URL接口,浏览器可以访问。
10.2 全局初始化
from flask import Flask, jsonify, request, send_from_directory
from flask_cors import CORS

# 创建所有管理器实例
config_mgr = ConfigManager()
account_mgr = AccountManager()
log_mgr = LogManager()
persona_mgr = PersonaManager(config_mgr)
processor = MessageProcessor(config_mgr, account_mgr, persona_mgr, log_mgr)
poller = Poller(config_mgr, account_mgr, processor, log_mgr)

# Flask应用
app = Flask(__name__, static_folder=None)
CORS(app)  # 允许跨域请求
程序启动时创建所有管理器,这就是「依赖注入」——每个对象需要的依赖都在创建时传入。
10.3 二维码登录的Web实现
_qrcode_data = {"key": None, "status": "idle", "url": None}

@app.route("/api/login/qrcode", methods=["POST"])
def api_login_qrcode():
    """获取B站登录二维码"""
    global _qrcode_data
    try:
        result = get_qrcode()
        if result.get("code") == 0:
            data = result.get("data", {})
            _qrcode_data = {
                "key": data.get("qrcode_key"),
                "url": data.get("url"),
                "status": "scanning"
            }
            return jsonify({"success": True,
                           "url": data.get("url"),
                           "key": data.get("qrcode_key")})
        return jsonify({"success": False,
                        "message": result.get("message", "获取二维码失败")})
    except Exception as e:
        return jsonify({"success": False, "message": str(e)})


@app.route("/api/login/poll", methods=["POST"])
def api_login_poll():
    """轮询扫码结果,保存cookies"""
    global _qrcode_data
    key = _qrcode_data.get("key")
    if not key:
        return jsonify({"success": False, "status": "idle"})

    result = poll_qrcode(key)
    data = result.get("json", {})
    cookies = result.get("cookies", {})
    code = data.get("code", -1)

    if code == 0:
        status = data.get("data", {}).get("code", 0)
        if status == 0:
            # 扫码成功,保存cookies和用户信息
            if cookies:
                nav = get_nav_info(cookies)
                if nav.get("code") == 0:
                    nd = nav.get("data", {})
                    login_info = {
                        "uname": nd.get("uname", ""),
                        "uid": nd.get("mid", 0),
                        "face": nd.get("face", "")
                    }
                    account_mgr.save_cookies(cookies, login_info)
                _qrcode_data["status"] = "done"
                return jsonify({"success": True, "status": "done",
                                "login_info": login_info})
        elif status == 86038:
            _qrcode_data["status"] = "expired"
            return jsonify({"success": False, "status": "expired"})

    return jsonify({"success": False, "status": "scanning"})
10.4 轮询控制API
@app.route("/api/poller/start", methods=["POST"])
def api_poller_start():
    """启动轮询"""
    if not account_mgr.is_logged_in():
        return jsonify({"success": False,
                        "message": "请先登录B站"})
    ok = poller.start()
    config_mgr.set("poller_running", True)
    return jsonify({"success": ok, "running": poller.is_running})


@app.route("/api/poller/stop", methods=["POST"])
def api_poller_stop():
    """停止轮询"""
    poller.stop()
    config_mgr.set("poller_running", False)
    return jsonify({"success": True, "running": False})
10.5 API路由一览
| 方法 | 路径 | 功能 |
|---|---|---|
| GET | /api/status | 运行状态(轮询/登录/人设) |
| GET | /api/stats | 统计数据 |
| POST | /api/login/qrcode | 获取B站二维码 |
| POST | /api/login/poll | 轮询扫码结果 |
| GET | /api/personas | 获取所有人设 |
| GET | /api/persona/current | 获取当前人设 |
| POST | /api/persona/select | 选择当天人设 |
| POST | /api/persona/update | 更新人设 |
| POST | /api/persona/reorder | 重新排序人设 |
| GET | /api/config | 获取配置 |
| POST | /api/config/save | 保存配置 |
| POST | /api/api_test | 测试API连接 |
| POST | /api/poller/start | 启动轮询 |
| POST | /api/poller/stop | 停止轮询 |
| GET | /api/logs | 获取日志 |
| POST | /api/logs/clear | 清空日志 |
10.6 启动服务器
def run_server():
    """启动Flask服务器"""
    # 如果之前轮询器在运行且已登录,自动恢复
    if config_mgr.get("poller_running") and account_mgr.is_logged_in():
        try:
            poller.start()
        except Exception:
            pass
    print(f"Web管理页面: http://{WEB_HOST}:{WEB_PORT}")
    app.run(host=WEB_HOST, port=WEB_PORT,
            debug=False, threaded=True)
threaded=True 允许Flask同时处理多个请求,不会卡住。
自动恢复: 如果上次关闭时轮询器在运行,再次启动时自动恢复。
10.7 前端架构
前端文件在 web/static/ 目录下:
| 文件 | 作用 |
|---|---|
| index.html | 管理页面HTML,包含仪表盘/设置/人设/日志等页面 |
| api-layer.js | 前端与后端通信的封装层 |
| personas.json | 人设数据 |
| logs.json | 日志数据 |
前后端通信方式:前端使用浏览器的fetch API调用后端API,后端返回JSON数据。
前端负责展示,后端负责处理业务逻辑。
11. 从启动到运行全流程串联
11.1 完整操作流程

第一步:启动程序
`ash
cd BiliReplyWeb
python app.py
输出:
==============================================
BiliReplyBot - Bilibili Smart Reply Assistant
Web UI: http://127.0.0.1:8005
Press Ctrl+C to stop
**第二步:打开Web管理页面**
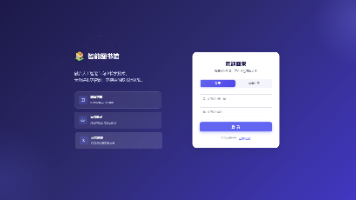
浏览器输入 http://127.0.0.1:8005

你会看到仪表盘页面,显示:
- 轮询状态(未启动)
- 登录状态(未登录)
- 统计信息(全为0)
- 当前人设(默认)

**第三步:设置API Key**
1. 点击左侧「设置」
2. 填写你的DeepSeek API Key
3. 点击「测试连接」
4. 显示「连接成功!延迟xxms」即可

**第四步:B站扫码登录**
1. 点击左侧「登录」
2. 点击「获取二维码」
3. 打开手机B站App,扫描二维码
4. 页面自动检测登录状态
5. 登录成功显示你的B站用户名和头像

**第五步:启动轮询**
1. 回到仪表盘
2. 点击「启动轮询」按钮
3. 状态变为「运行中」

**第六步:测试自动回复**
用粉丝账号在你任意视频/动态下评论(记得@你):

> @你的用户名 今天讲得太好了!

等待10-15秒,刷新Web页面查看日志——应该显示「回复成功」。
去B站看你的视频评论区,已有一条自动回复。

**第七步:测试AI总结**
用粉丝账号评论:

> @你的用户名 总结作品,私信我

等待20-30秒(AI生成需要时间),检查B站私信,应该收到AI总结。

### 11.2 程序启动背后发生了什么

运行 python app.py 时:
- Python 加载 app.py
- app.py import web.server -> 触发 server.py 执行
- server.py 创建所有管理器
- config_mgr (从data/config.json加载配置)
- account_mgr (从data/cookies.json加载登录凭证)
- log_mgr (从data/logs.json加载日志)
- persona_mgr (从web/static/personas.json加载人设)
- processor, poller
- run_server() 调用 Flask 的 app.run()
- Flask 开始在 127.0.0.1:8005 监听HTTP请求
- 如果之前轮询器在运行且已登录,自动启动轮询
### 11.3 用户使用场景

**场景1:日常运营**
- 早上打开Web页面查看昨晚回复了多少条
- 进入日志页面看有哪些粉丝互动
- 进入人设管理换一种风格

**场景2:处理问题**
- 状态变红时查看日志排查问题
- Cookie过期时重新登录
- 重启程序后自动恢复轮询

---


## 12. 常见问题与排错指南

### 12.1 端口被占用

症状:启动时报错「Address already in use」

解决:
`ash
# 查看谁占用了8005端口
netstat -ano | findstr :8005
# 强制结束进程
taskkill /F /PID 进程ID
或者修改 config.py 中的 WEB_PORT 为其他数字(如8080)。
12.2 API Key无效
检查项:
- 是否完整复制(没有漏字符)
- 前后有没有多余空格
- DeepSeek账户余额是否充足
- 网络能否访问 api.deepseek.com
- 在Web页面重新填写并测试连接
12.3 扫码登录失败
- 确保网络正常(能访问 passport.bilibili.com)
- 重新获取二维码(有效期2分钟)
- 更新B站App到最新版本
- 如果一直失败,检查是否被B站风控
12.4 轮询启动后没有回复
逐一排查:
- 登录状态:Web页面显示已登录吗?
- 轮询状态:显示「运行中」吗?
- 自己测试:用粉丝号@自己了吗?
- 查看日志:日志里有记录吗?
- 粉丝判断:测试号是否关注了你?
- 直接看日志文件:data/logs.json
12.5 如何查看日志
两种方式:
- Web页面 → 左侧「日志」侧边栏
- 直接打开 data/logs.json 文件
日志各字段含义:
t=时间, u=用户名, m=消息内容, s=状态, type=类型
type=success -> 成功
type=fail    -> 失败
type=info    -> 信息提示
12.6 Cookie过期
症状:
- 轮询停止
- 日志显示「B站登录状态已失效」
- code=-101
解决:在Web页面退出登录,重新扫码登录,重新启动轮询。
B站Cookie有效期通常为30天左右。
12.7 常见报错
ModuleNotFoundError:
`ash
pip install flask
pip install flask-cors
pip install requests
**ConnectionError:** 检查网络连接是否正常

**JSONDecodeError:** data/下的json文件可能损坏,删除相应文件重启

### 12.8 安全提醒

1. API Key 不要告诉别人——别人可以用你的key花钱
2. cookies.json 文件不要外传——别人可以登录你的B站账号
3. 只在信任的电脑运行——避免API Key泄漏
4. 不要大量刷评论——遵守B站用户协议
5. 如需分享代码,先删除 data/ 下的敏感文件

---


## 13. 附录

### 13.1 依赖清单

`	xt
flask>=3.0.0
flask-cors>=4.0.0
requests>=2.31.0
13.2 相关链接
| 链接 | 用途 |
|---|---|
| https://www.python.org/downloads/ | 下载Python |
| https://platform.deepseek.com/ | DeepSeek API官网 |
| https://www.bilibili.com/ | 哔哩哔哩 |
| https://pypi.tuna.tsinghua.edu.cn/simple | 清华pip镜像源 |
13.3 文件速查
| 文件 | 备注 |
|---|---|
| config.py | WEB_PORT、POLL_INTERVAL 可修改 |
| web/static/personas.json | 可编辑人设列表 |
| data/cookies.json | 自动管理,不要手动改 |
| data/config.json | 运行时配置,自动管理 |
| core/bilibili_api.py | B站接口变化时才需要动 |
13.4 常用命令速查
`ash
启动程序
python app.py
安装依赖
pip install -r requirements.txt
换源加速
pip config set global.index-url https://pypi.tuna.tsinghua.edu.cn/simple
查看端口占用
netstat -ano | findstr :8005
### 13.5 文件大小参考
| 文件 | 代码行数 | 说明 |
|------|---------|------|
| app.py | 25行 | 程序入口 |
| config.py | 45行 | 配置集中管理 |
| bilibili_api.py | 180行 | B站API封装 |
| ai_service.py | 80行 | AI服务 |
| persona_manager.py | 350行 | 人设管理 |
| poller.py | 150行 | 轮询器 |
| processor.py | 320行 | 消息处理 |
| config_manager.py | 45行 | 配置读写 |
| account_manager.py | 50行 | 账户管理 |
| log_manager.py | 40行 | 日志管理 |
| server.py | 270行 | Web服务器 |
| index.html | 1300行 | 前端页面 |
| api-layer.js | 600行 | 前端通信 |
---
> 🎉 **恭喜你读完全部教程!**
>
> 现在你掌握了:
> - 项目的每个文件是做什么的
> - 每一行核心代码的含义
> - 如何从零开始部署和运行
>
> 下一步:打开命令行,运行 python app.py,亲身体验自动回复的乐趣吧!

Agent 垂直技术社区,欢迎活跃、内容共建。
更多推荐

 4
4 0
0- 0


 已为社区贡献1条内容

所有评论(0)