告别枯燥界面!用 Python+Qt5 做一个高颜值电子表盘,电脑桌面秒变高级
每天盯着电脑桌面默认的时钟插件,是不是早已审美疲劳?作为程序员,不如亲手打造一款个性化电子表盘 —— 用 Python+Qt5 就能实现,不仅颜值在线,还能自定义样式,让你的桌面瞬间提升格调。
一、为什么选择 Python+Qt5?
开发电子表盘,选择合适的工具很重要。Python 语法简洁,入门门槛低,而 Qt5 作为成熟的 GUI 框架,支持跨平台(Windows/macOS/Linux),且自带丰富的界面组件和绘图功能,非常适合实现时钟的动态效果。
两者结合的优势:
- 代码量少,核心功能只需几十行代码就能跑通;
- Qt5 的 QPainter 模块支持自定义绘图,轻松实现数字、指针、刻度等元素;
- 支持透明窗口、无边框设计,可悬浮在桌面任意位置,不影响其他操作;
- 扩展性强,后续可轻松添加闹钟提醒、天气、日历等附加功能。
二、核心功能与效果展示
先来看最终成果 —— 这款电子表盘包含以下特点:
- 支持机械表盘和电子表两种模式,机械表盘显示时、分、秒指针,带刻度和数字标识;
- 支持透明背景,可完全融入桌面壁纸;
- 鼠标拖动可任意移动位置;
- 右键菜单可选择主题(支持多种主题)、切换大小、隐藏/显示表盘;
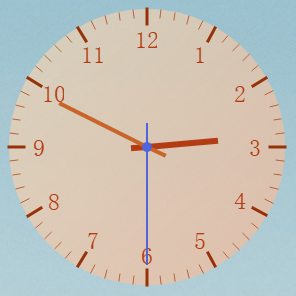
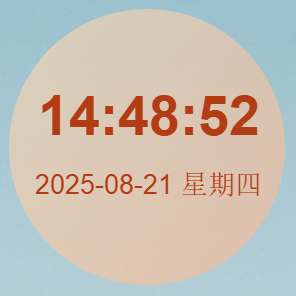
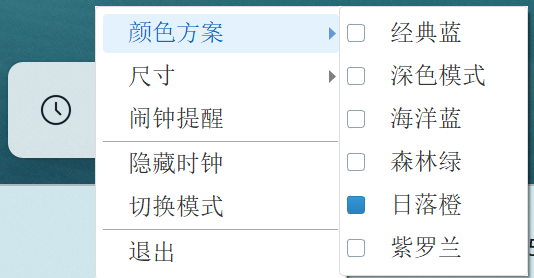
- 占用内存仅 6-10MB,轻量化不卡顿。
三、从零开始实现电子表盘
1. 环境准备
首先安装必要的库,PyQt5 是核心依赖:
pip install PyQt52. 基础窗口搭建
第一步是创建一个无边框、可透明的窗口,作为表盘的载体:
class DesktopClock(QMainWindow):
    def __init__(self, parent=None):
        super(DesktopClock, self).__init__(parent)

        # 窗口设置
        self.setWindowTitle("桌面时钟")
        self.setWindowFlags(Qt.FramelessWindowHint | Qt.WindowStaysOnTopHint | Qt.Tool)
        self.setAttribute(Qt.WA_TranslucentBackground)

        # 获取屏幕尺寸
        screen_geometry = QApplication.desktop().availableGeometry()
        self.screen_width = screen_geometry.width()
        self.screen_height = screen_geometry.height()

        self.clock_size = 300  # int(self.screen_width * (5 + global_config.size_level) / 60)
        self.calc_size()
        global_config.judge_pos(self.screen_width, self.screen_height, self.clock_size)
        self.move(QPoint(global_config.pos_x, global_config.pos_y))
        # 设置图标
        self.icon = QtGui.QIcon()
        self.icon.addPixmap(QtGui.QPixmap(":/ico/icon.ico"), QtGui.QIcon.Normal, QtGui.QIcon.Off)
        self.setWindowIcon(self.icon)

    def calc_size(self):
        # 更新尺寸
        self.clock_size = int(self.screen_width * (5 + global_config.size_level) / 62)
        self.setFixedSize(self.clock_size, self.clock_size)  # 固定窗口大小
3. 绘制机械表盘元素
接下来用 QPainter 绘制表盘的刻度、数字和指针。核心思路是:
- 根据时间计算指针角度;
- 每次刷新时重绘所有元素。
关键代码片段:
def draw_analog_clock(self, painter, clock_rect, colors):
    # 绘制表盘
    center = clock_rect.center()
    radius = min(clock_rect.width(), clock_rect.height()) // 2 - 10

    # 绘制表盘背景
    painter.save()
    painter.setPen(Qt.NoPen)

    # 渐变背景
    gradient = QLinearGradient(center.x() - radius, center.y() - radius,
                               center.x() + radius, center.y() + radius)
    gradient.setColorAt(0, colors["background1"])  # 添加透明度
    # gradient.setColorAt(1, QColor(220, 220, 240, 150))  # 添加透明度
    gradient.setColorAt(1, colors["background2"])  # 添加透明度
    painter.setBrush(QBrush(gradient))

    painter.drawEllipse(center, radius, radius)
    painter.restore()

    # 绘制表盘刻度
    painter.save()

    for i in range(60):
        angle = i * 6  # 6度一个刻度
        rad = math.radians(angle)

        # 小时刻度(更粗更长)
        if i % 5 == 0:
            inner_length = radius - 15
            painter.setPen(QPen(colors["hour_mark"], 3))

            # 绘制小时数字
            hour_num = i // 5 if i // 5 != 0 else 12
            text_x = center.x() + int((radius - 30) * math.sin(rad)) - 10
            text_y = center.y() - int((radius - 30) * math.cos(rad)) - 10

            painter.setPen(colors["text"])

            painter.drawText(text_x, text_y, 20, 20, Qt.AlignCenter, str(hour_num))
            painter.setPen(QPen(colors["hour_mark"], 3))
        else:
            inner_length = radius - 8
            painter.setPen(QPen(colors["minute_mark"], 1))

        outer_x = center.x() + int(radius * math.sin(rad))
        outer_y = center.y() - int(radius * math.cos(rad))
        inner_x = center.x() + int(inner_length * math.sin(rad))
        inner_y = center.y() - int(inner_length * math.cos(rad))

        painter.drawLine(inner_x, inner_y, outer_x, outer_y)

    painter.restore()

    # 绘制时针
    hour_angle = (self.current_time.hour() % 12) * 30 + self.current_time.minute() * 0.5
    self.draw_hand(painter, center, hour_angle, radius * 0.5, 6, colors["hour_hand"])

    # 绘制分针
    minute_angle = self.current_time.minute() * 6 + self.current_time.second() * 0.1
    self.draw_hand(painter, center, minute_angle, radius * 0.7, 4, colors["minute_hand"])

    # 绘制秒针
    second_angle = self.current_time.second() * 6
    self.draw_hand(painter, center, second_angle, radius * 0.85, 2, colors["second_hand"])

    # 绘制中心点
    painter.setPen(Qt.NoPen)
    painter.setBrush(QBrush(colors["center_point"]))
    painter.drawEllipse(center, 5, 5)

def draw_hand(self, painter, center, angle, length, width, color):
    # 绘制表针
    painter.save()
    painter.setPen(QPen(color, width))
    painter.setBrush(QBrush(color))

    rad = math.radians(angle)
    hand_x = center.x() + int(length * math.sin(rad))
    hand_y = center.y() - int(length * math.cos(rad))

    painter.drawLine(center.x(), center.y(), hand_x, hand_y)

    # 绘制指针尾部
    tail_length = length * 0.2
    tail_angle = angle + 180
    tail_rad = math.radians(tail_angle)
    tail_x = center.x() + int(tail_length * math.sin(tail_rad))
    tail_y = center.y() - int(tail_length * math.cos(tail_rad))

    painter.drawLine(center.x(), center.y(), tail_x, tail_y)
    painter.restore()
4. 绘制电子表盘元素
接下来用 QPainter 绘制电子表盘。核心思路是:
- 根据时间显示年月日、时分秒、星期;
- 每次刷新时重绘所有元素。
关键代码片段:
def draw_digital_clock(self, painter, clock_rect, colors):
    # 电子表
    center = clock_rect.center()

    # 绘制数字时间背景(圆形半透明背景)
    radius = min(clock_rect.width(), clock_rect.height()) // 2 - 10
    painter.save()
    painter.setPen(Qt.NoPen)

    # 渐变背景
    gradient = QLinearGradient(center.x() - radius, center.y() - radius,
                               center.x() + radius, center.y() + radius)
    gradient.setColorAt(0, colors["background1"])  # 添加透明度
    # gradient.setColorAt(1, QColor(220, 220, 240, 150))  # 添加透明度
    gradient.setColorAt(1, colors["background2"])  # 添加透明度
    painter.setBrush(QBrush(gradient))

    painter.drawEllipse(center, radius, radius)
    painter.restore()

    # 绘制数字时间
    time_str = self.current_time.toString("hh:mm:ss")
    date_str = QDate.currentDate().toString("yyyy-MM-dd dddd")

    # 设置字体
    time_font = QFont("Arial", 18 + 3 * global_config.size_level, QFont.Bold)
    date_font = QFont("Arial", 8 + 2 * global_config.size_level)

    painter.setFont(time_font)
    painter.setPen(colors["text"])

    # 计算文本位置
    time_rect = painter.fontMetrics().boundingRect(time_str)
    time_x = center.x() - time_rect.width() // 2
    time_y = center.y() - time_rect.height() // 2 + 20

    painter.drawText(time_x, time_y, time_str)

    # 绘制日期
    painter.setFont(date_font)
    date_rect = painter.fontMetrics().boundingRect(date_str)
    date_x = center.x() - date_rect.width() // 2
    date_y = center.y() + time_rect.height() // 2 + 15

    painter.drawText(date_x, date_y, date_str)
5. 设置定时重绘
这只定时器,调用重绘逻辑:
- 根据当前模式,选择调用机械表盘还是电子表盘;
- 每次刷新时重绘所有元素。
关键代码片段:
def set_timer(self):
    # 定时器
    self.timer = QTimer(self)
    self.timer.timeout.connect(self.update_time)
    self.timer.start(200)  # 每秒更新一次

def update_time(self):
    self.current_time = QTime.currentTime()
    self.update()

    self.check_alarms()
def paintEvent(self, event): painter = QPainter(self) painter.setRenderHint(QPainter.Antialiasing) # 清除背景 - 完全透明 painter.fillRect(self.rect(), Qt.transparent) # 获取当前颜色方案 colors = self.color_schemes.get(global_config.color_scheme, self.color_schemes["classic"]) # 获取时钟绘制区域 clock_rect = self.rect() if self.clock_mode == "analog": self.draw_analog_clock(painter, clock_rect, colors) else: self.draw_digital_clock(painter, clock_rect, colors)
6. 主题设置
可以设置主题,主题结构如下:
# 定义颜色方案
self.color_schemes = {
    "classic": {
        "name": "经典蓝",
        "background1": QColor(250, 250, 255, 150),
        "background2": QColor(220, 220, 240, 150),
        "hour_hand": QColor(50, 50, 50),
        "minute_hand": QColor(70, 70, 70),
        "second_hand": QColor(220, 50, 50),
        "center_point": QColor(220, 50, 50),
        "hour_mark": QColor(50, 50, 50),
        "minute_mark": QColor(100, 100, 100),
        "text": QColor(50, 50, 50),
    },
    "dark": {
        "name": "深色模式",
        "background1": QColor(40, 40, 60, 150),
        "background2": QColor(20, 20, 40, 150),
        "hour_hand": QColor(220, 220, 220),
        "minute_hand": QColor(180, 180, 180),
        "second_hand": QColor(255, 80, 80),
        "center_point": QColor(255, 80, 80),
        "hour_mark": QColor(200, 200, 200),
        "minute_mark": QColor(150, 150, 150),
        "text": QColor(220, 220, 220),
    },
    "ocean": {
        "name": "海洋蓝",
        "background1": QColor(180, 220, 255, 150),
        "background2": QColor(120, 180, 220, 150),
        "hour_hand": QColor(20, 60, 120),
        "minute_hand": QColor(40, 100, 160),
        "second_hand": QColor(255, 100, 100),
        "center_point": QColor(255, 100, 100),
        "hour_mark": QColor(10, 40, 90),
        "minute_mark": QColor(60, 100, 150),
        "text": QColor(20, 60, 120),
    },
    "forest": {
        "name": "森林绿",
        "background1": QColor(180, 230, 180, 150),
        "background2": QColor(140, 200, 140, 150),
        "hour_hand": QColor(40, 100, 40),
        "minute_hand": QColor(60, 140, 60),
        "second_hand": QColor(220, 100, 50),
        "center_point": QColor(220, 100, 50),
        "hour_mark": QColor(30, 80, 30),
        "minute_mark": QColor(80, 130, 80),
        "text": QColor(40, 100, 40),
    },
    "sunset": {
        "name": "日落橙",
        "background1": QColor(255, 220, 180, 150),
        "background2": QColor(255, 180, 140, 150),
        "hour_hand": QColor(180, 60, 20),
        "minute_hand": QColor(200, 100, 40),
        "second_hand": QColor(80, 100, 220),
        "center_point": QColor(80, 100, 220),
        "hour_mark": QColor(150, 50, 10),
        "minute_mark": QColor(180, 100, 60),
        "text": QColor(180, 60, 20),
    },
    "violet": {
        "name": "紫罗兰",
        "background1": QColor(230, 200, 255, 150),
        "background2": QColor(200, 170, 230, 150),
        "hour_hand": QColor(100, 40, 150),
        "minute_hand": QColor(130, 70, 180),
        "second_hand": QColor(80, 220, 180),
        "center_point": QColor(80, 220, 180),
        "hour_mark": QColor(80, 30, 120),
        "minute_mark": QColor(120, 80, 160),
        "text": QColor(100, 40, 150),
    }
}
四、打包成可执行文件
完成开发后,用 PyInstaller 打包成 exe,方便在没有 Python 环境的电脑上运行:
pyinstaller -D -w main.py -i icon.ico
打包完成后,在 dist 文件夹中找到 编译完成的文件夹,双击即可运行。
五、设置开机启动
在WIN+R运行中执行shell:startup后,在启动文件夹中添加启动快捷方式,即可在每次启动时自动加载桌面程序。
六、总结与进阶方向
这款电子表盘虽然小巧,但涵盖了 PyQt5 界面开发的核心知识点:窗口设置、绘图、事件处理、定时器等。在具体的项目中,还增加了一下功能:
- 调整表盘大小,自由拖动表盘位置;
- 记录设置的大小、主题、位置、显示模式等,再次启动保持原样;
- 增加了闹钟提醒功能,可进行闹钟提示;
- 适配高 DPI 屏幕,避免模糊。
具体的工具已打包成可执行程序,地址为 python+QT5实现的桌面电子表盘
附加源码,地址为 python+QT5实现的桌面电子表盘-源码资源-CSDN下载

Agent 垂直技术社区,欢迎活跃、内容共建。
更多推荐


 9
9 0
0- 0


 已为社区贡献1条内容

所有评论(0)