Baumer高防护相机如何通过Tiny-YOLO单类模型实现人体跌倒检测与跟踪(C#代码UI界面版)
《------往期经典推荐------》
AI应用软件开发实战专栏【链接】
Baumer高防护相机如何通过Tiny-YOLO单类模型实现人体跌倒检测与跟踪(C#代码UI界面版)
工业相机使用YoloV8模型实现人体跌倒检测与跟踪
本项目集成了Tiny-YOLO 检测模型 与 C#图形界面工具,实现了包括图片、文件夹、视频与摄像头等多种输入方式的实现人体跌倒检测与跟踪的检测识别。
现在支持7种动作:站立、行走、坐下、躺下、站起来、坐下、跌倒。
Baumer工业相机堡盟相机是一种高性能、高质量的工业相机,可用于各种应用场景,如物体检测、计数和识别、运动分析和图像处理。
Baumer的万兆网相机拥有出色的图像处理性能,可以实时传输高分辨率图像。此外,该相机还具有快速数据传输、低功耗、易于集成以及高度可扩展性等特点。
Baumer工业相机由于其性能和质量的优越和稳定,常用于高速同步采集领域,通常使用各种图像算法来提高其捕获的图像的质量。
本文以Baumer工业相机作为案例进行演示,实现将工业相机的图像或者本地图像夹导入Yolo模型从而实现人体跌倒检测与跟踪等功能。
工业相机通过YoloV8模型实现人体跌倒检测与跟踪的技术背景
本文通过C#中实现一个简单的UI界面,用于将YoloV8模型实现人体跌倒检测与跟踪
。
用户可以通过该界面执行以下操作:
-
转换相机图像为Mat图像:通过YoloV8模型实现人体跌倒检测与跟踪
-
转换本地图像为mat图像:通过YoloV8模型实现人体跌倒检测与跟踪
通过这个UI界面,用户能够在实时应用机器视觉数据处理时快速有效地进行操作,无需深入了解图像数据的底层处理过程。这个简单的介绍旨在为开发人员提供一个明确的方向,以便开始构建此类应用程序,并且该程序主要用于演示目的。
在相机SDK中获取图像转换图像的代码分析
本文介绍使用Baumer工业相机,实现将图像转换为Bitmap图像,再转换Mat图像,导入到Yolo模型进行推理,输出实现人体跌倒检测与跟踪的结果。
工业相机图像转换Bitmap图像格式和Mat图像重要核心代码
//将相机内部图像内存数据转为bitmap数据
System.Drawing.Bitmap bitmap  = new System.Drawing.Bitmap((int)mBufferFilled.Width, (int)mBufferFilled.Height,(int)mBufferFilled.Width,System.Drawing.Imaging.PixelFormat.Format8bppIndexed, (IntPtr)((ulong)mBufferFilled.MemPtr + mBufferFilled.ImageOffset));

#region//Mono图像数据转换。彩色图像数据转换于此不同
System.Drawing.Imaging.ColorPalette palette = bitmap.Palette;
int nColors = 256;
for (int ix = 0; ix < nColors; ix++)
{
     uint Alpha = 0xFF;
     uint Intensity = (uint)(ix * 0xFF / (nColors - 1));
     palette.Entries[ix] = System.Drawing.Color.FromArgb((int)Alpha, (int)Intensity,(int)Intensity, (int)Intensity);
}
bitmap.Palette = palette;
#endregion

string strtime = DateTime.Now.ToString("yyyyMMddhhmmssfff");
string saveimagepath = pImgFileDir + "\\" + strtime + ".brw";

//使用Bitmap格式保存
bitmap.Save(saveimagepath, System.Drawing.Imaging.ImageFormat.Bmp);


//用bitmap转换为mat
OpenCvSharp.Mat Matgray1 = OpenCvSharp.Extensions.BitmapConverter.ToMat(bitmap);
本地文件图像转换Bitmap图像格式和Mat图像重要核心代码
C#环境下代码如下所示:
if (imagePaths.Count() == 0)
{
    LoadImagePaths("test_img");
}

string currentImagePath = imagePaths[currentImageIndex];

    // 显示到pictureBoxA
pictureBoxA.Image.Dispose(); // 释放上一张图片资源,避免内存泄漏
pictureBoxA.Image = new Bitmap(currentImagePath);
image_path = currentImagePath;

currentImageIndex = (currentImageIndex + 1) % imagePaths.Count;

OnNotifyShowRecieveMsg("检测中,请稍等……");
//textBox1.Text = "检测中,请稍等……";
//pictureBox2.Image = null;
Application.DoEvents();

image = new Mat(image_path);

float ratio = Math.Min(1.0f * inpHeight / image.Rows, 1.0f * inpWidth / image.Cols);
int neww = (int)(image.Cols * ratio);
int newh = (int)(image.Rows * ratio);

Mat dstimg = new Mat();
Cv2.Resize(image, dstimg, new OpenCvSharp.Size(neww, newh));

Cv2.CopyMakeBorder(dstimg, dstimg, 0, inpHeight - newh, 0, inpWidth - neww, BorderTypes.Constant);
Mat图像导入YoloV8模型重要核心代码
C#环境下代码如下所示:
// 定义 ONNX 模型的路径
string onnxModelPath = "Fall_detection.onnx";
// 定义输入图像的形状
OpenCvSharp.Size inputShape = new OpenCvSharp.Size(640, 640);
// 从 ONNX 模型文件加载网络
if(net==null)
    net = CvDnn.ReadNetFromOnnx(onnxModelPath);


string[] modelClassify = {"drunk","stubbed toe","warking trip"};

if (imagePaths.Count() == 0)
{
    LoadImagePaths("test_img");
}

string currentImagePath = imagePaths[currentImageIndex];

    // 显示到pictureBoxA
pictureBoxA.Image.Dispose(); // 释放上一张图片资源,避免内存泄漏
pictureBoxA.Image = new Bitmap(currentImagePath);
image_path = currentImagePath;

if (pictureBoxA.Image == null)
{
    return;
}
currentImageIndex = (currentImageIndex + 1) % imagePaths.Count;

OnNotifyShowRecieveMsg("检测中,请稍等……");

Application.DoEvents();

image = new Mat(image_path);

dt1 = DateTime.Now;
// 调用识别图像的函数,并传入图像路径、阈值、网络、输入形状和分类类别列表
//result_image = Recognize(image, 0.35, net, inputShape, modelClassify);
result_image = RecognizeMat(image, 0.35, net, inputShape, modelClassify);
// 获取计算结束时间
dt2 = DateTime.Now;
// 显示输出的图像
pictureBoxA.Image = new Bitmap(result_image.ToMemoryStream());

// 显示推理耗时时间
OnNotifyShowRecieveMsg("推理耗时:" + (dt2 - dt1).TotalMilliseconds + "ms");
static Mat RecognizeMat(Mat imgInput, double threshold, Net net, OpenCvSharp.Size inputShape, string[] modelClassify)
{
    using (Mat img = imgInput)
    {

        int inpHeight = inputShape.Height; // 输入图像的高度
        int inpWidth = inputShape.Width; // 输入图像的宽度

        // 对图像进行预处理,调整尺寸
        Mat image = img;
        float ratio = Math.Min(1.0f * inpHeight / image.Rows, 1.0f * inpWidth / image.Cols);
        int neww = (int)(image.Cols * ratio);
        int newh = (int)(image.Rows * ratio);

        //// 将图像调整为模型需要的大小
        //Mat dstimg = new Mat();
        //Cv2.Resize(image, dstimg, new OpenCvSharp.Size(neww, newh));
        //Cv2.CopyMakeBorder(dstimg, dstimg, 0, inpHeight - newh, 0, inpWidth - neww, BorderTypes.Constant);
        //Mat BN_image = CvDnn.BlobFromImage(dstimg); // 将调整后的图像转换为Blob格式

        //// 配置图片输入数据 // 将 blob 设置为网络的输入
        //net.SetInput(BN_image);

        //// 从图像生成用于网络输入的 blob
        //Mat blob = CvDnn.BlobFromImage(img, 1 / 255.0, inputShape, new Scalar(0, 0, 0), false);
        ////Mat blob = CvDnn.BlobFromImage(img, 1.0 / 255.0, inputShape, new Scalar(0, 0, 0), true, false);
        // 将 blob 设置为网络的输入
        //net.SetInput(blob);

        //// 从图像生成用于网络输入的 blob
        Mat img0 = img;


        Mat blob0 = CvDnn.BlobFromImage(img0, 1 / 255.0, new OpenCvSharp.Size(inputShape.Width, inputShape.Height), swapRB: true, crop: false);
        net.SetInput(blob0);


        // 执行前向传播获取输出
        Mat output = net.Forward();
        // 此处可能需要根据 C# 中 OpenCV 的特性来处理转置操作
        output = ReshapeAndTranspose(output);


        // 获取图像的行数(高度)
        int height = img.Height;
        // 获取图像的列数(宽度)
        int width = img.Width;
        // 计算宽度的缩放因子
        double xFactor = (double)width / inputShape.Width;
        // 计算高度的缩放因子
        double yFactor = (double)height / inputShape.Height;

        // 初始化分类类别、得分和检测框的列表
        List<string> classifys = new List<string>();
        List<float> scores = new List<float>();
        List<Rect> boxes = new List<Rect>();

        List<Double> maxVales = new List<Double>();
        List<OpenCvSharp.Point> maxloces = new List<OpenCvSharp.Point>();

        // 遍历输出的行
        for (int i = 0; i < output.Rows; i++)
        {
            // 获取当前行的检测框数据
            using (Mat box = output.Row(i))
            {

                // 在框数据的特定范围中找到最小值、最大值及其位置
                OpenCvSharp.Point minloc, maxloc;
                double minVal, maxVal;
                // Mat classes_scores = box.ColRange(4, 5);//GetArray(i, 5, classes_scores);

                // double curmates0 = box.At<float>(0);
                double curmates1 = box.At<float>(4);
                int collength = box.Cols;
                int rowlength = box.Rows;


                Mat curmates = box.ColRange(4, box.Cols);
                //Cv2.MinMaxLoc(box.ColRange(4, box.Cols), out minVal, out maxVal, out minloc, out maxloc);
                Cv2.MinMaxLoc(box.ColRange(4, box.Cols), out minVal, out maxVal, out minloc, out maxloc);
                int classId = maxloc.Y;

                if (classId == 0)
                {
                    // 获取对应类别的得分
                    float score = (float)maxVal;

                    // 如果得分大于阈值
                    if (score > threshold)
                    {
                        // 将得分添加到得分列表
                        scores.Add(score);
                        // 将类别添加到类别列表
                        classifys.Add(modelClassify[classId]);

                        // 获取框的原始坐标
                        float x = box.At<float>(0, 0);
                        float y = box.At<float>(0, 1);
                        float w = box.At<float>(0, 2);
                        float h = box.At<float>(0, 3);


                        // 计算调整后的坐标
                        int xInt = (int)((x - 0.5 * w) * xFactor);
                        int yInt = (int)((y - 0.5 * h) * yFactor);
                        int wInt = (int)(w * xFactor);
                        int hInt = (int)(h * yFactor);
                        // 将调整后的框坐标添加到框列表
                        boxes.Add(new Rect(xInt, yInt, wInt, hInt));
                    }
                }


            }
        }


        // 执行非极大值抑制操作
        int[] indices;
        CvDnn.NMSBoxes(boxes, scores, 0.25f, 0.45f, out indices);
        // 遍历非极大值抑制操作后的索引
        foreach (int i in indices)
        {
            // 获取对应的类别、得分和框
            string classify = classifys[i];
            float score = scores[i];
            Rect box = boxes[i];

            // 获取框的坐标和尺寸
            // 在图像上绘制矩形框
            Cv2.Rectangle(img, box, new Scalar(0, 255, 0), 3);
            // 生成类别和得分的标签文本
            string label = $"{classify}: {score:F2}";
            // 在图像上添加标签文本
            Cv2.PutText(img, label, new OpenCvSharp.Point(box.X, box.Y - 10), HersheyFonts.HersheySimplex, 0.5, new Scalar(0, 255, 0), 2);
        }
        // 将图像复制输出返回
        Mat result_image0 = img.Clone();
        return result_image0;
        // 将处理后的图像保存为文件
        // Cv2.ImWrite("result.jpg", img);
    }
}
下面是detection.py的python代码:
import os
import cv2
import time
import torch
import argparse
import numpy as np

from Detection.Utils import ResizePadding
from CameraLoader import CamLoader, CamLoader_Q
from DetectorLoader import TinyYOLOv3_onecls

from PoseEstimateLoader import SPPE_FastPose
from fn import draw_single

from Track.Tracker import Detection, Tracker
from ActionsEstLoader import TSSTG

#source = '../Data/test_video/test7.mp4'
#source = '../Data/falldata/Home/Videos/video (2).avi'  # hard detect
source = '../Data/falldata/Home/Videos/video (1).avi'
#source = 2


def preproc(image):
    """preprocess function for CameraLoader.
    """
    image = resize_fn(image)
    image = cv2.cvtColor(image, cv2.COLOR_BGR2RGB)
    return image


def kpt2bbox(kpt, ex=20):
    """Get bbox that hold on all of the keypoints (x,y)
    kpt: array of shape `(N, 2)`,
    ex: (int) expand bounding box,
    """
    return np.array((kpt[:, 0].min() - ex, kpt[:, 1].min() - ex,
                     kpt[:, 0].max() + ex, kpt[:, 1].max() + ex))


if __name__ == '__main__':
    par = argparse.ArgumentParser(description='Human Fall Detection Demo.')
    par.add_argument('-C', '--camera', default=source,  # required=True,  # default=2,
                        help='Source of camera or video file path.')
    par.add_argument('--detection_input_size', type=int, default=384,
                        help='Size of input in detection model in square must be divisible by 32 (int).')
    par.add_argument('--pose_input_size', type=str, default='224x160',
                        help='Size of input in pose model must be divisible by 32 (h, w)')
    par.add_argument('--pose_backbone', type=str, default='resnet50',
                        help='Backbone model for SPPE FastPose model.')
    par.add_argument('--show_detected', default=False, action='store_true',
                        help='Show all bounding box from detection.')
    par.add_argument('--show_skeleton', default=True, action='store_true',
                        help='Show skeleton pose.')
    par.add_argument('--save_out', type=str, default='',
                        help='Save display to video file.')
    par.add_argument('--device', type=str, default='cuda',
                        help='Device to run model on cpu or cuda.')
    args = par.parse_args()

    device = args.device

    # DETECTION MODEL.
    inp_dets = args.detection_input_size
    detect_model = TinyYOLOv3_onecls(inp_dets, device=device)

    # POSE MODEL.
    inp_pose = args.pose_input_size.split('x')
    inp_pose = (int(inp_pose[0]), int(inp_pose[1]))
    pose_model = SPPE_FastPose(args.pose_backbone, inp_pose[0], inp_pose[1], device=device)

    # Tracker.
    max_age = 30
    tracker = Tracker(max_age=max_age, n_init=3)

    # Actions Estimate.
    action_model = TSSTG()

    resize_fn = ResizePadding(inp_dets, inp_dets)

    cam_source = args.camera
    if type(cam_source) is str and os.path.isfile(cam_source):
        # Use loader thread with Q for video file.
        cam = CamLoader_Q(cam_source, queue_size=1000, preprocess=preproc).start()
    else:
        # Use normal thread loader for webcam.
        cam = CamLoader(int(cam_source) if cam_source.isdigit() else cam_source,
                        preprocess=preproc).start()

    #frame_size = cam.frame_size
    #scf = torch.min(inp_size / torch.FloatTensor([frame_size]), 1)[0]

    outvid = False
    if args.save_out != '':
        outvid = True
        codec = cv2.VideoWriter_fourcc(*'MJPG')
        writer = cv2.VideoWriter(args.save_out, codec, 30, (inp_dets * 2, inp_dets * 2))

    fps_time = 0
    f = 0
    while cam.grabbed():
        f += 1
        frame = cam.getitem()
        image = frame.copy()

        # Detect humans bbox in the frame with detector model.
        detected = detect_model.detect(frame, need_resize=False, expand_bb=10)

        # Predict each tracks bbox of current frame from previous frames information with Kalman filter.
        tracker.predict()
        # Merge two source of predicted bbox together.
        for track in tracker.tracks:
            det = torch.tensor([track.to_tlbr().tolist() + [0.5, 1.0, 0.0]], dtype=torch.float32)
            detected = torch.cat([detected, det], dim=0) if detected is not None else det

        detections = []  # List of Detections object for tracking.
        if detected is not None:
            #detected = non_max_suppression(detected[None, :], 0.45, 0.2)[0]
            # Predict skeleton pose of each bboxs.
            poses = pose_model.predict(frame, detected[:, 0:4], detected[:, 4])

            # Create Detections object.
            detections = [Detection(kpt2bbox(ps['keypoints'].numpy()),
                                    np.concatenate((ps['keypoints'].numpy(),
                                                    ps['kp_score'].numpy()), axis=1),
                                    ps['kp_score'].mean().numpy()) for ps in poses]

            # VISUALIZE.
            if args.show_detected:
                for bb in detected[:, 0:5]:
                    frame = cv2.rectangle(frame, (bb[0], bb[1]), (bb[2], bb[3]), (0, 0, 255), 1)

        # Update tracks by matching each track information of current and previous frame or
        # create a new track if no matched.
        tracker.update(detections)

        # Predict Actions of each track.
        for i, track in enumerate(tracker.tracks):
            if not track.is_confirmed():
                continue

            track_id = track.track_id
            bbox = track.to_tlbr().astype(int)
            center = track.get_center().astype(int)

            action = 'pending..'
            clr = (0, 255, 0)
            # Use 30 frames time-steps to prediction.
            if len(track.keypoints_list) == 30:
                pts = np.array(track.keypoints_list, dtype=np.float32)
                out = action_model.predict(pts, frame.shape[:2])
                action_name = action_model.class_names[out[0].argmax()]
                action = '{}: {:.2f}%'.format(action_name, out[0].max() * 100)
                if action_name == 'Fall Down':
                    clr = (255, 0, 0)
                elif action_name == 'Lying Down':
                    clr = (255, 200, 0)

            # VISUALIZE.
            if track.time_since_update == 0:
                if args.show_skeleton:
                    frame = draw_single(frame, track.keypoints_list[-1])
                frame = cv2.rectangle(frame, (bbox[0], bbox[1]), (bbox[2], bbox[3]), (0, 255, 0), 1)
                frame = cv2.putText(frame, str(track_id), (center[0], center[1]), cv2.FONT_HERSHEY_COMPLEX,
                                    0.4, (255, 0, 0), 2)
                frame = cv2.putText(frame, action, (bbox[0] + 5, bbox[1] + 15), cv2.FONT_HERSHEY_COMPLEX,
                                    0.4, clr, 1)

        # Show Frame.
        frame = cv2.resize(frame, (0, 0), fx=2., fy=2.)
        frame = cv2.putText(frame, '%d, FPS: %f' % (f, 1.0 / (time.time() - fps_time)),
                            (10, 20), cv2.FONT_HERSHEY_SIMPLEX, 0.5, (0, 255, 0), 1)
        frame = frame[:, :, ::-1]
        fps_time = time.time()

        if outvid:
            writer.write(frame)

        cv2.imshow('frame', frame)
        if cv2.waitKey(1) & 0xFF == ord('q'):
            break

    # Clear resource.
    cam.stop()
    if outvid:
        writer.release()
    cv2.destroyAllWindows()
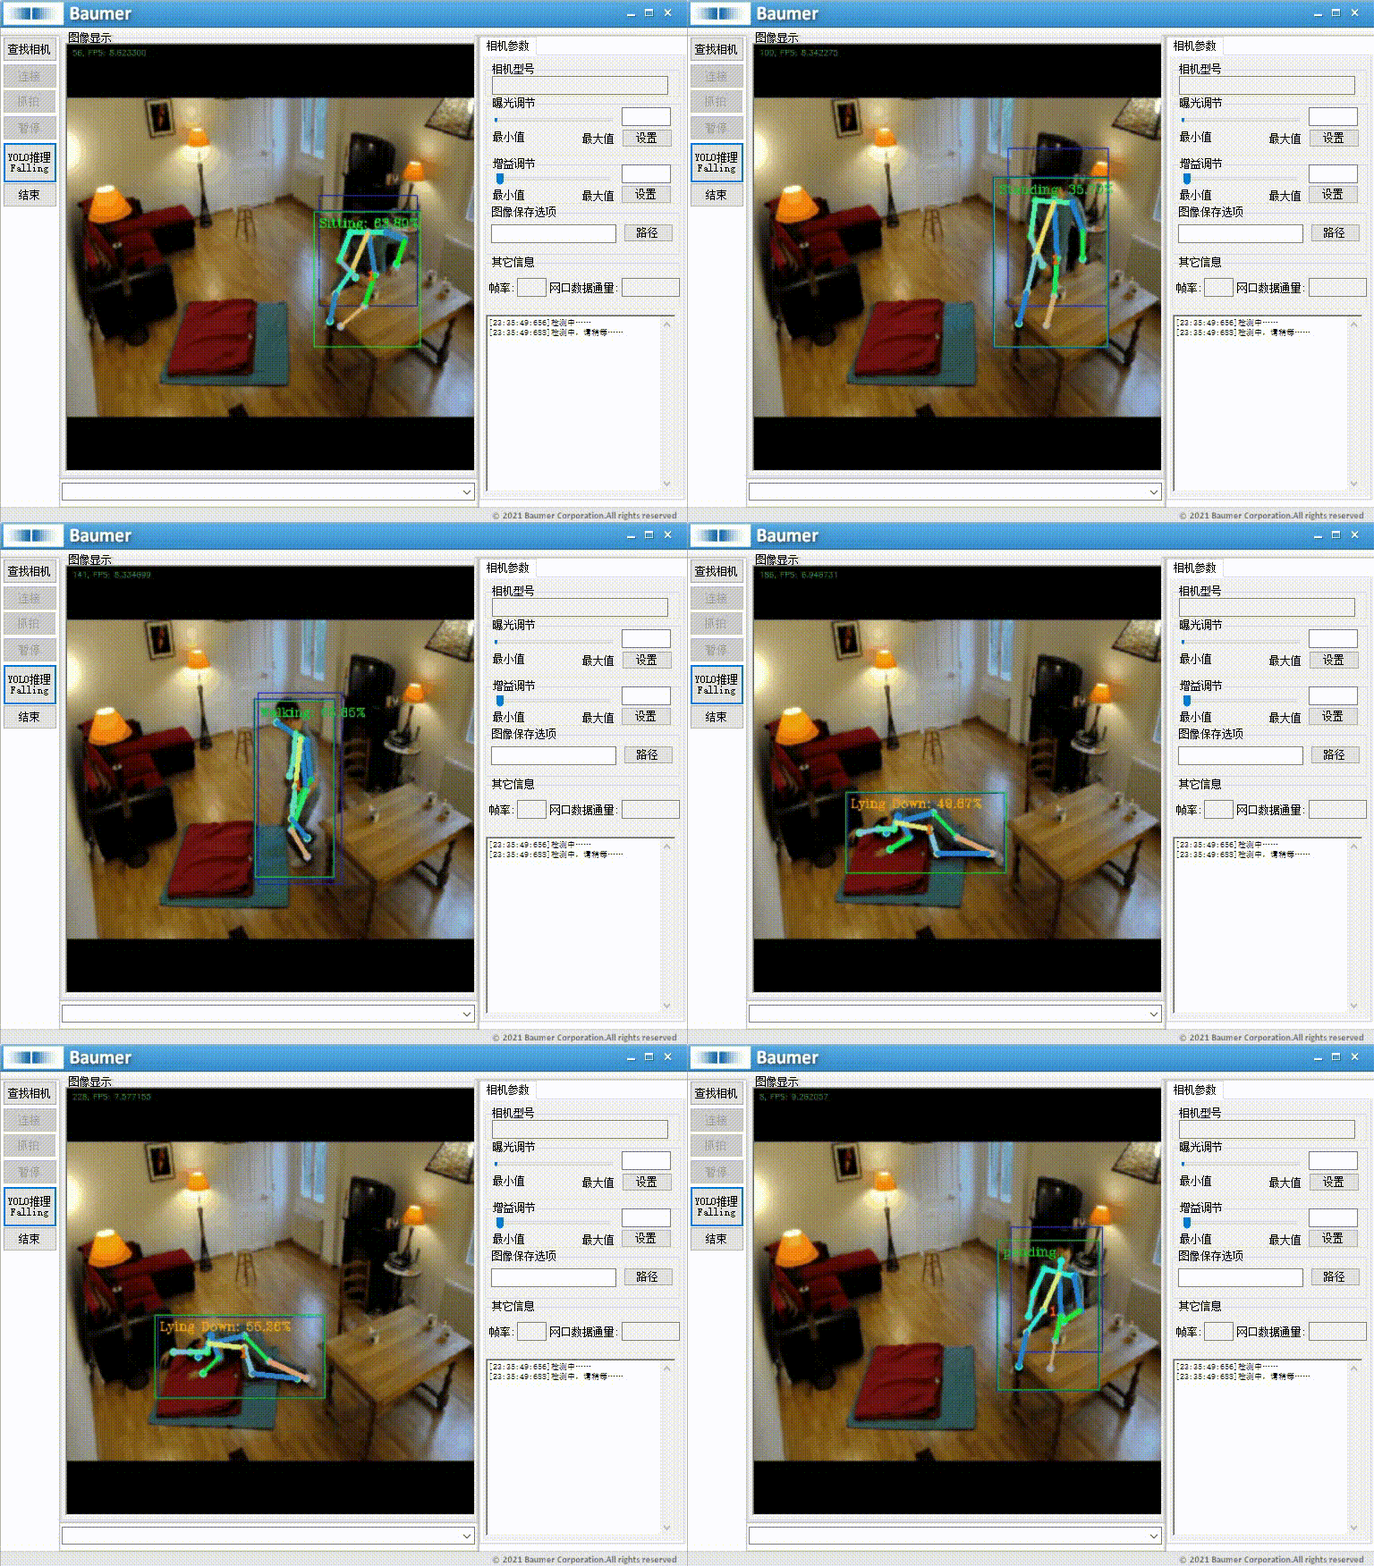
代码实现演示(实现人体跌倒检测与跟踪)
源码下载链接
C# WinForms工业相机+本地图像 通过YoloV8深度学习模型实现人体跌倒检测与跟踪 源码
工业相机通过YoloV8模型实现人体跌倒检测与跟踪的行业应用
工业相机 + YOLOv8 实现「实现人体跌倒检测与跟踪」行业应用速览
(2024-2025 年已落地,含源码、数据集、专利)
| 场景 | 业务痛点 | 工业相机/硬件形态 | YOLOv8 技术方案 & 现场效果 | 一键资源 |
|---|---|---|---|---|
| ① 养老院/医院病房 | 夜间跌倒无人发现 | 4 K 全局快门 30 fps + 红外补光 | YOLOv8-EdgeFall 轻量化模型 3.2 MB,Jetson Orin Nano 25 ms/帧,识别准确率 97 %,误报 < 1 % | CSDN 源码+PyQt5 |
| ② 智能家居/客厅 | 老人独居风险高 | 2 MP 家用网络摄像头 | YOLOv8 + DeepSort 轨迹分析,跌倒 3 秒触发手机推送 | 知乎专栏 |
| ③ 机场/车站大厅 | 人流密集、突发跌倒 | 8 K 云台相机 60 fps | 改进 YOLOv8(RFAConv+Diou-Inner-Focaler)mAP 83 %,定位误差 < 5 cm | 汉斯出版社论文 |
| ④ 工业车间/仓库 | 工人高处作业跌倒 | 防爆 2 MP 工业相机 | YOLOv8-seg 实例分割 + 声光报警,实时弹窗+短信通知 | 阿里云案例 |
| ⑤ 校园/操场 | 学生运动意外 | 车载 5 MP 相机 + Jetson Nano | 轻量 YOLOv8-Ghost,功耗 6 W,30 fps 实时预警 | 博客园源码 |
| ⑥ 网页端实时监测 | 零安装、浏览器即用 | USB3.0 120 fps 工业相机 | Streamlit + YOLOv8,CPU ONNX 80 ms,支持图片/视频/摄像头 | 博客园网页方案 |
关键技术细节
数据集:公开「Fall-2024」含 4.8 万张跌倒/正常图像,已标注 YOLO 格式
模型:YOLOv8n/s/x + 注意力/轻量化 + 姿态关键点,INT8 量化 3-5 MB
部署:Jetson Orin Nano 15-25 ms/帧;x86 IPC + RTX 3060 8 路并发 <30 W
合规:原始视频 72 h 自动覆盖,仅留事件 JSON,符合《个人信息保护法》

Agent 垂直技术社区,欢迎活跃、内容共建。
更多推荐
 20
20 0
0- 0


 已为社区贡献4条内容

所有评论(0)