SpringBoot(1)
Spring Boot 是一个开源的 Java 框架,用于简化 Spring 应用程序的开发过程。它基于 Spring 框架,旨在通过自动配置、简化的项目结构以及内嵌的服务器支持,帮助开发者快速构建和部署应用程序。
特性
-
自动配置:根据项目的依赖关系自动配置 Spring 框架
-
内嵌服务器:内嵌Tomcat或Jetty、 Undertow 等Servlet容器;
-
开箱即用:SpringBoot提供了许多默认的配置和模版,使开发者可以快速上手
-
提供可选的starter,简化应用整合: 场景启动器(starter):web、json、邮件、oss(对象存储)、异步、定时任务、缓存...
-
开发工具支持:支持自动重启、热部署
与传统 Spring 对比:
| 特性 | SpringBoot | 传统Spring |
|---|---|---|
| 配置方式 | 自动配置+注解 | XML/Java显式配置 |
| 服务器部署 | 内嵌容器,JAR直接运行 | 需外部服务器部署WAR |
| 依赖管理 | starter依赖自动关联 | 需手动管理依赖版本 |
| 启动速度 | 秒级启动 | 较慢(依赖外部容器初始化) |
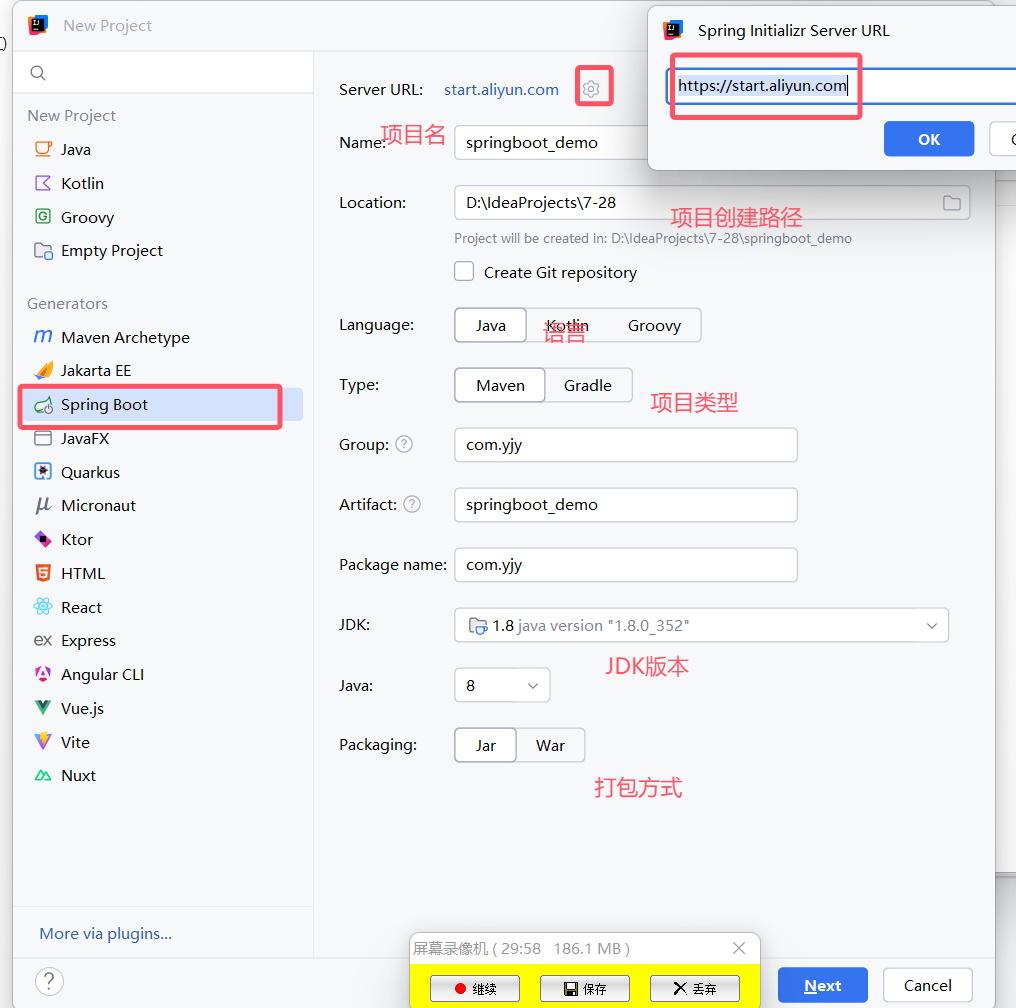
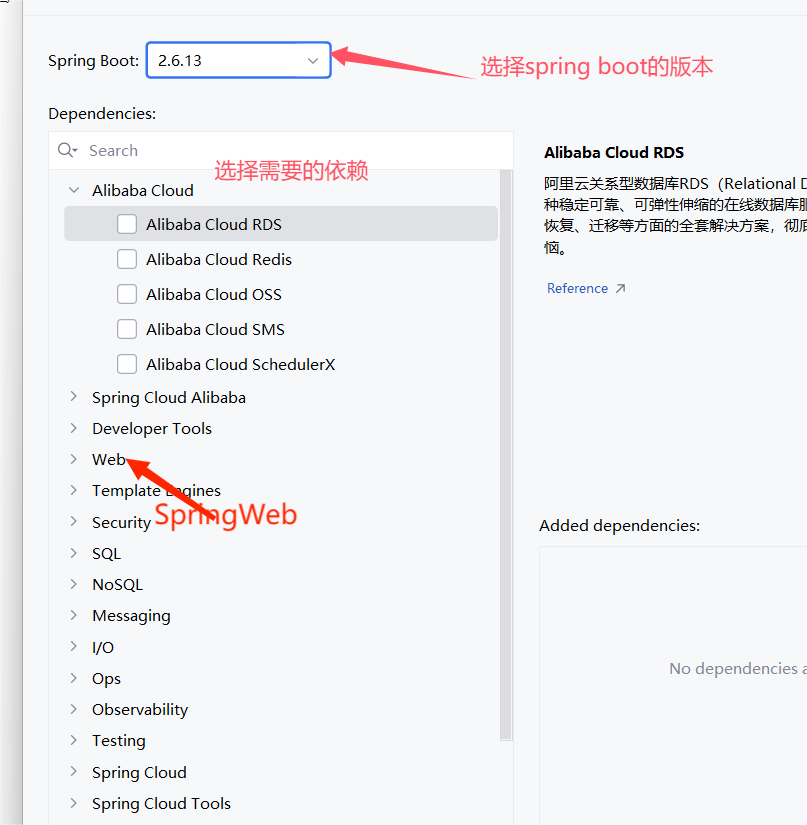
<!--指定了一个父工程,父工程中的东西在该工程中可以继承过来使用-->
<parent>
  <groupId>org.springframework.boot</groupId>
  <artifactId>spring-boot-starter-parent</artifactId>
  <version>2.5.0</version>
</parent>

<!--该依赖就是我们在创建 SpringBoot 工程勾选的那个 Spring Web 产生的-->
<dependency>
  <groupId>org.springframework.boot</groupId>
  <artifactId>spring-boot-starter-web</artifactId>
</dependency>
<!--这个是单元测试的依赖,我们现在没有进行单元测试,所以这个依赖现在可以没有-->
<dependency>
  <groupId>org.springframework.boot</groupId>
  <artifactId>spring-boot-starter-test</artifactId>
  <scope>test</scope>
</dependency>

<!--热部署配置-->
<dependency>
  <groupId>org.springframework.boot</groupId>
  <artifactId>spring-boot-devtools</artifactId>
</dependency>

<!-- 导入配置文件处理器,配置文件进行绑定就会有提示,需要重启 -->
  <dependency>
      <groupId>org.springframework.boot</groupId>
      <artifactId>spring-boot-configuration-processor</artifactId>
      <optional>true</optional>
  </dependency>
<build>
  <plugins>
    <!--这个插件是在打包时需要的,而这里暂时还没有用到-->
    <plugin>
      <groupId>org.springframework.boot</groupId>
      <artifactId>spring-boot-maven-plugin</artifactId>
    </plugin>
  </plugins>
</build>
自动装配是什么及作用
springboot的自动装配实际上就是为了从spring.factories文件中获取到对应的需要进行自动装配
的类,并生成相应的Bean对象,然后将它们交给spring容器来帮我们进行管理
2、spring自动装配的原理
2.1、启动类上注解的作用
@SpringBootApplication
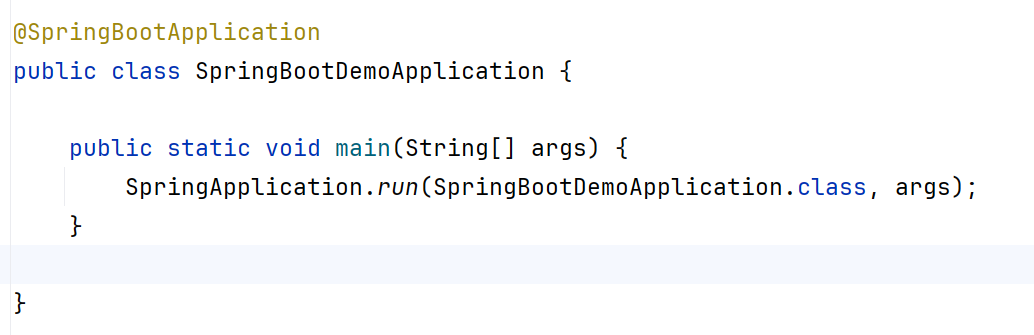
这个注解是springboot启动类上的一个注解,是一个组合注解,也就是由其他注解组合起来,它的
主要作用就是标记说明这个类是springboot的主配置类,springboot应该运行这个类里面的main()方法来启动程序
这个注解主要由三个子注解组成:
-
@SpringBootConfiguration
-
@EnableAutoConfiguration
-
@ComponentScan
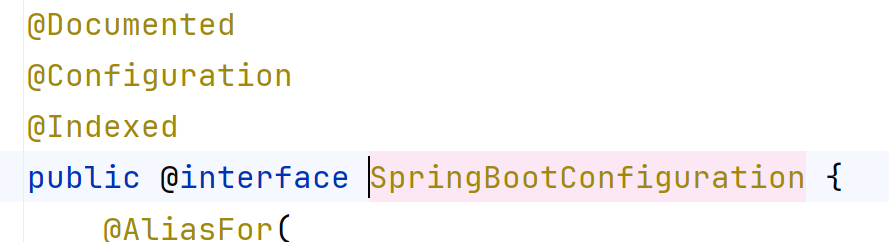
@SpringBootConfiguration
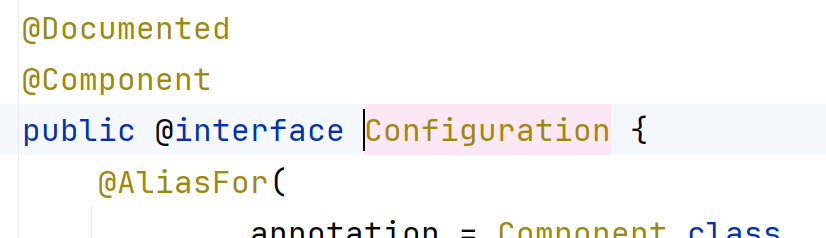
这个注解包含了@Configuration,@Configuration里面又包含了一个@Component注解,也就是说,这个注解标注在哪个类上,就表示当前这个类是一个配置类,而配置类也是spring容器中的组件
@EnableAutoConfiguration
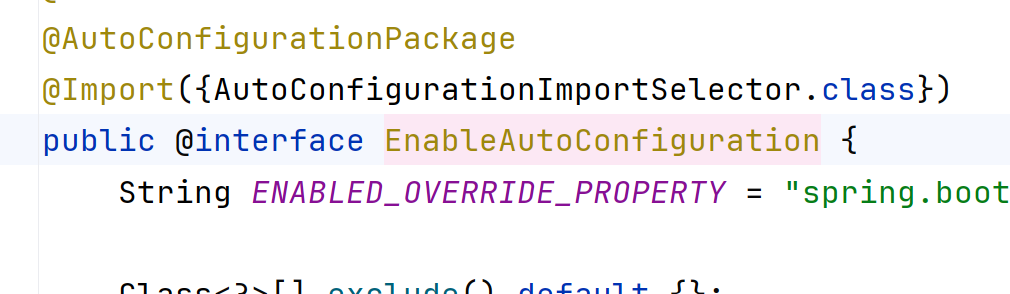
这个注解是开启自动配置的功能,里面包含了两个注解
-
@AutoConfigurationPackage
-
@Import(AutoConfigurationImportSelector.class)
-
-
@AutoConfigurationPackage
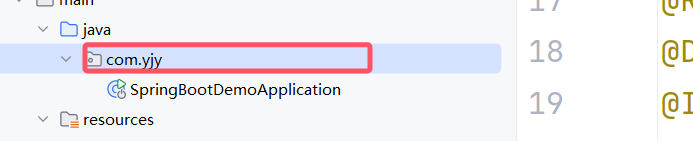
这个注解的作用说白了就是将主配置类(@SpringBootApplication标注的类)所在包以及子包里面的所有组件扫描并加载到spring的容器中,这也就是为什么我们在利用springboot进行开发的时候,无论是Controller还是Service的路径都是与主配置类同级或者次级的原因
@Import(AutoConfigurationImportSelector.class)
上一个注解我们把所有组件都加载到了容器里面,这个注解就是将需要自动装配的类以全类名的方式返回,那是怎么找到哪些是需要自动装配的类呢?
1、AutoConfigurationImportSelector这个类里面有一个方法selectImports(),如下
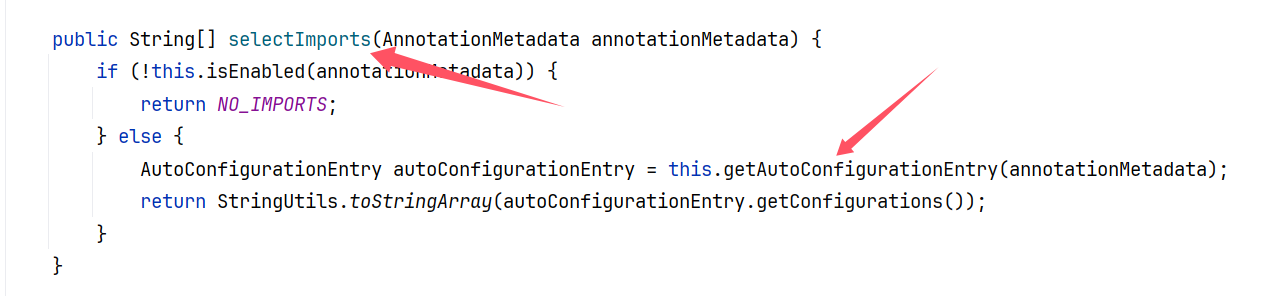
2、在selectImport()方法里调用了一个getAutoConfigurationEntry()方法,这个方法里面又调用了一个getConfigurations()方法
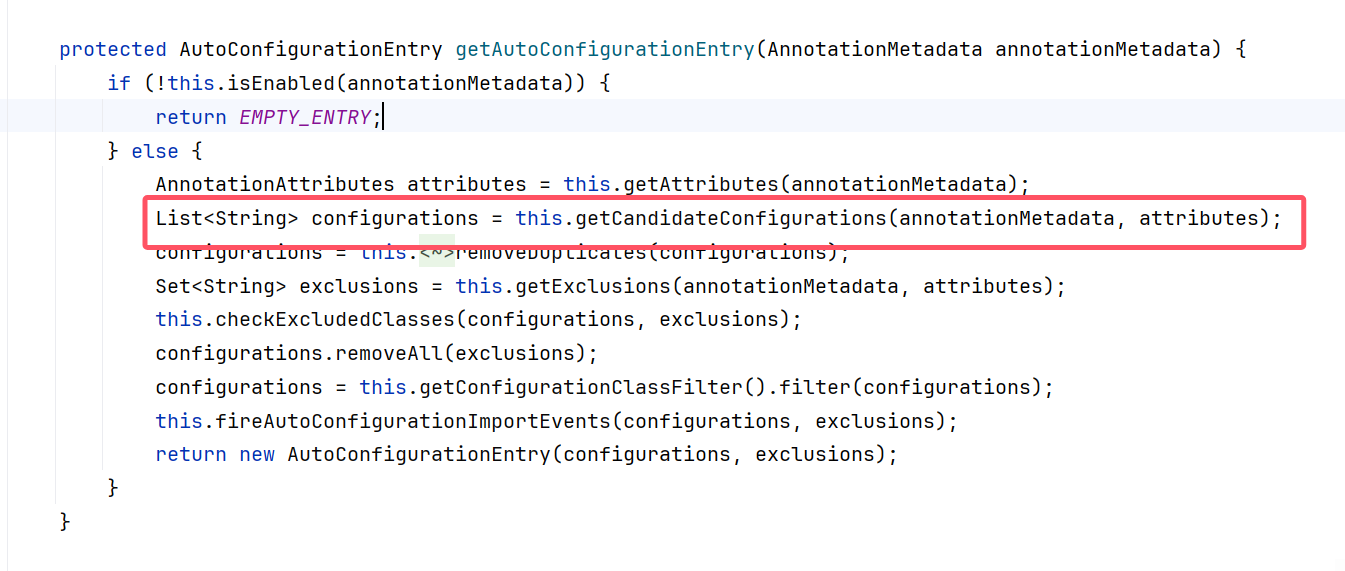
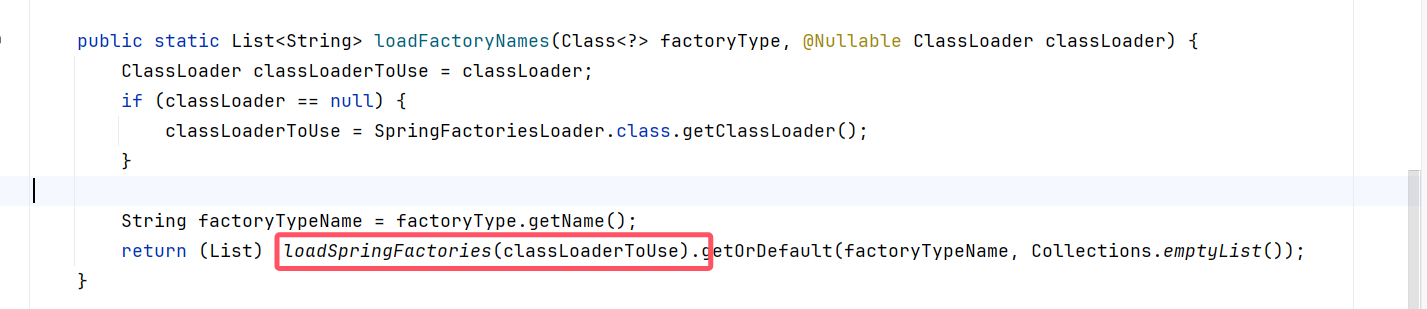
3、在getCandidateConfigurations()方法里面调用了loadFactoryNames()方法

4、loadFactoryNames()方法里面又调用了一个loadSpringFactories()方法
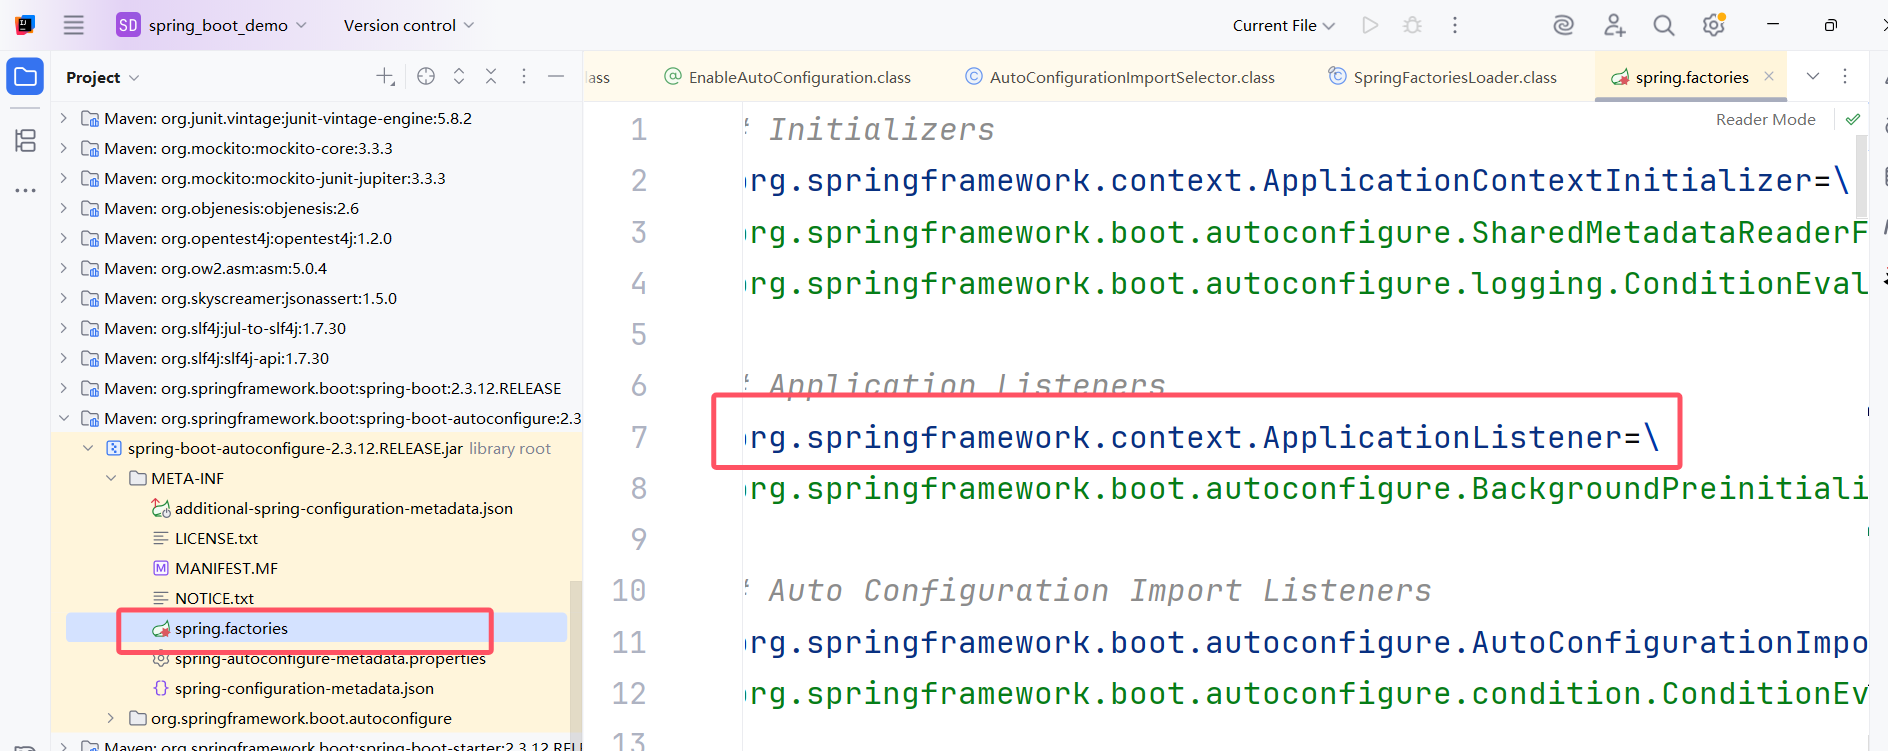
5、关键就在这个loadSpringFactories()方法里面,在这个方法里,它会查找所有在META-INF路径下的spring.factories文件
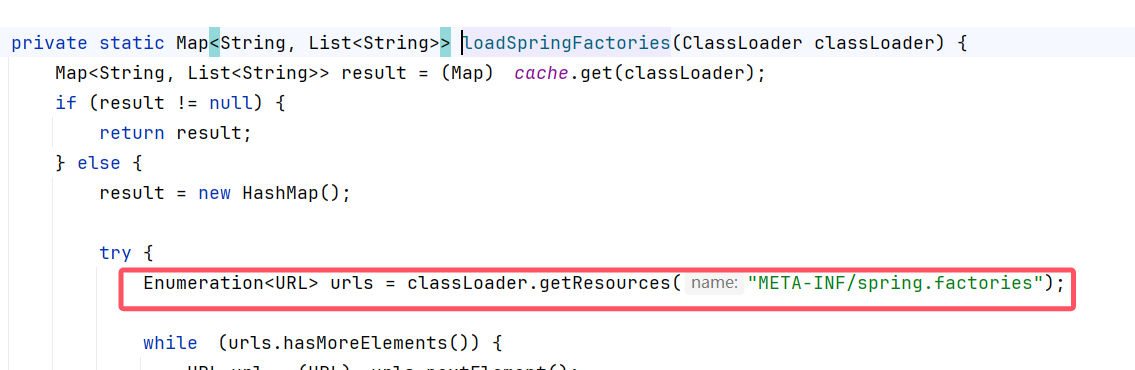
6、在META-INF/spring.factories这个文件里面的数据是以键=值的方式存储,然后解析这些文件,找出以EnableAutoConfiguration为键的所有值,以列表的方式返回
@ComponentScan
这个注解的作用就是扫描当前包及子包的注解
application.yml中的配置
server:
  port: 8080
  servlet:
    context-path: /demo
person:
  name: zhansan
  age: 23
  happy: false
  birth: 2009/01/10
  maps: { k1:v1,k2:v2 }
  lists:
    - code
    - dog
  dog:
    name: xiaomao
    age: 2
package com.yjy.entity;
import lombok.Data;
import lombok.ToString;
import org.springframework.beans.factory.annotation.Value;
import org.springframework.context.annotation.PropertySource;
import org.springframework.stereotype.Component;
@Data
@ToString
@Component //注册为bean
//设置 加载指定配置文件的位置
@PropertySource(value = "classpath:application.yml")
public class Dog {
// @Value("${person.dog.name}")
@Value("阿黄")
private String name;
// #{SPEL} Spring表达式
// @Value("#{9*2}")
// @Value("18")
@Value("${person.dog.age}")
private Integer age;
}测试
@RestController
@RequestMapping("/hello")
public class HelloController {

    @Autowired
    private Dog dog;

    @GetMapping("/index")
    public String sayHello() {
        return "Hello World!" + dog;
    }
}
person:
name: zhansan
age: 23
happy: false
birth: 2009/01/10
maps: { k1:v1,k2:v2 }
lists:
- code
- dog
dog:
name: xiaomao
age: 2
注意 属性 需要与 配置的key保持一致
@Data
@ToString
@Component
@ConfigurationProperties(value = "person")
public class Person {
private String name;
private Integer age;
private boolean happy;
private Date birth;
private Map<String, Object> maps;
private List<Object> lists;
private Dog dog;
}
Spring Boot整合Junit
@RunWith(SpringJUnit4ClassRunner.class)
@ContextConfiguration(classes = SpringbootDemoApplication.class)
@RunWith 指定运行器
@ContextConfiguration 注解来指定配置类 或者 配置文件
整合 MyBatis Plus
MyBatis-Plus 是基于 MyBatis 框架的一个增强工具,主要目的是简化 MyBatis 的开发过程,提供更加简洁、方便的 CRUD 操作。它是在保留 MyBatis 强大功能的基础上,通过封装和优化一些常见操作来提高开发效率。
MyBatis-Plus 提供了许多开箱即用的功能,包括自动 CRUD 代码生成、分页查询、性能优化、以及支持多种数据库。与 MyBatis 相比,MyBatis-Plus 的 部分 核心特性包括:
-
无侵入设计:不会改变 MyBatis 原有的 API 和使用方式,你可以自由选择 MyBatis 和 MyBatis-Plus 的功能。
-
自动 CRUD:通过
BaseMapper和ServiceImpl接口,MyBatis-Plus 提供了一系列 CRUD 操作的方法,如insert、delete、update和select,减少了重复的 SQL 编写工作。 -
条件构造器:MyBatis-Plus 提供了条件构造器(如
QueryWrapper),可以通过链式编程方式轻松构建复杂的查询条件。
准备工作
添加依赖
<dependency>
    <groupId>com.baomidou</groupId>
    <artifactId>mybatis-plus-boot-starter</artifactId>
    <version>3.5.7</version>
</dependency>
<dependency>
<groupId>mysql</groupId>
<artifactId>mysql-connector-java</artifactId>
</dependency>
修改application.yml
spring:
  datasource:
    driver-class-name: com.mysql.cj.jdbc.Driver
    username: root
    password: root
    url: jdbc:mysql://localhost:3306/school?serverTimezone=Asia/Shanghai&useUnicode=true&characterEncoding=utf-8

mybatis-plus:
  type-aliases-package: com.yjy.entity #指定别名
  mapper-locations:
    - classpath*:/mapper/**/*.xml #指定 mapper.xml映射文件的位置
  #  config-location: classpath:mybatis.xml #配置mybatis 配置文件的路径
  configuration:
    #是否开启自动驼峰命名规则映射:从数据库列名到JAVA实体类属性名(驼峰命名)
    map-underscore-to-camel-case: true
    #如果查询的记过中包含空值的列, 则Mybatis在映射的时候 ,就不会再映射这个字段了
    call-setters-on-nulls: true
    #配置将SQL语句打印出来
    log-impl: org.apache.ibatis.logging.stdout.StdOutImpl
创建实体类
package com.yjy.entity;

import com.baomidou.mybatisplus.annotation.IdType;
import com.baomidou.mybatisplus.annotation.TableField;
import com.baomidou.mybatisplus.annotation.TableId;
import com.baomidou.mybatisplus.annotation.TableName;
import lombok.Data;
import lombok.ToString;

import java.util.Date;

@Data
@ToString
//表名
@TableName("student")
public class Student {
    /**
     * 主键:
     *
     * @TableId 可以通过type属性 决定当前
     * 主键的类型。
     * AUTO:数据的ID自增
     * INPUT: 用户输入的ID
     * ID_WORKER :全局唯一ID,Long类型的主键
     * ID_WORKER_STR :字符串全局唯一ID
     * UUID 全局唯一的ID,UUID类型的主键
     * NONE 设置该类型没有设置主键类型
     */
    @TableId(type = IdType.AUTO, value = "studentNo") //标识主键
    private Integer stuNo;
    //配置数据库中表的字段名
    @TableField(value = "loginPwd")
    private String loginPwd;
    @TableField(value = "studentName")
    private String studentName;
    private String sex;
    @TableField(value = "gradeId")
    private Integer gradeId;
    private String phone;
    private String address;
    @TableField(value = "bornDate")
    private Date bornDate;
    private String email;
    @TableField(value = "identityCard")
    private String identityCard;

}
创建接口
import com.baomidou.mybatisplus.core.mapper.BaseMapper;
@Mapper
public interface StudentMapper extends BaseMapper<Student> {
    // 你可以在这里添加自定义方法
}
通过继承 BaseMapper<Student>,StudentMapper 立即拥有了所有的 CRUD 操作方法。你可以在你的服务层(Service Layer)中直接使用这些方法,无需再编写任何 SQL 语句。
测试
@Autowired
private StudentMapper studentMapper;

@GetMapping("/getStuList")
public Student getStudentList() {
    Student student = studentMapper.selectById(10001);
    System.out.println(student);
    return student;
}
核心功能
通过继承BaseMapper,可以让Mapper接口自动拥有通用的CRUD能力。
public void addStudentTest() {
    Student student = new Student();
    student.setLoginpwd("123456");
    student.setStudentname("张三测试");
    student.setSex("男");
    student.setGradeid(1);
    //调用新增方法  插入学生对象 到数据库中
    int row = studentMapper.insert(student);
    System.out.println(row);
}
条件构造器
-
QueryWrapper:专门用于构造查询条件,支持基本的等于、不等于、大于、小于等各种常见操作。它允许你以链式调用的方式添加多个查询条件,并且可以组合使用
and和or逻辑。 -
UpdateWrapper:用于构造更新条件,可以在更新数据时指定条件。与 QueryWrapper 类似,它也支持链式调用和逻辑组合。使用 UpdateWrapper 可以在不创建实体对象的情况下,直接设置更新字段和条件。
-
LambdaQueryWrapper:这是一个基于 Lambda 表达式的查询条件构造器,它通过 Lambda 表达式来引用实体类的属性,从而避免了硬编码字段名。这种方式提高了代码的可读性和可维护性,尤其是在字段名可能发生变化的情况下。
-
LambdaUpdateWrapper:类似于 LambdaQueryWrapper,LambdaUpdateWrapper 是基于 Lambda 表达式的更新条件构造器。它允许你使用 Lambda 表达式来指定更新字段和条件,同样避免了硬编码字段名的问题。
分页查询
<!-- https://mvnrepository.com/artifact/com.baomidou/mybatis-plus-boot-starter -->
<dependency>
    <groupId>com.baomidou</groupId>
    <artifactId>mybatis-plus-boot-starter</artifactId>
    <version>3.5.3.1</version>
</dependency>
<dependency>
    <groupId>com.baomidou</groupId>
    <artifactId>mybatis-plus-extension</artifactId>
    <version>3.5.3.1</version>
</dependency>
@Configuration
public class MyBatisPlusConfig {
@Bean
public MybatisPlusInterceptor mybatisPlusInterceptor() {
MybatisPlusInterceptor interceptor = new MybatisPlusInterceptor();
// 添加分页插件
interceptor.addInnerInterceptor(new PaginationInnerInterceptor(DbType.MYSQL));
return interceptor;
}
}@Test
public void testPage() {
//创建分页对象 参数:当前页,每页显示条数
Page<Student> page = new Page<>(1, 5);
//分页查询 返回 分页对象
Page<Student> stuPage = studentMapper.selectPage(page, null);
System.out.println("总记录数:" + stuPage.getTotal());
System.out.println("总页数:" + stuPage.getPages());
System.out.println("当前页:" + stuPage.getCurrent());
System.out.println("每页显示条数:" + stuPage.getSize());
System.out.println("是否有上一页:" + stuPage.hasPrevious());
System.out.println("是否有下一页:" + stuPage.hasNext());
//获取分页数据
List<Student> studentList = stuPage.getRecords();
studentList.forEach(student -> System.out.println(student));
}ActiveReCord 模式
让实体类具有数据库操作的能力
@Data
@ToString
@AllArgsConstructor
@NoArgsConstructor
@EqualsAndHashCode(callSuper = false)
public class Student extends Model<Student> implements Serializable {

    private static final long serialVersionUID = 1L;

    /**
     * 学号
     */
    @TableId(value = "studentNo", type = IdType.AUTO)
    private Integer studentno;

    /**
     * 密码
     */
    @TableField("loginPwd")
    private String loginpwd;

    /**
     * 学生姓名
     */
    @TableField("studentName")
    private String studentname;

    /**
     * 性别
     */
    private String sex;

    /**
     * 年级编号
     */
    @TableField("gradeId")
    private Integer gradeid;

    /**
     * 联系电话
     */
    private String phone;

    /**
     * 地址
     */
    private String address;

    /**
     * 出生时间
     */
    @TableField("bornDate")
    private Date borndate;

    /**
     * 邮件账号
     */
    private String email;

    /**
     * 身份证号码
     */
    @TableField("identityCard")
    private String identitycard;


}
@Test
public void testActiveReCord() {
    Student newStudent = new Student();
    newStudent.setStudentname("ActiveReCord");
    newStudent.setLoginpwd("123456");
    newStudent.setSex("男");
    newStudent.setGradeid(1);
    //添加
    boolean success = newStudent.insert();
    System.out.println("添加成功:" + success);


    //通过selectById 查询 新添加的对象
    Student found = new Student().selectById(newStudent.getStudentno());
    System.out.println("查询结果:" + found);

    //更新数据
    found.setLoginpwd("789465");
    //通过主键 更新 密码
    success = found.updateById();
    System.out.println("更新结果:" + success);

    //通过主键 删除记录
    success = found.deleteById();
    System.out.println("删除结果:" + success);


    //查询所有学生
    List<Student> studentList = new Student().selectAll();

    studentList.forEach(student -> System.out.println(student));


}
逻辑删除
逻辑删除是将数据标记为已删除,而不是物理删除。
application.yml
mybatis-plus
	global-config:
  		db-config:
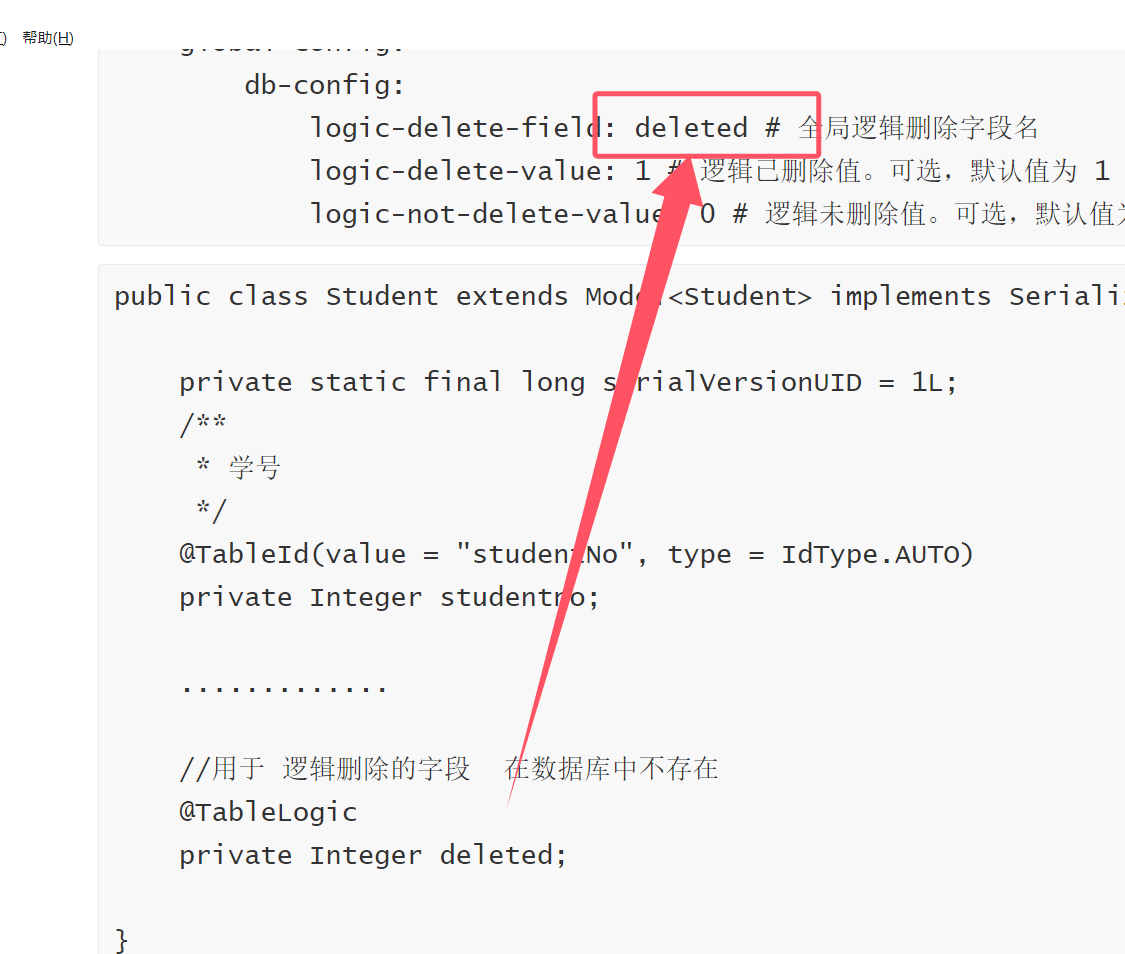
            logic-delete-field: deleted # 全局逻辑删除字段名
            logic-delete-value: 1 # 逻辑已删除值。可选,默认值为 1
            logic-not-delete-value: 0 # 逻辑未删除值。可选,默认值为 0
public class Student extends Model<Student> implements Serializable {
private static final long serialVersionUID = 1L;
/**
* 学号
*/
@TableId(value = "studentNo", type = IdType.AUTO)
private Integer studentno;
.............
//用于 逻辑删除的字段 在数据库中不存在 需要自己添加字段
@TableLogic
private Integer deleted;
}
使用逻辑删除
配置完成后,所有的删除操作都会编程逻辑删除,所有的查询都会自动过滤 逻辑删除的数据
@Test
    public void deleteStudentZl() {
        // 配置了逻辑删除
//      studentNo =  30026
        studentMapper.deleteById(30026);

        List<Student> studentList = studentMapper.selectList(null);
        studentList.forEach(student -> System.out.println(student));

    }
Agent 垂直技术社区,欢迎活跃、内容共建。
更多推荐


 19
19 0
0- 0


 已为社区贡献1条内容

所有评论(0)