Vue router-view和router-link分开写在不同的组件中实现导航栏切换界面
·
背景:
编写一个后台界面,要求左边有导航栏,后边根据左边的导航栏选择显示不同的组件。
结构:
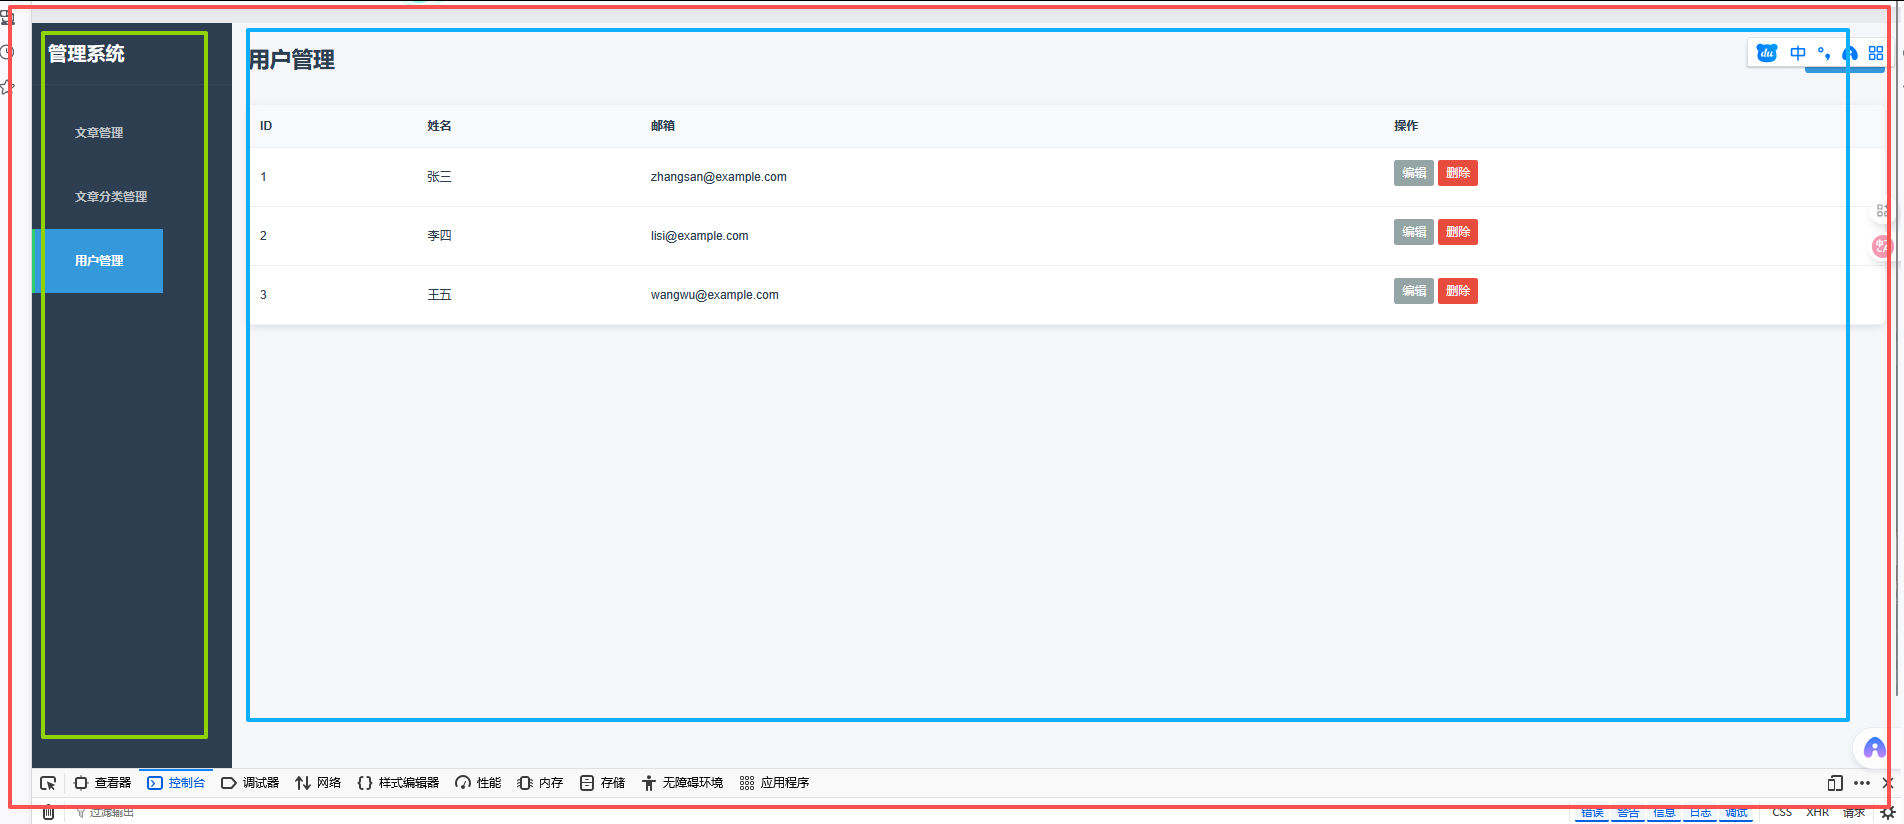
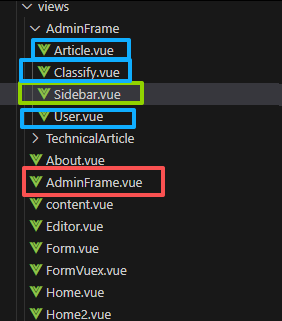
红色区域为主体组件,黄绿色为导航组件,蓝色为导航条目对应的组件。
实现思路:
在AdminFrame.vue中放置Sidebar.vue组件,和<router-view />标签。
在Sidebar.vue中放置<router-link/>标签实现路由切换,然后引起AdminFrame.vue中的router-view渲染出不同的组件。
代码:
1. 路由配置
{
  path: "/AdminFrame",
  name: "AdminFrame",
  component: AdminFrame,      // 父组件 - 包含布局
  children: [                 // 子路由 - 在父组件的 router-view 中显示
    {
      path: "User",           // → /AdminFrame/User
      name: "User",
      component: User
    },
    {
      path: "Classify",       // → /AdminFrame/Classify
      name: "Classify",
      component: Classify
    },
    {
      path: "Article",        // → /AdminFrame/Article
      name: "Article",
      component: Article
    }
  ]
}
2. Sidebar.vue - 只包含导航菜单
<template>
  <div class="sidebar">
    <div class="sidebar-header">
      <h2>管理后台</h2>
    </div>

    <nav class="nav-menu">
      <!-- 使用 router-link 导航到子路由 -->
      <router-link
        to="/AdminFrame/User"
        class="nav-item"
        active-class="active"
      >
        <i class="fas fa-users"></i>
        <span>用户管理</span>
      </router-link>

      <router-link
        to="/AdminFrame/Classify"
        class="nav-item"
        active-class="active"
      >
        <i class="fas fa-folder"></i>
        <span>分类管理</span>
      </router-link>

      <router-link
        to="/AdminFrame/Article"
        class="nav-item"
        active-class="active"
      >
        <i class="fas fa-file-alt"></i>
        <span>文章管理</span>
      </router-link>
    </nav>
  </div>
</template>

<script>
export default {
  name: 'Sidebar'
}
</script>

<style scoped>
.sidebar {
  width: 250px;
  background: #2c3e50;
  color: white;
  min-height: 100vh;
}

.sidebar-header {
  padding: 20px;
  border-bottom: 1px solid #34495e;
  text-align: center;
}

.sidebar-header h2 {
  margin: 0;
  color: white;
}

.nav-menu {
  padding: 20px 0;
}

.nav-item {
  display: flex;
  align-items: center;
  padding: 15px 20px;
  color: #bdc3c7;
  text-decoration: none;
  transition: all 0.3s;
  border-left: 4px solid transparent;
}

.nav-item:hover {
  background: #34495e;
  color: white;
}

.nav-item.active {
  background: #3498db;
  color: white;
  border-left-color: #2ecc71;
}

.nav-item i {
  width: 20px;
  margin-right: 10px;
}
</style>
3. AdminFrame.vue - 包含布局和 router-view
<template>
  <div class="admin-frame">
    <!-- 引入侧边栏组件 -->
    <Sidebar />

    <!-- 主内容区域 - 子路由在这里显示 -->
    <main class="main-content">
      <router-view />
    </main>
  </div>
</template>

<script>
import Sidebar from './Sidebar.vue'

export default {
  name: 'AdminFrame',
  components: {
    Sidebar
  }
}
</script>

<style scoped>
.admin-frame {
  display: flex;
  min-height: 100vh;
}

.main-content {
  flex: 1;
  padding: 20px;
  background-color: #f5f7fa;
}
</style>
4. 子组件示例(User.vue)
<template>
  <div class="user-management">
    <h1>用户管理</h1>
    <div class="content">
      <p>用户管理页面内容...</p>
      <!-- 用户列表、表格等 -->
    </div>
  </div>
</template>

<script>
export default {
  name: 'User'
}
</script>

<style scoped>
.user-management {
  background: white;
  padding: 30px;
  border-radius: 8px;
  box-shadow: 0 2px 10px rgba(0,0,0,0.1);
}
</style>

Agent 垂直技术社区,欢迎活跃、内容共建。
更多推荐


 1
1 0
0- 0


 已为社区贡献11条内容

所有评论(0)