自定义一个可视化编辑页面!(Vue+Echarts实现)
目录
前言
可视化编辑页面开发不完整教程,它来了!
前端开发的都知道,用代码一点点给组件调位置太墨迹啦,如果能像墨刀那样拖动组件构成原型图那样开发前端页面就好了(小声哔哔:其实已经有这类的开源项目了,本教程重在学习——也不一定算是合格的教程就是了?......),于是乎,主包在做完大屏显示后自己做了个可视化的编辑图表的页面,虽然设想的功能(预览和图片导出)还没完善,但感觉还是可以来 水 分享一下经验了。
功能目标
构建一个可视化编辑器,支持:
- 拖拽式组件添加
- 实时组件编辑
- 背景图片管理
- 数据持久化
- 代码导出
技术栈
- 前端框架: Vue 2.x
- UI组件库: Element UI
- 图表库: ECharts
- 样式: SCSS
- 数据存储: localStorage
1. 项目介绍
1.1 组件结构设计
<template>
  <div class="visual-editor">
    <!-- 左侧工具栏 -->
    <div class="toolbar">
      <!-- 组件库 -->
      <!-- 画布设置 -->
      <!-- 属性面板 -->
    </div>

    <!-- 主内容区 -->
    <div class="main-content">
      <!-- 操作按钮 -->
      <!-- 画布区域 -->
    </div>

    <!-- 预览模态框 -->
    <el-dialog>...</el-dialog>
  </div>
</template>
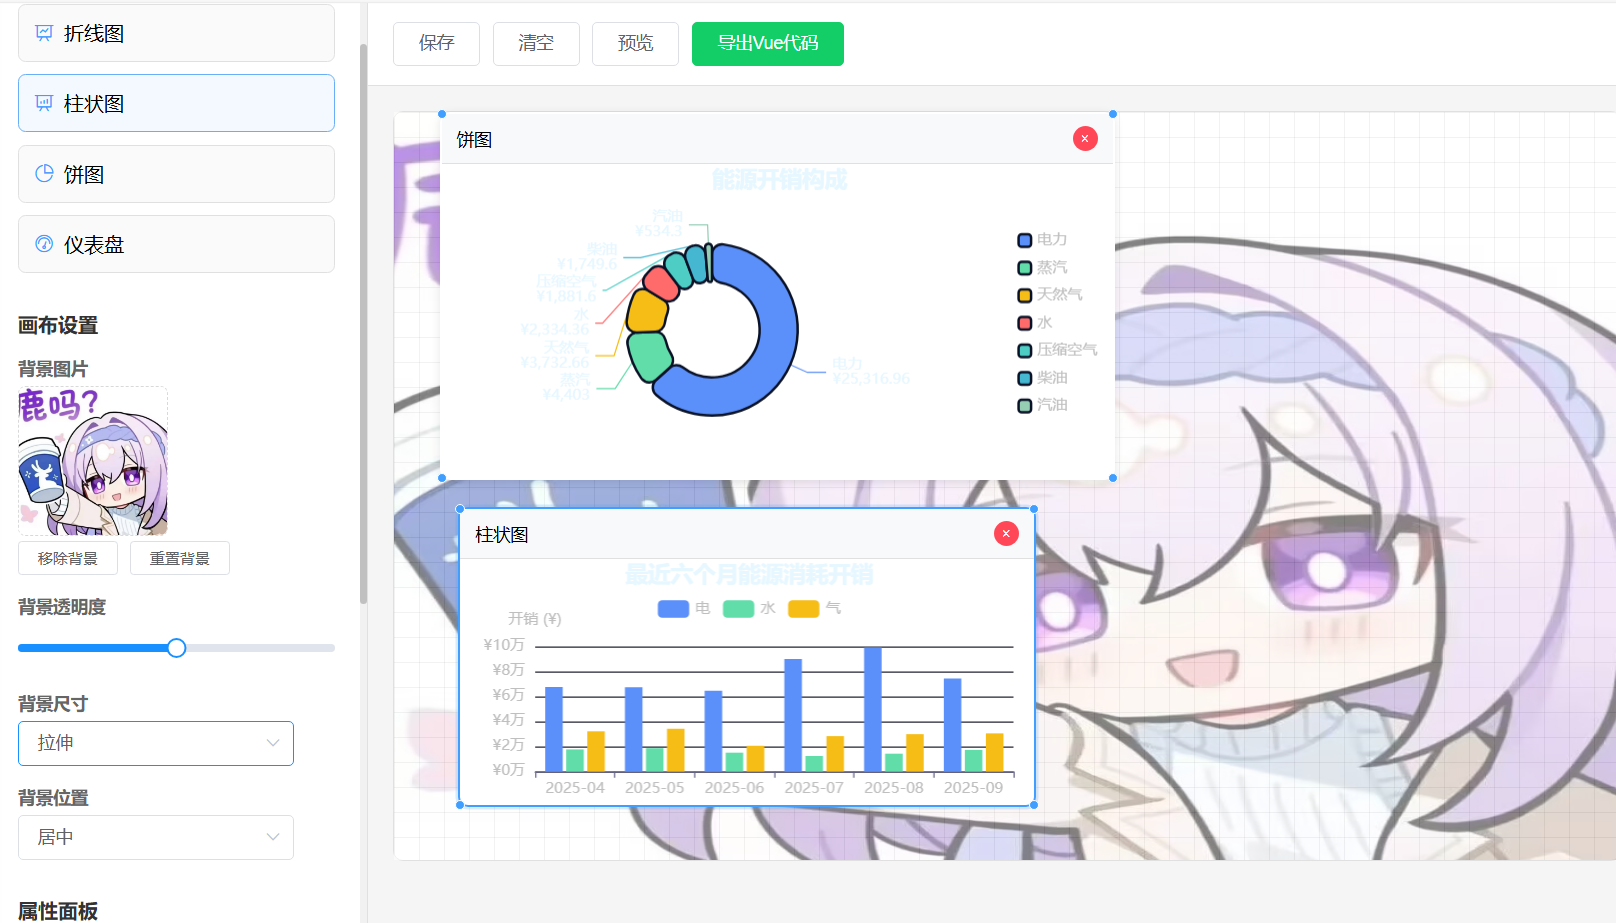
1.2 实现效果
最后页面效果是这样的:
1.3 项目代码
完整代码先给出来,接下来按功能实现解释如何实现:
<template>
<div class="visual-editor">
<!-- 工具栏 -->
<div class="toolbar">
<div class="toolbar-section">
<h3>图表组件</h3>
<div class="component-list">
<div
v-for="component in availableComponents"
:key="component.type"
class="component-item"
draggable="true"
@dragstart="onDragStart($event, component)"
>
<i :class="component.icon"></i>
<span>{{ component.name }}</span>
</div>
</div>
</div>
<div class="toolbar-section">
<h3>画布设置</h3>
<div class="canvas-settings">
<div class="property-group">
<label>背景图片</label>
<div class="background-upload">
<el-upload
class="background-uploader"
:auto-upload="false"
:show-file-list="false"
:on-change="handleBackgroundChange"
:before-upload="beforeBackgroundUpload"
accept="image/*"
>
<div v-if="canvasBackground" class="background-preview">
<img :src="canvasBackground" alt="背景预览" />
<div class="background-overlay">
<i class="el-icon-edit"></i>
<span>更换背景</span>
</div>
</div>
<div v-else class="background-placeholder">
<i class="el-icon-plus"></i>
<div>点击上传背景图</div>
</div>
</el-upload>
</div>
<div v-if="canvasBackground" class="background-actions">
<el-button size="mini" @click="removeBackground">移除背景</el-button>
<el-button size="mini" @click="resetBackground">重置背景</el-button>
</div>
</div>
<div class="property-group">
<label>背景透明度</label>
<el-slider
v-model="backgroundOpacity"
:min="0"
:max="100"
:format-tooltip="val => val + '%'"
@change="updateBackgroundStyle"
></el-slider>
</div>
<div class="property-group">
<label>背景尺寸</label>
<el-select v-model="backgroundSize" @change="updateBackgroundStyle">
<el-option label="覆盖" value="cover"></el-option>
<el-option label="包含" value="contain"></el-option>
<el-option label="拉伸" value="100% 100%"></el-option>
<el-option label="原始" value="auto"></el-option>
</el-select>
</div>
<div class="property-group">
<label>背景位置</label>
<el-select v-model="backgroundPosition" @change="updateBackgroundStyle">
<el-option label="左上" value="left top"></el-option>
<el-option label="居中" value="center"></el-option>
<el-option label="右上" value="right top"></el-option>
<el-option label="左下" value="left bottom"></el-option>
<el-option label="右下" value="right bottom"></el-option>
</el-select>
</div>
</div>
</div>
<div class="toolbar-section">
<h3>属性面板</h3>
<div v-if="selectedComponent" class="property-panel">
<div class="property-group">
<label>标题</label>
<el-input v-model="selectedComponent.title" @input="updateComponent"></el-input>
</div>
<div class="property-group">
<label>宽度</label>
<el-input-number v-model="selectedComponent.width" :min="200" :max="800" @change="updateComponent"></el-input-number>
</div>
<div class="property-group">
<label>高度</label>
<el-input-number v-model="selectedComponent.height" :min="200" :max="600" @change="updateComponent"></el-input-number>
</div>
<div class="property-group">
<label>X坐标</label>
<el-input-number v-model="selectedComponent.x" :min="0" @change="updateComponent"></el-input-number>
</div>
<div class="property-group">
<label>Y坐标</label>
<el-input-number v-model="selectedComponent.y" :min="0" @change="updateComponent"></el-input-number>
</div>
</div>
</div>
</div>
<!-- 主内容区域 -->
<div class="main-content">
<!-- 操作按钮 - 在画布上方 -->
<div class="action-buttons">
<el-button @click="saveCanvas">保存</el-button>
<el-button @click="clearCanvas">清空</el-button>
<el-button @click="previewCanvas">预览</el-button>
<el-button type="success" @click="exportVueCode">导出Vue代码</el-button>
</div>
<!-- 画布区域 -->
<div class="canvas-container">
<div
class="canvas"
:class="{ 'has-background': canvasBackground }"
:style="canvasStyle"
@drop="onDrop"
@dragover.prevent
@dragenter.prevent
ref="canvas"
>
<!-- 组件层 -->
<div class="canvas-components">
<div
v-for="(component, index) in canvasComponents"
:key="index"
class="canvas-component"
:style="{
left: component.x + 'px',
top: component.y + 'px',
width: component.width + 'px',
height: component.height + 'px'
}"
@click="selectComponent(component, index)"
@mousedown="startDrag($event, index)"
:class="{ selected: selectedComponent === component }"
>
<div class="component-header">
<span>{{ component.title }}</span>
<el-button type="text" size="mini" @click.stop="removeComponent(index)">×</el-button>
</div>
<div class="component-content">
<!-- 动态组件渲染 - 修复高度计算 -->
<component
:is="component.type"
:width="component.width + 'px'"
:height="Math.max(200, component.height - 40) + 'px'"
:key="`${component.id}-${component.width}-${component.height}`"
/>
</div>
<!-- 调整手柄 -->
<div class="resize-handles">
<div class="resize-handle nw" @mousedown="startResize($event, 'nw', index)"></div>
<div class="resize-handle ne" @mousedown="startResize($event, 'ne', index)"></div>
<div class="resize-handle sw" @mousedown="startResize($event, 'sw', index)"></div>
<div class="resize-handle se" @mousedown="startResize($event, 'se', index)"></div>
</div>
</div>
</div>
</div>
</div>
</div>
<!-- 预览模态框 -->
<el-dialog
title="画布预览"
:visible.sync="previewVisible"
width="90%"
:before-close="closePreview"
class="preview-dialog"
>
<div class="preview-container">
<div class="preview-canvas" :style="previewCanvasStyle">
<!-- 预览背景层 -->
<div
v-if="canvasBackground"
class="preview-background"
:style="previewBackgroundStyle"
></div>
<!-- 预览组件层 -->
<div class="preview-components">
<div
v-for="(component, index) in canvasComponents"
:key="index"
class="preview-component"
:style="{
left: component.x + 'px',
top: component.y + 'px',
width: component.width + 'px',
height: component.height + 'px'
}"
>
<div class="preview-component-content">
<!-- 预览动态组件渲染 - 修复高度计算 -->
<component
:is="component.type"
:width="component.width + 'px'"
:height="Math.max(200, component.height - 40) + 'px'"
:key="`preview-${component.id}-${component.width}-${component.height}`"
/>
</div>
</div>
</div>
</div>
</div>
<div slot="footer" class="dialog-footer">
<el-button @click="closePreview">关闭</el-button>
<el-button type="primary" @click="exportImage">导出图片</el-button>
<el-button type="success" @click="fullscreenPreview">全屏预览</el-button>
</div>
</el-dialog>
</div>
</template>
<script>
import EnergyLineChart from '@/views/dashboard/EnergyLineChart.vue'
import EnergyBarChart from '@/views/dashboard/EnergyBarChart.vue'
import EnergyPieChart from '@/views/dashboard/EnergyPieChart.vue'
import EnergyGaugeChart from '@/views/dashboard/EnergyGaugeChart.vue'
export default {
name: 'VisualEditor',
components: {
EnergyLineChart,
EnergyBarChart,
EnergyPieChart,
EnergyGaugeChart
},
data() {
return {
// 修改 exportVueCode 方法,添加 async/await
/*===============================请注意!!!!!!!!!!!!!!!!!!!!!!==
* ================================================================================
* ================================================================================
* ================================================================================
* ================================================================================
* 这里替换成你自己的组件即可
**/
availableComponents: [
{ type: 'EnergyLineChart', name: '折线图', icon: 'el-icon-data-line' },
{ type: 'EnergyBarChart', name: '柱状图', icon: 'el-icon-data-analysis' },
{ type: 'EnergyPieChart', name: '饼图', icon: 'el-icon-pie-chart' },
{ type: 'EnergyGaugeChart', name: '仪表盘', icon: 'el-icon-odometer' }
],
canvasComponents: [],
selectedComponent: null,
selectedIndex: -1,
isDragging: false,
isResizing: false,
dragStartPos: { x: 0, y: 0 },
resizeStartPos: { x: 0, y: 0, width: 0, height: 0 },
dragIndex: -1,
resizeIndex: -1,
resizeTimeout: null,
lastResizeTime: 0,
// 背景图相关
canvasBackground: '',
backgroundOpacity: 30,
backgroundSize: 'cover',
backgroundPosition: 'center',
// 预览相关
previewVisible: false
}
},
computed: {
// 修复:画布样式计算 - 使用CSS变量控制透明度
canvasStyle() {
const style = {
position: 'relative',
width: '100%',
minHeight: '600px',
background: '#fff',
border: '1px solid #e0e0e0',
borderRadius: '8px',
backgroundImage: `
linear-gradient(rgba(0,0,0,.1) 1px, transparent 1px),
linear-gradient(90deg, rgba(0,0,0,.1) 1px, transparent 1px)
`,
backgroundSize: '20px 20px'
}
// 如果有背景图,设置CSS变量
if (this.canvasBackground) {
style['--bg-image'] = `url(${this.canvasBackground})`
style['--bg-size'] = this.backgroundSize
style['--bg-position'] = this.backgroundPosition
style['--bg-opacity'] = this.backgroundOpacity / 100
}
return style
},
// 预览画布样式
previewCanvasStyle() {
return {
position: 'relative',
width: '100%',
minHeight: '600px',
background: '#fff',
border: '1px solid #e0e0e0',
borderRadius: '8px',
backgroundImage: `
linear-gradient(rgba(0,0,0,.1) 1px, transparent 1px),
linear-gradient(90deg, rgba(0,0,0,.1) 1px, transparent 1px)
`,
backgroundSize: '20px 20px'
}
},
// 预览背景样式
previewBackgroundStyle() {
if (!this.canvasBackground) return {}
return {
backgroundImage: `url(${this.canvasBackground})`,
backgroundSize: this.backgroundSize,
backgroundPosition: this.backgroundPosition,
backgroundRepeat: 'no-repeat',
opacity: this.backgroundOpacity / 100
}
}
},
methods: {
onDragStart(event, component) {
event.dataTransfer.setData('component', JSON.stringify(component))
},
onDrop(event) {
event.preventDefault()
const componentData = JSON.parse(event.dataTransfer.getData('component'))
const rect = this.$refs.canvas.getBoundingClientRect()
const x = event.clientX - rect.left
const y = event.clientY - rect.top
const newComponent = {
id: Date.now(),
type: componentData.type,
title: componentData.name,
x: x - 100, // 居中偏移
y: y - 100,
width: 400,
height: 300
}
this.canvasComponents.push(newComponent)
this.selectComponent(newComponent, this.canvasComponents.length - 1)
},
selectComponent(component, index) {
this.selectedComponent = component
this.selectedIndex = index
},
removeComponent(index) {
this.canvasComponents.splice(index, 1)
if (this.selectedIndex === index) {
this.selectedComponent = null
this.selectedIndex = -1
}
},
updateComponent() {
// 组件属性更新时自动触发重新渲染
this.$forceUpdate()
},
// 修复:开始拖拽移动组件 - 保持鼠标相对位置
startDrag(event, index) {
// 如果点击的是调整手柄,不启动拖拽
if (event.target.classList.contains('resize-handle')) {
return
}
event.preventDefault()
event.stopPropagation()
this.isDragging = true
this.dragIndex = index
// 修复:记录鼠标相对于组件的位置偏移
const rect = this.$refs.canvas.getBoundingClientRect()
const component = this.canvasComponents[index]
this.dragStartPos = {
x: event.clientX - rect.left - component.x, // 鼠标相对于组件的X偏移
y: event.clientY - rect.top - component.y // 鼠标相对于组件的Y偏移
}
// 选择当前组件
this.selectComponent(this.canvasComponents[index], index)
document.addEventListener('mousemove', this.handleDrag)
document.addEventListener('mouseup', this.stopDrag)
},
// 修复:处理拖拽移动 - 保持相对位置
handleDrag(event) {
if (!this.isDragging || this.dragIndex === -1) return
const component = this.canvasComponents[this.dragIndex]
const rect = this.$refs.canvas.getBoundingClientRect()
// 修复:使用鼠标位置减去初始偏移,保持相对位置
let newX = event.clientX - rect.left - this.dragStartPos.x
let newY = event.clientY - rect.top - this.dragStartPos.y
// 边界限制
newX = Math.max(0, Math.min(newX, rect.width - component.width))
newY = Math.max(0, Math.min(newY, rect.height - component.height))
component.x = newX
component.y = newY
},
// 停止拖拽移动
stopDrag() {
this.isDragging = false
this.dragIndex = -1
document.removeEventListener('mousemove', this.handleDrag)
document.removeEventListener('mouseup', this.stopDrag)
},
startResize(event, direction, index) {
event.preventDefault()
event.stopPropagation()
this.isResizing = true
this.resizeDirection = direction
this.resizeIndex = index
const component = this.canvasComponents[index]
this.resizeStartPos = {
x: event.clientX,
y: event.clientY,
width: component.width,
height: component.height
}
document.addEventListener('mousemove', this.handleResize)
document.addEventListener('mouseup', this.stopResize)
},
// 优化:使用节流处理缩放,保持等比例缩放
handleResize(event) {
if (!this.isResizing) return
const now = Date.now()
// 节流:每16ms(约60fps)更新一次
if (now - this.lastResizeTime < 16) {
return
}
this.lastResizeTime = now
const deltaX = event.clientX - this.resizeStartPos.x
const deltaY = event.clientY - this.resizeStartPos.y
const component = this.canvasComponents[this.resizeIndex]
if (this.resizeDirection.includes('e')) {
component.width = Math.max(200, this.resizeStartPos.width + deltaX)
}
if (this.resizeDirection.includes('w')) {
const newWidth = Math.max(200, this.resizeStartPos.width - deltaX)
component.x += component.width - newWidth
component.width = newWidth
}
if (this.resizeDirection.includes('s')) {
component.height = Math.max(200, this.resizeStartPos.height + deltaY)
}
if (this.resizeDirection.includes('n')) {
const newHeight = Math.max(200, this.resizeStartPos.height - deltaY)
component.y += component.height - newHeight
component.height = newHeight
}
},
stopResize() {
this.isResizing = false
document.removeEventListener('mousemove', this.handleResize)
document.removeEventListener('mouseup', this.stopResize)
},
// 修改:清空画布功能 - 清除保存的内容
clearCanvas() {
this.$confirm('确定要清空画布吗?此操作将删除所有组件和保存的数据。', '确认清空', {
confirmButtonText: '确定清空',
cancelButtonText: '取消',
type: 'warning',
confirmButtonClass: 'el-button--danger'
}).then(() => {
// 清空当前画布
this.canvasComponents = []
this.selectedComponent = null
this.selectedIndex = -1
// 清除本地存储的保存内容
localStorage.removeItem('visualCanvas')
this.$message.success('画布已清空,保存的数据已删除')
}).catch(() => {
// 用户取消操作
this.$message.info('已取消清空操作')
})
},
// 实现:预览功能
previewCanvas() {
if (this.canvasComponents.length === 0) {
this.$message.warning('画布为空,请先添加组件')
return
}
this.previewVisible = true
},
// 关闭预览
closePreview() {
this.previewVisible = false
},
// 全屏预览
fullscreenPreview() {
const previewWindow = window.open('', '_blank', 'width=1200,height=800,scrollbars=yes,resizable=yes')
const html = `
<!DOCTYPE html>
<html>
<head>
<title>画布预览</title>
<meta charset="utf-8">
<style>
body {
margin: 0;
padding: 20px;
background: #f5f5f5;
font-family: -apple-system, BlinkMacSystemFont, 'Segoe UI', Roboto, sans-serif;
}
.preview-container {
max-width: 1200px;
margin: 0 auto;
background: white;
border-radius: 8px;
box-shadow: 0 4px 12px rgba(0,0,0,0.1);
overflow: hidden;
}
.preview-canvas {
position: relative;
width: 100%;
min-height: 600px;
background: #fff;
background-image:
linear-gradient(rgba(0,0,0,.1) 1px, transparent 1px),
linear-gradient(90deg, rgba(0,0,0,.1) 1px, transparent 1px);
background-size: 20px 20px;
}
.preview-background {
position: absolute;
top: 0;
left: 0;
right: 0;
bottom: 0;
z-index: 1;
pointer-events: none;
}
.preview-components {
position: relative;
z-index: 2;
width: 100%;
height: 100%;
}
.preview-component {
position: absolute;
border-radius: 8px;
background: #fff;
box-shadow: 0 2px 8px rgba(0,0,0,0.1);
}
.preview-component-content {
width: 100%;
height: 100%;
overflow: hidden;
}
</style>
</head>
<body>
<div class="preview-container">
<div class="preview-canvas">
${this.canvasBackground ? `<div class="preview-background" style="background-image: url(${this.canvasBackground}); background-size: ${this.backgroundSize}; background-position: ${this.backgroundPosition}; background-repeat: no-repeat; opacity: ${this.backgroundOpacity / 100};"></div>` : ''}
<div class="preview-components">
${this.canvasComponents.map(component => `
<div class="preview-component" style="left: ${component.x}px; top: ${component.y}px; width: ${component.width}px; height: ${component.height}px;">
<div class="preview-component-content">
<div style="padding: 8px 12px; background: #f8f9fa; border-bottom: 1px solid #e0e0e0; font-size: 14px; font-weight: 500;">${component.title}</div>
<div style="height: calc(100% - 40px); display: flex; align-items: center; justify-content: center; color: #999; font-size: 14px;">
${component.type} 组件
</div>
</div>
</div>
`).join('')}
</div>
</div>
</div>
</body>
</html>
`
previewWindow.document.write(html)
previewWindow.document.close()
},
// 导出图片
exportImage() {
this.$message.info('导出图片功能开发中...')
// 这里可以使用 html2canvas 库来实现图片导出
// import html2canvas from 'html2canvas'
// const canvas = document.querySelector('.preview-canvas')
// html2canvas(canvas).then(canvas => {
// const link = document.createElement('a')
// link.download = 'canvas-preview.png'
// link.href = canvas.toDataURL()
// link.click()
// })
},
// 修复:背景图上传相关方法 - 使用本地文件上传
beforeBackgroundUpload(file) {
const isImage = file.type.startsWith('image/')
const isLt10M = file.size / 1024 / 1024 < 10
console.log('文件信息:', {
name: file.name,
type: file.type,
size: file.size,
isImage,
isLt10M
})
if (!isImage) {
this.$message.error('只能上传图片文件!')
return false
}
if (!isLt10M) {
this.$message.error('图片大小不能超过 10MB!')
return false
}
return true
},
// 在 export.vue 中修改背景图片相关方法
// 修改:移除背景图片
removeBackground() {
// 不需要释放URL对象,因为使用的是base64
this.canvasBackground = ''
this.updateBackgroundStyle()
this.$message.success('背景图已移除')
},
// 新增:保存时处理base64图片
saveCanvas() {
const canvasData = {
components: this.canvasComponents,
background: {
image: this.canvasBackground,
opacity: this.backgroundOpacity,
size: this.backgroundSize,
position: this.backgroundPosition
},
timestamp: new Date().toISOString()
}
// 检查base64图片大小,如果太大则压缩
if (this.canvasBackground && this.canvasBackground.length > 1000000) { // 1MB
this.$message.warning('背景图片较大,建议压缩后使用')
}
localStorage.setItem('visualCanvas', JSON.stringify(canvasData))
this.$message.success('画布已保存')
},
// 新增:压缩base64图片
compressBase64Image(base64, maxWidth = 1920, quality = 0.8) {
return new Promise((resolve) => {
const img = new Image()
img.onload = () => {
const canvas = document.createElement('canvas')
const ctx = canvas.getContext('2d')
// 计算压缩后的尺寸
let { width, height } = img
if (width > maxWidth) {
height = (height * maxWidth) / width
width = maxWidth
}
canvas.width = width
canvas.height = height
// 绘制压缩后的图片
ctx.drawImage(img, 0, 0, width, height)
// 转换为base64
const compressedBase64 = canvas.toDataURL('image/jpeg', quality)
resolve(compressedBase64)
}
img.src = base64
})
},
// 修改:处理背景图片上传时进行压缩
async handleBackgroundChange(file, fileList) {
console.log('文件变化:', file, fileList)
if (file.raw) {
const reader = new FileReader()
reader.onload = async (e) => {
let base64 = e.target.result
// 如果图片太大,进行压缩
if (base64.length > 1000000) { // 1MB
try {
base64 = await this.compressBase64Image(base64)
this.$message.info('图片已自动压缩')
} catch (error) {
console.error('图片压缩失败:', error)
this.$message.warning('图片压缩失败,使用原图')
}
}
this.canvasBackground = base64
this.updateBackgroundStyle()
this.$message.success('背景图上传成功')
}
reader.onerror = () => {
this.$message.error('图片读取失败')
}
reader.readAsDataURL(file.raw)
}
},
// 导出Vue代码功能
// 修改 exportVueCode 方法,添加 async/await
async exportVueCode() {
if (this.canvasComponents.length === 0) {
this.$message.warning('画布为空,请先添加组件')
return
}
try {
const vueCode = this.generateVueCode()
this.downloadVueFile(vueCode)
this.$message.success('Vue代码已导出')
} catch (error) {
console.error('导出Vue代码失败:', error)
this.$message.error('导出失败,请重试')
}
},
// 生成Vue代码
generateVueCode() {
const components = this.canvasComponents.map(component => {
return {
name: component.type,
title: component.title,
props: {
width: component.width + 'px',
height: Math.max(200, component.height - 40) + 'px'
},
position: {
left: component.x + 'px',
top: component.y + 'px',
width: component.width + 'px',
height: component.height + 'px'
}
}
})
return '<template>' +
'<div class="exported-canvas">' +
'<div class="canvas-container">' +
'<div class="canvas" :class="{ \'has-background\': canvasBackground }" :style="canvasStyle">' +
'<div v-for="(component, index) in components" :key="index" class="canvas-component" :style="component.position">' +
'<div class="component-header">' +
'<span>{{ component.title }}</span>' +
'</div>' +
'<div class="component-content">' +
'<component :is="component.name" :width="component.props.width" :height="component.props.height" />' +
'</div>' +
'</div>' +
'</div>' +
'</div>' +
'</div>' +
'</' + 'template>' +
'<' + 'script>' +
'import EnergyLineChart from \'@/views/dashboard/EnergyLineChart.vue\';' +
'import EnergyBarChart from \'@/views/dashboard/EnergyBarChart.vue\';' +
'import EnergyPieChart from \'@/views/dashboard/EnergyPieChart.vue\';' +
'import EnergyGaugeChart from \'@/views/dashboard/EnergyGaugeChart.vue\';' +
'' +
'export default {' +
'name: \'ExportedCanvas\',' +
'components: {' +
'EnergyLineChart,' +
'EnergyBarChart,' +
'EnergyPieChart,' +
'EnergyGaugeChart' +
'},' +
'data() {' +
'return {' +
'components: ' + JSON.stringify(components, null, 6) + ',' +
'canvasBackground: \'' + this.canvasBackground + '\',' +
'backgroundOpacity: ' + this.backgroundOpacity + ',' +
'backgroundSize: \'' + this.backgroundSize + '\',' +
'backgroundPosition: \'' + this.backgroundPosition + '\'' +
'}' +
'},' +
'computed: {' +
'canvasStyle() {' +
'const style = {' +
'position: \'relative\',' +
'width: \'100%\',' +
'minHeight: \'600px\',' +
'background: \'#fff\',' +
'border: \'1px solid #e0e0e0\',' +
'borderRadius: \'8px\',' +
'backgroundImage: `linear-gradient(rgba(0,0,0,.1) 1px, transparent 1px), linear-gradient(90deg, rgba(0,0,0,.1) 1px, transparent 1px)`,' +
'backgroundSize: \'20px 20px\'' +
'};' +
'' +
'if (this.canvasBackground) {' +
'style[\'--bg-image\'] = `url(${this.canvasBackground})`;' +
'style[\'--bg-size\'] = this.backgroundSize;' +
'style[\'--bg-position\'] = this.backgroundPosition;' +
'style[\'--bg-opacity\'] = this.backgroundOpacity / 100;' +
'}' +
'' +
'return style;' +
'}' +
'}' +
'}' +
'</' + 'script>' +
'<style scoped lang="scss">' +
'.exported-canvas {' +
'padding: 20px;' +
'background: #f5f5f5;' +
'min-height: 100vh;' +
'}' +
'' +
'.canvas-container {' +
'max-width: 1200px;' +
'margin: 0 auto;' +
'}' +
'' +
'.canvas {' +
'position: relative;' +
'width: 100%;' +
'min-height: 600px;' +
'background: #fff;' +
'border: 1px solid #e0e0e0;' +
'border-radius: 8px;' +
'background-image:' +
'linear-gradient(rgba(0,0,0,.1) 1px, transparent 1px),' +
'linear-gradient(90deg, rgba(0,0,0,.1) 1px, transparent 1px);' +
'background-size: 20px 20px;' +
'' +
'&.has-background {' +
'&::before {' +
'content: \'\';' +
'position: absolute;' +
'top: 0;' +
'left: 0;' +
'right: 0;' +
'bottom: 0;' +
'background-image: var(--bg-image);' +
'background-size: var(--bg-size);' +
'background-position: var(--bg-position);' +
'background-repeat: no-repeat;' +
'opacity: var(--bg-opacity);' +
'z-index: 1;' +
'pointer-events: none;' +
'}' +
'}' +
'}' +
'' +
'.canvas-component {' +
'position: absolute;' +
'border: 2px solid transparent;' +
'border-radius: 8px;' +
'background: #fff;' +
'box-shadow: 0 2px 8px rgba(0,0,0,0.1);' +
'z-index: 2;' +
'' +
'.component-header {' +
'display: flex;' +
'justify-content: space-between;' +
'align-items: center;' +
'padding: 8px 12px;' +
'background: #f8f9fa;' +
'border-bottom: 1px solid #e0e0e0;' +
'font-size: 14px;' +
'font-weight: 500;' +
'height: 40px;' +
'box-sizing: border-box;' +
'}' +
'' +
'.component-content {' +
'height: calc(100% - 40px);' +
'overflow: hidden;' +
'position: relative;' +
'box-sizing: border-box;' +
'}' +
'}' +
'</' + 'style>'
},
downloadVueFile(content) {
const blob = new Blob([content], { type: 'text/plain;charset=utf-8' })
const url = URL.createObjectURL(blob)
const link = document.createElement('a')
link.href = url
link.download = `canvas-export-${new Date().getTime()}.vue`
document.body.appendChild(link)
link.click()
document.body.removeChild(link)
URL.revokeObjectURL(url)
},
},
mounted() {
// 加载保存的画布
const savedCanvas = localStorage.getItem('visualCanvas')
if (savedCanvas) {
try {
const canvasData = JSON.parse(savedCanvas)
this.canvasComponents = canvasData.components || []
// 加载背景设置
if (canvasData.background) {
this.canvasBackground = canvasData.background.image || ''
this.backgroundOpacity = canvasData.background.opacity || 30
this.backgroundSize = canvasData.background.size || 'cover'
this.backgroundPosition = canvasData.background.position || 'center'
}
this.$message.info(`已加载保存的画布,包含 ${this.canvasComponents.length} 个组件`)
} catch (e) {
console.error('加载画布数据失败:', e)
this.$message.error('加载保存的画布数据失败')
}
}
},
beforeDestroy() {
// 清理定时器
if (this.resizeTimeout) {
clearTimeout(this.resizeTimeout)
}
// 清理URL对象
if (this.canvasBackground && this.canvasBackground.startsWith('blob:')) {
URL.revokeObjectURL(this.canvasBackground)
}
}
}
</script>
<style scoped lang="scss">
.visual-editor {
display: flex;
height: 100vh;
background: #f5f5f5;
}
.toolbar {
width: 300px;
background: #fff;
border-right: 1px solid #e0e0e0;
padding: 20px;
overflow-y: auto;
.toolbar-section {
margin-bottom: 30px;
h3 {
margin: 0 0 15px 0;
color: #333;
font-size: 16px;
}
}
.component-list {
display: flex;
flex-direction: column;
gap: 10px;
}
.component-item {
display: flex;
align-items: center;
padding: 12px;
border: 1px solid #e0e0e0;
border-radius: 6px;
cursor: grab;
background: #fafafa;
transition: all 0.2s;
&:hover {
border-color: #409eff;
background: #f0f9ff;
}
i {
margin-right: 8px;
color: #409eff;
}
}
.property-panel {
.property-group {
margin-bottom: 15px;
label {
display: block;
margin-bottom: 5px;
color: #666;
font-size: 14px;
}
}
}
// 新增:画布设置样式
.canvas-settings {
.property-group {
margin-bottom: 15px;
label {
display: block;
margin-bottom: 5px;
color: #666;
font-size: 14px;
}
}
.background-upload {
.background-uploader {
width: 100%;
}
.background-preview {
position: relative;
width: 100%;
height: 120px;
border: 1px dashed #d9d9d9;
border-radius: 6px;
overflow: hidden;
cursor: pointer;
transition: border-color 0.3s;
&:hover {
border-color: #409eff;
}
img {
width: 100%;
height: 100%;
object-fit: cover;
}
.background-overlay {
position: absolute;
top: 0;
left: 0;
right: 0;
bottom: 0;
background: rgba(0, 0, 0, 0.5);
display: flex;
flex-direction: column;
align-items: center;
justify-content: center;
color: white;
opacity: 0;
transition: opacity 0.3s;
&:hover {
opacity: 1;
}
i {
font-size: 20px;
margin-bottom: 5px;
}
span {
font-size: 12px;
}
}
}
.background-placeholder {
width: 100%;
height: 120px;
border: 1px dashed #d9d9d9;
border-radius: 6px;
display: flex;
flex-direction: column;
align-items: center;
justify-content: center;
cursor: pointer;
transition: border-color 0.3s;
&:hover {
border-color: #409eff;
}
i {
font-size: 28px;
color: #c0c4cc;
margin-bottom: 8px;
}
div {
color: #c0c4cc;
font-size: 14px;
}
}
.background-actions {
margin-top: 10px;
display: flex;
gap: 8px;
.el-button {
flex: 1;
}
}
}
}
}
// 新增:主内容区域
.main-content {
flex: 1;
display: flex;
flex-direction: column;
height: 100vh;
}
// 修改:操作按钮在画布上方
.action-buttons {
padding: 15px 20px;
background: #fff;
border-bottom: 1px solid #e0e0e0;
display: flex;
gap: 10px;
align-items: center;
.el-button {
margin-left: 0;
}
}
.canvas-container {
flex: 1;
padding: 20px;
overflow: auto;
.canvas {
position: relative;
width: 100%;
min-height: 600px;
background: #fff;
border: 1px solid #e0e0e0;
border-radius: 8px;
background-image:
linear-gradient(rgba(0,0,0,.1) 1px, transparent 1px),
linear-gradient(90deg, rgba(0,0,0,.1) 1px, transparent 1px);
background-size: 20px 20px;
// 修复:使用伪元素实现背景透明度
&.has-background {
&::before {
content: '';
position: absolute;
top: 0;
left: 0;
right: 0;
bottom: 0;
background-image: var(--bg-image);
background-size: var(--bg-size);
background-position: var(--bg-position);
background-repeat: no-repeat;
opacity: var(--bg-opacity);
z-index: 1;
pointer-events: none;
}
}
}
// 修复:组件层样式
.canvas-components {
position: relative;
z-index: 2;
width: 100%;
height: 100%;
}
}
.canvas-component {
position: absolute;
border: 2px solid transparent;
border-radius: 8px;
background: #fff;
box-shadow: 0 2px 8px rgba(0,0,0,0.1);
cursor: move;
transition: none;
user-select: none;
&:hover {
border-color: #409eff;
}
&.selected {
border-color: #409eff;
box-shadow: 0 0 0 2px rgba(64, 158, 255, 0.2);
}
.component-header {
display: flex;
justify-content: space-between;
align-items: center;
padding: 8px 12px;
background: #f8f9fa;
border-bottom: 1px solid #e0e0e0;
font-size: 14px;
font-weight: 500;
cursor: move;
height: 40px;
box-sizing: border-box;
.el-button {
padding: 0;
width: 20px;
height: 20px;
border-radius: 50%;
background: #ff4757;
color: white;
border: none;
&:hover {
background: #ff3742;
}
}
}
.component-content {
height: calc(100% - 40px);
overflow: hidden;
position: relative;
box-sizing: border-box;
}
.resize-handles {
position: absolute;
top: 0;
left: 0;
right: 0;
bottom: 0;
pointer-events: none;
.resize-handle {
position: absolute;
width: 8px;
height: 8px;
background: #409eff;
border: 1px solid #fff;
border-radius: 50%;
pointer-events: all;
cursor: nw-resize;
&.nw { top: -4px; left: -4px; cursor: nw-resize; }
&.ne { top: -4px; right: -4px; cursor: ne-resize; }
&.sw { bottom: -4px; left: -4px; cursor: sw-resize; }
&.se { bottom: -4px; right: -4px; cursor: se-resize; }
}
}
}
// 新增:预览模态框样式
.preview-dialog {
.preview-container {
max-height: 70vh;
overflow: auto;
}
.preview-canvas {
position: relative;
width: 100%;
min-height: 600px;
background: #fff;
border: 1px solid #e0e0e0;
border-radius: 8px;
background-image:
linear-gradient(rgba(0,0,0,.1) 1px, transparent 1px),
linear-gradient(90deg, rgba(0,0,0,.1) 1px, transparent 1px);
background-size: 20px 20px;
}
.preview-background {
position: absolute;
top: 0;
left: 0;
right: 0;
bottom: 0;
z-index: 1;
pointer-events: none;
}
.preview-components {
position: relative;
z-index: 2;
width: 100%;
height: 100%;
}
.preview-component {
position: absolute;
border-radius: 8px;
background: #fff;
box-shadow: 0 2px 8px rgba(0,0,0,0.1);
}
.preview-component-content {
width: 100%;
height: 100%;
overflow: hidden;
}
}
</style>
这里先说明一下实现vue代码导出时为什么要用字符串拼接的方式来写vue组件的语句,不知道为什么,主包将这些语句封装成vue组件后,怎么都读取不到正确的vue语法的语句,全是一些html语句,如果有高手知道怎么解决这个问题可以封装成组件,(如果方便可以评论区告诉一下主包该怎么改...一千多行代码写一坨还是太难维护了)。
其次是,如果要直接用主包的代码记得在component和availableComponents字段改成自己的组件,generateCode()return的vue语法的语句也要改Component的内容,至于其他的也许、可能、大概、maybe是不用改了...
最后是,细枝末节的实现就别问了,看注释里的那么多修复应该能理解主包已经对这一坨代码修修改改了多少次了,全都不会写.mp4。
2. 核心实现
2.1 组件定义
2.1.1 结构
export.vue
├── template/          # 模板层
│   ├── 工具栏区域
│   ├── 画布区域
│   └── 预览模态框
├── script/           # 逻辑层
│   ├── 组件管理
│   ├── 拖拽系统
│   ├── 数据持久化
│   └── 代码导出
└── style/            # 样式层
    ├── 布局样式
    ├── 组件样式
    └── 响应式设计
2.1.2 组件示例(记得换成自己的!)
// 可用的图表组件列表
data() {
  return {
    availableComponents: [
      {
        type: 'EnergyLineChart',    // 组件类型
        name: '折线图',              // 显示名称
        icon: 'el-icon-data-line'    // 图标
      },
      {
        type: 'EnergyBarChart',
        name: '柱状图',
        icon: 'el-icon-data-analysis'
      },
      {
        type: 'EnergyPieChart',
        name: '饼图',
        icon: 'el-icon-pie-chart'
      },
      {
        type: 'EnergyGaugeChart',
        name: '仪表盘',
        icon: 'el-icon-odometer'
      }
    ]
  }
}
将组件实例化到容器中。
自定义组件,Get !
2.2 拖拽系统
2.2.1 拖拽开始
// 当用户拖拽组件到画布时
onDrop(event) {
  event.preventDefault()

  // 1. 获取拖拽的组件数据
  const componentData = JSON.parse(event.dataTransfer.getData('component'))

  // 2. 计算放置位置
  const rect = this.$refs.canvas.getBoundingClientRect()
  const x = event.clientX - rect.left
  const y = event.clientY - rect.top

  // 3. 创建新的组件实例
  const newComponent = {
    id: Date.now(),                    // 唯一标识
    type: componentData.type,          // 组件类型
    title: componentData.name,        // 组件标题
    x: x - 100,                       // X坐标(居中偏移)
    y: y - 100,                       // Y坐标(居中偏移)
    width: 400,                        // 默认宽度
    height: 300                       // 默认高度
  }

  // 4. 添加到画布组件列表
  this.canvasComponents.push(newComponent)

  // 5. 自动选中新添加的组件
  this.selectComponent(newComponent, this.canvasComponents.length - 1)
}
不设置居中偏移图表定位会偏离鼠标中心哦。
2.2.2 拖拽移动
// 开始拖拽时的处理
onDragStart(event, component) {
  // 设置拖拽数据,包含组件信息
  event.dataTransfer.setData('component', JSON.stringify(component))
}
拖拽开始时将被拖拽的组件存入dragstart事件,后续拖拽时通过事件读取该组件。
2.2.3 拖拽处理
// 组件在画布上的拖拽移动
startDrag(event, index) {
  // 防止点击调整手柄时启动拖拽
  if (event.target.classList.contains('resize-handle')) {
    return
  }

  event.preventDefault()
  event.stopPropagation()

  this.isDragging = true
  this.dragIndex = index

  // 🔑 关键:记录鼠标相对于组件的位置偏移
  const rect = this.$refs.canvas.getBoundingClientRect()
  const component = this.canvasComponents[index]

  this.dragStartPos = {
    x: event.clientX - rect.left - component.x,  // 鼠标在组件内的X偏移
    y: event.clientY - rect.top - component.y   // 鼠标在组件内的Y偏移
  }

  // 选择当前拖拽的组件
  this.selectComponent(this.canvasComponents[index], index)

  // 绑定全局鼠标事件
  document.addEventListener('mousemove', this.handleDrag)
  document.addEventListener('mouseup', this.stopDrag)
}
鼠标拖拽时组件跟随的逻辑是,startDrag中先记录鼠标相对于组件的位置偏移并记录到全局变量中,然后添加两个事件监听器,鼠标移动时调用handleDrag,左键松开后调用stopDrag,其中,handleDrag会将组件被点击的位置与鼠标位置的坐标绑定;stopDrag设置拖拽属性为false且解除松开左键与鼠标移动事件监听器的绑定。
拖拽功能,Get!
2.3 缩放系统
组件内的图表一定要随着组件等比例缩放!
2.3.1 缩放开始
startResize(event, direction, index) {
  // 阻止事件的默认行为(如文本选择、链接跳转等)
  event.preventDefault()
  // 阻止事件冒泡,避免触发父元素的拖拽或其他事件
  event.stopPropagation()
  // 设置正在调整大小的状态为true
  this.isResizing = true
  // 记录调整大小的方向('n', 's', 'e', 'w')
  this.resizeDirection = direction
  // 记录当前正在调整大小的组件在画布组件数组中的索引
  this.resizeIndex = index
  // 根据索引从画布组件数组中获取对应的组件对象
  const component = this.canvasComponents[index]
  // 记录调整大小开始时的初始状态:
  this.resizeStartPos = {
    x: event.clientX,
    y: event.clientY,
    width: component.width,
    height: component.height
  }

  // 在document上添加鼠标移动事件监听器,用于实时处理调整大小
  document.addEventListener('mousemove', this.handleResize)
  // 在document上添加鼠标松开事件监听器,用于结束调整大小操作
  document.addEventListener('mouseup', this.stopResize)
},
逻辑上和拖拽非常非常非常~~类似,就不多赘述了。
2.3.2 缩放处理(性能优化)
// 缩放处理 - 使用节流优化性能
handleResize(event) {
  if (!this.isResizing) return

  const now = Date.now()
  // 🚀 性能优化:节流处理,每16ms(约60fps)更新一次
  if (now - this.lastResizeTime < 16) {
    return
  }
  this.lastResizeTime = now

  const deltaX = event.clientX - this.resizeStartPos.x
  const deltaY = event.clientY - this.resizeStartPos.y
  const component = this.canvasComponents[this.resizeIndex]

  // 根据缩放方向调整尺寸
  if (this.resizeDirection.includes('e')) {  // 右边缘
    component.width = Math.max(200, this.resizeStartPos.width + deltaX)
  }
  if (this.resizeDirection.includes('w')) { // 左边缘
    const newWidth = Math.max(200, this.resizeStartPos.width - deltaX)
    component.x += component.width - newWidth  // 调整X坐标
    component.width = newWidth
  }
  if (this.resizeDirection.includes('s')) {  // 下边缘
    component.height = Math.max(200, this.resizeStartPos.height + deltaY)
  }
  if (this.resizeDirection.includes('n')) { // 上边缘
    const newHeight = Math.max(200, this.resizeStartPos.height - deltaY)
    component.y += component.height - newHeight  // 调整Y坐标
    component.height = newHeight
  }
}
逻辑上就是根据拉伸的方向,对角位置不变,被拉伸的角坐标要修改。
这里有调用后端接口实时渲染的组件一定要设置自己设置更新时间,不然调一下大小的过程不知道会发多少请求给后端,做了请求限制的服务器还好,最多是页面被请求限制提示刷屏,要是没做限制,性能差点的服务器要红温了(警告⚠警告⚠)。
缩放功能,Get !
2.4 背景系统
2.4.1 背景图片上传
// 背景图片上传处理
async handleBackgroundChange(file, fileList) {
  console.log('文件变化:', file, fileList)

  if (file.raw) {
    const reader = new FileReader()

    reader.onload = async (e) => {
      let base64 = e.target.result

      // 🖼️ 图片压缩:如果图片太大,自动压缩
      if (base64.length > 1000000) { // 1MB
        try {
          base64 = await this.compressBase64Image(base64)
          this.$message.info('图片已自动压缩')
        } catch (error) {
          console.error('图片压缩失败:', error)
          this.$message.warning('图片压缩失败,使用原图')
        }
      }

      this.canvasBackground = base64
      this.updateBackgroundStyle()
      this.$message.success('背景图上传成功')
    }

    reader.onerror = () => {
      this.$message.error('图片读取失败')
    }

    reader.readAsDataURL(file.raw)
  }
}
没什么好嗦的,非常常规的图片上传+大小检测,太大就压缩。
2.4.2 图片压缩算法
// 图片压缩方法
compressBase64Image(base64, maxWidth = 1920, quality = 0.8) {
  return new Promise((resolve) => {
    const img = new Image()

    img.onload = () => {
      const canvas = document.createElement('canvas')
      const ctx = canvas.getContext('2d')

      // 计算压缩后的尺寸
      let { width, height } = img
      if (width > maxWidth) {
        height = (height * maxWidth) / width
        width = maxWidth
      }

      canvas.width = width
      canvas.height = height

      // 绘制压缩后的图片
      ctx.drawImage(img, 0, 0, width, height)

      // 转换为base64
      const compressedBase64 = canvas.toDataURL('image/jpeg', quality)
      resolve(compressedBase64)
    }

    img.src = base64
  })
}
2.4.3 背景样式控制
// 背景样式计算
computed: {
  canvasStyle() {
    const style = {
      position: 'relative',
      width: '100%',
      minHeight: '600px',
      background: '#fff',
      border: '1px solid #e0e0e0',
      borderRadius: '8px',
      // 网格背景
      backgroundImage: `
        linear-gradient(rgba(0,0,0,.1) 1px, transparent 1px),
        linear-gradient(90deg, rgba(0,0,0,.1) 1px, transparent 1px)
      `,
      backgroundSize: '20px 20px'
    }

    // 如果有背景图,设置CSS变量
    if (this.canvasBackground) {
      style['--bg-image'] = `url(${this.canvasBackground})`
      style['--bg-size'] = this.backgroundSize
      style['--bg-position'] = this.backgroundPosition
      style['--bg-opacity'] = this.backgroundOpacity / 100
    }

    return style
  }
}
有了这个就可以控制背景图片的位置、透明度了。
背景图片,Get !
2.5 画布区域
重量级来了,放置组件和背景图片的画布!
画布区域布局如下,看一眼动态渲染组件就ok啦。
<!-- 主内容区域 -->
<div class="main-content">
  <!-- 操作按钮 -->
  <div class="action-buttons">
    <el-button @click="saveCanvas">保存</el-button>
    <el-button @click="clearCanvas">清空</el-button>
    <el-button @click="previewCanvas">预览</el-button>
    <el-button type="success" @click="exportVueCode">导出Vue代码</el-button>
  </div>

  <!-- 画布容器 -->
  <div class="canvas-container">
    <div
      class="canvas"
      :class="{ 'has-background': canvasBackground }"
      :style="canvasStyle"
      @drop="onDrop"
      @dragover.prevent
      @dragenter.prevent
      ref="canvas"
    >
      <!-- 组件层 -->
      <div class="canvas-components">
        <div
          v-for="(component, index) in canvasComponents"
          :key="index"
          class="canvas-component"
          :style="{
            left: component.x + 'px',
            top: component.y + 'px',
            width: component.width + 'px',
            height: component.height + 'px'
          }"
          @click="selectComponent(component, index)"
          @mousedown="startDrag($event, index)"
          :class="{ selected: selectedComponent === component }"
        >
          <!-- 组件头部 -->
          <div class="component-header">
            <span>{{ component.title }}</span>
            <el-button type="text" size="mini" @click.stop="removeComponent(index)">×</el-button>
          </div>

          <!-- 组件内容 -->
          <div class="component-content">
            <!-- 🔑 关键:动态组件渲染 -->
            <component
              :is="component.type"
              :width="component.width + 'px'"
              :height="Math.max(200, component.height - 40) + 'px'"
              :key="`${component.id}-${component.width}-${component.height}`"
            />
          </div>

          <!-- 调整手柄 -->
          <div class="resize-handles">
            <div class="resize-handle nw" @mousedown="startResize($event, 'nw', index)"></div>
            <div class="resize-handle ne" @mousedown="startResize($event, 'ne', index)"></div>
            <div class="resize-handle sw" @mousedown="startResize($event, 'sw', index)"></div>
            <div class="resize-handle se" @mousedown="startResize($event, 'se', index)"></div>
          </div>
        </div>
      </div>
    </div>
  </div>
</div>
2.5.1 数据解析
data() {
  return {
    // 可用组件列表
    availableComponents: [
      { type: 'EnergyLineChart', name: '折线图', icon: 'el-icon-data-line' },
      { type: 'EnergyBarChart', name: '柱状图', icon: 'el-icon-data-analysis' },
      { type: 'EnergyPieChart', name: '饼图', icon: 'el-icon-pie-chart' },
      { type: 'EnergyGaugeChart', name: '仪表盘', icon: 'el-icon-odometer' }
    ],

    // 画布上的组件实例
    canvasComponents: [],

    // 当前选中的组件
    selectedComponent: null,
    selectedIndex: -1,

    // 拖拽状态
    isDragging: false,
    isResizing: false,
    dragStartPos: { x: 0, y: 0 },
    resizeStartPos: { x: 0, y: 0, width: 0, height: 0 },
    dragIndex: -1,
    resizeIndex: -1,

    // 背景相关
    canvasBackground: '',
    backgroundOpacity: 30,
    backgroundSize: 'cover',
    backgroundPosition: 'center',

    // 预览相关
    previewVisible: false
  }
}
2.5.2 保存功能
// 保存画布数据
saveCanvas() {
  const canvasData = {
    components: this.canvasComponents,
    background: {
      image: this.canvasBackground,
      opacity: this.backgroundOpacity,
      size: this.backgroundSize,
      position: this.backgroundPosition
    },
    timestamp: new Date().toISOString()
  }

  // 检查base64图片大小
  if (this.canvasBackground && this.canvasBackground.length > 1000000) {
    this.$message.warning('背景图片较大,建议压缩后使用')
  }

  localStorage.setItem('visualCanvas', JSON.stringify(canvasData))
  this.$message.success('画布已保存')
}
组件和背景图片都通过localStorage存在visualCanvas里了.
2.5.3 加载功能
// 组件挂载时加载保存的数据
mounted() {
  const savedCanvas = localStorage.getItem('visualCanvas')
  if (savedCanvas) {
    try {
      const canvasData = JSON.parse(savedCanvas)
      this.canvasComponents = canvasData.components || []

      // 恢复背景设置
      if (canvasData.background) {
        this.canvasBackground = canvasData.background.image || ''
        this.backgroundOpacity = canvasData.background.opacity || 30
        this.backgroundSize = canvasData.background.size || 'cover'
        this.backgroundPosition = canvasData.background.position || 'center'
      }

      this.$message.info(`已加载保存的画布,包含 ${this.canvasComponents.length} 个组件`)
    } catch (e) {
      console.error('加载画布数据失败:', e)
      this.$message.error('加载保存的画布数据失败')
    }
  }
}
存在哪儿就从哪儿取回来~
2.5.4 清空功能
// 清空画布
clearCanvas() {
  this.$confirm('确定要清空画布吗?此操作将删除所有组件和保存的数据。', '确认清空', {
    confirmButtonText: '确定清空',
    cancelButtonText: '取消',
    type: 'warning',
    confirmButtonClass: 'el-button--danger'
  }).then(() => {
    // 清空当前画布
    this.canvasComponents = []
    this.selectedComponent = null
    this.selectedIndex = -1

    // 清除本地存储
    localStorage.removeItem('visualCanvas')

    this.$message.success('画布已清空,保存的数据已删除')
  }).catch(() => {
    this.$message.info('已取消清空操作')
  })
}
清空component列表的时候也别忘了清空localStorage(这段感觉有点水字数了...
2.6 vue代码导出
// 导出Vue代码
async exportVueCode() {
  if (this.canvasComponents.length === 0) {
    this.$message.warning('画布为空,请先添加组件')
    return
  }

  try {
    const vueCode = this.generateVueCode()
    this.downloadVueFile(vueCode)
    this.$message.success('Vue代码已导出')
  } catch (error) {
    console.error('导出Vue代码失败:', error)
    this.$message.error('导出失败,请重试')
  }
} 画布有组件时导出vue代码,调用generateVueCode生成Vue代码,然后传给downloadVueFile以二进制的形式将文件传输到创建的url上,然后利用<a>标签的download属性强制浏览器下载。
2.7 模态框预览
// 预览画布
previewCanvas() {
  if (this.canvasComponents.length === 0) {
    this.$message.warning('画布为空,请先添加组件')
    return
  }
  this.previewVisible = true
},

// 关闭预览
closePreview() {
  this.previewVisible = false
}
简单通过previewVisible字段控制预览页面的渲染。
写在最后
其他的全屏预览和图片导出就鸽了,看以后有没有心情写吧,唉,烂尾。

Agent 垂直技术社区,欢迎活跃、内容共建。
更多推荐

 63
63 0
0- 0


 已为社区贡献1条内容

所有评论(0)