源码篇 Vue Router 4 中篇
电梯
Vue 源码
Vue Router 4 源码
源码拉取步骤可见上篇,话不多说,我们直接切入正题。
正文
1.H5 History 模式
它让单页应用(SPA)有了假装页面跳转的能力,Vue Router 的 history.push() / router.push() 底层就在用这个 API。它有下面这几个常用的 API:(本文以前两个为主分析)
| API | 作用 | 是否会刷新页面 |
|---|---|---|
history.pushState(state, title, url) | 向历史记录栈中添加一个新条目 | ❌ 否 |
history.replaceState(state, title, url) | 替换当前历史记录 | ❌ 否 |
history.back() | 后退一页(相当于浏览器返回) | ❌ 否 |
history.forward() | 前进一页 | ❌ 否 |
history.go(n) | 前进或后退 n 步 | ❌ 否 |
window.onpopstate | 监听用户点击“前进/后退”触发的事件 | ❌ 否 |
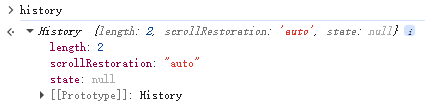
我们打开任意一个网页,在初始状态下,在控制台中输出history,可以得到:
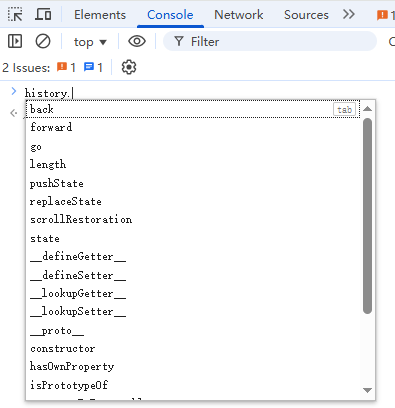
我们在控制台输入就可以看到API:
1.pushState(state, title, url)
假设我们的初始地址:

此时我们执行:
history.pushState({ userId: 123 }, '', '/users/123')我们的地址栏就会变成:

回退按键高亮,此时点击会回到 https://www.bing.com/

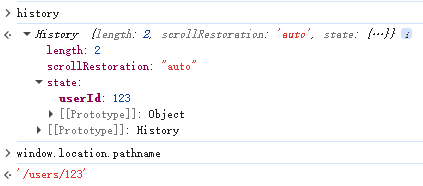
这个时候我们再输出 history,可以看到:
小结:
- 地址栏会从 / 变成 /users/123,并且不会触发页面刷新
- 用 window.location.pathname 输出了 /users/123
- 历史记录 +1(可以后退回来)
- state 可以随这条记录保存数据(可在 popstate 时取回)
2.replaceState(state, title, url)
此时我们执行:
history.replaceState({ userId: 456 }, '', '/users/456')得到结果如下:

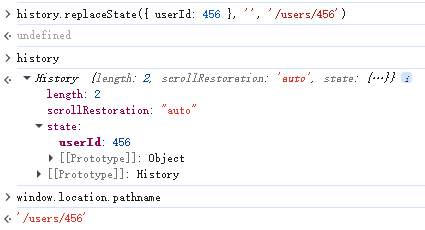
这时候我点回退,会直接回到 https://www.bing.com/,因为前一天记录被我替换掉了。
小结:
- replaceState 会替换当前历史记录(不会增加新记录)
3.popstate 事件
当用户点击 浏览器的“前进”或“后退”按钮 时,popstate 事件会触发:
window.addEventListener('popstate', (event) => {
  console.log('回到:', location.pathname)
  console.log('携带的 state:', event.state)
})
注意:
- pushState() 和 replaceState() 不会触发 popstate
- 只有用户操作历史记录时才会触发
4.刷新 404 的问题
因为 pushState 改变了 URL,但并没有真实的服务器资源。如果你直接刷新 /users/1,浏览器会去服务器请求 /users/1 页面。→ 若服务器没有对应路由,就会返回 404。
解决方法:在服务器配置一个“回退规则”,所有路径都返回 index.html,由前端接管路由。
5.History 和 Hash 的简单对比
项目 History 模式 Hash 模式 URL 样式 /users/123/#/users/123是否需要服务器支持 是 否 是否兼容旧浏览器 较差 较好 美观程度 漂亮 有 #
介绍完 H5 History API 的关键方法,我们来看看 Vue Router 是如何使用它的:
首先还是以一个例子开始,下面是我定义的路由配置:
createWebHistory() 基于 H5 History API
import { createRouter, createWebHistory } from 'vue-router'

const router = createRouter({
  history: createWebHistory(),
  routes: [
    { path: '/', component: Home },
    { path: '/users/:id', component: User },
  ]
})
执行流程:
- 调用 router.push('/users/1') → 内部执行 history.pushState({}, '', '/users/1')
- Vue Router 监听 popstate 事件 → 用户点返回时自动匹配并更新组件
- 不会重新加载页面,整个过程完全在前端控制
找到以下源码位置:
packages/router/src/history/html5.ts
packages/router/src/history/common.ts
2.Vue Router 的三种 History 模式
| 函数名 | 底层机制 | 适用场景 |
|---|---|---|
createWebHistory() | 使用 HTML5 的 history.pushState | 现代浏览器环境,URL 无 # |
createWebHashHistory() | 使用 URL 的 #hash 片段 | 兼容性好,不依赖服务器配置 |
createMemoryHistory() | 纯内存实现,不依赖浏览器 URL | SSR(服务端渲染)或测试环境 |
接下来将会分为3个模块对这三种模式展开说明。
3.createWebHistory
1.标准化 base 路径
export function createWebHistory(base?: string): RouterHistory这便是 createWebHistory 的方法定义,其中 入参 base 是指 基础路径:
base = normalizeBase(base)例如:
- 如果项目部署在 /app/ 下,base 就是 /app/
- 如果项目在根路径 /,base 就是 /
- normalizeBase() 会确保它:
- 以 / 开头,不以 / 结尾
- 确保格式规范(例如去掉多余斜杠)
normalizeBase('/app/') // => '/app'
normalizeBase('') // => '/'
返回的 RouterHistory 是一个“HTML5 History 模式”的路由历史对象。
2.创建导航控制对象
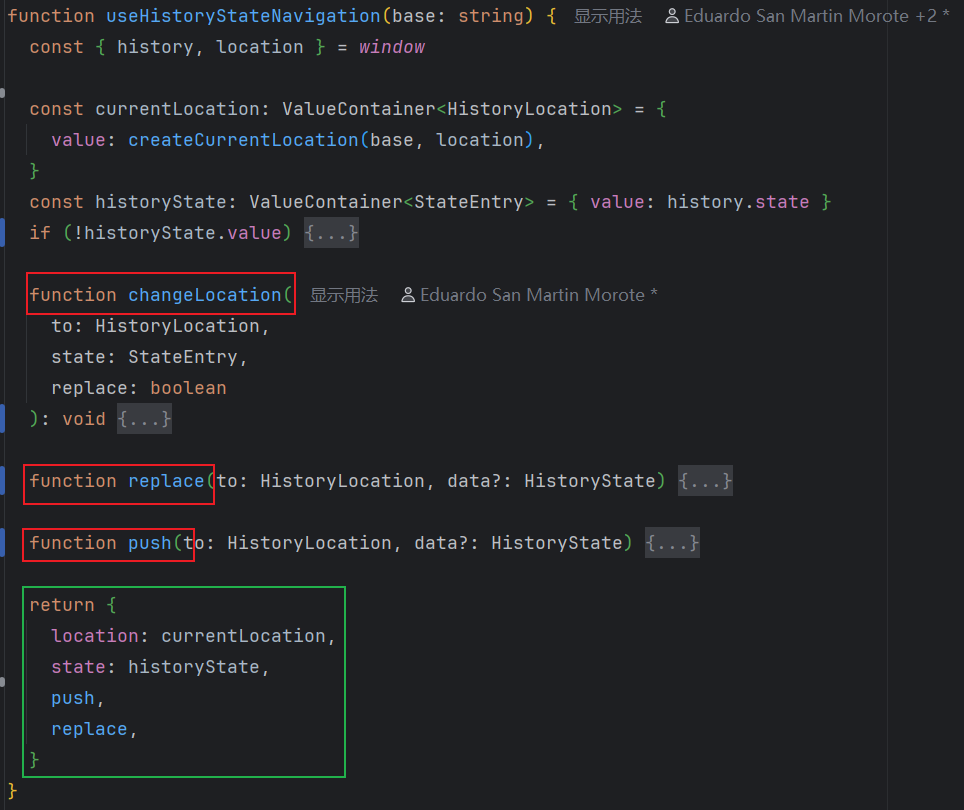
const historyNavigation = useHistoryStateNavigation(base)负责封装对 浏览器原生 History API 的操作,它最终返回的对象包含:replace(),push(),location,state。那么我深入看看 useHistoryStateNavigation 的内部执行:
源码位置:packages/router/src/history/html5.ts
- history.pushState 和 history.replaceState 被统一封装在 changeLocation 这个路径更新函数中。
- changeLocation 作为底层公共方法,被上层的 push 和 replace 函数调用,(即 router.push 与 router.replace 的核心实现)
- 根据 replace 标记决定使用 history.pushState 或 history.replaceState 进行跳转
- Vue Router 的 history state 本质上是基于浏览器原生的 history.state 实现。
- useHistoryStateNavigation 方法将 push、replace、state 与 location 进行封装,并作为一个整体对象返回,从而完成了路由历史的初始化与管理。
其中 replace 和 push 里都使用到一个公共函数 buildState:
function buildState(
  back: HistoryLocation | null,
  current: HistoryLocation,
  forward: HistoryLocation | null,
  replaced: boolean = false,
  computeScroll: boolean = false
): StateEntry {
  return {
    back,
    current,
    forward,
    replaced,
    position: window.history.length,
    scroll: computeScroll ? computeScrollPosition() : null,
  }
}
它用于构建一个完整的路由状态对象(StateEntry),记录了当前路由、前进/后退路径、在历史栈的位置、是否替换、以及页面滚动位置。当我回退时就可以滚动到原来位置。
export const computeScrollPosition = (): _ScrollPositionNormalized => ({
  left: window.scrollX,
  top: window.scrollY,
})
computeScrollPosition 记录了当前页面滚动条的位置,这个数据会被保存在 state.scroll 里,用于在用户「后退 / 前进」时恢复页面的滚动位置。
replace() 执行流程:
function replace(to, data) {
  const state: StateEntry = assign(
    {},
    history.state,                     // ① 继承浏览器现有状态
    buildState(                        // ② 创建新的状态对象
      historyState.value.back,         //   - back: 旧的上一个页面
      to,                              //   - current: 新目标路径
      historyState.value.forward,      //   - forward: 保留前进目标
      true                             //   - replaced = true
    ),
    data,                              // ③ 用户自定义的扩展数据
    { position: historyState.value.position } // ④ 保持当前位置不变
  )

  changeLocation(to, state, true)      // ⑤ 调用 changeLocation(replaceState)
  currentLocation.value = to           // ⑥ 更新响应式 currentLocation
}
注意:
- position 不变,代表仍在同一个历史位置
- 保留原来的前后链路(back/forward),仅更新 current
push() 执行流程:
function push(to, data) {
  const currentState = assign(
    {},
    historyState.value,               // ① 取当前 Vue Router 内部 state
    history.state,                    // ② 取浏览器实际 state
    {
      forward: to,                    // ③ 指定 forward = 目标路径
      scroll: computeScrollPosition() // ④ 记录当前滚动位置
    }
  )

  // 🚨 如果用户手动替换了 history.state,给出警告
  if (__DEV__ && !history.state) {
    warn('history.state seems to have been manually replaced...')
  }

  changeLocation(currentState.current, currentState, true)
  // ⑤ 先把当前 entry 更新(用 replaceState)

  const state: StateEntry = assign(
    {},
    buildState(currentLocation.value, to, null), // ⑥ 构建新的 entry
    { position: currentState.position + 1 },     // ⑦ 历史位置 +1
    data
  )

  changeLocation(to, state, false)   // ⑧ pushState => 新增历史记录
  currentLocation.value = to         // ⑨ 更新响应式 currentLocation
}
注意:
- position +1,表示历史栈向前推进
- 先更新当前页的滚动信息,再推入新 entry(这就是为什么要调用两次changeLocation)
调用 操作类型 作用 对应的浏览器行为 第一次 changeLocation(..., true)replaceState更新当前页的状态(记录滚动位置、forward 信息) 不改变 URL,不新增记录 第二次 changeLocation(..., false)pushState新增一条历史记录(目标路由) URL 变化,历史长度 +1 举个例子,在 /home 页面滚动到 300px 高度,执行 router.push('/about') 跳转到 /about:
changeLocation(currentState.current, currentState, true)changeLocation(to, state, false)初始状态: [ { current: '/home', back: null, forward: null } ] 用户执行 router.push('/about') │ ├─ 第一次 changeLocation(..., true) ← replaceState │ 更新当前记录: │ { current: '/home', forward: '/about', scroll: { top: 300, left: 0 } } │ └─ 第二次 changeLocation(..., false) ← pushState 新增一条记录: { back: '/home', current: '/about', forward: null } 最终形成新的前后链: [ /home ] ← current ↓ forward [ /about ]
3.创建监听器对象
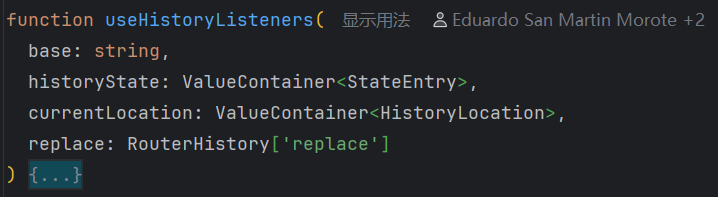
const historyListeners = useHistoryListeners(
    base,
    historyNavigation.state,
    historyNavigation.location,
    historyNavigation.replace
)
我们上面提到 “当用户点击 浏览器的“前进”或“后退”按钮 时,popstate 事件会触发:”,这里就涉及到了 popStateHandler 方法,将其绑定到 popstate 事件 即可实现路由跳转监听。当页面关闭或跳转前会触发 beforeunload 事件,这里是将 beforeUnloadListener 方法绑定到 beforeunload 事件上实现监听。
源码位置:packages/router/src/history/html5.ts
popStateHandler():
const popStateHandler: PopStateListener = ({
    state,
  }: {
    state: StateEntry | null
  }) => {
    // 获取当前与上一次的路由位置
    const to = createCurrentLocation(base, location)
    const from: HistoryLocation = currentLocation.value
    const fromState: StateEntry = historyState.value
    // 初始化 delta(表示历史位置偏移量)
    let delta = 0

    if (state) {
      // 表示这次 popstate 事件带有 history.state,更新内部缓存
      currentLocation.value = to
      historyState.value = state

      // 暂停监听时,清空 pauseState 并不继续执行导航逻辑
      if (pauseState && pauseState === from) {
        pauseState = null
        return
      }
      // 计算前进/后退偏移量 delta
      delta = fromState ? state.position - fromState.position : 0
    } else {
      // 这次 popstate 没带 history.state,用当前 URL 重新建立一个 state 对象(补全历史状态)
      replace(to)
    }
    // 通知所有监听器(触发路由更新),发出一个导航事件
    listeners.forEach(listener => {
      listener(currentLocation.value, from, {
        delta,
        type: NavigationType.pop,
        direction: delta
          ? delta > 0
            ? NavigationDirection.forward
            : NavigationDirection.back
          : NavigationDirection.unknown,
      })
    })
  }
beforeUnloadListener():
function beforeUnloadListener() {
    // 获取 window.history
    const { history } = window
    // 如果当前没有 state,直接退出
    if (!history.state) return
    // 替换当前 state(保存滚动信息)
    history.replaceState(
      assign({}, history.state, { scroll: computeScrollPosition() }),
      ''
    )
  }
三个钩子:(便于自定义监听逻辑)
function pauseListeners() {
    pauseState = currentLocation.value
}

function listen(callback: NavigationCallback) {
    listeners.push(callback)

    const teardown = () => {
      const index = listeners.indexOf(callback)
      if (index > -1) listeners.splice(index, 1)
    }

    teardowns.push(teardown)
    return teardown
}

function destroy() {
    for (const teardown of teardowns) teardown()
    teardowns = []
    window.removeEventListener('popstate', popStateHandler)
    window.removeEventListener('beforeunload', beforeUnloadListener)
}
4.定义 go() 方法
function go(delta: number, triggerListeners = true) {
    if (!triggerListeners) historyListeners.pauseListeners()
    history.go(delta)
}
相当于封装浏览器原生的 history.go(),用于前进/后退若干步。
- delta:向前/后多少步(正数 = 前进,负数 = 后退)
- triggerListeners = false 时,先暂停监听器,防止重复触发导航。
routerHistory.go(-1) // 后退一页
routerHistory.go(1)  // 前进一页
5.组装 routerHistory 对象
const routerHistory: RouterHistory = assign(
    {
      location: '',
      base,
      go,
      createHref: createHref.bind(null, base),
    },

    historyNavigation,
    historyListeners
)
将前面三个部分整合为一个完整的路由历史对象。
6.定义响应式 getter
Object.defineProperty(routerHistory, 'location', {
    enumerable: true,
    get: () => historyNavigation.location.value,
})

Object.defineProperty(routerHistory, 'state', {
    enumerable: true,
    get: () => historyNavigation.state.value,
})
让 routerHistory.location 和 routerHistory.state 始终保持最新值(由内部 ref 控制)
4.createWebHashHistory
createWebHashHistory() 的原理和 createWebHistory() 一样,区别在于它使用 URL 的 # 部分来保存路径。
createWebHistory():     https://example.com/about
createWebHashHistory(): https://example.com/#/about
特点:
- hash 模式下不会触发服务端 404;
- 只修改 URL 的哈希部分(# 后的内容),不会触发浏览器真正的导航;
- 通过 hashchange 事件监听变化;
- 用于前端 SPA 应用在旧服务器或静态环境中。
源码位置:packages/router/src/history/hash.ts
export function createWebHashHistory(base?: string): RouterHistory {
  base = location.host ? base || location.pathname + location.search : ''
  if (!base.includes('#')) base += '#'

  if (__DEV__ && !base.endsWith('#/') && !base.endsWith('#')) {
    warn(
      `A hash base must end with a "#":\n"${base}" should be "${base.replace(
        /#.*$/,
        '#'
      )}".`
    )
  }
  return createWebHistory(base)
}
5.createMemoryHistory
源码位置:packages/router/src/history/memory.ts
下面是对于源码的分析:
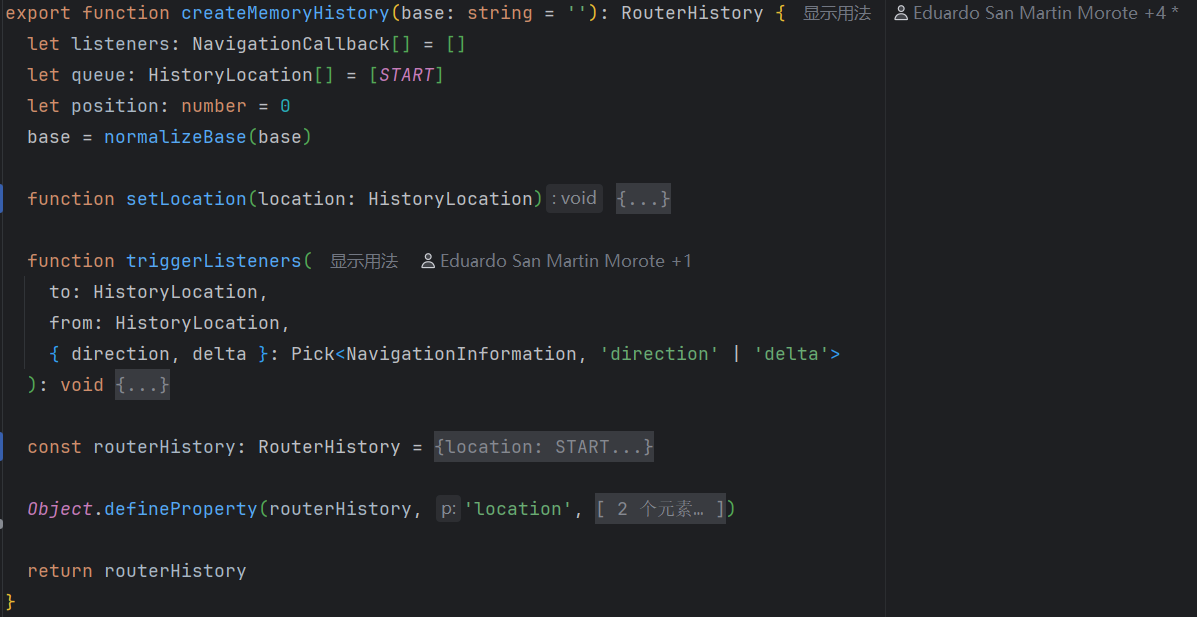
export function createMemoryHistory(base: string = ''): RouterHistorycreateMemoryHistory 不依赖浏览器的真实 URL,所有导航状态都存储在 JavaScript 的内存中。
let listeners: NavigationCallback[] = []
let queue: HistoryLocation[] = [START]
let position: number = 0
base = normalizeBase(base)- listeners: 保存所有注册的导航监听函数
- queue: 模拟浏览器历史栈,初始为 [START](通常是 /)
- position: 当前“指针”指向栈中的位置
- base: 统一格式化 base 路径
function setLocation(location: HistoryLocation) {
    position++
    if (position !== queue.length) {
      queue.splice(position)
    }
    queue.push(location)
}
通过position(计步器)改变queue达到路由跳转效果,模拟 push 行为
Object.defineProperty(routerHistory, 'location', {
  enumerable: true,
  get: () => queue[position],
})- 保证 routerHistory.location 始终返回当前路径
- 不可被直接修改
- 随着 position 的变化动态更新
本篇小结
本篇作为 Vue Router4 源码篇 的第二篇,我们分析了 H5 History 模式,区分了 createWebHistory(),createWebHashHistory(),createMemoryHistory(),接下来,我们将重点围绕 导航守卫 展开。

Agent 垂直技术社区,欢迎活跃、内容共建。
更多推荐


 21
21 0
0- 0


 已为社区贡献6条内容

所有评论(0)