跨平台React Native鸿蒙开发案例十二:react-native-pager-view 2种使用方案
react-native-pager-view是一个专门为React Native应用设计的原生分页视图组件,它提供了在移动应用中实现水平滑动页面切换的能力,类似于Android中的ViewPager或iOS中的UIPageViewController的功能。这个库通过桥接原生平台的视图组件,为React Native开发者提供了流畅、自然的页面切换体验,同时保持了与React Native生态系统的完美集成。
从技术架构的角度来看,react-native-pager-view实际上是一个原生模块的封装,它利用了React Native的Native Modules体系结构,将原生的分页功能暴露给JavaScript层使用。在Android平台上,它基于AndroidX的ViewPager2组件构建,这是一个现代化的分页解决方案,相比传统的ViewPager具有更好的性能和更多的功能。在iOS平台上,它使用UIPageViewController来实现类似的功能。这种跨平台的设计使得开发者可以用相同的代码在两大移动平台上获得一致的用户体验。
使用三方库
本工程的首页视图中使用了react-native-pager-view库进行开发。需要先按照工程运行指导的说明添加三方库依赖。
使用三方库包括两种方式:
-
方式一:在CAPI版本中使用ArkTS版本的三方库。当前RN框架仅支持叶子节点的ArkTS版本的三方库,不支持容器节点的三方库。具体的使用方法为在鸿蒙侧的
buildCustomComponent方法中添加三方库组件映射,例如FastImage。注意,映射需要在外侧添加一个Stack组件,并设置position为(0,0):
-
方式二:直接使用CPP版本的三方库,此种方式无需进行其他操作,可以直接使用。
在React Native侧
SamplePackage/MainProject/src/bundles/HomePage/HomePage.tsx文件中使用三方库的PagerView组件: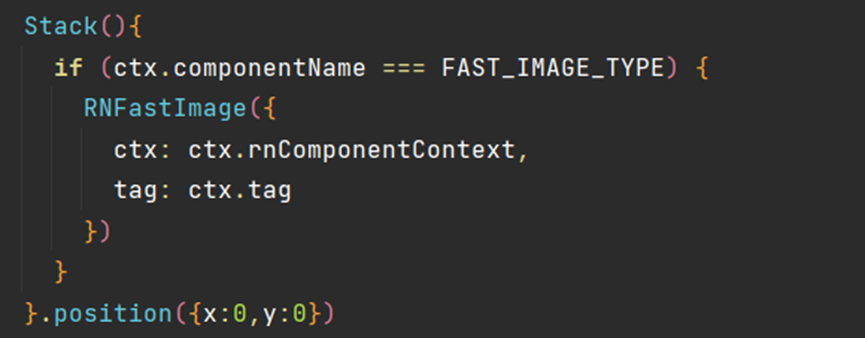
在安装和使用方面,react-native-pager-view可以通过npm或yarn进行安装,并且由于它包含原生代码,因此在安装后需要执行相应的链接命令。对于较新版本的React Native,这个组件还支持自动链接功能,大大简化了集成过程。
组件的主要属性包括initialPage,用于设置初始显示的页面索引;orientation,控制分页方向是水平还是垂直;scrollEnabled,启用或禁用滑动功能;onPageSelected,页面切换时的回调函数;onPageScroll,页面滚动时的回调函数等。这些属性共同构成了一个灵活而强大的分页系统。
从性能优化的角度来看,react-native-pager-view采用了原生的分页实现,这意味着页面切换的流畅度和响应性都达到了原生应用的水平。
在实际应用场景中,react-native-pager-view非常适合构建需要多个标签页切换的应用界面,比如新闻阅读器、图片浏览器、设置页面等。在这些场景中,用户期望能够通过直观的滑动手势在不同内容之间导航。
该组件还提供了丰富的API,允许开发者在JavaScript层面对分页行为进行精细控制。例如,可以使用setPage方法以编程方式切换到指定页面,或者使用setScrollEnabled方法动态控制是否允许用户滑动切换页面。
在用户体验方面,react-native-pager-view提供了平滑的页面切换动画,支持自定义过渡效果,并且与React Native的手势识别系统完美集成。
从兼容性角度来看,react-native-pager-view支持React Native 0.60及以上版本,并且与Hermes引擎完全兼容。
import {
  RNInstance,
  RNOHCoreContext,
  ResourceJSBundleProvider,
  RNSurface,
  RNComponentContext,
  RNOHContext,
  CustomRNComponentFrameNodeFactory,
  buildRNComponentForTag
} from '@rnoh/react-native-openharmony';
import { createRNPackages, buildCustomComponent, ENABLE_CAPI_ARCHITECTURE } from '../rn';
import { arkTsComponentNames } from '../rn/LoadBundle';

const wrappedCustomRNComponentBuilder = wrapBuilder(buildCustomComponent);

@Entry
@Component
export struct MultiSurface {
  @StorageLink('RNOHCoreContext') rnohCoreContext: RNOHCoreContext | undefined = undefined;
  private instance1: RNInstance | undefined;
  private instance2: RNInstance | undefined;
  private instance3: RNInstance | undefined;
  private bundlePath1 = 'bundle/cp/homepage.harmony.bundle';
  private moduleName1 = 'HomePage';
  private bundlePath2 = 'bundle/cp/goods.harmony.bundle';
  private moduleName2 = 'Goods';
  private bundlePath3 = 'bundle/bp/details.harmony.bundle';
  private moduleName3 = 'Details';
  @State isBundleReady1: boolean = false;
  @State isBundleReady2: boolean = false;
  @State isBundleReady3: boolean = false;
  container: Record<string, string | number> = {
    "backgroundColor": '#E6E6E6',
    "flex": 1,
    "padding": 20,
  }
  apiFontSize: Record<string, string | number> = {
    'fontSize': 30,
    'color': 'white'
  }
  styles: Record<string, object> = {
    'container': this.container,
    'apiFontSize': this.apiFontSize
  }
  initProps: Record<string, string | object> = {
    'stringParam': 'ArkTS传递给RN的参数',
    'styles': this.styles
  };

  async aboutToAppear() {
    console.log("MultiSurface=====")
    if (!this.rnohCoreContext) {
      return;
    }

    this.instance1 = await this.rnohCoreContext.createAndRegisterRNInstance({
      createRNPackages: createRNPackages,
      enableNDKTextMeasuring: true,
      enableBackgroundExecutor: false,
      enableCAPIArchitecture: ENABLE_CAPI_ARCHITECTURE,
      arkTsComponentNames: arkTsComponentNames
    });
    const ctxInstance1: RNComponentContext = new RNComponentContext(
      RNOHContext.fromCoreContext(this.rnohCoreContext!, this.instance1),
      wrapBuilder(buildCustomComponent),
      wrapBuilder(buildRNComponentForTag),
      new Map()
    );
    await this.instance1.runJSBundle(new ResourceJSBundleProvider(getContext().resourceManager,
      'bundle/basic/basic.harmony.bundle'));
    await this.instance1.runJSBundle(new ResourceJSBundleProvider(getContext().resourceManager, this.bundlePath1))
      .then(() => {
        this.isBundleReady1 = true;
        console.log('instance1 加载完成' + this.bundlePath1);
      })

    this.instance2 = await this.rnohCoreContext.createAndRegisterRNInstance({
      createRNPackages: createRNPackages,
      enableNDKTextMeasuring: true,
      enableBackgroundExecutor: false,
      enableCAPIArchitecture: ENABLE_CAPI_ARCHITECTURE,
      arkTsComponentNames: arkTsComponentNames
    });
    const ctxInstance2: RNComponentContext = new RNComponentContext(
      RNOHContext.fromCoreContext(this.rnohCoreContext!, this.instance2),
      wrapBuilder(buildCustomComponent),
      wrapBuilder(buildRNComponentForTag),
      new Map()
    );
    await this.instance2.runJSBundle(new ResourceJSBundleProvider(getContext().resourceManager,
      'bundle/basic/basic.harmony.bundle'));
    await this.instance2.runJSBundle(new ResourceJSBundleProvider(getContext().resourceManager, this.bundlePath2))
      .then(() => {
        this.isBundleReady2 = true;
        console.log('instance2 加载完成' + this.bundlePath2);
      })

    this.instance3 = await this.rnohCoreContext.createAndRegisterRNInstance({
      createRNPackages: createRNPackages,
      enableNDKTextMeasuring: true,
      enableBackgroundExecutor: false,
      enableCAPIArchitecture: ENABLE_CAPI_ARCHITECTURE,
      arkTsComponentNames: arkTsComponentNames
    });
    const ctxInstance3: RNComponentContext = new RNComponentContext(
      RNOHContext.fromCoreContext(this.rnohCoreContext!, this.instance3),
      wrapBuilder(buildCustomComponent),
      wrapBuilder(buildRNComponentForTag),
      new Map()
    );
    await this.instance3.runJSBundle(new ResourceJSBundleProvider(getContext().resourceManager, this.bundlePath3))
      .then(() => {
        this.isBundleReady3 = true;
        console.log('instance3 加载完成' + this.bundlePath3);
      })
  }

  @Builder
  MultiSurfaceItem(moduleName: string, instance: RNInstance) {
    Column() {
      RNSurface({
        surfaceConfig: {
          appKey: moduleName,
          initialProps: this.initProps,
        },
        ctx: new RNComponentContext(
          RNOHContext.fromCoreContext(this.rnohCoreContext!, instance),
          wrappedCustomRNComponentBuilder,
          wrapBuilder(buildRNComponentForTag),
          new Map()
        ),
      })
    }
    .align(Alignment.Top)
    // .margin({ top: 10 })
    .width('100%')
    .height('30%')
  }

  build() {
    NavDestination() {
      Column() {
        // It's OK
        // if (this.isBundleReady1 && this.isBundleReady2 && this.isBundleReady3) {
        //   this.MultiSurfaceItem(this.moduleName1, this.instance1!)
        //   this.MultiSurfaceItem(this.moduleName2, this.instance2!)
        //   this.MultiSurfaceItem(this.moduleName3, this.instance3!)
        // }
        // It's OK
        if (this.isBundleReady1) {
          this.MultiSurfaceItem(this.moduleName1, this.instance1!);
        }
        if (this.isBundleReady2) {
          this.MultiSurfaceItem(this.moduleName2, this.instance2!);
        }
        if (this.isBundleReady3) {
          this.MultiSurfaceItem(this.moduleName3, this.instance3!);
        }
      }
      .width('100%')
      .height('100%')
    }
  }
}
欢迎大家加入开源鸿蒙跨平台开发者社区,一起共建开源鸿蒙跨平台生态。

Agent 垂直技术社区,欢迎活跃、内容共建。
更多推荐


 9
9 0
0- 0


 已为社区贡献5条内容

所有评论(0)