SpringBoot,Thymeleaf,Druid,Shiro,Swagger,Dubbo+Zookeeper
文章目录
SpringBoot
1、回顾Spring
Spring是为了解决企业级应用开发的复杂性而创建的,简化开发。
1.1、Spring是如何简化Java开发的
为了降低Java开发的复杂性,Spring采用了以下4种关键策略:
1、基于POJO的轻量级和最小侵入性编程,所有东西都是bean;
2、通过IOC,依赖注入(DI)和面向接口实现松耦合;
3、基于切面(AOP)和惯例进行声明式编程;
4、通过切面和模版减少样式代码,RedisTemplate,xxxTemplate;
2、什么是SpringBoot
Spring Boot 基于 Spring 开发,Spirng Boot 本身并不提供 Spring 框架的核心特性以及扩展功能,只是用于快速、敏捷地开发新一代基于 Spring 框架的应用程序。 以约定大于配置的核心思想,默认帮我们进行了很多设置。
简单来说就是SpringBoot其实不是什么新的框架,它默认配置了很多框架的使用方式,就像maven整合了所有的jar包,spring boot整合了所有的框架 。
Spring Boot的主要优点:
- 为所有Spring开发者更快的入门
- 开箱即用,提供各种默认配置来简化项目配置
- 内嵌式容器简化Web项目
- 没有冗余代码生成和XML配置的要求
3、第一个SpringBoot程序
使用 IDEA 直接创建项目
1、创建一个新项目
2、选择spring initalizr , 可以看到默认就是去官网的快速构建工具那里实现
3、填写项目信息
4、选择初始化的组件(初学勾选 Web 即可)
5、填写项目路径
6、等待项目构建成功
3.1、更改端口号
在application.properties中
Server.port=8081
3.2、pom.xml
spring-boot-dependencies:核心依赖在父工程中
我们在写或引入springboot依赖时不需要指定版本,因为有这些版本的仓库
4、自动装配原理
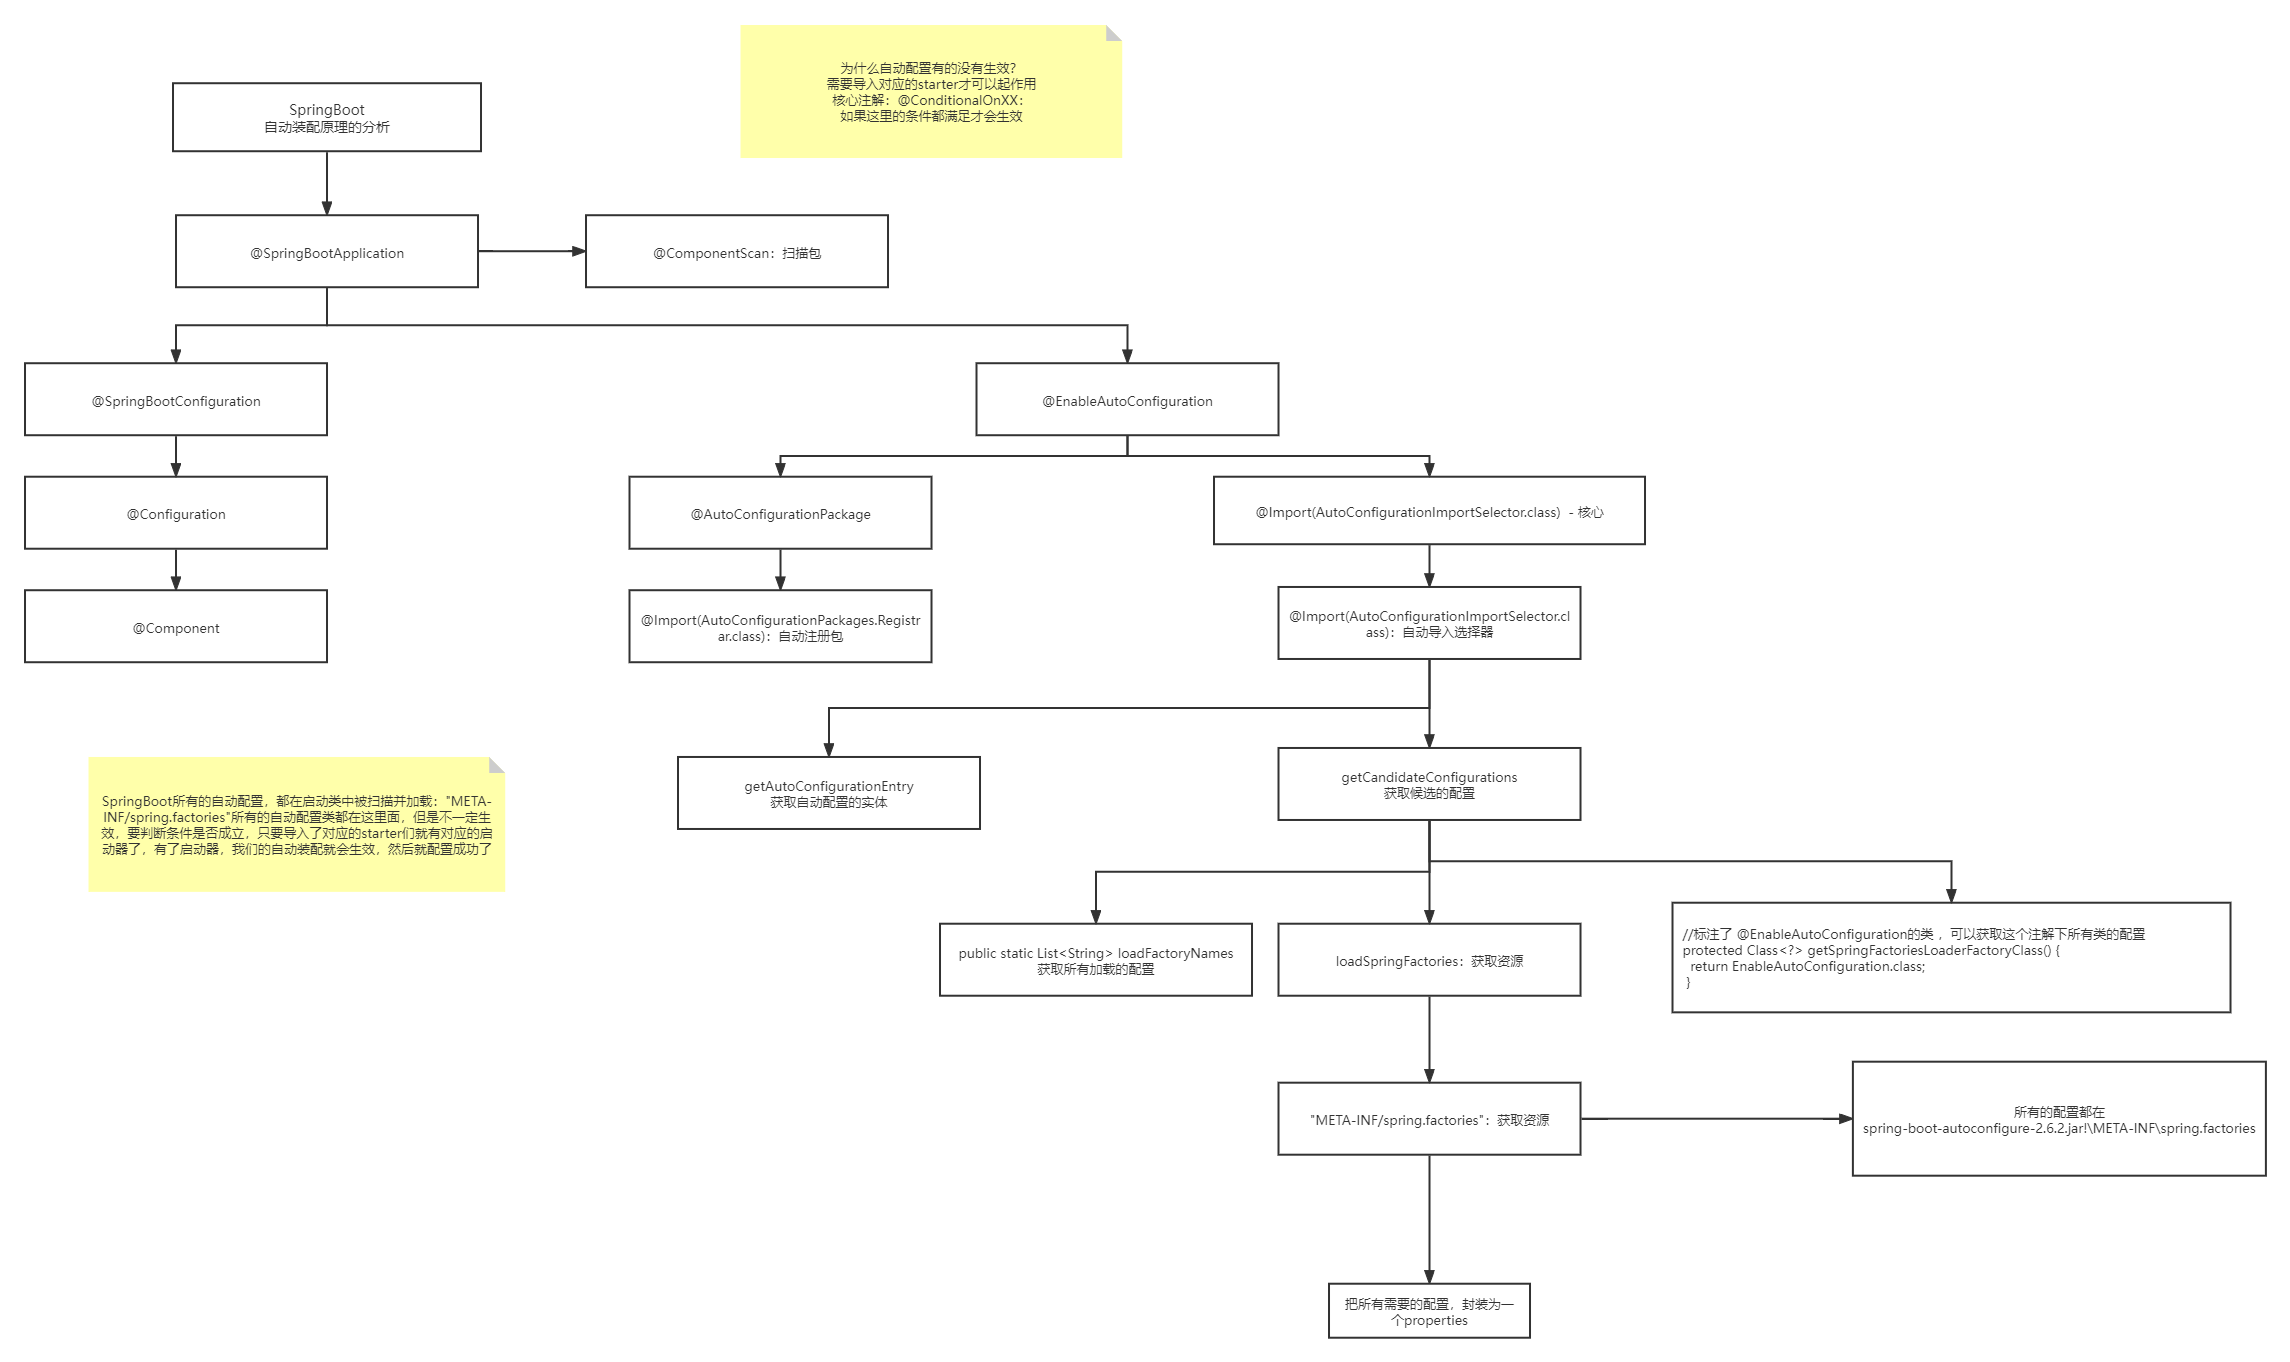
springboot2
- 在SpringBoot启动类上有一个注解@SpringBootApplication,他对三个注解进行了封装:@SpringBootConfiguration,@EnableAutoConfiguration,@ComponentScan
- @SpringBootConfiguration注解对@Configuration注解封装,@Configuration对@Component进行了封装,说明是一个spring配置类,是spring的一个组件
- @EnableAutoConfiguration是自动化配置的核心,它通过@AutoConfigurationPackage注解注册包,通过
@Import注解导入对应的配置选择器。关键的是内部就是读取了该项目和该项目引用的Jar包的的classpath路径下META-INF/spring.factories文件中的所配置的类的全类名。在这些配置类中所定义的Bean会根据条件注解所指定的条件来决定是否需要将其导入到Spring容器中。 - 一般条件判断会有像
@ConditionalOnClass这样的注解,判断是否有对应的class文件,如果有则加载该类,把这个配置类的所有的Bean放入spring容器中使用。 - 比如:在application.yaml中填写配置,所有配置都会绑定一个xxxproperties类,在xxxAutoConfiguration自动装配时@EnableConfigurationProperties会找到对应的xxxproperties类,读取到填写的配置后,根据条件决定是否放入容器
Spring Boot 3 自动配置原理是:启动类上的 @SpringBootApplication 包含了 @EnableAutoConfiguration,该注解通过 @Import 导入了 AutoConfigurationImportSelector。在容器刷新阶段,selectImports() 方法被调用,它会读取 META-INF/spring/org.springframework.boot.autoconfigure.AutoConfiguration.imports 文件中定义的所有自动配置类全限定名,然后通过 @Conditional 条件注解体系(如 @ConditionalOnClass, @ConditionalOnProperty 等)筛选出满足条件的配置类,最终将其中的 Bean 自动注册到 IOC 容器中,实现零配置开箱即用。
5、启动类的run方法
主要做了以下四件事情:
- 1、推断应用的类型是普通的项目还是Web项目
- 2、查找并加载所有可用初始化器 , 设置到initializers属性中
- 3、找出所有的应用程序监听器,设置到listeners属性中
- 4、推断并设置main方法的定义类,找到运行的主类
6、关于SpringBoot,谈谈你的理解:
- 自动装配:如何加载
- run方法:如何启动
7、配置文件
7.1、properties
- application.properties
- 语法结构 :key=value
扁平键值对,适合简单配置
7.2、yaml(yml)
树状缩进,支持锚点(&)、别名(*)、引用,配置较多时层次清晰,可读性更强
语法:
# k-v键值对
name: xiaoqi
#相当于name=xiaoqi
# 存对象
student:
  name: xiaoqi
  age: 12

# 行内写法
student1: {name: xiaoqi,age: 13}

#数组
pets:
  - cat
  - dog
  - pyg

pets1: [cat,dog]
说明:语法要求严格!
1、空格不能省略
2、以缩进来控制层级关系,只要是左边对齐的一列数据都是同一个层级的。
3、属性和值的大小写都是十分敏感的。
7.3、配置文件赋值
配置文件赋值给实体类/JavaConfig有两种方式
7.3.1、@ConfigurationProperties
yaml文件给实体类直接注入匹配值
-
Dog
package com.zhao.pojo; import lombok.AllArgsConstructor; import lombok.Data; import lombok.NoArgsConstructor; import org.springframework.stereotype.Component; @Component @Data @NoArgsConstructor @AllArgsConstructor public class Dog { private String name; private int age; } -
Person
package com.zhao.pojo; import lombok.AllArgsConstructor; import lombok.Data; import lombok.NoArgsConstructor; import lombok.ToString; import org.springframework.boot.context.properties.ConfigurationProperties; import org.springframework.stereotype.Component; import java.util.Date; import java.util.List; import java.util.Map; @Component @Data @NoArgsConstructor @AllArgsConstructor @ToString @ConfigurationProperties(prefix = "person") public class Person { private String name; private Integer age; private boolean happy; private Date birthday; private Map<Object,Object> map; private List<Object> list; private Dog dog; } -
application.yaml
Person: name: 张三 age: 18 happy: true birthday: 2000/01/01 map: {k1: v1, k2: v2} list: - l1 - l2 - l3 dog: name: 旺财 age: 1 -
test
@SpringBootTest
class Springboot02ConfigApplicationTests {
    @Autowired
    private Person person;
    @Test
    void contextLoads() {
        System.out.println(person);
    }

}
7.3.2、@PropertySource和@Value
加载指定的配置文件,以properties为例
-
新建一个person.properties文件
name=zhangsan -
然后在我们的代码中指定加载person.properties文件
@PropertySource("classpath:person.properties")
public class Person {
    @Value("${person.name}")
    private String name;
    private Integer age;
    private boolean happy;
    private Date birthday;
    private Map<Object,Object> map;
    private List<Object> list;
    private Dog dog;
}
7.3.3、对比
| @ConfigurationProperties | @Value | |
|---|---|---|
| 功能 | 批量注入配置文件中的属性 | 一个个注入 |
| 松散绑定 | 支持 | 不支持 |
| SpEL | 不支持 | 支持 |
| JSR303数据校验 | 支持 | 不支持 |
| 复杂类型封装 | 支持 | 不支持 |
- 松散绑定:这个什么意思呢? 比如我的yml中写last-name,对应Person类中lastName,两者是一样的(相似于数据库字段转驼峰命名), - 后面跟着的字母默认是大写的。这就是松散绑定。
- JSR303数据校验 , 这个就是我们可以在字段是增加一层过滤器验证 , 可以保证数据的合法性
7.4、配置文件占位符
配置文件还可以编写占位符生成随机
Person:
  name: 张三${random.uuid}
  age: 18
  happy: true
  birthday: 2000/01/01
  map: {k1: v1, k2: v2}
  hello: world
  list:
    - l1
    - l2
    - l3
  dog:
    name: ${person.hello:other}_旺财 #如果hello没有那么就默认值other+旺财
    age: 1
7.5、JSR303校验
空检查
@Null 验证对象是否为null
@NotNull 验证对象是否不为null, 无法查检长度为0的字符串
@NotBlank 检查约束字符串是不是Null还有被Trim的长度是否大于0,只对字符串,且会去掉前后空格.
@NotEmpty 检查约束元素是否为NULL或者是EMPTY.

Booelan检查
@AssertTrue 验证 Boolean 对象是否为 true
@AssertFalse 验证 Boolean 对象是否为 false

长度检查
@Size(min=, max=) 验证对象(Array,Collection,Map,String)长度是否在给定的范围之内
@Length(min=, max=) Validates that the annotated string is between min and max included.

日期检查
@Past 验证 Date 和 Calendar 对象是否在当前时间之前,验证成立的话被注释的元素一定是一个过去的日期
@Future 验证 Date 和 Calendar 对象是否在当前时间之后 ,验证成立的话被注释的元素一定是一个将来的日期
@Pattern 验证 String 对象是否符合正则表达式的规则,被注释的元素符合制定的正则表达式,regexp:正则表达式 flags: 指定 Pattern.Flag 的数组,表示正则表达式的相关选项。

数值检查
建议使用在Stirng,Integer类型,不建议使用在int类型上,因为表单值为“”时无法转换为int,但可以转换为Stirng为”“,Integer为null
@Min 验证 Number 和 String 对象是否大等于指定的值
@Max 验证 Number 和 String 对象是否小等于指定的值
@DecimalMax 被标注的值必须不大于约束中指定的最大值. 这个约束的参数是一个通过BigDecimal定义的最大值的字符串表示.小数存在精度
@DecimalMin 被标注的值必须不小于约束中指定的最小值. 这个约束的参数是一个通过BigDecimal定义的最小值的字符串表示.小数存在精度
@Digits 验证 Number 和 String 的构成是否合法
@Digits(integer=,fraction=) 验证字符串是否是符合指定格式的数字,interger指定整数精度,fraction指定小数精度。
@Range(min=, max=) 被指定的元素必须在合适的范围内
@Range(min=10000,max=50000,message=”range.bean.wage”)
@Valid 递归的对关联对象进行校验, 如果关联对象是个集合或者数组,那么对其中的元素进行递归校验,如果是一个map,则对其中的值部分进行校验.(是否进行递归验证)
@CreditCardNumber信用卡验证
@Email 验证是否是邮件地址,如果为null,不进行验证,算通过验证。
@ScriptAssert(lang= ,script=, alias=)
@URL(protocol=,host=, port=,regexp=, flags=)]()]()
7.6、配置文件位置不同的优先级
优先级1:项目路径下的config文件夹配置文件优先级 file:./config/
2:项目路径下配置文件优先级 file:./
3:resource路径下的config文件夹配置文件优先级 classpath:/config/
4:resource路径下配置文件 classpath:/
7.7、多环境切换
我们在主配置文件编写的时候,文件名可以是 application-{profile}.properties/yml , 用来指定多个环境版本;
-
properties
application.properties
server.port=8080
spring.profiles.active=dev
application-dev.properties
server.port=8081application-test.properties
server.port=8082 -
yaml
使用yml去实现不需要创建多个配置文件,更加方便了 !
application.yaml
server:
  port: 8080

spring:
  profiles:
    active: dev

---
server:
  port: 8081
spring:
  config:
    activate:
      on-profile: dev

---
server:
  port: 8082
spring:
  config:
    activate:
      on-profile: test
注意:如果yml和properties同时都配置了端口,并且没有激活其他环境 , 默认会使用properties配置文件的!
8、SpringBoot Web
spring官网创建项目太慢,使用阿里云镜像https://start.aliyun.com/
8.1、静态资源存放
-
webjars(很少使用)
WebJars是将web前端资源(js,css等)打成jar包文件,然后借助Maven工具,以jar包形式对web前端资源进行统一依赖管理,保证这些Web资源版本唯一性。WebJars的jar包部署在Maven中央仓库上。
http://localhost:8080/webjars/github-com-jquery-jquery/3.4.1/jquery.js -
使用/**或/static或者/resources或者/public来访问静态资源
localhost:8080/1.js
localhost:8080/static/1.js
优先级:resources>static(默认)>puiblic
8.2、首页
在static下创建index.html即可,templates类似于WEB-INF无法直接访问
8.3、Thymeleaf模板引擎
前端交给我们的页面,是html页面。如果是我们以前开发,我们需要把他们转成jsp页面,jsp好处就是当我们查出一些数据转发到JSP页面以后,我们可以用jsp轻松实现数据的显示,及交互等。
jsp支持非常强大的功能,包括能写Java代码,但是呢,我们现在的这种情况,SpringBoot这个项目首先是以jar的方式,不是war,像第二,我们用的还是嵌入式的Tomcat,所以呢,他现在默认是不支持jsp的。
那不支持jsp,如果我们直接用纯静态页面的方式,那给我们开发会带来非常大的麻烦,那怎么办呢?
SpringBoot推荐你可以来使用模板引擎:
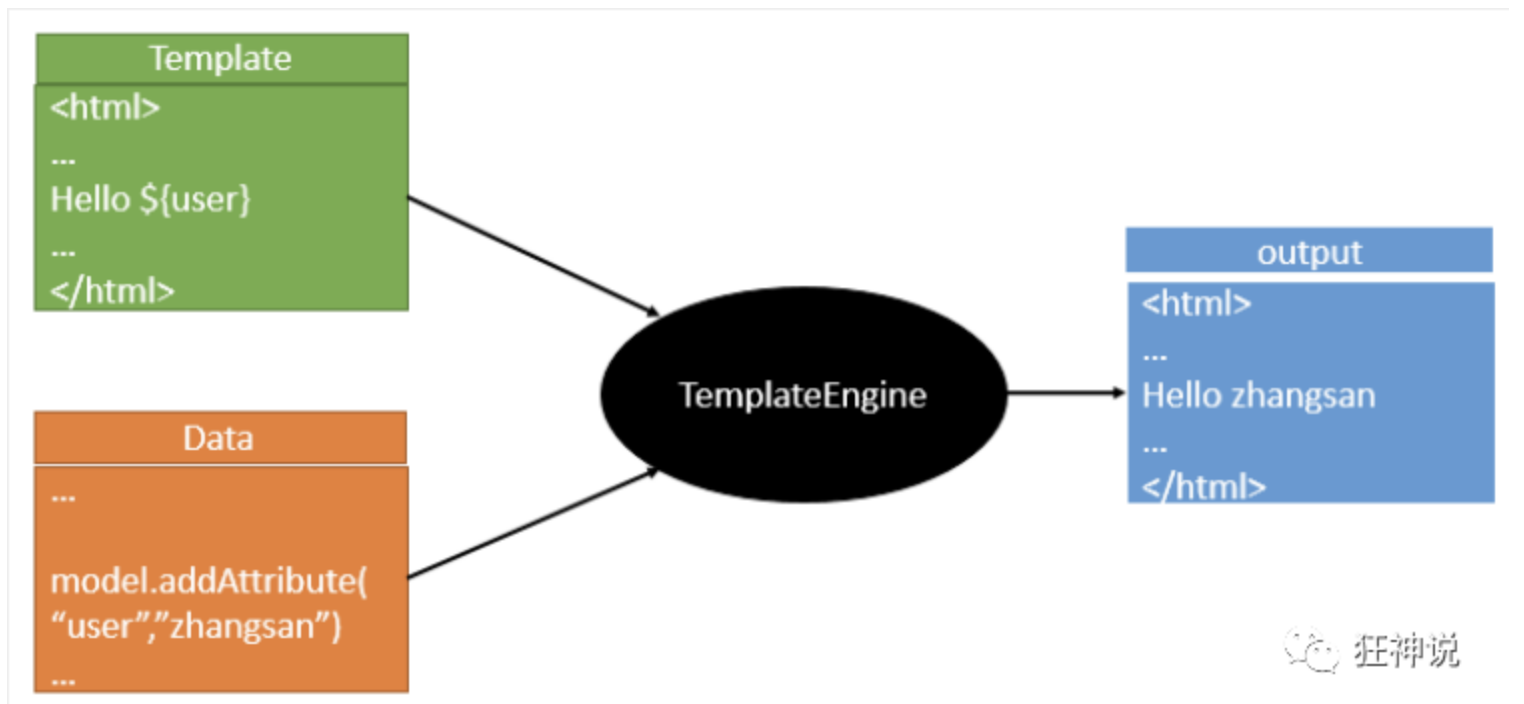
模板引擎,我们其实大家听到很多,其实jsp就是一个模板引擎,还有用的比较多的freemarker,包括SpringBoot给我们推荐的Thymeleaf,模板引擎有非常多,但再多的模板引擎,他们的思想都是一样的,什么样一个思想呢我们来看一下这张图:
8.3.1、引入Thymeleaf
<dependency>
    <groupId>org.thymeleaf</groupId>
    <artifactId>thymeleaf-spring5</artifactId>
</dependency>
<dependency>
    <groupId>org.thymeleaf.extras</groupId>
    <artifactId>thymeleaf-extras-java8time</artifactId>
</dependency>
使用Thymeleaf,只需要导入对应的依赖即可,如果想要访问页面,我们将html放入Templates目录下即可
8.3.2、分析Thymeleaf
前面呢,我们已经引入了Thymeleaf,那这个要怎么使用呢?
我们首先得按照SpringBoot的自动配置原理看一下我们这个Thymeleaf的自动配置规则,在按照那个规则,我们进行使用。
我们去找一下Thymeleaf的自动配置类:ThymeleafProperties
@ConfigurationProperties(
    prefix = "spring.thymeleaf"
)
public class ThymeleafProperties {
    private static final Charset DEFAULT_ENCODING;
    public static final String DEFAULT_PREFIX = "classpath:/templates/";
    public static final String DEFAULT_SUFFIX = ".html";
    private boolean checkTemplate = true;
    private boolean checkTemplateLocation = true;
    private String prefix = "classpath:/templates/";
    private String suffix = ".html";
    private String mode = "HTML";
    private Charset encoding;
}
我们可以在其中看到默认的前缀和后缀!
我们只需要把我们的html页面放在类路径下的templates下,thymeleaf就可以帮我们自动渲染了。
8.3.3、Thymeleaf语法
-
Simple expressions:
简单表达式:
- Variable Expressions:
${...}
变量表达式:${...} - Selection Variable Expressions:
*{...}
选择变量表达式:*{...} - Message Expressions:
#{...}消息表达式:#{...} - Link URL Expressions:
@{...}
链接 URL 表达式:@{...} - Fragment Expressions:
~{...}
片段表达式:~{...}
- Variable Expressions:
-
Literals
字面量
- Text literals:
'one text','Another one!',…
文本字面量:'one text','Another one!',… - Number literals:
0,34,3.0,12.3,…
数字字面量:0,34,3.0,12.3,… - Boolean literals:
true,false
布尔字面量:true,false - Null literal:
null空字面量:null - Literal tokens:
one,sometext,main,…
字面量标记:one,sometext,main,…
- Text literals:
-
Text operations:
文本操作:
- String concatenation:
+
字符串连接:+ - Literal substitutions:
|The name is ${name}|
字面替换:|The name is ${name}|
- String concatenation:
-
Arithmetic operations:
算术运算:
- Binary operators:
+,-,*,/,%
二元运算符:+,-,*,/,% - Minus sign (unary operator):
-
减号(一元运算符):-
- Binary operators:
-
Boolean operations:
布尔运算:
- Binary operators:
and,or
二元运算符:and,or - Boolean negation (unary operator):
!,not
布尔否定(一元运算符):!,not
- Binary operators:
-
Comparisons and equality:
比较和相等:
- Comparators:
>,<,>=,<=(gt,lt,ge,le)
比较器:>,<,>=,<=(gt,lt,ge,le) - Equality operators:
==,!=(eq,ne)
相等运算符:==,!=(eq,ne)
- Comparators:
-
Conditional operators:
条件运算符:
- If-then:
(if) ? (then)如果-那么:(if) ? (then) - If-then-else:
(if) ? (then) : (else)如果-那么-否则:(if) ? (then) : (else) - Default:
(value) ?: (defaultvalue)默认:(value) ?: (defaultvalue)
- If-then:
-
Special tokens:
特殊标记:
- No-Operation:
_无操作:_
- No-Operation:
8.3.4、使用
-
Controller
@RequestMapping("a") public String test(Model model){ model.addAttribute("name","zhangsan"); return "a"; } -
a.html
<!DOCTYPE html>
<html lang="en" xmlns:th="http://www.thymeleaf.org">
<head>
    <meta charset="UTF-8">
    <title>Title</title>
</head>
<body>
<div th:text="${name}"></div>
</body>
</html>
8.4、MVC扩展
如果你希望保留 Spring Boot MVC 的功能,并想添加额外的 MVC 配置(拦截器、格式化器、视图控制器和其他功能),你可以添加你自己的类型为 WebMvcConfigurer 的@Configuration 类,但不要包含@EnableWebMvc。如果你希望提供自定义的 RequestMappingHandlerMapping、RequestMappingHandlerAdapter 或 ExceptionHandlerExceptionResolver 实例,你可以声明一个 WebMvcRegistrationsAdapter 实例来提供这些组件。
我们要做的就是编写一个@Configuration注解类,并且类型要为WebMvcConfigurer,还不能标注@EnableWebMvc注解;我们去自己写一个;我们新建一个包叫config,写一个类MyMvcConfig;
//应为类型要求为WebMvcConfigurer,所以我们实现其接口
//可以使用自定义类扩展MVC的功能
@Configuration
public class MyMvcConfig implements WebMvcConfigurer {

    @Override
    public void addViewControllers(ViewControllerRegistry registry) {
        // 浏览器发送/test , 就会跳转到test页面;
        registry.addViewController("/test").setViewName("test");
    }
}
9、员工管理系统
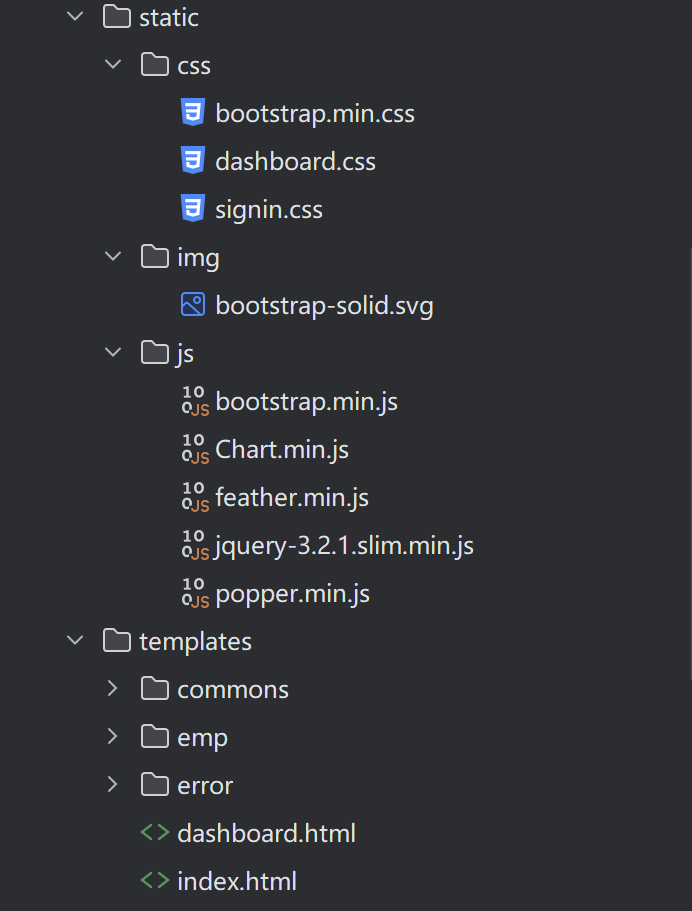
9.1、创建项目并导入静态资源
创建springboot项目,选择spingweb和thymeleaf导入,配置文件关闭thymeleaf缓存
9.2、编写pojo,dao
员工表
//员工表
@Data
@NoArgsConstructor
public class Employee {

    private Integer id;
    private String lastName;
    private String email;
    private Integer gender; //性别 0 女, 1,男
    private Department department;
    private Date birth;

    public Employee(Integer id, String lastName, String email, Integer gender, Department department) {
        this.id = id;
        this.lastName = lastName;
        this.email = email;
        this.gender = gender;
        this.department = department;
        this.birth = new Date();
    }
}
部门表
//部门表
@Data
@AllArgsConstructor
@NoArgsConstructor
public class Department {
    private int id;  //部门id
    private String departmentName;  //部门名字
}
部门dao
这里我们模拟数据库,springboot和数据库的连接在后序课程中。
//部门dao
@Repository
public class DepartmentDao {

    //模拟数据库中的数据

    private static Map<Integer, Department>departments = null;

    static {
        departments = new HashMap<Integer, Department>(); //创建一个部门表

        departments.put(101,new Department(101,"教学部"));
        departments.put(102,new Department(102,"市场部"));
        departments.put(103,new Department(103,"教研部"));
        departments.put(104,new Department(104,"运营部"));
        departments.put(105,new Department(105,"后勤部"));
    }

    //获取所有的部门信息
    public Collection<Department> getDepartments(){
        return departments.values();
    }
    //通过id得到部门
    public Department getDepartmentById(Integer id){
        return departments.get(id);
    }
}
员工dao
//员工dao
@Repository //被string托管
public class EmployeeDao {

    //模拟数据库中的数据
    private static Map<Integer, Employee> employees= null;
    //员工所属的部门
    @Autowired
    private DepartmentDao departmentDao;
    static {
        employees = new HashMap<Integer,Employee>(); //创建一个部门表

        employees.put(1001,new Employee(  1001,"AA","1622840727@qq.com",1,new Department(101,"教学部")));
        employees.put(1002,new Employee(  1002,"BB","2622840727@qq.com",0,new Department(102,"市场部")));
        employees.put(1003,new Employee(  1003,"CC","4622840727@qq.com",1,new Department(103,"教研部")));
        employees.put(1004,new Employee(  1004,"DD","5628440727@qq.com",0,new Department(104,"运营部")));
        employees.put(1005,new Employee(  1005,"FF","6022840727@qq.com",1,new Department(105,"后勤部")));
    }
    //主键自增
    private static Integer ininId = 1006;
    //增加一个员工
    public void save(Employee employee){
        if(employee.getId() == null){
            employee.setId(ininId++);
        }
        employee.setDepartment(departmentDao.getDepartmentById(employee.getDepartment().getId()));
        employees.put(employee.getId(),employee);
    }
    //查询全部的员工
    public Collection<Employee>getALL(){
         return employees.values();
    }

    //通过id查询员工
    public Employee getEmployeeById(Integer id){
        return employees.get(id);
    }

    //删除一个员通过id
    public void delete(Integer id){
        employees.remove(id);
    }
}
9.3、编写Config
MyMvcConfig
//扩展使用SpringMVC
@Configuration
public class MyMvcConfig implements WebMvcConfigurer {
    @Override
    public void addViewControllers(ViewControllerRegistry registry) {
        registry.addViewController("/").setViewName("index");
        registry.addViewController("/index.html").setViewName("index");
    }
}
9.4、修改静态资源路径
所有的静态资源都需要使用thymeleaf接管:@{}
<!-- Bootstrap core CSS -->
<link th:href="@{/css/bootstrap.min.css}" rel="stylesheet">
<!-- Custom styles for this template -->
<link th:href="@{/css/signin.css}" rel="stylesheet">
9.5、页面国际化
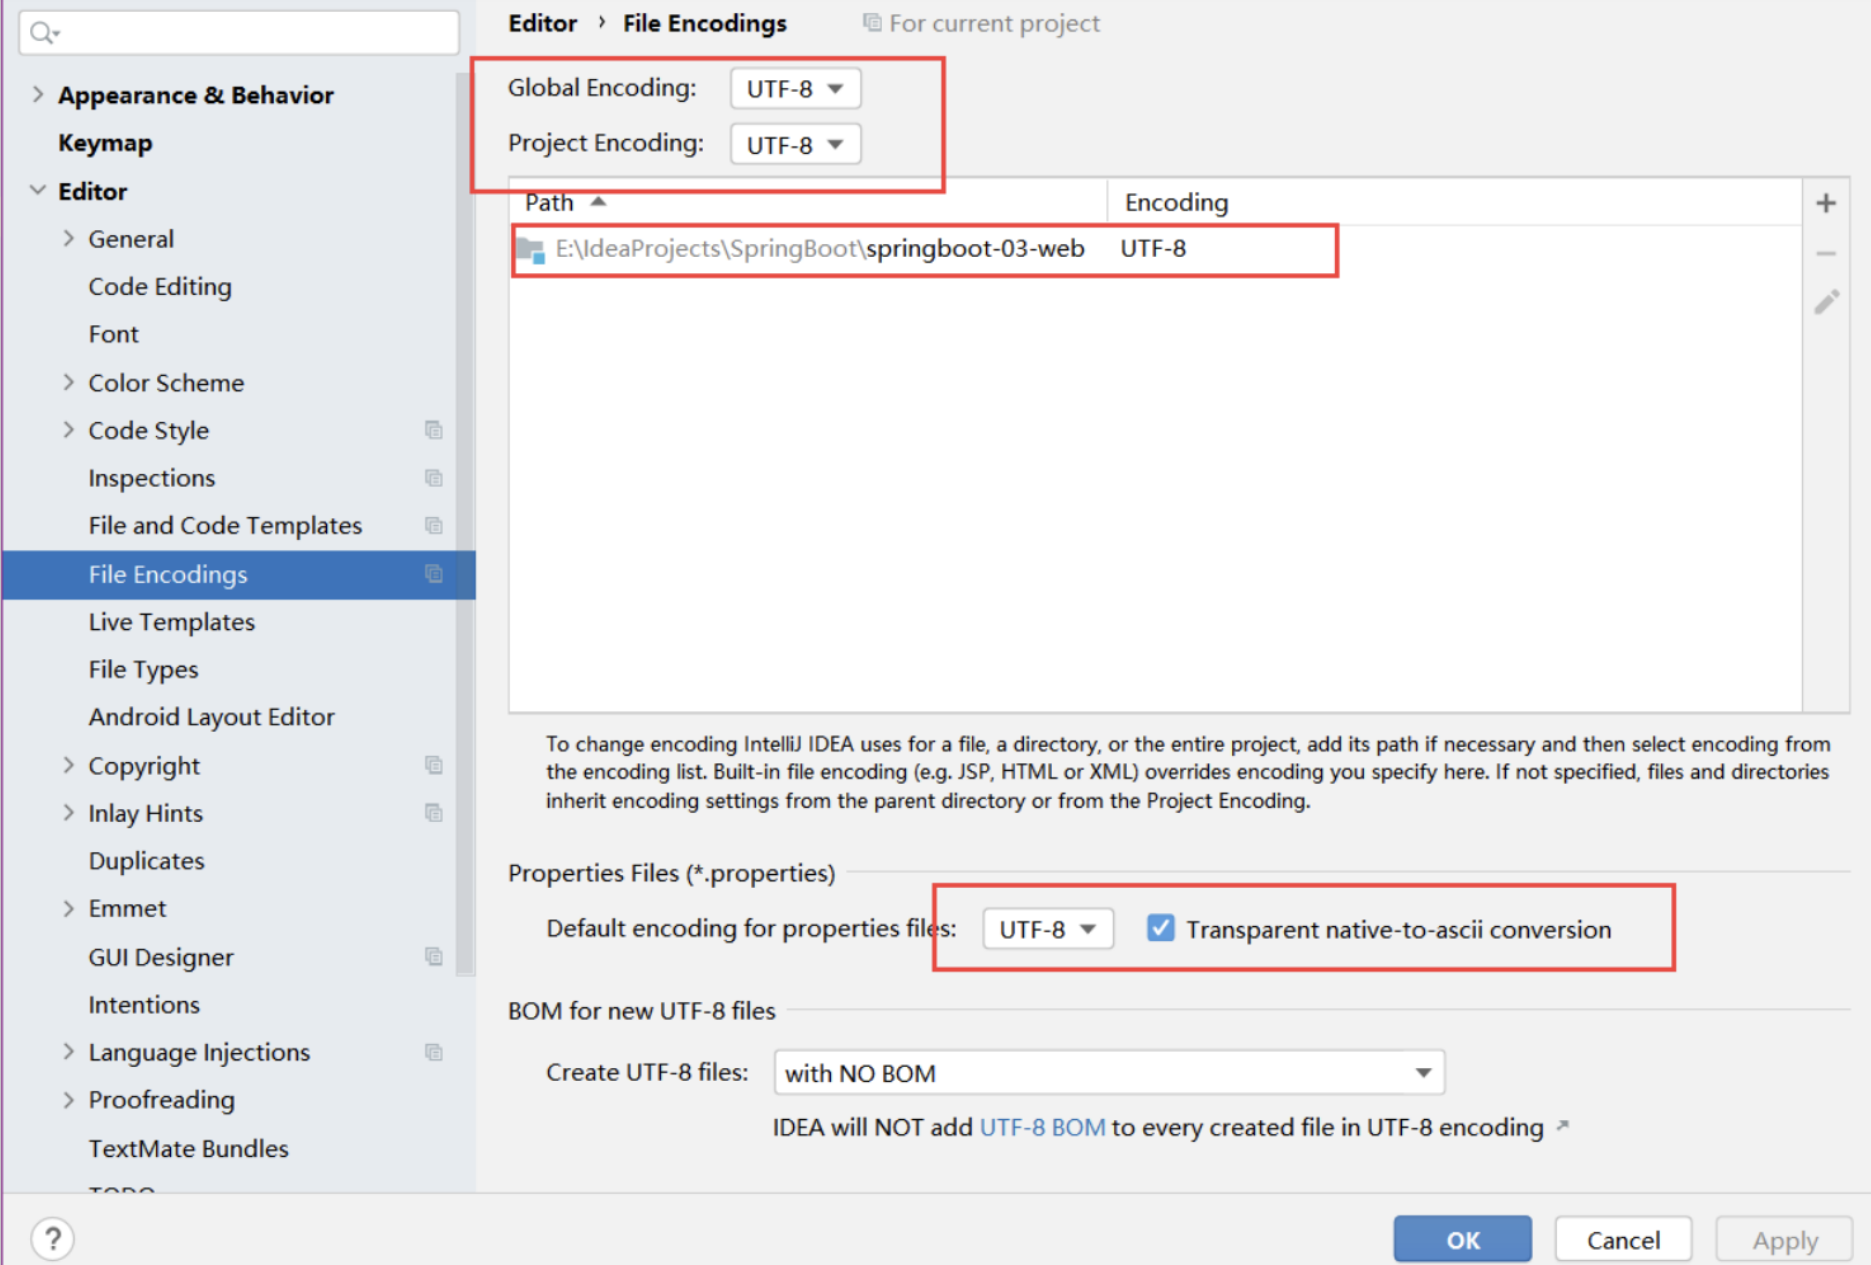
9.5.1、File Encodings设置
先在IDEA中统一设置properties的编码问题!
9.5.2、配置文件编写
-
我们在resources资源文件下新建一个i18n目录,存放国际化配置文件
-
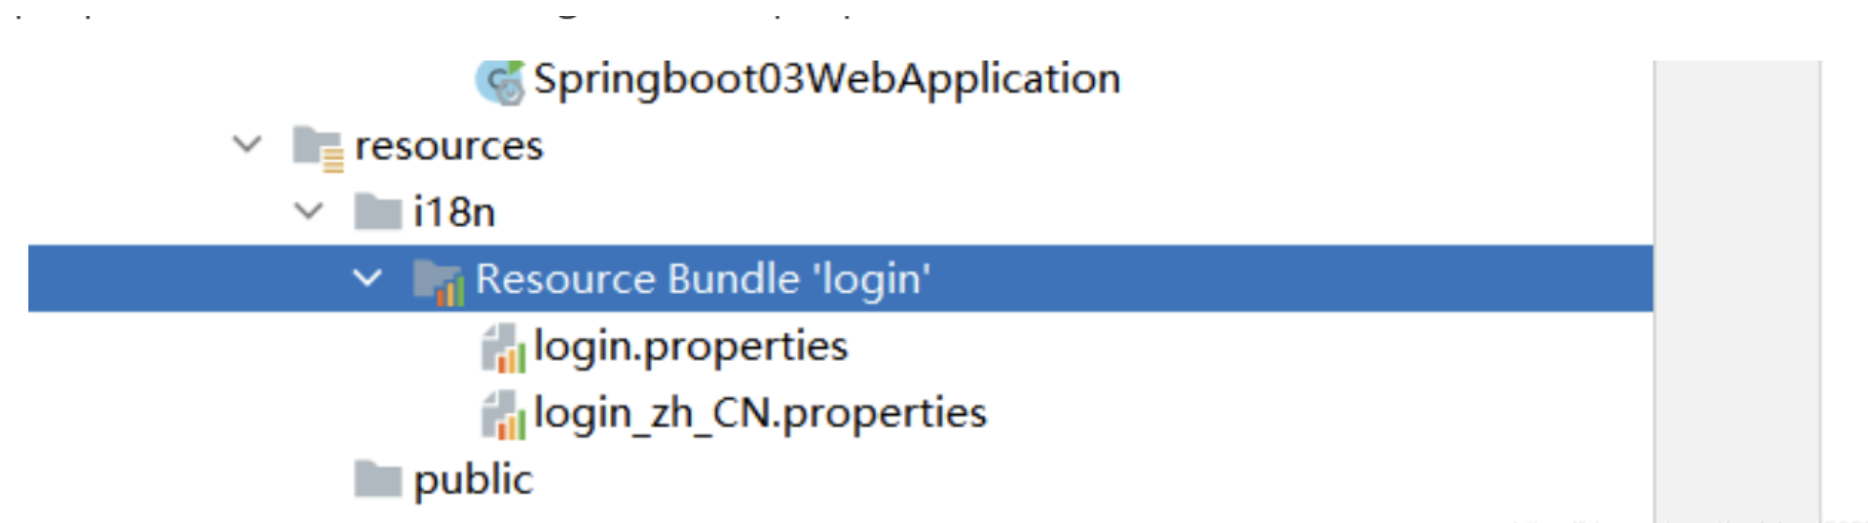
建立一个login.properties文件,还有一个login_zh_CN.properties;发现IDEA自动识别了我们要做国际化操作;文件夹变了!
-
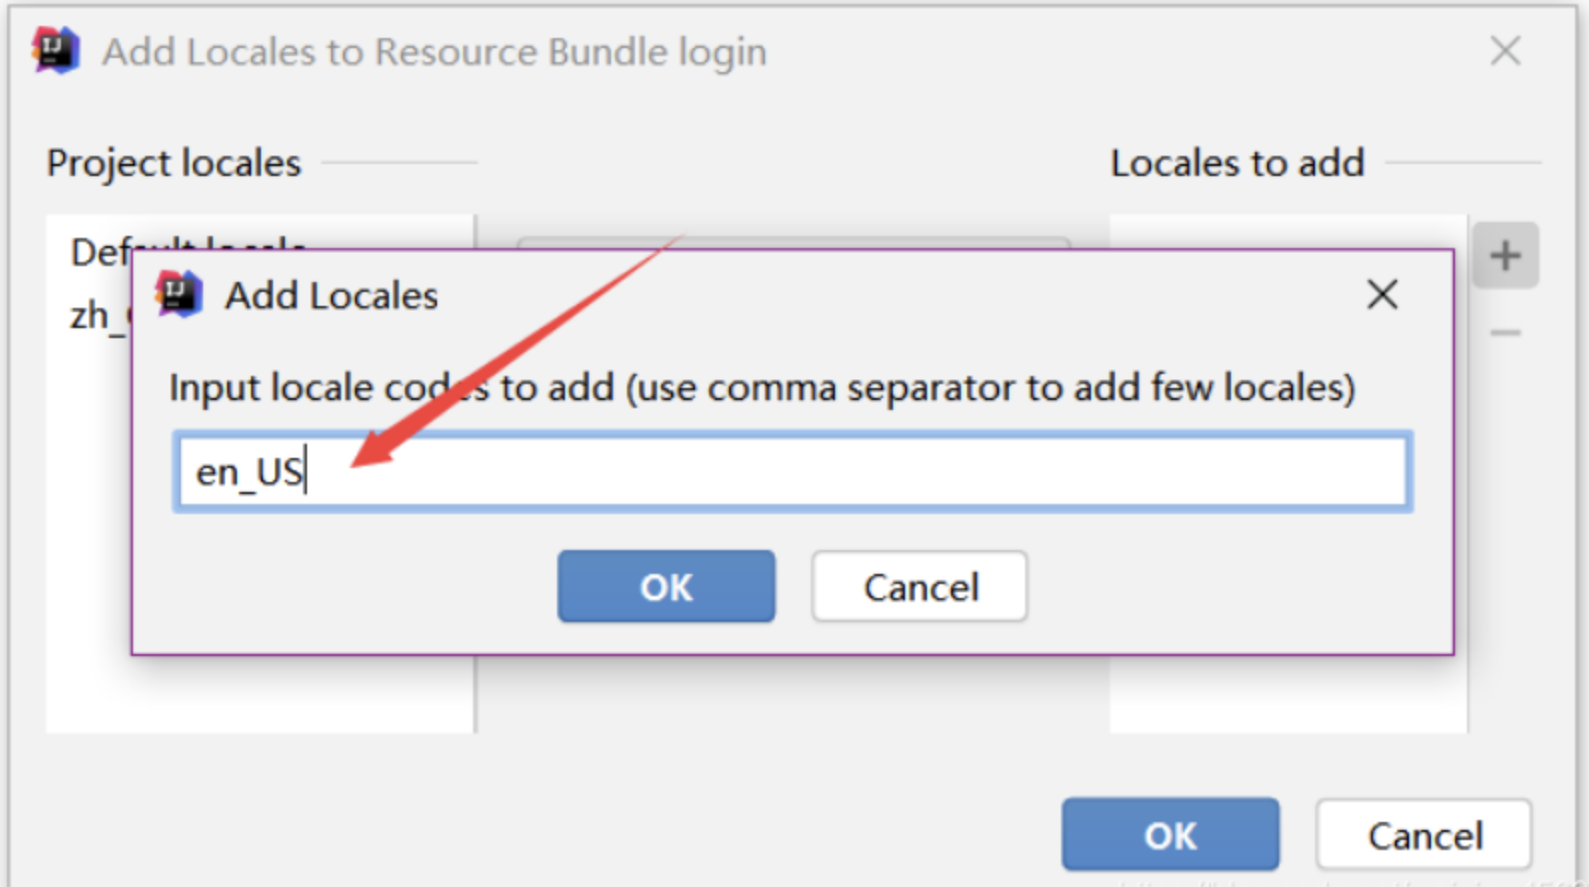
我们可以在这上面去新建一个文件;
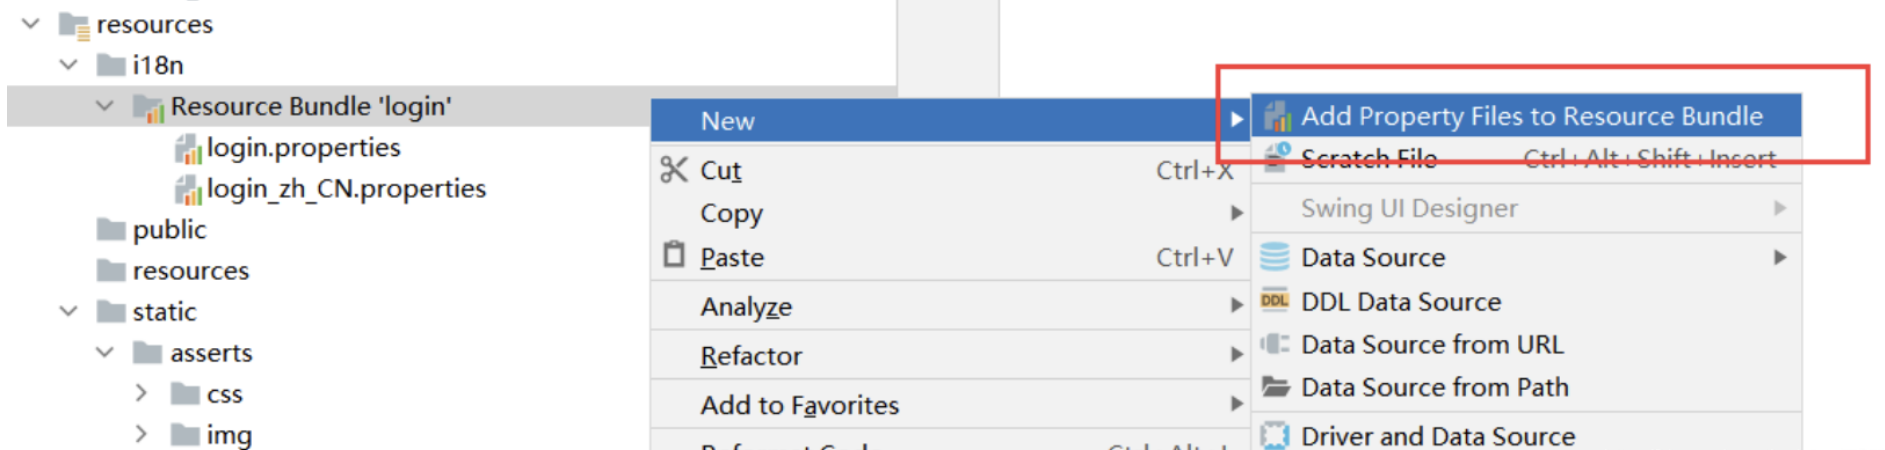
20251120112714698.png&pos_id=img-BaO3qFhT-1764142152417)
-
下载Resource Bundle Editor插件,我们可以看到idea下面有另外一个视图;
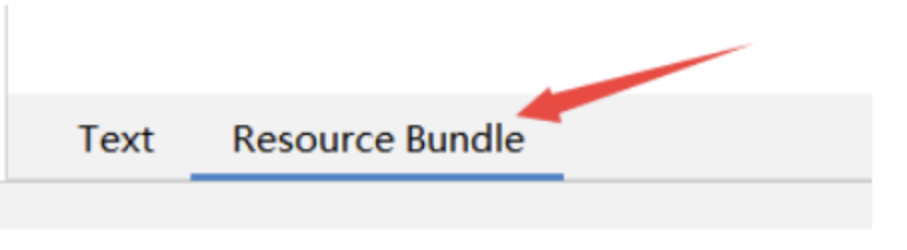
这个视图我们点击 + 号就可以直接添加属性了;我们新建一个login.tip,可以看到边上有三个文件框可以输入
在这里插入图片描述
我们添加一下首页的内容!
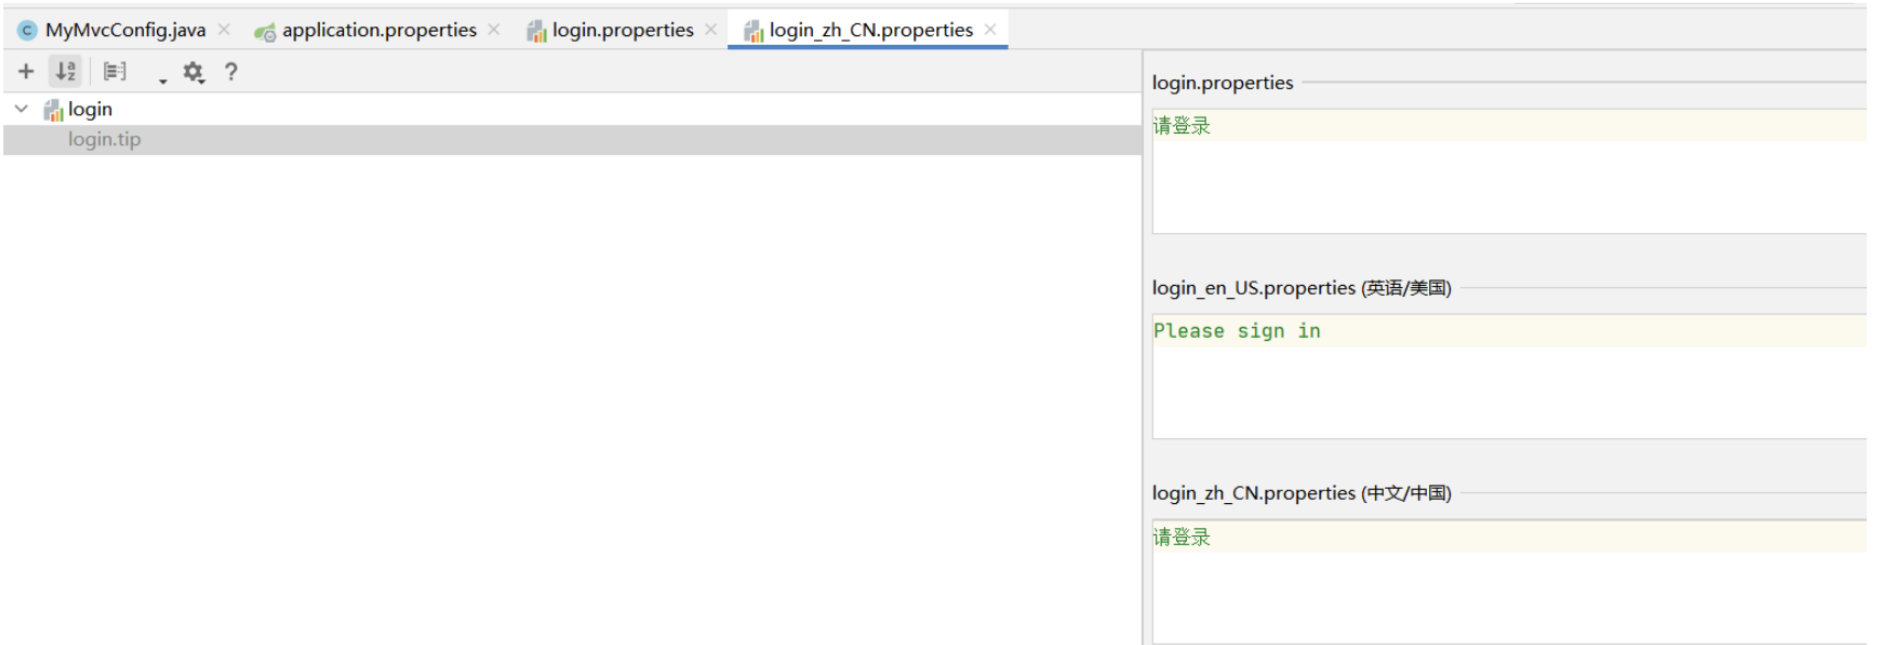
然后依次添加其他页面内容即可!
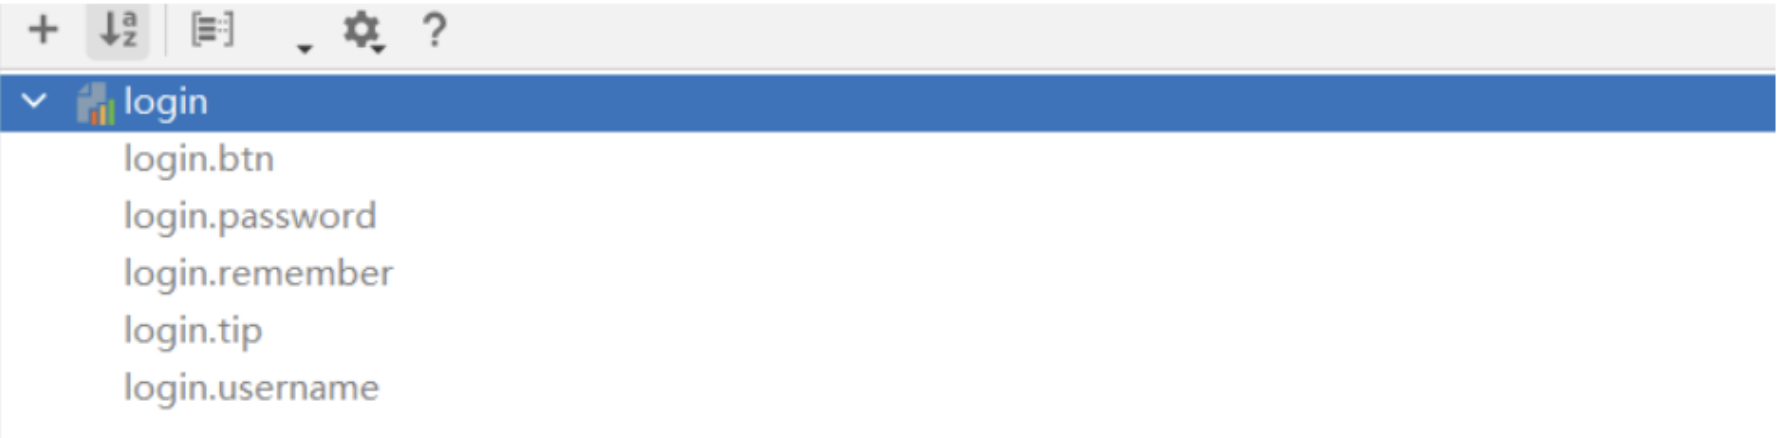
-
我们真实的情况是放在了i18n目录下,所以我们要去配置这个messages的路径;
spring.messages.basename=i18n.login
9.5.3、配置页面国际化值
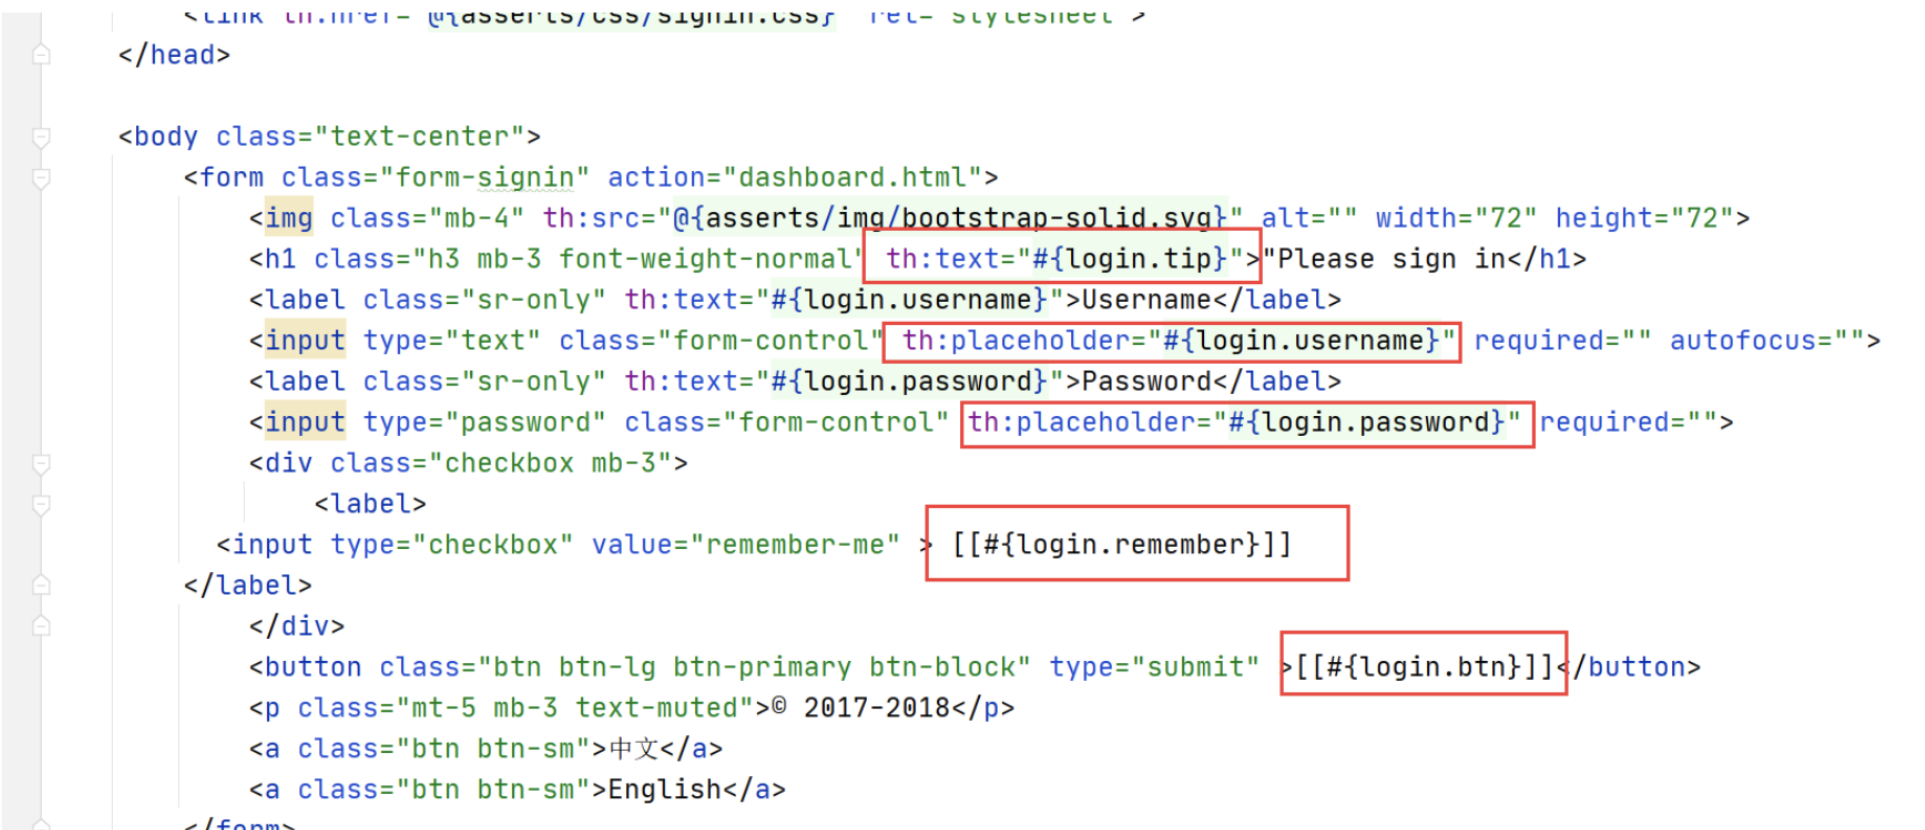
9.5.4、配置国际化解析
可以根据按钮自动切换中文英文!
在Spring中有一个国际化的Locale (区域信息对象);里面有一个叫做LocaleResolver (获取区域信息对象)的解析器!
我们去我们webmvc自动配置文件,寻找一下!看到SpringBoot默认配置:
@Bean
@ConditionalOnMissingBean
@ConditionalOnProperty(prefix = "spring.mvc", name = "locale")
public LocaleResolver localeResolver() {
   // 容器中没有就自己配,有的话就用用户配置的
   if (this.mvcProperties.getLocaleResolver() == WebMvcProperties.LocaleResolver.FIXED) {
       return new FixedLocaleResolver(this.mvcProperties.getLocale());
   }
   // 接收头国际化分解
   AcceptHeaderLocaleResolver localeResolver = new AcceptHeaderLocaleResolver();
   localeResolver.setDefaultLocale(this.mvcProperties.getLocale());
   return localeResolver;
}
假如我们现在想点击链接让我们的国际化资源生效,就需要让我们自己的Locale生效!
我们去自己写一个自己的LocaleResolver,可以在链接上携带区域信息!
修改一下前端页面的跳转连接:
<!-- 这里传入参数不需要使用 ?使用 (key=value)-->
<a class="btn btn-sm" th:href="@{/index.html(l='zh_CN')}">中文</a>
<a class="btn btn-sm" th:href="@{/index.html(l='en_US')}">English</a>
MyLocaleResolver
//可以在链接上携带区域信息
public class MyLocaleResolver implements LocaleResolver {

    //解析请求
    @Override
    public Locale resolveLocale(HttpServletRequest request) {

        String language = request.getParameter("l");
        Locale locale = Locale.getDefault(); // 如果没有获取到就使用系统默认的
        //如果请求链接不为空
        if (!StringUtils.isEmpty(language)){
            //分割请求参数
            String[] split = language.split("_");
            //国家,地区
            locale = new Locale(split[0],split[1]);
        }
        return locale;
    }

    @Override
    public void setLocale(HttpServletRequest httpServletRequest, HttpServletResponse httpServletResponse, Locale locale) {

    }
}
为了让我们的区域化信息能够生效,我们需要再配置一下这个组件!在我们自己的MvcConofig下添加bean;
@Bean
public LocaleResolver localeResolver(){
    return new MyLocaleResolver();
}
9.5.5、注意点
- 页面设置:
- 注意点,所有的静态资源都要由Thymeleaf接管
- url:@{}
- 页面国际化:
- 我们需要配置i18n文件(其来源是英文单词 internationalization的首末字符i和n,18为中间的字符数)是“国际化”的简称)
- 我们如果需要在项目中进行按钮自动切换,需要配置自定义的LocaleResolver
- 记得写到spring容器@Bean
- message:#{}
9.6、登录
模板引擎修改后,想要实时生效!页面修改完毕后,IDEA小技巧 : Ctrl + F9 重新编译!即可生效!
-
我们把登录页面的表单提交地址写一个controller!
<form class="form-signin" th:action="@{/user/login}" method="post"> //这里面的所有表单标签都需要加上一个name属性 </form> -
去编写对应的controller
@Controller public class LoginController { @RequestMapping("/user/login") public String login( @RequestParam("username") String username , @RequestParam("password") String password, Model model){ //具体的业务 if(!StringUtils.isEmpty(username)&&"123456".equals(password)){ return "redirect:/main.html"; } else{ //告诉用户,你登录失败 model.addAttribute("msg","用户名或者密码错误!"); return "index"; } } } -
登录失败的话,我们需要将后台信息输出到前台,可以在首页标题下面加上判断
<!--判断是否显示,使用if, ${}可以使用工具类,可以看thymeleaf的中文文档--> <p style="color: red" th:text="${msg}" th:if="${not #strings.isEmpty(msg)}"> </p> -
优化,登录成功后,由于是转发,链接不变,我们可以重定向到首页!
registry.addViewController("/main.html").setViewName("dashboard"); -
将 Controller 的代码改为重定向
//登录成功!防止表单重复提交,我们重定向
return "redirect:/main.html";
9.7、拦截器
但是又发现新的问题,我们可以直接登录到后台主页,不用登录也可以实现!怎么处理这个问题呢?我
们可以使用拦截器机制,实现登录检查!
-
在LoginController添加serssion
session.setAttribute("loginUser",username); -
自定义一个拦截器
//自定义拦截器 public class LoginHandlerInterceptor implements HandlerInterceptor { @Override public boolean preHandle(HttpServletRequest request, HttpServletResponse response, Object handler) throws Exception { //获取 loginUser 信息进行判断 Object user = request.getSession().getAttribute("loginUser"); if(user == null){//未登录,返回登录页面 request.setAttribute("msg","没有权限,请先登录"); request.getRequestDispatcher("/index.html").forward(request,response); return false; }else{ //登录,放行 return true; } } } -
然后将拦截器注册到我们的SpringMVC配置类当中!
@Override public void addInterceptors(InterceptorRegistry registry) { // 注册拦截器,及拦截请求和要剔除哪些请求! // 我们还需要过滤静态资源文件,否则样式显示不出来 registry.addInterceptor(new LoginHandlerInterceptor()) .addPathPatterns("/**") .excludePathPatterns("/index.html","/user/login","/","/css/*","/img/**","/js/**"); } -
我们然后在后台主页,获取用户登录的信息
<!--后台主页显示登录用户的信息-->
[[${session.loginUser}]] <!--$取EL表达式-->
9.8、展示员工列表
9.8.1、员工列表页面跳转
我们在主页点击Customers,就显示列表页面;我们去修改下
-
将首页的侧边栏Customers改为员工管理
-
a链接添加请求
<a class="nav-link" th:href="@{/emps}">员工管理</a> -
templates新建emp文件夹,将list放在emp文件夹下
-
编写处理请求的controller
//员工列表
@Controller
public class EmployeeController {

    @Autowired
    EmployeeDao employeeDao;

    @RequestMapping("/emps")
    public String list(Model model){
        Collection<Employee> employees = employeeDao.getALL();
        model.addAttribute("emps",employees);
        return "emp/list";
    }
}
9.8.2、Thymeleaf公共页面元素抽取
步骤:
-
抽取公共片段 th:fragment 定义模板名
-
引入公共片段 th:insert 插入模板名
实现:
-
我们来抽取一下,使用list列表做演示!我们要抽取头部nav标签,我们在dashboard中将nav部分定义一个模板名;
<!--顶部导航栏--> <nav class="navbar navbar-dark sticky-top bg-dark flex-md-nowrap p-0" th:fragment="topbar"> <a class="navbar-brand col-sm-3 col-md-2 mr-0" href="http://getbootstrap.com/docs/4.0/examples/dashboard/#">[[${session.loginUser}]]</a> <!--$取EL表达式--> <input class="form-control form-control-dark w-100" type="text" placeholder="Search" aria-label="Search"> <ul class="navbar-nav px-3"> <li class="nav-item text-nowrap"> <a class="nav-link" href="http://getbootstrap.com/docs/4.0/examples/dashboard/#">注销</a> </li> </ul> </nav> -
然后我们在list页面中去引入,可以删掉原来的nav
<!--引入抽取的topbar-->
<!--模板名 : 会使用thymeleaf的前后缀配置规则进行解析 使用~{模板::标签名}-->
<!--顶部导航栏-->
<div th:insert="~{dashboard::topbar}"></div>
说明:
除了使用insert插入,还可以使用replace替换,或者include包含,三种方式会有一些小区别,可以见名知 义;
我们使用replace替换,可以解决div多余的问题,可以查看thymeleaf的文档学习
- 侧边栏也是同理,当做练手,可以也同步一下!
定义模板:
<!--侧边栏-->
<nav th:fragment="sitebar" class="col-md-2 d-none d-md-block bg-light sidebar">
然后我们在list页面中去引入:
<!--侧边栏-->
<div th:insert="~{dashboard::sitebar}"></div>
我们发现一个小问题,侧边栏高亮的问题,它总是激活第一个;按理来说,这应该是动态的才对!
为了重用更清晰,我们建立一个commons文件夹,专门存放公共页面;
<!DOCTYPE html>
<html lang="en" xmlns:th="http://www.thymeleaf.org">
<!--顶部导航栏-->
<nav class="navbar navbar-dark sticky-top bg-dark flex-md-nowrap p-0" th:fragment="topbar">
...
</nav>
<!--侧边栏-->
<nav class="col-md-2 d-none d-md-block bg-light sidebar" th:fragment="sidebar">
...
</nav>
</html>
侧边栏激活问题:
-
将首页的超链接地址改到项目中
-
我们在a标签中加一个判断,使用class改变标签的值;
<a th:class="${active=='list.html'?'nav-link active':'nav-link'}" th:href="@{/index.html}">
    <svg xmlns="http://www.w3.org/2000/svg" width="24" height="24" viewBox="0 0 24 24" fill="none" stroke="currentColor" stroke-width="2" stroke-linecap="round" stroke-linejoin="round" class="feather feather-home">
        <path d="M3 9l9-7 9 7v11a2 2 0 0 1-2 2H5a2 2 0 0 1-2-2z"></path>
        <polyline points="9 22 9 12 15 12 15 22"></polyline>
    </svg>
    首页 <span class="sr-only">(current)</span>
</a>

<a th:class="${active=='list.html'?'nav-link active':'nav-link'}" th:href="@{/emps}">
    <svg xmlns="http://www.w3.org/2000/svg" width="24" height="24" viewBox="0 0 24 24" fill="none" stroke="currentColor" stroke-width="2" stroke-linecap="round" stroke-linejoin="round" class="feather feather-shopping-cart">
        <circle cx="9" cy="21" r="1"></circle>
        <circle cx="20" cy="21" r="1"></circle>
        <path d="M1 1h4l2.68 13.39a2 2 0 0 0 2 1.61h9.72a2 2 0 0 0 2-1.61L23 6H6"></path>
    </svg>
    员工管理
</a>
-
修改请求链接
<div th:replace="~{commons/commons::topbar(active='main.html')}"></div>
<div th:replace="~{commons/commons::sidebar(active='list.html')}"></div>
9.8.3、员工信息页面展示
<thead>
    <tr>
        <th>id</th>
        <th>lastName</th>
        <th>email</th>
        <th>gender</th>
        <th>department</th>
        <th>birth</th>
        <th>操作</th>
    </tr>
</thead>
<tbody>
    <tr th:each="emp:${emps}">
        <td th:text="${emp.getId()}"></td>
        <td th:text="${emp.getLastName()}"></td>
        <td th:text="${emp.getEmail()}"></td>
        <td th:text="${emp.getGender()==0?'女':'男'}"></td>
        <td th:text="${emp.department.getDepartmentName()}"></td>
        <td th:text="${#dates.format(emp.getBirth(),'yyyy-MM-dd HH:mm:ss')}"></td>
        <td>
            <button class="btn btn-sm btn-primary">编辑</button>
            <button class="btn btn-sm btn-danger">删除</button>
        </td>
    </tr>
</tbody>
9.9、添加员工实现
9.9.1、表单及细节处理
-
将添加员工信息改为超链接
<h2><a class="btn btn-sm btn-success" th:href="@{/emp}">添加员工</a></h2> -
编写对应的controller
//to员工添加页面 @GetMapping("/emp") public String toAddPage(){ return "emp/add"; } -
添加前端页面;复制list页面,修改即可
<form th:action="@{/emp}" method="post" > <div class="form-group" ><label>LastName</label> <input class="form-control" placeholder="kuangshen" type="text" name="lastName"> </div> <div class="form-group" ><label>Email</label> <input class="form-control" placeholder="24736743@qq.com" type="email" name="email"> </div> <div class="form-group"><label>Gender</label><br/> <div class="form-check form-check-inline"> <input class="form-check-input" name="gender" type="radio" value="1"> <label class="form-check-label">男</label> </div> <div class="form-check form-check-inline"> <input class="form-check-input" name="gender" type="radio" value="0"> <label class="form-check-label">女</label> </div> </div> <div class="form-group" ><label>department</label> <select class="form-control" name="department.id"> <option th:each="dept:${departments}" th:text="${dept.getDepartmentName()}" th:value="${dept.getId()}"></option> </select> </div> <div class="form-group" > <label >Birth</label> <input class="form-control" placeholder="kuangstudy" type="text" name="birth"> </div> <button class="btn btn-primary" type="submit">添加</button> </form> -
部门信息下拉框应该选择的是我们提供的数据,所以我们要修改一下前端和后端
@GetMapping("/emp") public String toAddPage(Model model){ //查询所有的部门信息 Collection<Department> departments = departmentDao.getDepartments(); model.addAttribute("departments",departments); return "emp/add"; }<select class="form-control" name="department.id"> <option th:each="dept:${departments}" th:text="${dept.getDepartmentName()}" th:value="${dept.getId()}"></option> </select>
9.9.2、具体添加功能
-
修改add页面form表单提交地址和方式
<form th:action="@{/emp}" method="post"> -
编写controller
//员工添加功能 //接收前端传递的参数,自动封装成为对象[要求前端传递的参数名,和属性名一致] @PostMapping ("/emp") public String addEmp(Employee employee){ //保存员工的信息 System.out.println(employee); employeeDao.save(employee); // 回到员工列表页面,可以使用redirect或者forward,就不会被视图解析器解析 return "redirect:/emps"; } -
时间格式问题
生日我们提交的是一个日期 , 我们第一次使用的 / 正常提交成功了,后面使用 - 就错误了,所以这里面
应该存在一个日期格式化的问题;
SpringMVC会将页面提交的值转换为指定的类型,默认日期是按照 / 的方式提交 ; 比如将2019/01/01
转换为一个date对象。
那思考一个问题?我们能不能修改这个默认的格式呢?
这个在配置类中,所以我们可以自定义的去修改这个时间格式化问题,我们在我们的配置文件中修改一
下;
spring.mvc.date-format=yyyy-MM-dd这样的话,我们现在就支持 - 的格式了,但是又不支持 / 了
9.10、修改员工信息
我们要实现员工修改功能,需要实现两步;
1、点击修改按钮,去到编辑页面,我们可以直接使用添加员工的页面实现
2、显示原数据,修改完毕后跳回列表页面!
-
我们去实现一下,首先修改跳转链接的位置;
<a class="btn btn-sm btn-primary" th:href="@@{/emp/{id}(id=${emp.getId()})}">编辑</a> -
编写对应的controller
//员工修改页面 @GetMapping("/emp/{id}") public String toUpdateEmp(@PathVariable("id") Integer id,Model model){ Employee employee = employeeDao.getEmployeeById(id); model.addAttribute("emp",employee); //查询所有的部门信息 Collection<Department> departments = departmentDao.getDepartments(); model.addAttribute("departments",departments); return "emp/update"; } @PostMapping("updateEmp") public String updateEmp(Employee employee){ employeeDao.save(employee); return "redirect:/emps"; } -
我们需要在这里将add页面复制一份,改为update页面;需要修改页面,将我们后台查询数据回显
<form th:action="@{/emp}" method="post" >
    <input type="hidden" name="id" th:value="${emp.getId()}">
    <div class="form-group" ><label>LastName</label>
        <input th:value="${emp.getLastName()}" class="form-control" placeholder="kuangshen" type="text" name="lastName">
    </div>
    <div class="form-group" ><label>Email</label>
        <input th:value="${emp.getEmail()}" class="form-control" placeholder="24736743@qq.com" type="email" name="email">
    </div>
    <div class="form-group"><label>Gender</label><br/>
        <div class="form-check form-check-inline">
            <input th:checked="${emp.getGender()==1}" class="form-check-input" name="gender" type="radio" value="1">
            <label class="form-check-label">男</label>
        </div>
        <div class="form-check form-check-inline">
            <input th:checked="${emp.getGender()==0}" class="form-check-input" name="gender" type="radio" value="0">
            <label class="form-check-label">女</label>
        </div>
    </div>
    <div class="form-group" ><label>department</label>
        <select class="form-control" name="department.id">
            <option th:selected="${dept.id==emp.getDepartment().getId()}" th:each="dept:${departments}" th:text="${dept.getDepartmentName()}" th:value="${dept.getId()}"></option>
        </select>
    </div>
    <div class="form-group" >
        <label >Birth</label>
        <input th:value="${#dates.format(emp.birth,'yyyy-MM-dd HH:mm')}" class="form-control" placeholder="2021-02-02" type="text" name="birth">
    </div>
    <button class="btn btn-primary" type="submit">修改</button>
</form>
9.11、删除员工信息
-
list页面,编写提交地址
<a class="btn btn-sm btn-danger" th:href="@{/delEmp/}+${emp.getId()}">删除</a> -
编写Controller
//删除员工
@GetMapping("/delEmp/{id}")
public String delEmp(@PathVariable("id") Integer id){
    employeeDao.delete(id);
    return "redirect:/emps";
}
9.12、404及注销
我们只需要在模板目录下添加一个error文件夹,文件夹中存放我们相应的错误页面;
比如404.html 或者 4xx.html 等等,SpringBoot就会帮我们自动使用了!
注销
 <a class="nav-link" th:href="@{/user/logout}">注销</a>
2、对应的controller

```java
   @RequestMapping("/user/logout")
    public String logout(HttpSession session){
        session.invalidate();
        return "redirect:/index.html";
    }
10、整合JDBC
10.1、SpringData
对于数据访问层,无论是 SQL(关系型数据库) 还是 NOSQL(非关系型数据库),Spring Boot 底层都是采用 Spring Data 的方式进行统一处理。比如:Spring Data JDBC,Spring Data Redis,Spring Data MangoDB
10.2、JdbcTemplate
- Spring 本身也对原生的JDBC 做了轻量级的封装,即JdbcTemplate
- 数据库操作的所有 CRUD 方法都在 JdbcTemplate 中
- JdbcTemplate主要提供以下几类方法:
- execute方法:可以用于执行任何SQL语句,一般用于执行DDL语句;
- update方法及batchUpdate方法:update方法用于执行新增、修改、删除等语句;batchUpdate方法用于执行批处理相关语句;
- query方法及queryForXXX方法:用于执行查询相关语句;
- call方法:用于执行存储过程、函数相关语句。
10.3、CRUD
-
application.yaml
spring: datasource: driver-class-name: com.mysql.cj.jdbc.Driver url: jdbc:mysql://localhost:3306/mybatis_study?useUnicode=true&characterEncoding=utf-8&serverTimezone=Asia/Shanghai username: root password: root -
Controller
@RestController
public class JDBCController {
    @Autowired
    private JdbcTemplate jdbcTemplate;
    @RequestMapping("queryall")
    public List<Map<String,Object>> queryAll(){
        String sql = "select * from user";
        return jdbcTemplate.queryForList(sql);
    }
    @RequestMapping("insert")
    public String insert(){
        String sql = "insert into user(id,name,pwd) values(?,?,?)";
        Object[] params = new Object[]{"8","zhangsan","123456"};
        int update = jdbcTemplate.update(sql,params);
        return "insert success";
    }
    @RequestMapping("update/{id}")
    public String update(@PathVariable("id") Integer id){
        String sql = "update user set name=?,pwd=? where id="+id;
        Object[] params = new Object[]{"zhangsan22","12345613123"};
        int update = jdbcTemplate.update(sql,params);
        return "update success";
    }
    @RequestMapping("delete/{id}")
    public String delete(@PathVariable("id") Integer id){
        String sql ="delete from user where id="+id;
        int update = jdbcTemplate.update(sql);
        return "delete success";
    }
}
11、集成Druid
11.1、Druid简介
Java程序很大一部分要操作数据库,为了提高性能操作数据库的时候,又不得不使用数据库连接池。
Druid 是阿里巴巴开源平台上一个数据库连接池实现,结合了 C3P0、DBCP 等 DB 池的优点,同时加入了日志监控。
Druid 可以很好的监控 DB 池连接和 SQL 的执行情况,天生就是针对监控而生的 DB 连接池。
11.2、springboot集成
依赖
<!--引入druid数据源-->
<dependency>
    <groupId>com.alibaba</groupId>
    <artifactId>druid-spring-boot-starter</artifactId>
    <version>1.2.6</version>
</dependency>
yml 配置文件切换数据源:
spring:
  datasource:
    driver-class-name: com.mysql.cj.jdbc.Driver
    url: jdbc:mysql://localhost:3306/springboot_test?characterEncoding=utf8&serverTimezone=UTC
    username: root
    password: root
    # druid-spring-boot-starter 依赖自动生效 druid,可以不配置 type 属性,但建议配置
    type: com.alibaba.druid.pool.DruidDataSource
11.3、spring集成
依赖
<!--引入druid数据源-->
<dependency>
    <groupId>com.alibaba</groupId>
    <artifactId>druid</artifactId>
    <version>1.2.6</version>
</dependency>
yml 配置文件切换数据源
spring:
  datasource:
    driver-class-name: com.mysql.cj.jdbc.Driver
    url: jdbc:mysql://localhost:3306/springboot_study?useUnicode=true&characterEncoding=utf-8&serverTimezone=Asia/Shanghai
    username: root
    password: root
    type: com.alibaba.druid.pool.DruidDataSource

    #Spring Boot 默认是不注入这些属性值的,需要自己绑定
    #druid 数据源专有配置
    initialSize: 5
    minIdle: 5
    maxActive: 20
    maxWait: 60000
    timeBetweenEvictionRunsMillis: 60000
    minEvictableIdleTimeMillis: 300000
    validationQuery: SELECT 1 FROM DUAL
    testWhileIdle: true
    testOnBorrow: false
    testOnReturn: false
    poolPreparedStatements: true

    #配置监控统计拦截的filters,stat:监控统计、log4j:日志记录、wall:防御sql注入
    #如果允许时报错  java.lang.ClassNotFoundException: org.apache.log4j.Priority
    #则导入 log4j 依赖即可,Maven 地址:https://mvnrepository.com/artifact/log4j/log4j
    filters:
      commons-log.connection-logger-name: stat,wall,log4j
    maxPoolPreparedStatementPerConnectionSize: 20
    useGlobalDataSourceStat: true
    connectionProperties: druid.stat.mergeSql=true;druid.stat.slowSqlMillis=500
配置类:添加 DruidDataSource 组件到容器中,并绑定属性
@Configuration
public class DruidConfig {
    @Bean
    @ConfigurationProperties(prefix = "spring.datasource")
    @ConditionalOnProperty(name = "spring.datasource.type", havingValue = "com.alibaba.druid.pool.DruidDataSource")
    //绑定到application.yaml文件中 生效
    public DataSource druidDateSource(){
        return new DruidDataSource();
    }
    //因为iSpringBoot内置了servlet容器,所有没有web.xml,替代方法、:ServletRegistrationBean
    //后台监控功能
    @Bean
    public ServletRegistrationBean statViewServlet(){
        ServletRegistrationBean<StatViewServlet> bean = new ServletRegistrationBean<>(new StatViewServlet(), "/druid/*");//访问这个就可以进入后台监控页面,写死的
        //后台需要有人登录
        //账号密码配置也是死的
        HashMap<String,String> initParameters = new HashMap<>();
        //增加配置
        initParameters.put("loginUsername","admin");
        initParameters.put("loginPassword","123456");//key是固定的

        //允许谁能访问
        initParameters.put("allow","");//all

        bean.setInitParameters(initParameters);//设置初始化参数
        return bean;
    }

    //filter后台过滤
    @Bean
    public FilterRegistrationBean webServletFilter(){
        FilterRegistrationBean bean = new FilterRegistrationBean();
        bean.setFilter(new WebStatFilter());
        //可以过滤哪些请求
        HashMap<String,String> map = new HashMap<>();
        map.put("exclusions","*.js,*.css,/druid/*");//这些东西不进行统计
        bean.setInitParameters(map);
        return bean;
    }
}
12、整合Mybatis
-
导入依赖
<!-- https://mvnrepository.com/artifact/org.mybatis.spring.boot/mybatis-spring-boot-starter --> <dependency> <groupId>org.mybatis.spring.boot</groupId> <artifactId>mybatis-spring-boot-starter</artifactId> <version>2.1.3</version> </dependency> -
数据库
spring.datasource.username=root spring.datasource.password=123456 spring.datasource.url=jdbc:mysql://localhost:3306/mybatis?userUnicode=true&useSSL=true&characterEncoding=utf8 spring.datasource.driver-class-name=com.mysql.cj.jdbc.Driver -
测试是否连接成功
@SpringBootTest class SpringBoot05MybatisApplicationTests { @Autowired DataSource dataSource; @Test void contextLoads() throws SQLException { System.out.println(dataSource.getClass()); System.out.println(dataSource.getConnection()); } } -
实体类
@AllArgsConstructor @NoArgsConstructor @Data public class User { private Integer id; private String name; private String pwd; } -
mapper
package com.example.springboot05mybatis.mapper; import com.example.springboot05mybatis.pojo.User; import org.apache.ibatis.annotations.Mapper; import org.springframework.stereotype.Repository; import java.util.List; //这个实体类既需要具有增删改查的功能又需要注册到spring中托管所有需要Repository和mapper @Mapper @Repository //Dao层 //这个注解代表了这是一个mybatis的mapper接口 public interface UserMapper { List<User> queryUserList(); User queryUserById(int id); int updateUser(User user); int addUser(User user); int deleteUser(int id); } -
mapper.xml
<?xml version="1.0" encoding="UTF-8" ?> <!DOCTYPE mapper PUBLIC "-//mybatis.org//DTD Mapper 3.0//EN" "http://mybatis.org/dtd/mybatis-3-mapper.dtd"> <mapper namespace="com.example.springboot05mybatis.mapper.UserMapper"> <select id="queryUserList" resultType="User"> select * from user </select> <select id="queryUserById" parameterType="int" resultType="User"> select * from user where id = #{id} </select> <update id="updateUser" parameterType="User" > update user set name=#{name},pwd=#{pwd} where id = #{id} </update> <insert id="addUser" parameterType="User"> insert into user(id,name,pwd) values (#{id},#{name},#{pwd}) </insert> <delete id="deleteUser" parameterType="int"> delete from user where id = #{id} </delete> </mapper> -
整合mybatis,让spring可以识别mappper
spring.datasource.username=root spring.datasource.password=123456 spring.datasource.url=jdbc:mysql://localhost:3306/mybatis?userUnicode=true&useSSL=true&characterEncoding=utf8 spring.datasource.driver-class-name=com.mysql.cj.jdbc.Driver #整合Mybatis #让spring识别到mapper文件 mybatis.type-aliases-package=com.example.springboot05mybatis.pojo mybatis.mapper-locations=classpath:mybatis/mapper/*.xml -
编写controller测试
package com.example.springboot05mybatis.controller;

import com.example.springboot05mybatis.mapper.UserMapper;
import com.example.springboot05mybatis.pojo.User;
import org.springframework.beans.factory.annotation.Autowired;
import org.springframework.web.bind.annotation.GetMapping;
import org.springframework.web.bind.annotation.PathVariable;
import org.springframework.web.bind.annotation.RestController;

import java.util.List;

@RestController
public class UserController {
    @Autowired
    private UserMapper userMapper;

    @GetMapping("/query")
    public List<User> quertyUserList(){
        List<User> users = userMapper.queryUserList();
        for (User user : users){
            System.out.println(user);
        }
        return users;
    }

    @GetMapping("/byid/{id}")
    public User queryUserById(@PathVariable("id") int id){
        User user = userMapper.queryUserById(id);
        System.out.println(user);
        return user;
    }

    @GetMapping("/updata")
    public String updateUser(){
        User user = new User(4,"xiaoqi","123456");
        if (userMapper.updateUser(user)!=0){
            return "ok";
        }
        return "false";

    }
}
13、Spring Security
13.1、简介
Spring Security 是针对Spring项目的安全框架,也是Spring Boot底层安全模块默认的技术选型,他可以实现强大的Web安全控制,对于安全控制,我们仅需要引入 spring-boot-starter-security 模块,进行少量的配置,即可实现强大的安全管理!
记住几个类:
- WebSecurityConfigurerAdapter:自定义Security策略
- AuthenticationManagerBuilder:自定义认证策略
- @EnableWebSecurity:开启WebSecurity模式
Spring Security的两个主要目标是 “认证” 和 “授权”(访问控制)。
“认证”(Authentication)
身份验证是关于验证您的凭据,如用户名/用户ID和密码,以验证您的身份。
身份验证通常通过用户名和密码完成,有时与身份验证因素结合使用。
“授权” (Authorization)
授权发生在系统成功验证您的身份后,最终会授予您访问资源(如信息,文件,数据库,资金,位置,几乎任何内容)的完全权限。
13.2、使用
- 依赖
<dependency>
   <groupId>org.springframework.boot</groupId>
   <artifactId>spring-boot-starter-security</artifactId>
</dependency>
-
controller
@Controller public class RouterController { @RequestMapping({"/","/index"}) public String index(){ return "index"; } @RequestMapping("/toLogin") public String toLogin(){ return "views/login"; } //可以实现公用 @RequestMapping("/level1/{id}") public String level(@PathVariable("id") int id){ return "views/level1/" +id; } @RequestMapping("/level2/{id}") public String level2(@PathVariable("id") int id){ return "views/level2/" +id; } @RequestMapping("/level3/{id}") public String level3(@PathVariable("id") int id){ return "views/level3/" +id; } } -
编写config继承WebSecurityConfigurerAdapter
@EnableWebSecurity // 开启WebSecurity模式 public class SecurityConfig extends WebSecurityConfigurerAdapter { @Override //授权 protected void configure(HttpSecurity http) throws Exception { //首页所有人可以访问,但是功能页只有对应有权限的人才能访问 //链式编程 //请求授权的规则 http.authorizeHttpRequests().antMatchers("/").permitAll() .antMatchers("/level1/**").hasRole("vip1") .antMatchers("/level2/**").hasRole("vip2") .antMatchers("/levle3/**").hasRole("vip3"); // 没有权限默认进入登陆页 // 开启自动配置的登录功能 // /login 请求来到登录页 // /login?error 重定向到这里表示登录失败 http.formLogin(); } //认证规则 //密码编码 PasswordEncoder //在SpringSecuritys5中,新增了许多加密方式 @Override protected void configure(AuthenticationManagerBuilder auth) throws Exception { //这些数据应该从数据库中读 //Spring security 5.0中新增了多种加密方式,也改变了密码的格式。 //要想我们的项目还能够正常登陆,需要修改一下configure中的代码。我们要将前端传过来的密码进行某种方式加密 //spring security 官方推荐的是使用bcrypt加密方式。 auth.inMemoryAuthentication().passwordEncoder(new BCryptPasswordEncoder()) .withUser("zhangsan").password(new BCryptPasswordEncoder().encode("123456")).roles("vip2","vip3") .and() .withUser("root").password(new BCryptPasswordEncoder().encode("123456")).roles("vip1","vip2","vip3"); } } -
注销与不同权限显示不同内容
我们需要结合thymeleaf中的一些功能
sec:authorize=“isAuthenticated()”:是否认证登录!来显示不同的页面
导入依赖
<!-- https://mvnrepository.com/artifact/org.thymeleaf.extras/thymeleaf-extras-springsecurity4 -->
<dependency>
   <groupId>org.thymeleaf.extras</groupId>
   <artifactId>thymeleaf-extras-springsecurity5</artifactId>
   <version>3.0.4.RELEASE</version>
</dependency>
修改我们的 前端页面,导入命名空间
xmlns:sec="http://www.thymeleaf.org/thymeleaf-extras-springsecurity5"-
添加注销按钮,并根据是否登录显示不同内容
<!--登录注销--> <!--如果未登录 显示登陆按钮,如果以登录,显示用户名和注销按钮--> <div class="right menu"> <!--未登录--> <div sec:authorize="!isAuthenticated()"> <a class="item" th:href="@{/login}"> <i class="address card icon"></i> 登录 </a> </div> <!--登录--> <div sec:authorize="isAuthenticated()"> <a class="item" th:href="@{#}"> <!--从授权那里获取name--> 用户名:<span sec:authentication="name"></span> 角色:<span sec:authentication="principal.authorities"></span> </a> <a class="item" th:href="@{/logout}"> <i class="sign out icon"></i> 注销 </a> </div> -
config添加注销功能
protected void configure(HttpSecurity http) throws Exception { //首页所有人可以访问,但是功能页只有对应有权限的人才能访问 //链式编程 //请求授权的规则 http.authorizeHttpRequests().antMatchers("/").permitAll() .antMatchers("/level1/**").hasRole("vip1") .antMatchers("/level2/**").hasRole("vip2") .antMatchers("/levle3/**").hasRole("vip3"); //定制登陆页 //没有权限默认为登陆页 http.formLogin(); //如果注销404了,就是因为它默认防止csrf跨站请求伪造,因为会产生安全问题,我们可以将请求改为post表单提交,或者在spring security中关闭csrf功能 http.csrf().disable();//登出失败可能出现的原因,禁用后就可以正常注销 //注销 跳会首页 //开启了注销功能 http.logout().logoutSuccessUrl("/index"); } -
不同权限显示不同内容
<div class="column" sec:authorize="hasRole('vip1')">
-
-
记住我与定制首页
-
可以使用spring security自带的login页面,比较丑
http.rememberMe()//添加记住我功能,本质cookie -
定制登录页
-
在刚才的登录页配置后面指定 loginpage
http.formLogin().loginPage("/toLogin").loginProcessingUrl("/login").defaultSuccessUrl("/index"); -
然后前端也需要指向我们自己定义的 login请求
<a class="item" th:href="@{/toLogin}"> <i class="address card icon"></i> 登录 </a> -
我们登录,需要将这些信息发送到哪里,我们也需要配置,login.html 配置提交请求及方式,方式必须为post:
<form th:action="@{/login}" method="post"> <div class="field"> <label>Username</label> <div class="ui left icon input"> <input type="text" placeholder="Username" name="username"> <i class="user icon"></i> </div> </div> <div class="field"> <label>Password</label> <div class="ui left icon input"> <input type="password" name="password"> <i class="lock icon"></i> </div> </div> <input type="submit" class="ui blue submit button"/> </form> -
在登录页增加记住我的多选框
<input type="checkbox" name="remember"> 记住我 -
后端验证处理!
//定制记住我的参数!
http.rememberMe().rememberMeParameter("remember");
-
-
14、Shiro
14.1、简介
Apache Shiro 是一个强大灵活的开源安全框架,可以完全处理身份验证、授权、加密和会话管理。类似于Spring Security
Shiro能到底能做些什么呢?
- 验证用户身份
- 用户访问权限控制,比如:1、判断用户是否分配了一定的安全角色。2、判断用户是否被授予完成某个操作的权限
- 在非 Web 或 EJB 容器的环境下可以任意使用Session API
- 可以响应认证、访问控制,或者 Session 生命周期中发生的事件
- 可将一个或以上用户安全数据源数据组合成一个复合的用户 “view”(视图)
- 支持单点登录(SSO)功能
- 支持提供“Remember Me”服务,获取用户关联信息而无需登录
特性:
- **Authentication(认证):**用户身份识别,通常被称为用户“登录”
- **Authorization(授权):**访问控制。比如某个用户是否具有某个操作的使用权限。
- **Session Management(会话管理):**特定于用户的会话管理,甚至在非web 或 EJB 应用程序。
- **Cryptography(加密):**在对数据源使用加密算法加密的同时,保证易于使用。
三大核心对象:
- **Subject:**当前用户,Subject 可以是一个人,但也可以是第三方服务、守护进程帐户、时钟守护任务或者其它–当前和软件交互的任何事件。
- **SecurityManager:**管理所有Subject,SecurityManager 是 Shiro 架构的核心,配合内部安全组件共同组成安全伞。
- **Realms:**用于进行权限信息的验证,我们自己实现。Realm 本质上是一个特定的安全 DAO:它封装与数据源连接的细节,得到Shiro 所需的相关的数据。在配置 Shiro 的时候,你必须指定至少一个Realm 来实现认证(authentication)和/或授权(authorization)。
一些方法:
//获取当前角色
Subject currentUser = SecurityUtils.getSubject();
//获取当前 Subject 的会话对象
Session session = currentUser.getSession();
//判断当前用户是否已通过身份验证(登录)
currentUser.isAuthenticated()
//获取当前用户的主体标识(身份信息,用户名,邮箱等)
currentUser.getPrincipal()
//判断当前用户角色
currentUser.hasRole("schwartz")
//判断当前用户是否拥有指定权限(比角色检查更灵活,推荐用于细粒度的访问控制)
currentUser.isPermitted("lightsaber:wield")
//注销
currentUser.logout();
14.2、集成springboot
14.2.1、环境搭建
pom.xml
<dependency>
    <groupId>org.springframework.boot</groupId>
    <artifactId>spring-boot-starter-jdbc</artifactId>
</dependency>
<dependency>
    <groupId>org.springframework.boot</groupId>
    <artifactId>spring-boot-starter-thymeleaf</artifactId>
</dependency>
<dependency>
    <groupId>org.springframework.boot</groupId>
    <artifactId>spring-boot-starter-web</artifactId>
</dependency>

<dependency>
    <groupId>com.mysql</groupId>
    <artifactId>mysql-connector-j</artifactId>
    <scope>runtime</scope>
</dependency>
<dependency>
    <groupId>org.projectlombok</groupId>
    <artifactId>lombok</artifactId>
    <optional>true</optional>
</dependency>
<dependency>
    <groupId>org.springframework.boot</groupId>
    <artifactId>spring-boot-starter-test</artifactId>
    <scope>test</scope>
</dependency>
<dependency>
    <groupId>org.apache.shiro</groupId>
    <artifactId>shiro-spring</artifactId>
    <version>2.0.4</version>
</dependency>
Config
UserRealm
//自定义realm
public class UserRealm extends AuthorizingRealm {
    //授权
    @Override
    protected AuthorizationInfo doGetAuthorizationInfo(PrincipalCollection principalCollection) {
        System.out.println("执行了授权doGetAuthorizationInfo");
        return null;
    }
    //认证
    @Override
    protected AuthenticationInfo doGetAuthenticationInfo(AuthenticationToken authenticationToken) throws AuthenticationException {
        System.out.println("执行了认证doGetAuthenticationInfo");
        return null;
    }
}
ShiroConfig
@Configuration
public class ShiroConfig{

    //3. 创建ShiroFilterFactoryBean对象
    @Bean
    public ShiroFilterFactoryBean shiroFilterFactoryBean() {
        ShiroFilterFactoryBean shiroFilterFactoryBean = new ShiroFilterFactoryBean();
        //设置安全管理器
        shiroFilterFactoryBean.setSecurityManager(DefaultWebSecurityManager());
        return shiroFilterFactoryBean;
    }
    //2. 创建DefaultWebSecurityManager对象
    @Bean
    public DefaultWebSecurityManager DefaultWebSecurityManager(){
        DefaultWebSecurityManager defaultWebSecurityManager = new DefaultWebSecurityManager();
        //关联realm
        defaultWebSecurityManager.setRealm(userRealm());
        return defaultWebSecurityManager;
    }

    //1. 创建realm对象,需要自定义类
    @Bean
    public UserRealm userRealm(){
        return new UserRealm();
    }
}
前端页面
index
<!DOCTYPE html>
<html lang="en" xmlns:th="http://www.thymeleaf.org">
<head>
    <meta charset="UTF-8">
    <title>Title</title>
</head>
<body>
<h1>首页</h1>
<p th:text="${msg}"></p>
<a th:href="@{/user/add}">add</a> |
<a th:href="@{/user/update}">update</a>
</body>
</html>
add
<!DOCTYPE html>
<html lang="en">
<head>
    <meta charset="UTF-8">
    <title>Title</title>
</head>
<body>
<h1>add</h1>
</body>
</html>
update
<!DOCTYPE html>
<html lang="en">
<head>
    <meta charset="UTF-8">
    <title>Title</title>
</head>
<body>
<h1>update</h1>
</body>
</html>
Controller
@Controller
public class ShiroController {
    @RequestMapping({"index","/"})
    public String index(Model model){
        model.addAttribute("msg","hello shiro");
        return "index";
    }
    @RequestMapping("/user/add")
    public String add(){
        return "user/add";
    }
    @RequestMapping("/user/update")
    public String update(){
        return "user/update";
    }
}
14.2.2、登录拦截
login.html
<!DOCTYPE html>
<html lang="en">
<head>
    <meta charset="UTF-8">
    <title>Title</title>
</head>
<body>
<h1>登录页面</h1>
<form action="/login" method="post">
    用户名:<input type="text" name="username"><br>
    密码:<input type="password" name="password"><br>
    <input type="submit" value="登录">
</form>
</body>
</html>
ShiroConfig
@Configuration
public class ShiroConfig{

    //3. 创建ShiroFilterFactoryBean对象
    @Bean
    public ShiroFilterFactoryBean shiroFilterFactoryBean() {
        ShiroFilterFactoryBean shiroFilterFactoryBean = new ShiroFilterFactoryBean();
        //设置拦截器
        Map<String, String> FilterMap = new LinkedHashMap<>();
        // anon:无需认证就可以访问
        // authc:必须认证了才能访问
        // user: 必须拥有记住我才能访问
        // perms:拥有对某个资源的权限
        // role:拥有某个角色权限才能访问
        FilterMap.put("/user/**","authc");
        shiroFilterFactoryBean.setFilterChainDefinitionMap(FilterMap);
        //登陆拦截,设置登录请求
        shiroFilterFactoryBean.setLoginUrl("/toLogin");
        //设置安全管理器
        shiroFilterFactoryBean.setSecurityManager(DefaultWebSecurityManager());
        return shiroFilterFactoryBean;
    }
}
14.2.3、用户认证
login.html添加错误显示
<!DOCTYPE html>
<html lang="en" xmlns:th="http://www.thymeleaf.org">
<head>
    <meta charset="UTF-8">
    <title>Title</title>
</head>
<body>
<h1>登录页面</h1>
<p th:text="${msg}" style="color: red"></p>
<form action="/login" method="post">
    用户名:<input type="text" name="username"><br>
    密码:<input type="password" name="password"><br>
    <input type="submit" value="登录">
</form>
</body>
</html>
controller添加请求
@RequestMapping("login")
    public String login(String username,String password,Model model){
        //获取当前用户
        Subject currentUser = SecurityUtils.getSubject();
        //封装用户数据
        UsernamePasswordToken token = new UsernamePasswordToken(username, password);
        try {
            //执行登录
            currentUser.login(token);
            return "redirect:/index";
        } catch (UnknownAccountException e) {
            model.addAttribute("msg","用户名错误");
            return "login";
        } catch (IncorrectCredentialsException e){
            model.addAttribute("msg","密码错误");
            return "login";
        }
    }
realm验证
@Override
    protected AuthenticationInfo doGetAuthenticationInfo(AuthenticationToken authenticationToken) throws AuthenticationException {
        System.out.println("执行了认证doGetAuthenticationInfo");
        UsernamePasswordToken token = (UsernamePasswordToken) authenticationToken;
        String username = "zhangsan";
        String password = "123456";
        //用户名验证
        if (!token.getUsername().equals(username)){
            return null; //抛出异常
        }
        //密码验证,shiro做
        return new SimpleAuthenticationInfo("",password,"");
    }
14.2.3、整合mybatis
依赖
<dependency>
    <groupId>org.mybatis.spring.boot</groupId>
    <artifactId>mybatis-spring-boot-starter</artifactId>
    <version>2.1.3</version>
</dependency>
pojo
@Data
@NoArgsConstructor
@AllArgsConstructor
public class User {
    private Integer id;
    private String name;
    private String pwd;
}
mapper
@Repository
@Mapper
public interface UserMapper {
    User selectByName(String name);
}
<?xml version="1.0" encoding="UTF-8" ?>
<!DOCTYPE mapper
        PUBLIC "-//mybatis.org//DTD Mapper 3.0//EN"
        "http://mybatis.org/dtd/mybatis-3-mapper.dtd">
<mapper namespace="com.zhao.mapper.UserMapper">
    <select id="selectByName" resultType="com.zhao.pojo.User">
        select * from user where name = #{name}
    </select>
</mapper>
service
public interface UserService {
    User selectByName(String name);
}
@Service
public class UserServiceImpl implements UserService{
    @Autowired
    private UserMapper userMapper;
    @Override
    public User selectByName(String name) {
        return userMapper.selectByName(name);
    }
}
更改realm
//认证
@Override
protected AuthenticationInfo doGetAuthenticationInfo(AuthenticationToken authenticationToken) throws AuthenticationException {
    System.out.println("执行了认证doGetAuthenticationInfo");
    UsernamePasswordToken token = (UsernamePasswordToken) authenticationToken;
    User user = userService.selectByName(token.getUsername());
    //用户名验证
    if (user == null){
        return null;
    }
    //密码验证,shiro做
    return new SimpleAuthenticationInfo("",user.getPwd(),"");
}
14.2.4、请求授权
shiroConfig设置授权,并设置无权限跳转路径
//3. 创建ShiroFilterFactoryBean对象
    @Bean
    public ShiroFilterFactoryBean shiroFilterFactoryBean() {
        ShiroFilterFactoryBean shiroFilterFactoryBean = new ShiroFilterFactoryBean();
        //设置拦截器
        // anon:无需认证就可以访问
        // authc:必须认证了才能访问
        // user: 必须拥有记住我才能访问
        // perms:拥有对某个资源的权限
        // role:拥有某个角色权限才能访问
        Map<String, String> FilterMap = new LinkedHashMap<>();
        //设置授权,没有授权的话会跳转到未授权页面
        //必须带有user:add才有权限
        FilterMap.put("/user/add","perms[user:add]");
        FilterMap.put("/user/update","perms[user:update]");
        //user下的其余请求必须登录后才能访问
        FilterMap.put("/user/**","authc");
        shiroFilterFactoryBean.setFilterChainDefinitionMap(FilterMap);
        //登陆拦截,设置登录请求
        shiroFilterFactoryBean.setLoginUrl("/toLogin");
        //未授权跳转
        shiroFilterFactoryBean.setUnauthorizedUrl("/unauthorized");
        //设置安全管理器
        shiroFilterFactoryBean.setSecurityManager(DefaultWebSecurityManager());
        return shiroFilterFactoryBean;
    }
controller
@RequestMapping("unauthorized")
@ResponseBody
public String unauthorized(){
    return "无权限";
}
realm授予权限,网页可以正常访问
//授权
    @Override
    protected AuthorizationInfo doGetAuthorizationInfo(PrincipalCollection principalCollection) {
        System.out.println("执行了授权doGetAuthorizationInfo");
        SimpleAuthorizationInfo info = new SimpleAuthorizationInfo();
        info.addStringPermission("user:add");
        info.addStringPermission("user:update");
        return info;
    }
引入数据库
添加permission字段,给用户添加user:add,user:update
修改pojo,添加permission属性
realm,认证部分将数据库中的user传出,授权部分subject取出user
public class UserRealm extends AuthorizingRealm {
    @Autowired
    private UserService userService;
    //授权
    @Override
    protected AuthorizationInfo doGetAuthorizationInfo(PrincipalCollection principalCollection) {
        System.out.println("执行了授权doGetAuthorizationInfo");
        SimpleAuthorizationInfo info = new SimpleAuthorizationInfo();
//        info.addStringPermission("user:add");
//        info.addStringPermission("user:update");
        Subject subject = SecurityUtils.getSubject();
        User user = (User) subject.getPrincipal();
        info.addStringPermission(user.getPermission());
        return info;
    }
    //认证
    @Override
    protected AuthenticationInfo doGetAuthenticationInfo(AuthenticationToken authenticationToken) throws AuthenticationException {
        System.out.println("执行了认证doGetAuthenticationInfo");
        UsernamePasswordToken token = (UsernamePasswordToken) authenticationToken;
        User user = userService.selectByName(token.getUsername());
        //用户名验证
        if (user == null){
            return null;
        }
        //密码验证,shiro做
        return new SimpleAuthenticationInfo(user,user.getPwd(),"");
    }
}
14.2.5、整合thymeleaf
首页添加登录链接,登陆后不显示登陆链接和无权限功能的链接
依赖
<dependency>
    <groupId>com.github.theborakompanioni</groupId>
    <artifactId>thymeleaf-extras-shiro</artifactId>
    <version>2.1.0</version>
</dependency>
放入容器
//4.集合ShiroDialect:整合thymeleaf-shiro
@Bean
public ShiroDialect shiroDialect(){
    return new ShiroDialect();
}
index
<!DOCTYPE html>
<html lang="en" xmlns:th="http://www.thymeleaf.org"
      xmlns:shiro="http://www.w3.org/1999/xhtml">
<head>
    <meta charset="UTF-8">
    <title>Title</title>
</head>
<body>
<h1>首页</h1>
<div th:if="${session.user==null}">
    <a th:href="@{/toLogin}">登录</a>
</div>
<p th:text="${msg}"></p>
<div shiro:hasPermission="user:add">
    <a th:href="@{/user/add}">add</a>
</div>
<div shiro:hasPermission="user:update">
    <a th:href="@{/user/update}">update</a>
</div>
</body>
</html>
realm
//认证
    @Override
    protected AuthenticationInfo doGetAuthenticationInfo(AuthenticationToken authenticationToken) throws AuthenticationException {
        System.out.println("执行了认证doGetAuthenticationInfo");
        UsernamePasswordToken token = (UsernamePasswordToken) authenticationToken;
        User user = userService.selectByName(token.getUsername());
        //将用户信息存入session,用于前端显示登录按钮
        Subject subject = SecurityUtils.getSubject();
        subject.getSession().setAttribute("user",user);
        //用户名验证
        if (user == null){
            return null;
        }
        //密码验证,shiro做
        return new SimpleAuthenticationInfo(user,user.getPwd(),"");
    }
15、Swagger2
swagger就是一个在你写接口的时候自动帮你生成接口文档的东西,只要你遵循它的规范并写一些接口的说明注解即可。
15.1、简单使用
-
新建springboot-web项目
-
导入依赖
<!-- https://mvnrepository.com/artifact/io.springfox/springfox-swagger-ui --> <dependency> <groupId>io.springfox</groupId> <artifactId>springfox-swagger-ui</artifactId> <version>2.10.0</version> </dependency> <!-- https://mvnrepository.com/artifact/io.springfox/springfox-swagger2 --> <dependency> <groupId>io.springfox</groupId> <artifactId>springfox-swagger2</artifactId> <version>2.9.2</version> </dependency> -
配置swagger
@Configuration //加载到配置里面 //开启Swagger @EnableSwagger2 public class SwaggerConfig { } -
测试:Swagger UI
15.2、配置Swagger信息
-
Swagger2实例Bean是Docket,所以通过配置Docket实例来配置Swaggger
@Bean public Docket docket(){ return new Docket(DocumentationType.SWAGGER_2)//配置了Swaggerbean实例 .apiInfo(apiInfo());//重新配置了默认的文档信息 } -
创建一个apiinfo 配置基本信息
//配置Swagger信息=apiInfo
public ApiInfo apiInfo(){

    Contact contact = new Contact("张三","xxxstudy.blog.csdn.net","123");//作者信息
    return new ApiInfo("Api Documentation",
                       "Api Documentation", "1.0",
                       "xxxstudy.blog.csdn.nets", contact,
                       "Apache 2.0", "http://www.apache.org/licenses/LICENSE-2.0", new ArrayList());

}
15.3、配置扫描接口
构建Docket时通过select()方法配置怎么扫描接口
@Configuration //加载到配置里面
//开启Swagger
@EnableSwagger2
public class SwaggerConfig {
    @Bean
    public Docket docket(){
        return new Docket(DocumentationType.SWAGGER_2)//配置了Swaggerbean实例
            .apiInfo(apiInfo())//重新配置了默认的文档信息
            .select()
            //RequestHandlerSelectors 要扫描接口的方式
            //指定要扫描的包 basePackage()
            //any() 扫描全部
            //withClassAnnotation() 扫描类上的注解,需要注解的反射对象
            //withMethodAnnotation() 扫描方法上注解
            //只会扫描有ResrController注解的类.生成一个接口
            .apis(RequestHandlerSelectors.basePackage("com.zhao.controller"))
            //.paths(PathSelectors.ant("/zhao/**"))//过滤路径
            .build();//工厂模式
    }
}
路径过滤这里的可选值还有
any() // 任何请求都扫描
none() // 任何请求都不扫描
regex(final String pathRegex) // 通过正则表达式控制
ant(final String antPattern) // 通过ant()控制
15.4、配置Swagger是否启动
public Docket docket(){
    return new Docket(DocumentationType.SWAGGER_2)//配置了Swaggerbean实例
        .apiInfo(apiInfo())//重新配置了默认的文档信息
        //是否启用swagger,false浏览器不能访问swagger
        .enable(false)
        .select()
        .apis(RequestHandlerSelectors.basePackage("com.zhao.controller"))
        .build();
}
如何设置在某些环境可以使用swagger,在某些环境下不能使用swagger?
有application-dev.properties,application-test.properties等等
@Bean
public Docket docket(Environment environment){
    Profiles profiles = Profiles.of("dev");//设置可以使用swagger的环境
    //获取环境
    //通过environment.acceptsProfiles判断是否出来自己设定的环境
    boolean flag = environment.acceptsProfiles(profiles);//获得监听的对象

    return new Docket(DocumentationType.SWAGGER_2)//配置了Swaggerbean实例
        .apiInfo(apiInfo())//重新配置了默认的文档信息
        //是否启用swagger,false浏览器不能访问swagger
        .enable(flag)
        .select()
        .apis(RequestHandlerSelectors.basePackage("com.example.xioaqi.controller"))
        .build();
}
15.5、配置分组
配置多个分组只需要配置多个docket即可:
@Bean
public Docket docket(Environment environment){

    return new Docket(DocumentationType.SWAGGER_2)//配置了Swaggerbean实例
            .apiInfo(apiInfo())
            .groupName("张三")

}
//配置多个Docket
public Docket docket1(){
    return new Docket(DocumentationType.SWAGGER_2)
            .groupName("A");
}
public Docket docket2(){
    return new Docket(DocumentationType.SWAGGER_2)
            .groupName("B");
}
public Docket docket3(){
    return new Docket(DocumentationType.SWAGGER_2)
            .groupName("C");
}
15.6、实体配置
@ApiModel("用户实体类")
public class User {
    public String username;
    public String password;
}
@RestController
public class HelloController {
    //只有我们的接口中,返回值中存在实体类,他才会被扫描到
    @PostMapping("/user")
    public User user(){
        return new User();
    }
}
15.7、注解
- @ApiModel为类添加注释
- @ApiModelProperty为类属性添加注释
| Swagger注解 | 简单说明 |
|---|---|
| @Api(tags = “xxx模块说明”) | 作用在模块类上 |
| @ApiOperation(“xxx接口说明”) | 作用在接口方法上 |
| @ApiModel(“xxxPOJO说明”) | 作用在模型类上:如VO、BO |
| @ApiModelProperty(value = “xxx属性说明”,hidden = true) | 作用在类方法和属性上,hidden设置为true可以隐藏该属性 |
| @ApiParam(“xxx参数说明”) | 作用在参数、方法和字段上,类似@ApiModelProperty |
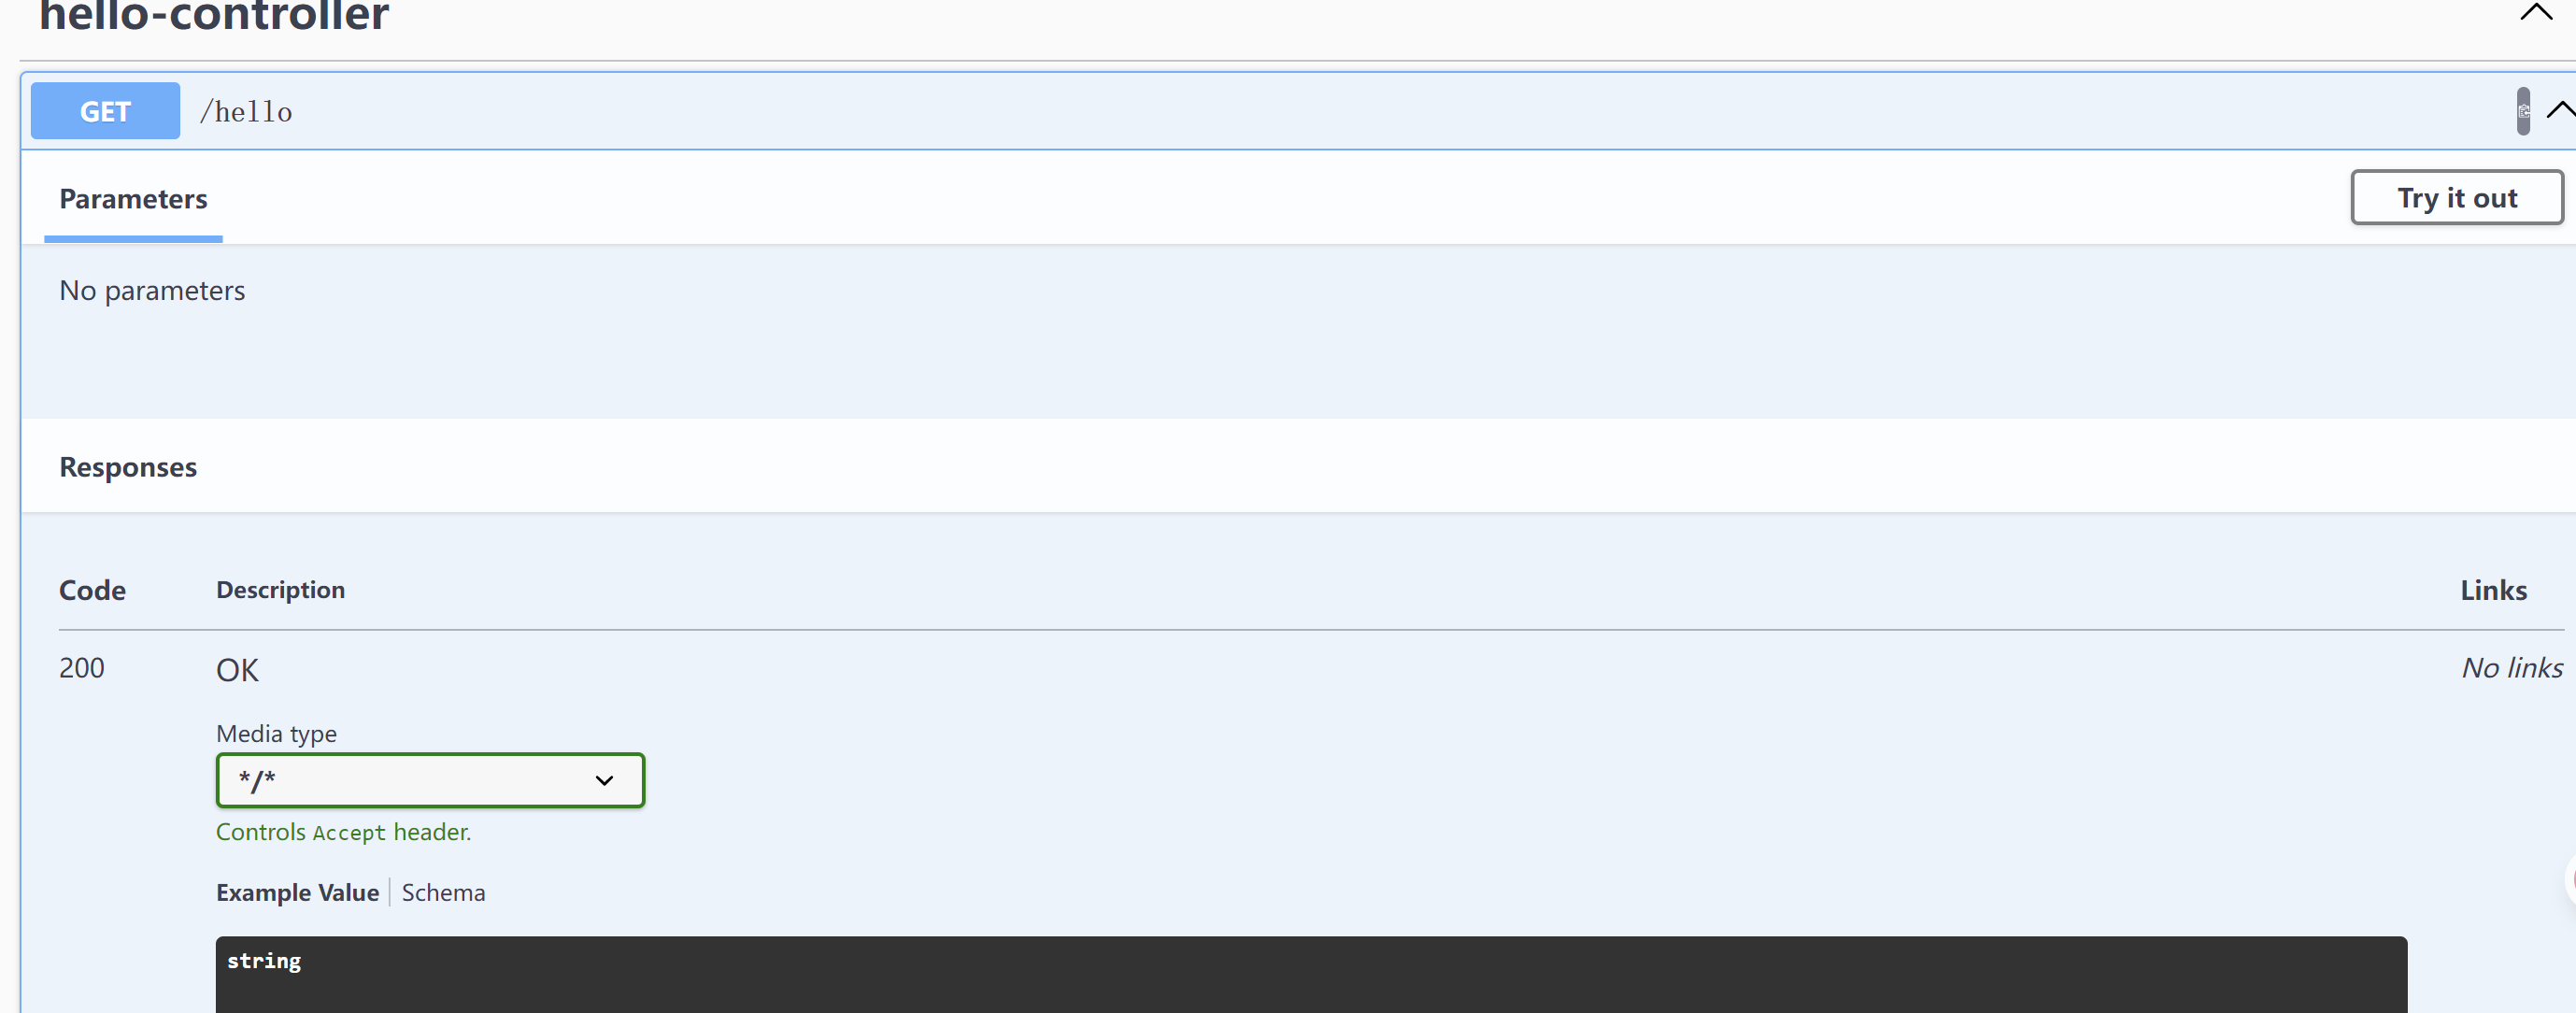
15.8、Swagger测试
点击try it测试
16、SpringDoc OpenAPI
springfox停止维护了,使用SpringDoc OpenAPI (是目前官方推荐的替代方案)
16.1、配置信息
依赖
<dependency>
    <groupId>org.springdoc</groupId>
    <artifactId>springdoc-openapi-ui</artifactId>
    <version>1.8.0</version>
</dependency>
配置swagger
import io.swagger.v3.oas.models.OpenAPI;
import io.swagger.v3.oas.models.info.Info;
import org.springframework.context.annotation.Bean;
import org.springframework.context.annotation.Configuration;

@Configuration
public class SwaggerConfig {
    @Bean
    public OpenAPI customOpenAPI() {
        return new OpenAPI()
            .info(new Info()
                  .title("API文档")
                  .version("1.0")
                  .description("项目接口文档"));
    }
}
16.2、配置扫描接口和分组
springdoc:
  # 1. 指定扫描的包路径(多个用逗号分隔)
  packages-to-scan: com.example.controller,com.example.api

  # 2. 指定匹配的路径模式(Ant 风格)
  paths-to-match: /api/ **,/admin/**

  # 3. 排除不需要扫描的包
  packages-to-exclude: com.example.internal

  # 4. 排除不需要扫描的路径
  paths-to-exclude: /actuator/ **,/internal/**

  # 5. 分组配置(为不同模块创建独立文档)
  group-configs:
    - group: public-api
      paths-to-match: /api/public **/**
      packages-to-scan: com.example.controller.public

    - group: admin-api
      paths-to-match: /api/admin/***
      packages-to-scan: com.example.controller.admin
16.3、注解
| 注解 | 作用 | 适用位置 |
|---|---|---|
@OpenAPIDefinition | 全局 API 信息配置(标题、版本、服务器等) | 启动类或配置类 |
@Tag | 标记 Controller 或方法的所属分组 | 类、方法 |
@Operation | 描述单个接口的详细信息(摘要、描述等) | 方法 |
@Parameter | 描述单个请求参数(路径、查询、Header) | 方法参数 |
@Schema | 描述 DTO 字段的类型、格式、示例等 | 类、字段、方法参数 |
@ApiResponse | 描述单个响应状态码及返回结构 | 方法 |
@SecurityRequirement | 指定接口的安全认证要求 | 类、方法 |
@Hidden | 隐藏接口或字段,不生成文档 | 类、方法、字段 |
17、任务
17.1、异步任务
指在程序中执行某些操作时,不需要等待操作完成就可以继续执行其他任务。其核心思想是通过多线程避免程序阻塞,提高资源利用效率。
@Service
public class AsynService {
    //告诉Spring这是一个异步的方法
    @Async
    public void hello(){
        try {
            Thread.sleep(3000);
        } catch (InterruptedException e) {
            e.printStackTrace();
        }
        System.out.println("数据正在处理");
    }
}
//开启异步功能
@EnableAsync
@SpringBootApplication
public class SpringBoot09Application {

    public static void main(String[] args) {
        SpringApplication.run(SpringBoot09Application.class, args);
    }
}
@RestController
public class AsynController {

    @Autowired
    AsynService asynService;
    @RequestMapping("/hello")
    public String hello(){
        asynService.hello();//停止三秒钟
        return "ok";
    }
}
17.2、邮件发送
导入依赖
<dependency>
    <groupId>org.springframework.boot</groupId>
    <artifactId>spring-boot-starter-mail</artifactId>
</dependency>
设置自己的邮箱
spring.mail.username=123456@qq.com
# 在qq邮箱中开启POP3/SMTP 获得密码: 生成的授权码
spring.mail.password=xxxxxxxxxx
spring.mail.host=smtp.qq.com

spring.mail.properties.mail.smtp.ssl.enable=true
import javax.mail.internet.MimeMessage;

@SpringBootTest
class SpringBoot09ApplicationTests {
    @Autowired
    JavaMailSenderImpl mailSender;

    //简单的邮件
    @Test
    void contextLoads() {
        SimpleMailMessage mailMessage = new SimpleMailMessage();
        mailMessage.setSubject("12");
        mailMessage.setText("11");
        mailMessage.setTo("123456@qq.com");
        mailMessage.setFrom("123456@qq.com");
        mailSender.send(mailMessage);
    }
}
发送复杂的邮件,使用helper
 //复杂的邮件
    @Test
    void contextLoads2() throws MessagingException {
        //一个复杂的邮件
        MimeMessage mimeMessage = mailSender.createMimeMessage();
        //组装
        //正文
        MimeMessageHelper messageHelper = new MimeMessageHelper(mimeMessage,true);
        messageHelper.setSubject("12");
        //true 支持html
        messageHelper.setText("<p>123</p>",true);
        //附件
        messageHelper.addAttachment("1.jpg",new File("D:\\java\\SpringBoot\\SpringBoot-09\\src\\main\\resources\\images\\1.jpg"));
        messageHelper.setTo("123456@qq.com");
        messageHelper.setFrom("123456@qq.com");
        mailSender.send(mimeMessage);
    }
17.3、定时任务
项目开发中经常需要执行一些定时任务,比如需要在每天凌晨的时候,分析一次前一天的日志信息,Spring为我们提供了异步执行任务调度的方式,提供了两个接口。
-
TaskExecutor接口 任务执行
-
TaskScheduler接口 任务调度
两个注解:
- @EnableScheduling
- @Scheduled
在main方法上加入
@EnableScheduling //开始定时功能的主角
public class SpringBoot09Application {}
@Service
public class ScheduledService {

    //Cron表达式
    //秒 分 时 月 星期
    //每一天的0秒启动
    @Scheduled(cron = "0 * * * * 0-7")
    public void hello(){
        System.out.println("Scheduled被执行了");//在一个特定的时间执行这个方法
    }
}
它用到了cron表达式,可以使用cron在线生成器生成在线Cron表达式生成器 - 码工具 (matools.com)
* * * * * *
 | | | | | |
 | | | | | +--- 星期(0-7,0和7都表示星期日)
 | | | | +----- 月份(1-12)
 | | | +------- 日期(1-31)
 | | +--------- 小时(0-23)
 | +----------- 分钟(0-59)
 +------------- 秒(0-59),**部分环境不支持秒字段**
示例
0 0 12 * * ?:每天中午 12 点执行一次。0 15 10 * * ?:每天上午 10:15 执行一次。0 15 10 * * MON-FRI:每周一到周五上午 10:15 执行一次。
通配符
| 符号 | 说明 | 示例 |
|---|---|---|
| * | 任意值(匹配所有可能值) | * * * * * 表示每分钟执行一次 |
| , | 指定多个值 | 1,15 * * * * 表示每小时的第 1 和 15 分钟执行一次 |
| - | 指定范围 | 1-5 * * * * 表示每小时的第 1 到 5 分钟执行一次 |
| / | 指定步长 | */15 * * * * 表示每 15 分钟执行一次 |
| ? | 不指定值(仅在日期和星期字段中有效) | 0 0 12 1 * ? 表示每月1号中午执行一次 |
| L | 最后一个,通常用于月份和星期字段 | L 表示最后一天或最后一个星期 |
| W | 最近的工作日(仅在日期字段中有效) | 1W 表示每月 1 号最近的工作日 |
| # | 每月的第几个星期几(仅星期字段中有效) | 2#3 表示每月的第三个星期二 |
18、分布式Dubbo+Zooker
18.1、分布式系统
- 分布式系统是若干独立计算机的集合,这些计算机对于用户来说就像单个相关系统
- 分布式系统是由一组通过网络进行通信、为了完成共同的任务而协调工作的计算机节点组成的系统。
只有当单个节点的处理能力无法满足日益增长的计算、存储任务的时候,且硬件的提升(加内存、加磁盘、使用更好的CPU)高昂到得不偿失的时候,应用程序也不能进一步优化的时候,我们才需要考虑分布式系统。
18.2、RPC(Remote Procedure Call)
RPC是指远程过程调用,是一种进程间通信方式,他是一种技术的思想,而不是规范。它允许程序调用另一个地址空间(通常是共享网络的另一台机器上)的过程或函数,而不用程序员显式编码这个远程调用的细节。即程序员无论是调用本地的还是远程的函数,本质上编写的调用代码基本相同。
RPC两个核心模块:通讯,序列化。
18.3、Dubbo
Apache Dubbo是一款高性能、轻量级的开源Java RPC框架,它提供了三大核心能力:面向接口的远程方法调用,智能容错和负载均衡,以及服务自动注册和发现。
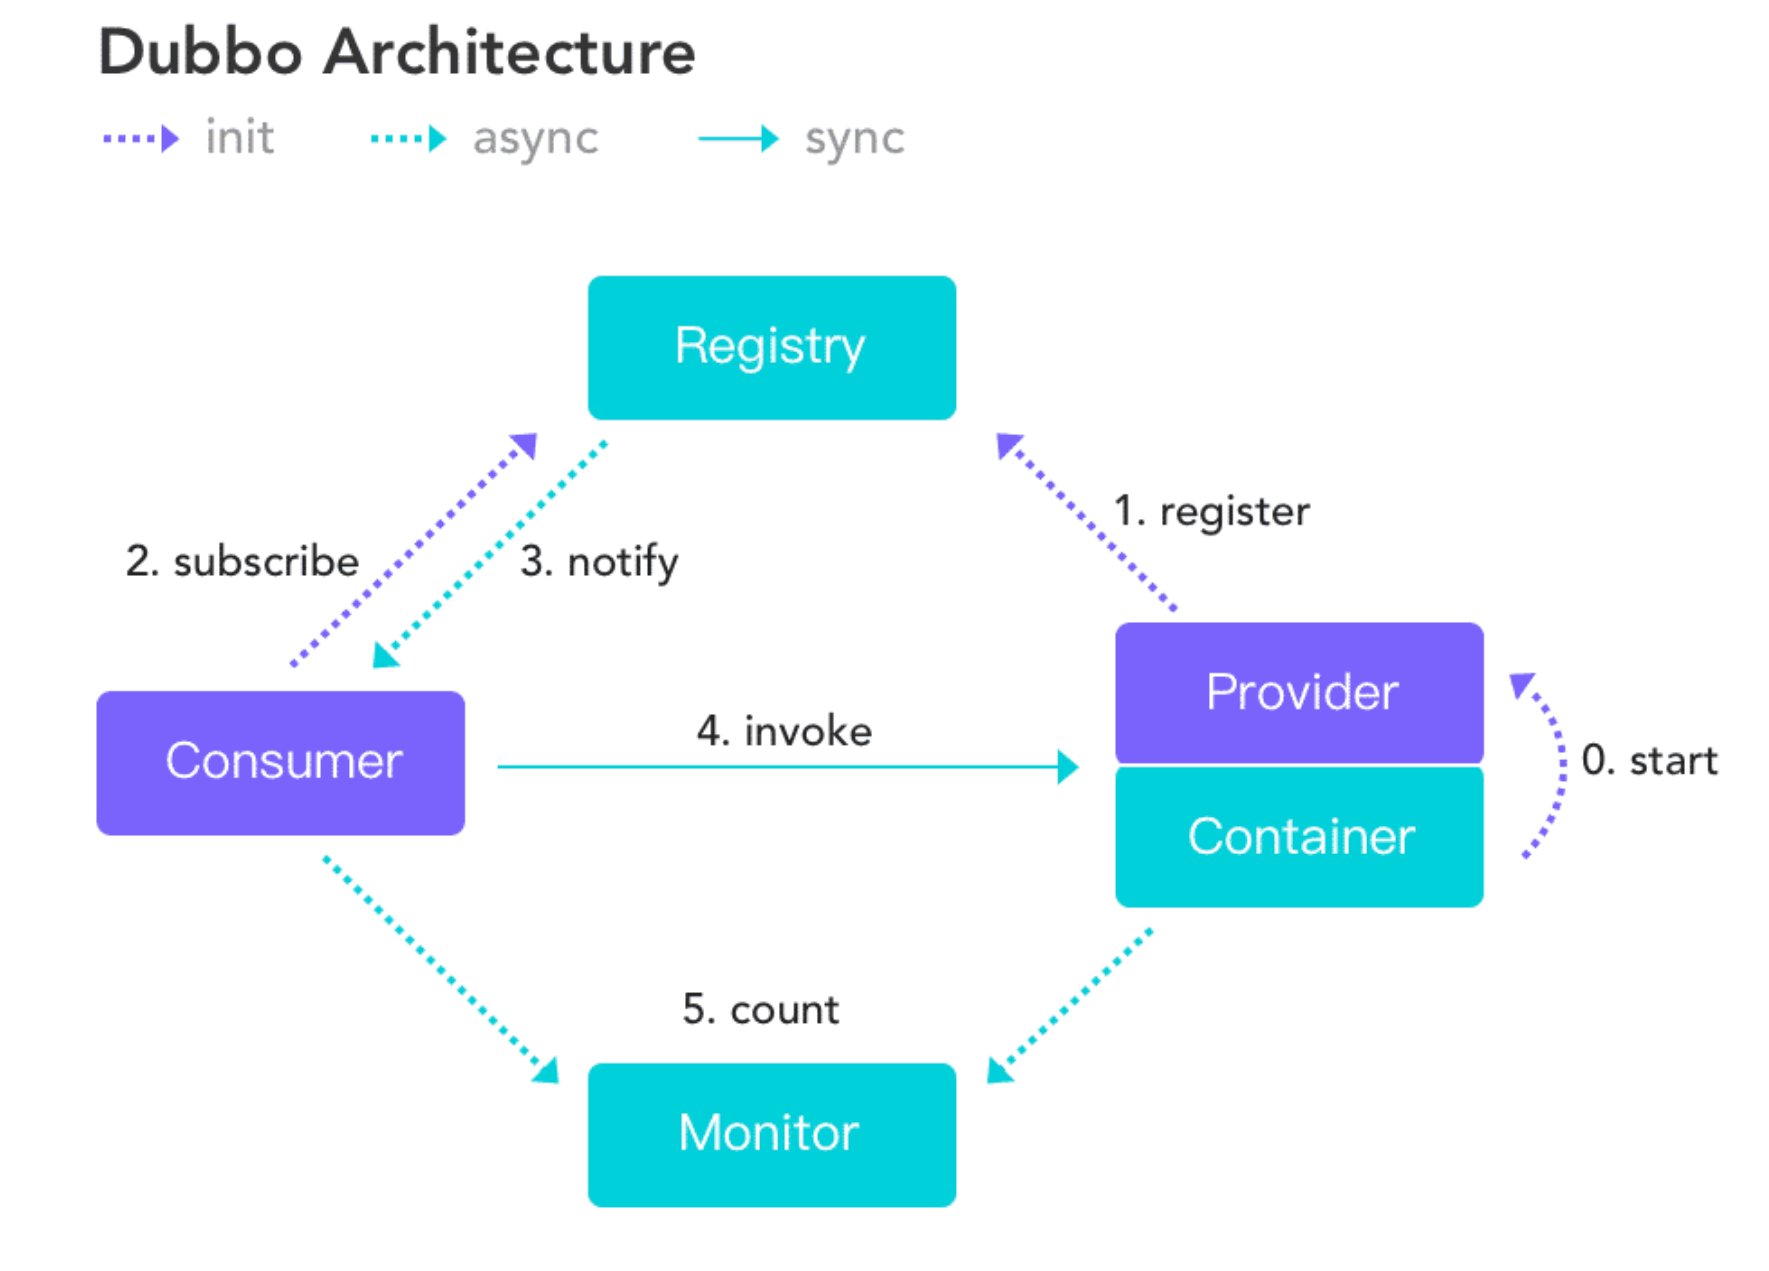
服务提供者(Provider):暴露服务的服务提供方,服务提供者在启动时,向注册中心注册自己提供的服务。
服务消费者(Consumer):调用远程服务的服务消费方,服务消费者在启动时,向注册中心订阅自己所需的服务,服务消费者,从提供者地址列表中,基于软负载均衡算法,选一台提供者进行调用,如果调用失败,再选另一台调用。
注册中心(Registry):注册中心返回服务提供者地址列表给消费者,如果有变更,注册中心将基于长连接推送变更数据给消费者
监控中心(Monitor):服务消费者和提供者,在内存中累计调用次数和调用时间,定时每分钟发送一次统计数据到监控中心
调用关系说明
l 服务容器负责启动,加载,运行服务提供者。
l 服务提供者在启动时,向注册中心注册自己提供的服务。
l 服务消费者在启动时,向注册中心订阅自己所需的服务。
l 注册中心返回服务提供者地址列表给消费者,如果有变更,注册中心将基于长连接推送变更数据给消费者。
l 服务消费者,从提供者地址列表中,基于软负载均衡算法,选一台提供者进行调用,如果调用失败,再选另一台调用。
l 服务消费者和提供者,在内存中累计调用次数和调用时间,定时每分钟发送一次统计数据到监控中心。
18.3.1、Dubbo环境搭建
推荐使用Zookeeper 注册中心
ZooKeeper 是一个分布式的,开放源码的分布式应用程序协同服务。
zookeeper 下载地址为: https://zookeeper.apache.org/releases.html
-
将 conf 目录下的 zoo_sample.cfg 文件,复制一份,重命名为 zoo.cfg
-
在安装目录下面新建一个空的 data 文件夹和 log 文件夹
-
修改 zoo.cfg 配置文件,将 dataDir=/tmp/zookeeper 修改成 zookeeper 安装目录所在的 data 文件夹,再添加一条添加数据日志的配置(需要根据自己的安装路径修改)。
dataDir=D:\Program\Environment\Java\apache-zookeeper-3.8.5-bin\data dataLogDir=D:\Program\Environment\Java\apache-zookeeper-3.8.5-bin\log -
双击 zkServer.cmd 启动程序
-
控制台显示 bind to port 0.0.0.0/0.0.0.0:2181,表示服务端启动成功!
-
双击zkCli.cmd 启动客户端
-
在客户端测试
ls / -
创建节点
create -e /zhangsan
18.3.2、Dubbo-admin安装
- dubbo 本身并不是一个服务软件,它其实是一个jar包,能够帮你的Java程序连接到zookeeper,并利用zookeeper消费、提供服务。
- 但是为了让用户能够更好的管理监控众多的 dubbo 服务,官方提供了一个可视化的监控程序dubbo-adimin,不过这个监控即使不装也不影响使用。
-
**下载dubbo-admin:**地址:https://github.com/apache/dubbo-admin/选择java分支,目前develop分支为go
-
修改 dubbo-admin\src\main\resources \application.properties 指定zookeeper地址
# 注册中心地址(与 Dubbo 服务使用的 Zookeeper 一致) admin.registry.address=zookeeper://127.0.0.1:2181 # 配置中心地址(通常与注册中心相同) admin.config-center=zookeeper://127.0.0.1:2181 # 元数据中心地址(存储服务元数据) admin.metadata-report.address=zookeeper://127.0.0.1:2181 -
在项目目录下打包dubbo-admin,生成可执行 JAR 包,打包成功后,会在
dubbo-admin-distribution/target目录下生成dubbo-admin-0.1.jarmvn clean package -Dmaven.test.skip=true -
进入dubbo-admin-distribution/target目录,执行以下命令启动后端 Spring Boot 服务(默认端口 8080):
java -jar dubbo-admin-0.7.jar -
访问地址,(默认用户名 / 密码:root/root)
-
在创建zookeeper实例时jdk17使用InetSocketAddress的toString方法时有问题,更换java8重新构建并重新启动成功。
18.4、SpringBoot+Dubbo+Zookeeper
1. 启动zookeeper !
2. IDEA创建一个空项目;
3.创建一个模块,实现服务提供者:provider-server , 选择web依赖即可
4.项目创建完毕,我们写一个服务,比如卖票的服务;
编写接口
package com.kuang.provider.service;

public interface TicketService {
   public String getTicket();
}
编写实现类
package com.kuang.provider.service;

public class TicketServiceImpl implements TicketService {
   @Override
   public String getTicket() {
       return "《狂神说Java》";
  }
}
5.创建一个模块,实现服务消费者:consumer-server , 选择web依赖即可
6.项目创建完毕,我们写一个服务,比如用户的服务;
编写service
package com.kuang.consumer.service;

public class UserService {
   //我们需要去拿去注册中心的服务
}
服务提供者
1、将服务提供者注册到注册中心,我们需要整合Dubbo和zookeeper,所以需要导包
使用 Dubbo Spring Boot Starter,首先引入以下 Maven 依赖
    <dependencyManagement>
        <dependencies>
            <dependency>
                <groupId>org.apache.dubbo</groupId>
                <artifactId>dubbo-bom</artifactId>
                <version>3.3.0</version>
                <type>pom</type>
                <scope>import</scope>
            </dependency>
        </dependencies>
    </dependencyManagement>
然后,在相应模块的 pom 中增加必要的 starter 依赖:
    <dependencies>
        <dependency>
            <groupId>org.apache.dubbo</groupId>
            <artifactId>dubbo-spring-boot-starter</artifactId>
        </dependency>
        <dependency>
            <groupId>org.apache.dubbo</groupId>
            <artifactId>dubbo-zookeeper-spring-boot-starter</artifactId>
        </dependency>
    </dependencies>
2、在springboot配置文件中配置dubbo相关属性!
#当前应用名字
dubbo.application.name=provider-server
#注册中心地址
dubbo.registry.address=zookeeper://127.0.0.1:2181
#扫描指定包下服务
dubbo.scan.base-packages=com.kuang.provider.service
3、在service的实现类中配置服务注解,发布服务!注意导包问题
import org.apache.dubbo.config.annotation.Service;
import org.springframework.stereotype.Component;

@DubboService //将服务发布出去
@Service //放在容器中
public class TicketServiceImpl implements TicketService {
   @Override
   public String getTicket() {
       return "《狂神说Java》";
  }
}
逻辑理解 :应用启动起来,dubbo就会扫描指定的包下带有@service注解的服务,将它发布在指定的注册中心中!
服务消费者
1、导入依赖,和之前的依赖一样;
2、配置参数
#当前应用名字
dubbo.application.name=consumer-server
#注册中心地址
dubbo.registry.address=zookeeper://127.0.0.1:2181
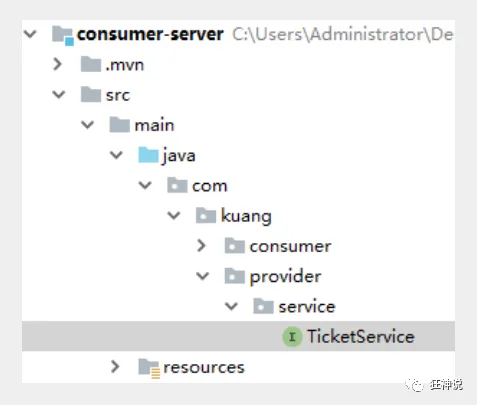
3. 本来正常步骤是需要将服务提供者的接口打包,然后用pom文件导入,我们这里使用简单的方式,直接将服务的接口拿过来,路径必须保证正确,即和服务提供者相同;
4. 完善消费者的服务类
package com.kuang.consumer.service;

import com.kuang.provider.service.TicketService;
import org.apache.dubbo.config.annotation.Reference;
import org.springframework.stereotype.Service;

@Service //注入到容器中
public class UserService {

   @Reference //远程引用指定的服务,他会按照全类名进行匹配,看谁给注册中心注册了这个全类名
   TicketService ticketService;

   public void bugTicket(){
       String ticket = ticketService.getTicket();
       System.out.println("在注册中心买到"+ticket);
  }

}
5. 测试类编写;
@RunWith(SpringRunner.class)
@SpringBootTest
public class ConsumerServerApplicationTests {

   @Autowired
   UserService userService;

   @Test
   public void contextLoads() {

       userService.bugTicket();

  }

}
启动测试
1. 开启zookeeper
2. 打开dubbo-admin实现监控【可以不用做】
3. 开启服务者
4. 消费者消费测试,结果:
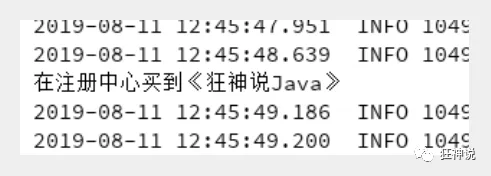
监控中心 :
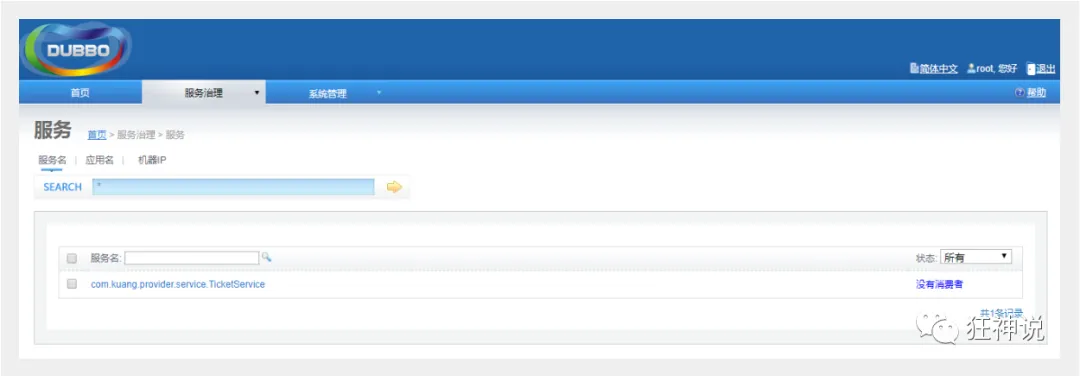
ok , 这就是SpingBoot + dubbo + zookeeper实现分布式开发的应用,其实就是一个服务拆分的思想;

Agent 垂直技术社区,欢迎活跃、内容共建。
更多推荐

 5
5 0
0- 0


 已为社区贡献1条内容

所有评论(0)