vue3-flow使用流程,实例代码,做工作流或者脑图挺好看的
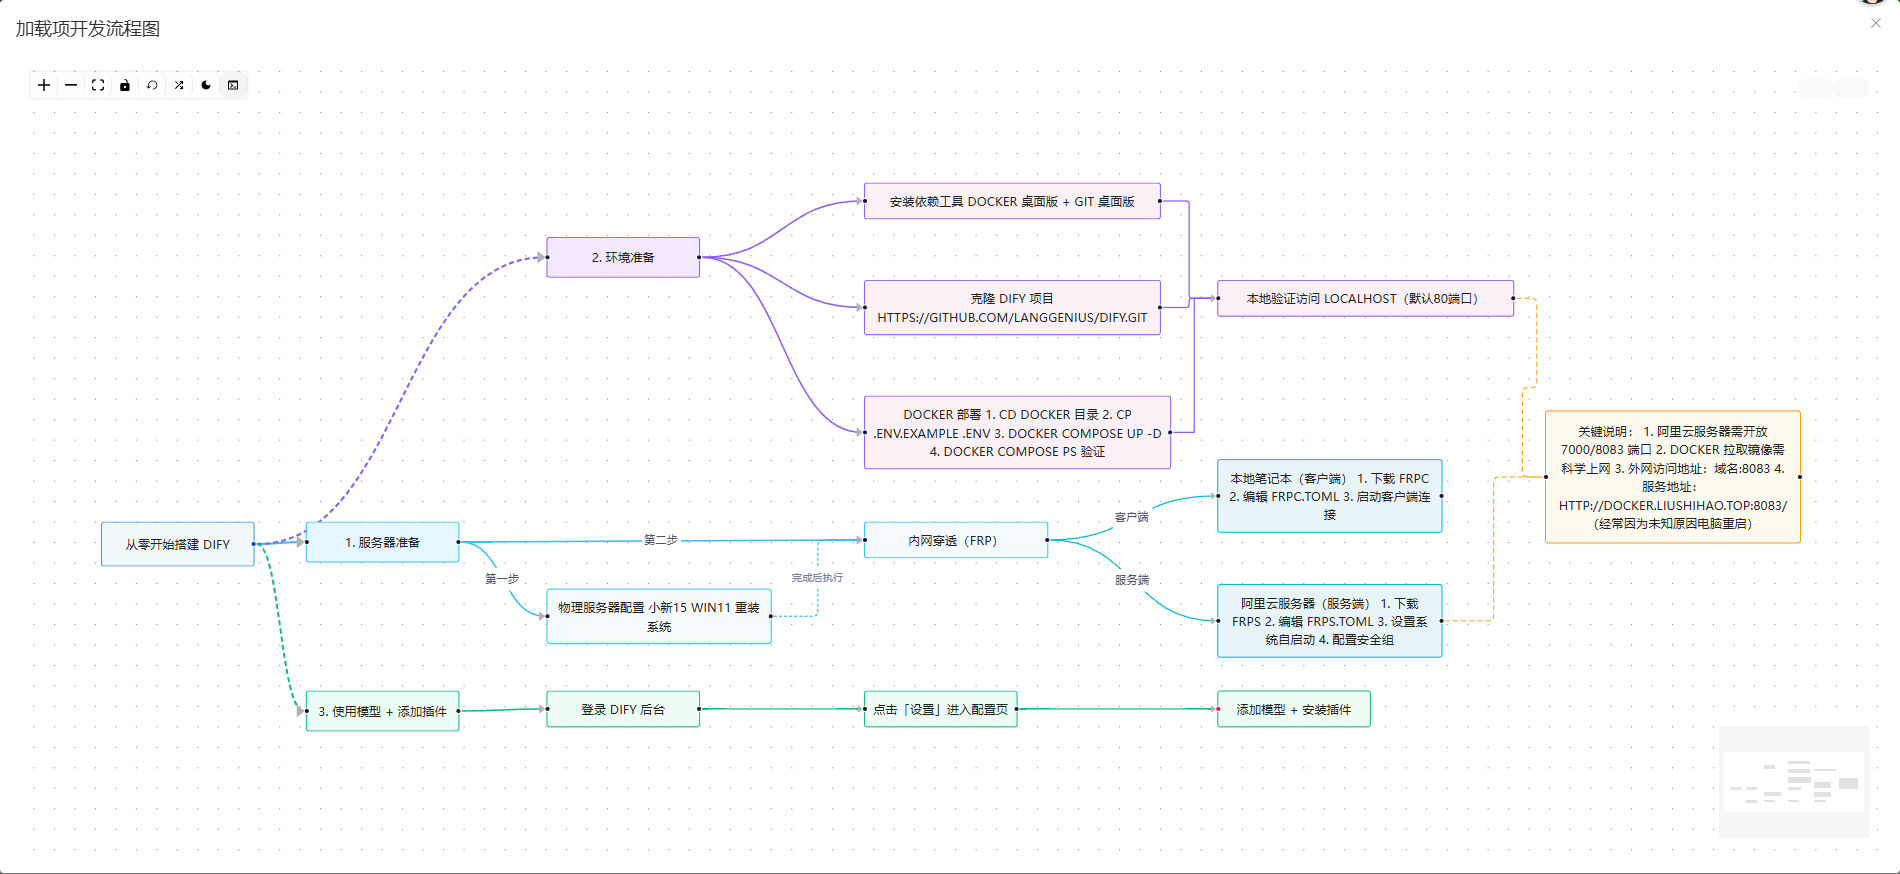
效果图
Vue Flow 是一款轻量、高性能的 Vue3 流程图可视化组件,以下示例实现了 Dify 部署流程的可视化编排,支持拖拽、布局切换、暗黑模式等功能:
官网&环境要求
- 官网地址:https://vue-flow.nodejs.cn/examples/(访问需科学上网)
- 核心环境:Node.js 22.x(版本过低可能导致依赖安装/运行报错
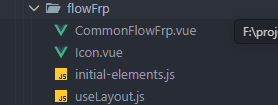
目录结构
展示示例项目的核心文件层级,便于理解文件关联关系
操作流程
1. 依赖导入package.json
核心依赖为 @vue-flow/* 系列包,负责流程图的渲染、交互;其他依赖为辅助功能(UI、图表、markdown等),可按需删减。
{
	"name": "my-vue-app",
	"private": true,
	"version": "0.0.0",
	"type": "module",
	"scripts": {
		"dev": "vite",
		"build": "vite build",
		"preview": "vite preview"
	},
	"dependencies": {
		"@dagrejs/dagre": "^1.1.8",
		"@fortawesome/free-solid-svg-icons": "^7.1.0",
		"@fortawesome/vue-fontawesome": "^3.1.2",
		"@vue-flow/background": "^1.3.2",
		"@vue-flow/controls": "^1.1.3",
		"@vue-flow/core": "^1.48.0",
		"@vue-flow/minimap": "^1.5.4",
		"@vue-flow/node-resizer": "^1.5.0",
		"@vue-flow/node-toolbar": "^1.1.1",
		"echarts": "^5.6.0",
		"echarts-liquidfill": "^3.1.0",
		"element-plus": "^2.3.9",
		"markdown-it": "^14.1.0",
		"markdown-it-emoji": "^3.0.0",
		"markdown-it-highlightjs": "^4.2.0",
		"markdown-it-task-lists": "^2.1.1",
		"markmap-common": "^0.15.3",
		"markmap-lib": "^0.15.4",
		"markmap-view": "^0.15.4",
		"sass": "^1.96.0",
		"vue": "^3.5.24",
		"vue-echarts": "^6.6.1",
		"vue-router": "^4.6.3"
	},
	"devDependencies": {
		"@vitejs/plugin-vue": "^6.0.1",
		"vite": "^7.2.4"
	}
}
2. 在main.js中导入需要的css文件我的文件是flow.css,这里设置
madin.js:
import { createApp } from 'vue';
import ElementPlus from 'element-plus';
import 'element-plus/dist/index.css';
import App from './App.vue';
import WorkStatistics from './WorkStatistics.vue';
import { createRouter, createWebHistory } from 'vue-router';
import './style.css';
import './flow.css';
// 路由配置
const routes = [{ path: '/', component: WorkStatistics }];

const router = createRouter({
	history: createWebHistory(import.meta.env.BASE_URL),
	routes,
});

const app = createApp(App);
app.use(ElementPlus);
app.use(router);
app.mount('#app');
flow.css
@import './flowCss/controls_style.css';
@import './flowCss/core_style.css';
@import './flowCss/minimap_style.css';
@import './flowCss/node-resizer_style.css';
@import './flowCss/theme-default.css';

.vue-flow__minimap {
  transform: scale(75%);
  transform-origin: bottom right;
}

.basic-flow.dark {
    background:#2d3748;
    color:#fffffb
}

.basic-flow.dark .vue-flow__node {
    background:#4a5568;
    color:#fffffb
}

.basic-flow.dark .vue-flow__node.selected {
    background:#333;
    box-shadow:0 0 0 2px #2563eb
}

.basic-flow .vue-flow__controls {
    display:flex;
    flex-wrap:wrap;
    justify-content:center
}

.basic-flow.dark .vue-flow__controls {
    border:1px solid #FFFFFB
}

.basic-flow .vue-flow__controls .vue-flow__controls-button {
    border:none;
    border-right:1px solid #eee
}

.basic-flow .vue-flow__controls .vue-flow__controls-button svg {
    height:100%;
    width:100%
}

.basic-flow.dark .vue-flow__controls .vue-flow__controls-button {
    background:#333;
    fill:#fffffb;
    border:none
}

.basic-flow.dark .vue-flow__controls .vue-flow__controls-button:hover {
    background:#4d4d4d
}

.basic-flow.dark .vue-flow__edge-textbg {
    fill:#292524
}

.basic-flow.dark .vue-flow__edge-text {
    fill:#fffffb
}

.vue-flow__minimap {
  transform: scale(75%);
  transform-origin: bottom right;
}
这几个文件原来是引入的cdn模式,我这里网络问题 有时候加载不出来所以把这几个文件复制在本地了
@import ‘./flowCss/controls_style.css’;
@import ‘./flowCss/core_style.css’;
@import ‘./flowCss/minimap_style.css’;
@import ‘./flowCss/node-resizer_style.css’;
@import ‘./flowCss/theme-default.css’;
下面是cdn的格式
@import ‘https://cdn.jsdelivr.net/npm/@vue-flow/core@1.48.0/dist/style.css’;
@import ‘https://cdn.jsdelivr.net/npm/@vue-flow/core@1.48.0/dist/theme-default.css’;
@import ‘https://cdn.jsdelivr.net/npm/@vue-flow/controls@latest/dist/style.css’;
@import ‘https://cdn.jsdelivr.net/npm/@vue-flow/minimap@latest/dist/style.css’;
@import ‘https://cdn.jsdelivr.net/npm/@vue-flow/node-resizer@latest/dist/style.css’;
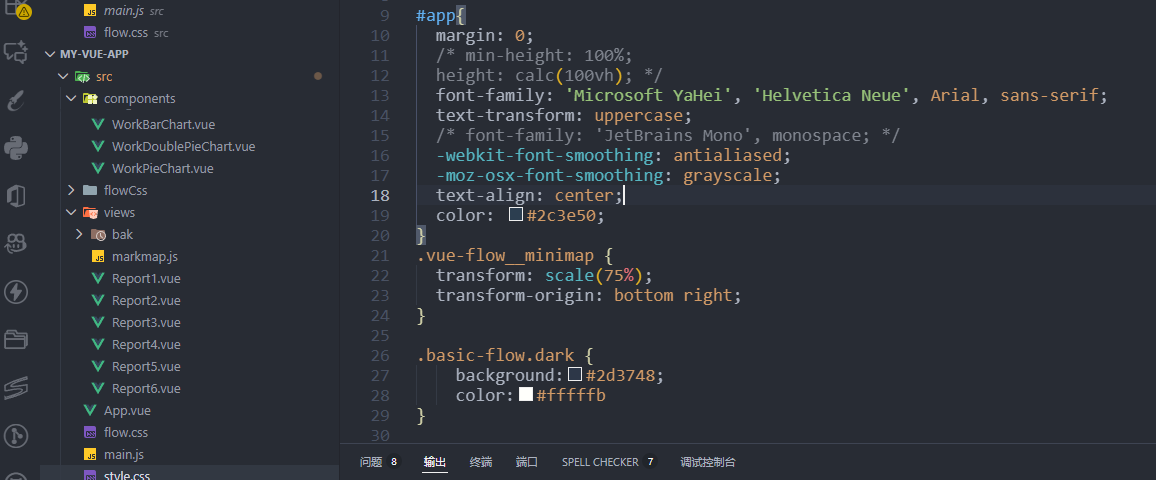
注意:一定要注意整体css的#app样式 如果不显示的话注意宽高的问题
3. 实例代码(官网上其实都有,官网的也挺方便的)
文件1. CommonFlowFrp.vue(组件代码 这里按需引入模块组件)
<script setup>
// Vue核心API:nextTick(DOM更新后执行)、ref(响应式变量)
import { nextTick, ref } from 'vue';
// 导入Vue Flow核心组件/方法:Panel(面板)、VueFlow(根容器)、useVueFlow(核心钩子)
import { Panel, VueFlow, useVueFlow } from '@vue-flow/core';
// 导入Vue Flow扩展组件:MiniMap(缩略图)
import { MiniMap } from '@vue-flow/minimap';
// 导入Vue Flow扩展组件:ControlButton(控制按钮)、Controls(控制栏)
import { ControlButton, Controls } from '@vue-flow/controls';
// 导入Vue Flow扩展组件:Background(流程图背景)
import { Background } from '@vue-flow/background';
// 导入自定义图标组件(封装各类操作图标)
import Icon from './Icon.vue';

// 导入初始化节点/连线数据(核心:流程图的内容定义)
import { initialEdges, initialNodes } from './initial-elements.js';
// 导入布局方法(横向/纵向布局切换)
import { useLayout } from './useLayout';

// 响应式变量:节点数据(绑定到VueFlow组件的nodes属性)
const nodes = ref(initialNodes);
// 响应式变量:连线数据(绑定到VueFlow组件的edges属性)
const edges = ref(initialEdges);

// 解构布局方法:layout(执行布局计算)
const { layout } = useLayout();

// 解构Vue Flow核心方法:fitView(适配视图,让所有节点显示在可视区域)
const { fitView } = useVueFlow();

/**
 * 流程图布局切换方法
 * @param {string} direction 布局方向:LR(左右/横向)、TB(上下/纵向)
 */
async function layoutGraph(direction) {
	// 执行布局算法,更新节点位置
	nodes.value = layout(nodes.value, edges.value, direction);
	// DOM更新后执行:适配视图,确保所有节点可见
	nextTick(() => {
		fitView();
	});
}

// 解构Vue Flow核心方法/事件:
// onInit(初始化完成)、onNodeDragStop(节点拖拽停止)、onConnect(新建连线)
// addEdges(添加连线)、setViewport(设置视图)、toObject(导出流程图数据)
const { onInit, onNodeDragStop, onConnect, addEdges, setViewport, toObject } =
	useVueFlow();

// 响应式变量:暗黑模式开关(默认关闭)
const dark = ref(false);

/**
 * Vue Flow初始化事件:视图加载完成后触发
 * @param {Object} vueFlowInstance Vue Flow实例(与useVueFlow返回值一致)
 */
onInit((vueFlowInstance) => {
	// 初始化完成后,自动适配视图(让所有节点显示在可视区域)
	vueFlowInstance.fitView();
});

/**
 * 节点拖拽停止事件:监听节点拖拽结束
 * @param {Object} param 事件参数:event(原生事件)、nodes(拖拽的节点列表)、node(触发拖拽的节点)
 */
onNodeDragStop(({ event, nodes, node }) => {
	// 调试用:打印拖拽信息
	console.log('Node Drag Stop', { event, nodes, node });
});

/**
 * 新建连线事件:用户拖拽创建连线后触发
 * @param {Object} connection 连线数据(source:源节点ID,target:目标节点ID)
 */
onConnect((connection) => {
	// 添加新连线到edges数组(必须调用,否则连线不会显示)
	addEdges(connection);
});

/**
 * 随机更新节点位置:演示节点数据更新逻辑
 */
function updatePos() {
	// 重新生成节点数组,随机修改position属性
	nodes.value = nodes.value.map((node) => {
		return {
			...node, // 保留原有属性
			position: {
				// 随机位置(400px范围内)
				x: Math.random() * 400,
				y: Math.random() * 400,
			},
		};
	});
}

/**
 * 导出流程图数据:将nodes/edges转换为可持久化的对象(便于存储/传输)
 */
function logToObject() {
	console.log(toObject());
}

/**
 * 重置视图:恢复默认缩放(1.0)和位置(x:0,y:0)
 */
function resetTransform() {
	setViewport({ x: 0, y: 0, zoom: 1 });
}

/**
 * 切换暗黑模式:修改dark响应式变量,触发样式切换
 */
function toggleDarkMode() {
	dark.value = !dark.value;
}
</script>

<template>
	<!-- 流程图容器:必须设置高度(否则无法显示) -->
	<div id="app" class="layout-flow" style="height: 800px">
		<!-- Vue Flow核心组件:所有功能的根容器 -->
		<!-- 绑定节点数据 -->
		<!-- 绑定连线数据 -->
		<!-- 暗黑模式样式切换 -->
		<!-- 基础样式类 -->
		<!-- 默认视图缩放比例 -->
		<!-- 最小缩放比例 -->
		<!-- 最大缩放比例 -->
		<!-- 节点初始化完成后,执行横向布局 -->
		<VueFlow
			:nodes="nodes"
			:edges="edges"
			:class="{ dark }"
			class="basic-flow"
			:default-viewport="{ zoom: 1.5 }"
			:min-zoom="0.2"
			:max-zoom="4"
			@nodes-initialized="layoutGraph('LR')"
		>
			<!-- 流程图背景:默认网格背景(可配置为点阵) -->
			<Background />
			<!-- 缩略图:全局视图,定位在右下角 -->
			<MiniMap />
			<!-- 控制栏:定位在左上角,包含自定义操作按钮 -->
			<Controls position="top-left">
				<!-- 重置视图按钮 -->
				<ControlButton title="Reset Transform" @click="resetTransform">
					<Icon name="reset" />
				</ControlButton>
				<!-- 随机更新节点位置按钮 -->
				<ControlButton
					title="Shuffle Node Positions"
					@click="updatePos"
				>
					<Icon name="update" />
				</ControlButton>
				<!-- 切换暗黑模式按钮 -->
				<ControlButton title="Toggle Dark Mode" @click="toggleDarkMode">
					<Icon v-if="dark" name="sun" />
					<!-- 暗黑模式显示太阳(切回亮色) -->
					<Icon v-else name="moon" />
					<!-- 亮色模式显示月亮(切到暗黑) -->
				</ControlButton>
				<!-- 导出流程图数据按钮 -->
				<ControlButton title="Log `toObject`" @click="logToObject">
					<Icon name="log" />
				</ControlButton>
			</Controls>
			<!-- 自定义面板:定位在右上角,布局切换按钮 -->
			<Panel class="process-panel" position="top-right">
				<div class="layout-panel">
					<!-- 横向布局按钮(LR:Left to Right) -->
					<button
						title="set horizontal layout"
						@click="layoutGraph('LR')"
					>
						<Icon name="horizontal" style="width: 100px" />
					</button>
					<!-- 纵向布局按钮(TB:Top to Bottom) -->
					<button
						title="set vertical layout"
						@click="layoutGraph('TB')"
					>
						<Icon name="vertical" />
					</button>
				</div>
			</Panel>
		</VueFlow>
	</div>
</template>

<style scoped>
/* 局部样式:确保容器高度生效(scoped仅作用于当前组件) */
#app {
	height: 500px; /* 固定高度:可根据需求改为100vh(占满视口) */
}
</style>
文件2. Icon.vue(这个是官方的icon组件)
<script setup>
defineProps({
	name: {
		type: String,
		required: true,
	},
});
</script>

<template>
	<svg v-if="name === 'reset'" width="16" height="16" viewBox="0 0 32 32">
		<path
			d="M18 28A12 12 0 1 0 6 16v6.2l-3.6-3.6L1 20l6 6l6-6l-1.4-1.4L8 22.2V16a10 10 0 1 1 10 10Z"
		/>
	</svg>

	<svg v-if="name === 'update'" width="16" height="16" viewBox="0 0 24 24">
		<path
			d="M14 20v-2h2.6l-3.2-3.2l1.425-1.425L18 16.55V14h2v6Zm-8.6 0L4 18.6L16.6 6H14V4h6v6h-2V7.4Zm3.775-9.425L4 5.4L5.4 4l5.175 5.175Z"
		/>
	</svg>

	<svg v-if="name === 'sun'" width="16" height="16" viewBox="0 0 24 24">
		<path
			d="M12 17q-2.075 0-3.537-1.463Q7 14.075 7 12t1.463-3.538Q9.925 7 12 7t3.538 1.462Q17 9.925 17 12q0 2.075-1.462 3.537Q14.075 17 12 17ZM2 13q-.425 0-.712-.288Q1 12.425 1 12t.288-.713Q1.575 11 2 11h2q.425 0 .713.287Q5 11.575 5 12t-.287.712Q4.425 13 4 13Zm18 0q-.425 0-.712-.288Q19 12.425 19 12t.288-.713Q19.575 11 20 11h2q.425 0 .712.287q.288.288.288.713t-.288.712Q22.425 13 22 13Zm-8-8q-.425 0-.712-.288Q11 4.425 11 4V2q0-.425.288-.713Q11.575 1 12 1t.713.287Q13 1.575 13 2v2q0 .425-.287.712Q12.425 5 12 5Zm0 18q-.425 0-.712-.288Q11 22.425 11 22v-2q0-.425.288-.712Q11.575 19 12 19t.713.288Q13 19.575 13 20v2q0 .425-.287.712Q12.425 23 12 23ZM5.65 7.05L4.575 6q-.3-.275-.288-.7q.013-.425.288-.725q.3-.3.725-.3t.7.3L7.05 5.65q.275.3.275.7q0 .4-.275.7q-.275.3-.687.287q-.413-.012-.713-.287ZM18 19.425l-1.05-1.075q-.275-.3-.275-.712q0-.413.275-.688q.275-.3.688-.287q.412.012.712.287L19.425 18q.3.275.288.7q-.013.425-.288.725q-.3.3-.725.3t-.7-.3ZM16.95 7.05q-.3-.275-.287-.688q.012-.412.287-.712L18 4.575q.275-.3.7-.288q.425.013.725.288q.3.3.3.725t-.3.7L18.35 7.05q-.3.275-.7.275q-.4 0-.7-.275ZM4.575 19.425q-.3-.3-.3-.725t.3-.7l1.075-1.05q.3-.275.713-.275q.412 0 .687.275q.3.275.288.688q-.013.412-.288.712L6 19.425q-.275.3-.7.287q-.425-.012-.725-.287Z"
		/>
	</svg>

	<svg v-if="name === 'moon'" width="16" height="16" viewBox="0 0 24 24">
		<path
			d="M12 21q-3.75 0-6.375-2.625T3 12q0-3.75 2.625-6.375T12 3q.35 0 .688.025q.337.025.662.075q-1.025.725-1.637 1.887Q11.1 6.15 11.1 7.5q0 2.25 1.575 3.825Q14.25 12.9 16.5 12.9q1.375 0 2.525-.613q1.15-.612 1.875-1.637q.05.325.075.662Q21 11.65 21 12q0 3.75-2.625 6.375T12 21Z"
		/>
	</svg>

	<svg v-if="name === 'log'" width="16" height="16" viewBox="0 0 24 24">
		<path
			d="M20 19V7H4v12h16m0-16a2 2 0 0 1 2 2v14a2 2 0 0 1-2 2H4a2 2 0 0 1-2-2V5a2 2 0 0 1 2-2h16m-7 14v-2h5v2h-5m-3.42-4L5.57 9H8.4l3.3 3.3c.39.39.39 1.03 0 1.42L8.42 17H5.59l3.99-4Z"
		/>
	</svg>
</template>
文件3. initial-elements.js(主要连线代码)
import { MarkerType } from '@vue-flow/core';

export const initialNodes = [
	// 根节点(顶部居中)
	{
		id: 'root',
		type: 'input',
		data: { label: '从零开始搭建 Dify' },
		position: { x: 500, y: 20 },
		class: 'light',
		style: {
			borderColor: '#4299e1',
			backgroundColor: '#f0f8fb',
			padding: '12px',
		},
	},

	// 一级节点:三大核心步骤(纵向排列,拉开间距)
	{
		id: 'step1',
		data: { label: '1. 服务器准备' },
		position: { x: 500, y: 120 },
		class: 'light',
		style: {
			borderColor: '#38bdf8',
			backgroundColor: '#e6f7ff',
			padding: '10px',
		},
	},
	{
		id: 'step2',
		data: { label: '2. 环境准备' },
		position: { x: 500, y: 450 },
		class: 'light',
		style: {
			borderColor: '#8b5cf6',
			backgroundColor: '#f3e8ff',
			padding: '10px',
		},
	},
	{
		id: 'step3',
		data: { label: '3. 使用模型 + 添加插件' },
		position: { x: 500, y: 800 },
		class: 'light',
		style: {
			borderColor: '#10b981',
			backgroundColor: '#ecfdf5',
			padding: '10px',
		},
	},

	// 二级节点:服务器准备子步骤(调整顺序:物理服务器在前,内网穿透在后,横向展开)
	{
		id: 'step1-1',
		data: { label: '物理服务器配置\n小新15 Win11 重装系统' },
		position: { x: 250, y: 220 }, // 左侧:物理服务器(先执行)
		class: 'light',
		style: {
			borderColor: '#38bdf8',
			backgroundColor: '#f5fafe',
			padding: '8px',
			width: '220px',
		},
	},
	{
		id: 'step1-2',
		data: { label: '内网穿透(frp)' },
		position: { x: 750, y: 220 }, // 右侧:内网穿透(后执行)
		class: 'light',
		style: {
			borderColor: '#38bdf8',
			backgroundColor: '#f5fafe',
			padding: '8px',
			width: '180px',
		},
	},

	// 三级节点:frp 配置子步骤(内网穿透下方,左右分栏,顺序不变)
	{
		id: 'step1-2-1',
		data: {
			label: '阿里云服务器(服务端)\n1. 下载 frps\n2. 编辑 frps.toml\n3. 设置系统自启动\n4. 配置安全组',
		},
		position: { x: 600, y: 320 },
		class: 'light',
		style: {
			borderColor: '#06b6d4',
			backgroundColor: '#e8f4f8',
			padding: '8px',
			width: '220px',
		},
	},
	{
		id: 'step1-2-2',
		data: {
			label: '本地笔记本(客户端)\n1. 下载 frpc\n2. 编辑 frpc.toml\n3. 启动客户端连接',
		},
		position: { x: 850, y: 320 }, // 右移50px,避免拥挤
		class: 'light',
		style: {
			borderColor: '#06b6d4',
			backgroundColor: '#e8f4f8',
			padding: '8px',
			width: '220px',
		},
	},

	// 二级节点:环境准备子步骤(左右分栏+纵向延伸,优化间距)
	{
		id: 'step2-1',
		data: { label: '安装依赖工具\nDocker 桌面版 + Git 桌面版' },
		position: { x: 200, y: 550 }, // 左移50px,增大间距
		class: 'light',
		style: {
			borderColor: '#8b5cf6',
			backgroundColor: '#faf0f5',
			padding: '8px',
			width: '290px',
		},
	},
	{
		id: 'step2-2',
		data: {
			label: '克隆 Dify 项目\nhttps://github.com/langgenius/dify.git',
		},
		position: { x: 500, y: 550 },
		class: 'light',
		style: {
			borderColor: '#8b5cf6',
			backgroundColor: '#faf0f5',
			padding: '8px',
			width: '290px',
		},
	},
	{
		id: 'step2-3',
		data: {
			label: 'Docker 部署\n1. cd docker 目录\n2. cp .env.example .env\n3. docker compose up -d\n4. docker compose ps 验证',
		},
		position: { x: 800, y: 550 }, // 右移50px,增大间距
		class: 'light',
		style: {
			borderColor: '#8b5cf6',
			backgroundColor: '#faf0f5',
			padding: '8px',
			width: '300px',
		},
	},
	{
		id: 'step2-4',
		data: { label: '本地验证访问\nlocalhost(默认80端口)' },
		position: { x: 500, y: 700 },
		class: 'light',
		style: {
			borderColor: '#8b5cf6',
			backgroundColor: '#faf0f5',
			padding: '8px',
			width: '290px',
		},
	},

	// 二级节点:使用配置子步骤(纵向延伸,拉开间距)
	{
		id: 'step3-1',
		data: { label: '登录 Dify 后台' },
		position: { x: 500, y: 900 },
		class: 'light',
		style: {
			borderColor: '#10b981',
			backgroundColor: '#f0fdf4',
			padding: '8px',
		},
	},
	{
		id: 'step3-2',
		data: { label: '点击「设置」进入配置页' },
		position: { x: 500, y: 1000 },
		class: 'light',
		style: {
			borderColor: '#10b981',
			backgroundColor: '#f0fdf4',
			padding: '8px',
		},
	},
	{
		id: 'step3-3',
		data: { label: '添加模型 + 安装插件' },
		position: { x: 500, y: 1100 },
		type: 'output',
		class: 'light',
		style: {
			borderColor: '#10b981',
			backgroundColor: '#f0fdf4',
			padding: '8px',
		},
	},

	// 补充节点:关键说明(调整位置,避免重叠)
	{
		id: 'note1',
		data: {
			label: '关键说明:\n1. 阿里云服务器需开放 7000/8083 端口\n2. Docker 拉取镜像需科学上网\n3. 外网访问地址:域名:8083 4.服务地址:http://docker.liushihao.top:8083/  \n(经常因为未知原因电脑重启)',
		},
		position: { x: 500, y: 1250 },
		class: 'light',
		style: {
			borderColor: '#f59e0b',
			backgroundColor: '#fffaf0',
			padding: '10px',
			width: '250px',
		},
	},
];

export const initialEdges = [
	// 根节点 → 一级节点(纵向连线,垂直向下)
	{
		id: 'root-step1',
		source: 'root',
		target: 'step1',
		markerEnd: MarkerType.ArrowClosed,
		style: { stroke: '#38bdf8', strokeWidth: 2 },
	},
	{
		id: 'root-step2',
		source: 'root',
		target: 'step2',
		markerEnd: MarkerType.ArrowClosed,
		style: { stroke: '#8b5cf6', strokeWidth: 2, strokeDasharray: '5,3' }, // 虚线区分并行步骤
	},
	{
		id: 'root-step3',
		source: 'root',
		target: 'step3',
		markerEnd: MarkerType.ArrowClosed,
		style: { stroke: '#10b981', strokeWidth: 2, strokeDasharray: '5,3' },
	},

	// 服务器准备 → 子步骤(调整连线逻辑,体现物理服务器在前)
	{
		id: 'step1-step1-1',
		source: 'step1',
		target: 'step1-1',
		markerEnd: MarkerType.ArrowClosed,
		style: { stroke: '#38bdf8', strokeWidth: 1.5 },
		label: '第一步', // 新增标签,明确顺序
		labelStyle: { fontSize: 11, fill: '#4a5568' },
	},
	{
		id: 'step1-step1-2',
		source: 'step1',
		target: 'step1-2',
		markerEnd: MarkerType.ArrowClosed,
		style: { stroke: '#38bdf8', strokeWidth: 1.5 },
		label: '第二步', // 新增标签,明确顺序
		labelStyle: { fontSize: 11, fill: '#4a5568' },
	},
	// 新增:物理服务器 → 内网穿透 的连线,体现流程依赖
	{
		id: 'step1-1-step1-2',
		type: 'smoothstep',
		source: 'step1-1',
		target: 'step1-2',
		markerEnd: MarkerType.ArrowClosed,
		style: { stroke: '#38bdf8', strokeWidth: 1.2, strokeDasharray: '3,2' },
		label: '完成后执行',
		labelStyle: { fontSize: 10, fill: '#718096' },
	},
	{
		id: 'step1-2-step1-2-1',
		source: 'step1-2',
		target: 'step1-2-1',
		markerEnd: MarkerType.ArrowClosed,
		style: { stroke: '#06b6d4', strokeWidth: 1.2 },
		label: '服务端',
		labelStyle: { fontSize: 11, fill: '#4a5568' },
	},
	{
		id: 'step1-2-step1-2-2',
		source: 'step1-2',
		target: 'step1-2-2',
		markerEnd: MarkerType.ArrowClosed,
		style: { stroke: '#06b6d4', strokeWidth: 1.2 },
		label: '客户端',
		labelStyle: { fontSize: 11, fill: '#4a5568' },
	},

	// 环境准备 → 子步骤(横向+纵向结合,优化连线平滑度)
	{
		id: 'step2-step2-1',
		source: 'step2',
		target: 'step2-1',
		markerEnd: MarkerType.ArrowClosed,
		style: { stroke: '#8b5cf6', strokeWidth: 1.5 },
	},
	{
		id: 'step2-step2-2',
		source: 'step2',
		target: 'step2-2',
		markerEnd: MarkerType.ArrowClosed,
		style: { stroke: '#8b5cf6', strokeWidth: 1.5 },
	},
	{
		id: 'step2-step2-3',
		source: 'step2',
		target: 'step2-3',
		markerEnd: MarkerType.ArrowClosed,
		style: { stroke: '#8b5cf6', strokeWidth: 1.5 },
	},
	{
		id: 'step2-1-step2-4',
		type: 'smoothstep',
		source: 'step2-1',
		target: 'step2-4',
		markerEnd: MarkerType.ArrowClosed,
		style: { stroke: '#8b5cf6', strokeWidth: 1.2 },
	},
	{
		id: 'step2-2-step2-4',
		type: 'smoothstep',
		source: 'step2-2',
		target: 'step2-4',
		markerEnd: MarkerType.ArrowClosed,
		style: { stroke: '#8b5cf6', strokeWidth: 1.2 },
	},
	{
		id: 'step2-3-step2-4',
		type: 'smoothstep',
		source: 'step2-3',
		target: 'step2-4',
		markerEnd: MarkerType.ArrowClosed,
		style: { stroke: '#8b5cf6', strokeWidth: 1.2 },
	},

	// 使用配置 → 子步骤(纵向连线,垂直向下)
	{
		id: 'step3-step3-1',
		source: 'step3',
		target: 'step3-1',
		markerEnd: MarkerType.ArrowClosed,
		style: { stroke: '#10b981', strokeWidth: 1.5 },
	},
	{
		id: 'step3-1-step3-2',
		source: 'step3-1',
		target: 'step3-2',
		markerEnd: MarkerType.ArrowClosed,
		style: { stroke: '#10b981', strokeWidth: 1.2 },
	},
	{
		id: 'step3-2-step3-3',
		source: 'step3-2',
		target: 'step3-3',
		markerEnd: MarkerType.ArrowClosed,
		style: { stroke: '#10b981', strokeWidth: 1.2 },
	},

	// 补充说明连线(优化连线,避免交叉)
	{
		id: 'step2-4-note1',
		type: 'smoothstep',
		source: 'step2-4',
		target: 'note1',
		style: { stroke: '#f59e0b', strokeWidth: 1, strokeDasharray: '5,3' },
	},
	{
		id: 'step1-2-1-note1',
		type: 'smoothstep',
		source: 'step1-2-1',
		target: 'note1',
		style: { stroke: '#f59e0b', strokeWidth: 1, strokeDasharray: '5,3' },
	},
];
文件4. useLayout.js(这个入口)
import dagre from '@dagrejs/dagre';
import { Position, useVueFlow } from '@vue-flow/core';
import { ref } from 'vue';

/**
 * Composable to run the layout algorithm on the graph.
 * It uses the `dagre` library to calculate the layout of the nodes and edges.
 */
export function useLayout() {
	const { findNode } = useVueFlow();

	const graph = ref(new dagre.graphlib.Graph());

	const previousDirection = ref('LR');

	function layout(nodes, edges, direction) {
		// we create a new graph instance, in case some nodes/edges were removed, otherwise dagre would act as if they were still there
		const dagreGraph = new dagre.graphlib.Graph();

		graph.value = dagreGraph;

		dagreGraph.setDefaultEdgeLabel(() => ({}));

		const isHorizontal = direction === 'LR';
		dagreGraph.setGraph({ rankdir: direction });

		previousDirection.value = direction;

		for (const node of nodes) {
			// if you need width+height of nodes for your layout, you can use the dimensions property of the internal node (`GraphNode` type)
			const graphNode = findNode(node.id);

			dagreGraph.setNode(node.id, {
				width: graphNode.dimensions.width || 150,
				height: graphNode.dimensions.height || 50,
			});
		}

		for (const edge of edges) {
			dagreGraph.setEdge(edge.source, edge.target);
		}

		dagre.layout(dagreGraph);

		// set nodes with updated positions
		return nodes.map((node) => {
			const nodeWithPosition = dagreGraph.node(node.id);

			return {
				...node,
				targetPosition: isHorizontal ? Position.Left : Position.Top,
				sourcePosition: isHorizontal ? Position.Right : Position.Bottom,
				position: { x: nodeWithPosition.x, y: nodeWithPosition.y },
			};
		});
	}

	return { graph, layout, previousDirection };
}
引用代码
<template>
	<MarkdownDialog
		v-model="isMindmapOpen"
		:md-content="'frp-study'"
		custom-title="部署实践流程图"
	/>
	</template>
<script setup>
import { ref } from 'vue';
// 导入组件
import MarkdownDialog from '../components/dialogFlow.vue';

// 控制弹窗显示
const isMindmapOpen = ref(false);

// 打开弹窗
const openAiMarkdownDialog = () => {
	isMindmapOpen.value = true;
};
// 无额外逻辑,纯展示组件
</script>

Agent 垂直技术社区,欢迎活跃、内容共建。
更多推荐


 23
23 0
0- 0


 已为社区贡献1条内容

所有评论(0)