vLLM部署Qwen3-VL多模态大模型
【代码】vLLM部署Qwen3-VL多模态大模型。
·
部署环境
- 以下配置是作者的部署环境,大家可以自行参考
- 处理器: Intel Core i9-12950HX
- 独立显卡: Nvidia-RTX3080Ti(16G)
- 内存: 32G
- 操作系统:Windows(Docker),已提前安装英伟达显卡驱动版本:572.70
- 注意:vLLM不支持Windows。作者之所以能够在Windows部署,实际上利用了Docker,Docker内安装了Linux。
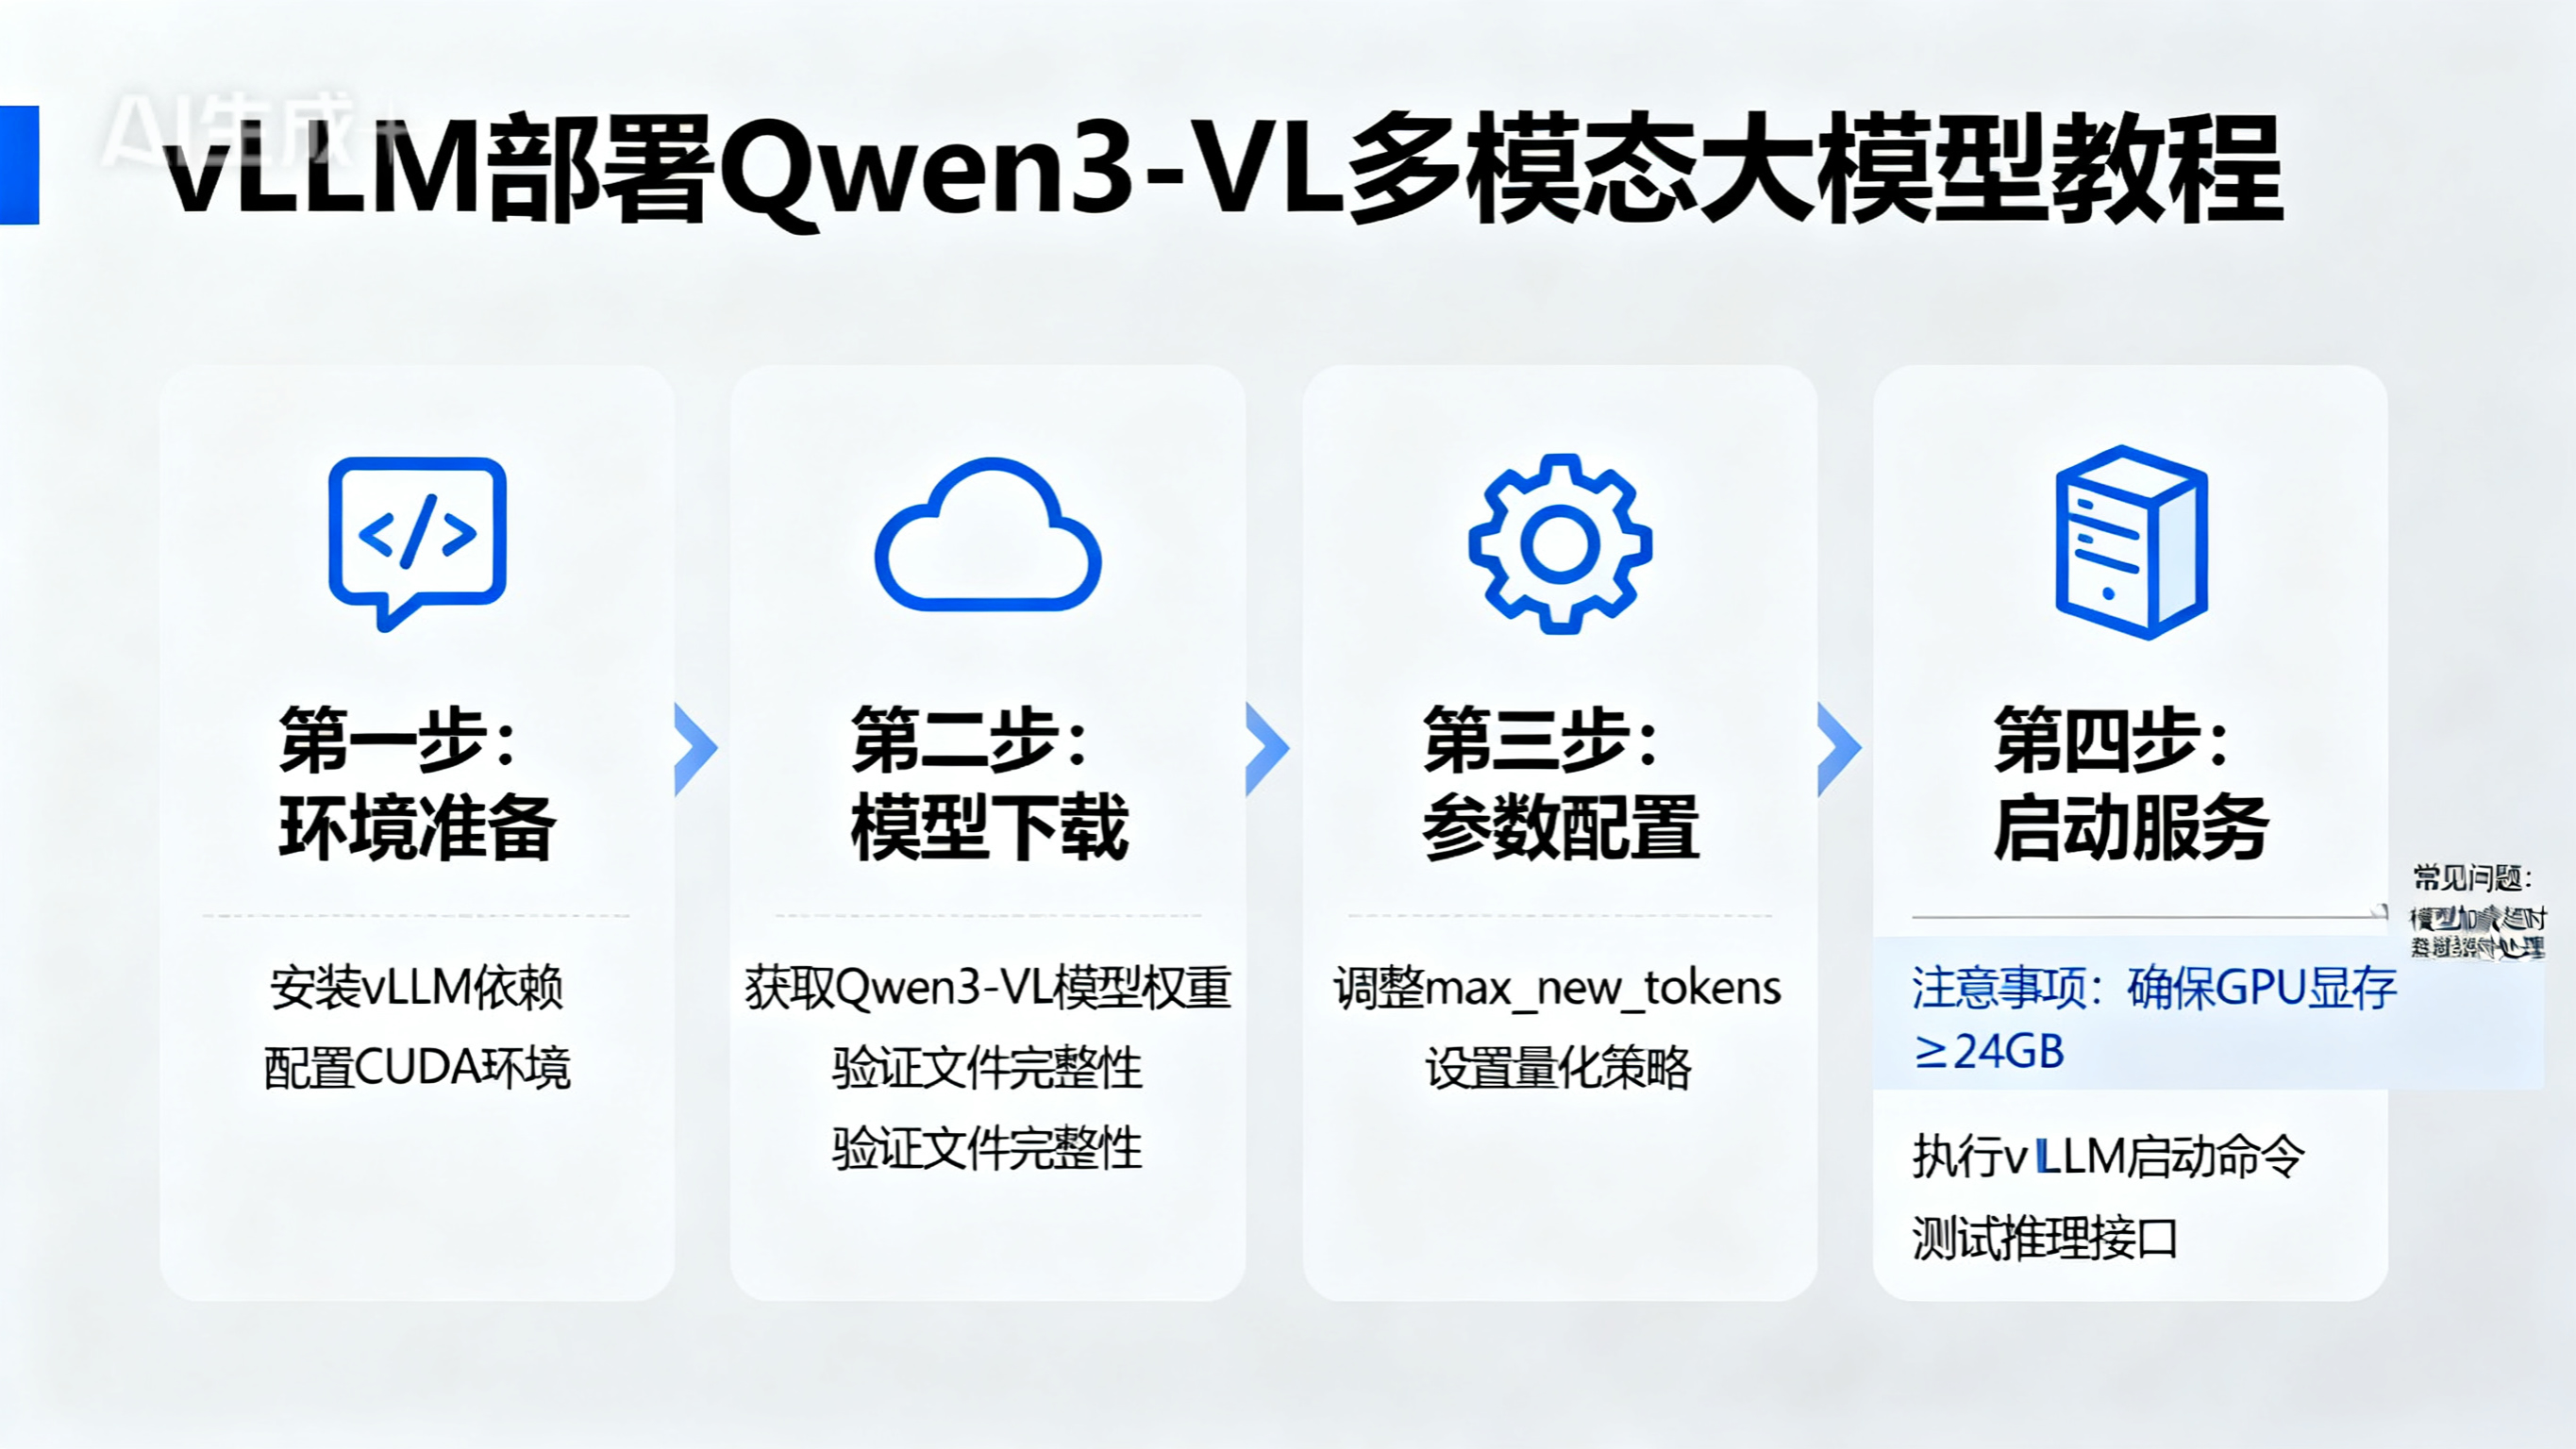
开始部署Qwen3-VL
- 作者此前使用vLLM部署过Qwen2.5-VL 3B和7B的模型,使用的vLLM==0.8.2实现的。但是vLLM==0.8.2无法正常运行Qwen3-VL的模型
- 接下来使用vLLM==0.11.0部署Qwen3-VL的模型
1. 在Windows的Docker中启动Ubuntu22.04的镜像容器,可以参考文档:betps://beixiaocai.yuque.com/org-wiki-beixiaocai-vo72oa/xcms/bm55ci5chq69gi81#youKH

2. 进入到Ubuntu22.04的容器内部,执行以下命令
 sudo apt -y update
 sudo apt -y install unzip net-tools vim psmisc htop
 sudo apt -y install gcc g++ make cmake gdb
 sudo apt -y install pkg-config
 sudo apt -y install libgl1-mesa-glx
 sudo apt -y install python3-pip
 pip3 install vllm==0.11.0 -i https://pypi.tuna.tsinghua.edu.cn/simple
 pip3 install transformers==4.57.1 -i https://pypi.tuna.tsinghua.edu.cn/simple

3. 下载Qwen3-VL的模型权重文件
 Qwen3-VL模型,官方下载地址:https://huggingface.co/collections/Qwen/qwen3-vl-68d2a7c1b8a8afce4ebd2dbe
 Qwen3-VL模型,作者提供的下载地址:https://pan.baidu.com/s/1yRzD7O6dPvhM8JFbtbFzGA?pwd=6rtv 提取码: 6rtv
    如果是下载作者提供的模型,打开网盘后,进入文件夹,找到Qwen文件夹,例如下载 Qwen3-VL-4B-Instruct.zip

4. 使用vLLM启动Qwen3-VL的模型
 启动命令示例:vllm serve Qwen/Qwen3-VL-4B-Instruct --gpu_memory_utilization=0.9 --max_model_len=2048
Python调用Qwen3-VL大模型接口
import time
import cv2
import base64
import json
from openai import OpenAI

# 安装依赖库
# pip install opencv-python==4.5.4.58 -i https://pypi.tuna.tsinghua.edu.cn/simple
# pip install openai -i https://pypi.tuna.tsinghua.edu.cn/simple

if __name__ == '__main__':
    image_path = "D:\\file\\images\\bus.jpg" # 替换成你的图片地址
    openai_api_key = "EMPTY"
    openai_api_base = "http://127.0.0.1:8000/v1" # 替换成你的Qwen3-VL大模型部署地址

    image = cv2.imread(image_path)

    h, w, c = image.shape
    resize_h = int(h / 3)
    resize_w = int(w / 3)
    image = cv2.resize(image, (resize_w, resize_h), interpolation=cv2.INTER_NEAREST)
    encoded_image_byte = cv2.imencode(".jpg", image)[1].tobytes()  # bytes类型
    image_base64 = base64.b64encode(encoded_image_byte)
    image_base64 = image_base64.decode("utf-8")  # str类型

    try:
        client = OpenAI(
            api_key=openai_api_key,
            base_url=openai_api_base,
        )
        t1 = time.time()
        messages = [
            # {
            #     "role": "system",
            #     "content": [{"type": "text", "text": "You are a helpful assistant."}]
            # },
            {
                "role": "user",
                "content": [
                    {
                        "type": "image_url",
                        "image_url": {
                            "url": "data:image/jpeg;base64,%s" % str(image_base64)
                        },
                    },
                    {"type": "text", "text": "图中描绘的是什么景象?"},
                    # {"type": "text", "text": "获得图片中所有人的坐标?"},
                    # {"type": "text", "text": "图片中所有车辆的坐标?"},
                ],
            }
        ]
        completion = client.chat.completions.create(
            # model="Qwen/Qwen2.5-VL-3B-Instruct-AWQ",
            # model="Qwen/Qwen2.5-VL-3B-Instruct",
            # model="Qwen/Qwen2.5-VL-7B-Instruct-AWQ",
            model="Qwen/Qwen3-VL-4B-Instruct",
            messages=messages,
            temperature=0.7,
            top_p=0.8,
            max_tokens=1228,
            extra_body={
                "repetition_penalty": 1.05,
            },
        )
        t2 = time.time()
        t = t2 - t1
        content = completion.choices[0].message.content
        print("耗时:", t)
        print("content:", content)

        client.close()
    except Exception as e:
        print(e)
Agent 垂直技术社区,欢迎活跃、内容共建。
更多推荐
 12
12 0
0- 0


 已为社区贡献1条内容

所有评论(0)