Android Kotlin 下FragmentContainerView的基本使用
每一个Fragment都有一个按钮用来跳转下一个Fragment,像firstFragment调转SecondFragment, SecondFragment跳转ThirdFragment、ThirdFragment跳转FirstFragment。因为我提前配置了,跳转逻辑。当然,也可以不用提前配置。想着,如果他是一个容器,那它就会被装满,装满就是异常。我个人认为比较好的方法就是写一个Fragme
(自己个人见解,如有错误的地方,您可以评论,我会及时修改,感谢)
一、为什么要使用
单纯好用,后续在补充...
我是用来替换下面的常规方法
    // 替换 FrameLayout 中的 Fragment
    public void replaceFragment(Fragment fragment) {
        // 声音事件
        AudioPlayerUtil.getInstance().setOnAudioCompleteListener(null);
        AudioPlayerUtil.getInstance().stopAudio();
        FragmentManager fragmentManager = getSupportFragmentManager();
        FragmentTransaction transaction = fragmentManager.beginTransaction();
        transaction.setTransition(FragmentTransaction.TRANSIT_NONE); // 无动画
        transaction.replace(R.id.fragment_space, fragment); // 替换 FrameLayout 内容
        transaction.commit(); // 提交事务
    }
二、FragmentContainerView是什么
FragmentContainerView 是一个专门用于托管 Fragment 的容器,强烈建议用于动态添加 Fragment 的场景,以替代 FrameLayout 或其他布局。(详细可以看看官网介绍)
三、基本使用
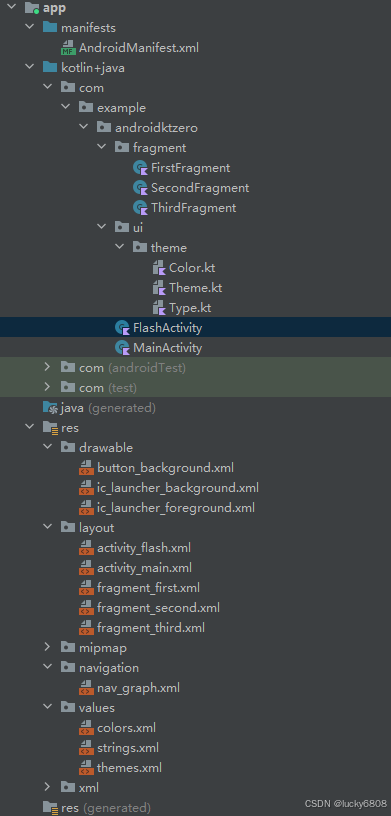
-1、项目整体结构(没有使用MainActivity,而是使用FlashActivity当启动)
0、配置工作
依赖导入
    implementation(libs.androidx.navigation.fragment.ktx)
    implementation(libs.androidx.navigation.ui.ktx)


    androidx-navigation-fragment-ktx = { group = "androidx.navigation", name = "navigation-fragment-ktx", version.ref = "navigationVersion" }
    androidx-navigation-ui-ktx = { group = "androidx.navigation", name = "navigation-ui-ktx", version.ref = "navigationVersion" }

    navigationVersion = "2.6.0"
打开viewbinding, 这个非常好用。使用这个就是为了避免什么findById, R.id 这些东西。
buildFeatures{
        viewBinding = true
}
为什么使用了这个,下面的还是使用了R.id.xxxx, 因为这个 FragmentContainerView 有点特殊。
val navHostFragment =
            supportFragmentManager.findFragmentById(R.id.nav_host_fragment) as NavHostFragment
1、创建三个Fragment
每一个Fragment都有一个按钮用来跳转下一个Fragment,像firstFragment调转SecondFragment, SecondFragment跳转ThirdFragment、ThirdFragment跳转FirstFragment。但是代码为什么报错了,继续往下看。导航组件还没有配置完。(findNavController().navigate(R.id.action_first_Fragment_to_secondFragment))
import android.os.Bundle
import android.view.View
import androidx.fragment.app.Fragment
import androidx.navigation.fragment.findNavController
import com.example.androidktzero.R
import com.example.androidktzero.databinding.FragmentFirstBinding

/**
 * FirstFragment 代表导航中的第一个 Fragment
 * 用户可以点击按钮跳转到 SecondFragment
 */
class FirstFragment : Fragment(R.layout.fragment_first) { // 传入布局资源 ID,Fragment 会自动加载对应的 XML

    // ViewBinding 变量(用于访问 XML 视图)
    private var _binding: FragmentFirstBinding? = null

    // 只读属性,确保 _binding 不为空时才能使用
    private val binding get() = _binding!!

    /**
     * 当 Fragment 的视图创建完成时调用
     * @param view 生成的 View
     * @param savedInstanceState 之前保存的状态
     */
    override fun onViewCreated(view: View, savedInstanceState: Bundle?) {
        super.onViewCreated(view, savedInstanceState)

        // 绑定 ViewBinding(必须使用 bind 方法,不能使用 inflate)
        _binding = FragmentFirstBinding.bind(view)

        // 设置点击事件,点击按钮后导航到 SecondFragment
        binding.goToSecond.setOnClickListener {
            findNavController().navigate(R.id.action_first_Fragment_to_secondFragment)
        }
    }

    /**
     * 当 Fragment 视图销毁时,将 _binding 置空,避免内存泄漏
     */
    override fun onDestroyView() {
        super.onDestroyView()
        _binding = null
    }
}
为什么使用androidx.appcompat.widget.AppCompatButton 这个button而不使用 <Button>, 因为这个好方便控制Button样式。
<?xml version="1.0" encoding="utf-8"?>
<FrameLayout xmlns:android="http://schemas.android.com/apk/res/android"
xmlns:tools="http://schemas.android.com/tools"
android:layout_width="match_parent"
android:layout_height="match_parent"
tools:context=".fragment.FirstFragment">
<androidx.appcompat.widget.AppCompatButton
android:id="@+id/go_to_second"
android:layout_gravity="center"
android:text="跳转第二个"
android:background="@color/md_blue"
android:layout_width="wrap_content"
android:layout_height="wrap_content"/>
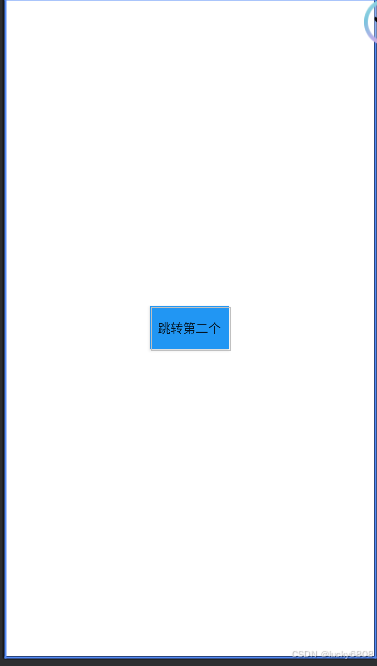
</FrameLayout>页面效果就是下面这样
2、Activity的界面
<?xml version="1.0" encoding="utf-8"?>
<FrameLayout
        xmlns:android="http://schemas.android.com/apk/res/android"
        xmlns:tools="http://schemas.android.com/tools"
        xmlns:app="http://schemas.android.com/apk/res-auto"
        android:id="@+id/main"
        android:layout_width="match_parent"
        android:layout_height="match_parent"
        tools:context=".FlashActivity">

    <androidx.fragment.app.FragmentContainerView
            android:id="@+id/nav_host_fragment"
            android:name="androidx.navigation.fragment.NavHostFragment"
            android:layout_width="match_parent"
            android:layout_height="match_parent"
            app:navGraph="@navigation/nav_graph"
            app:defaultNavHost="true"
            >

    </androidx.fragment.app.FragmentContainerView>

    <LinearLayout
            android:layout_gravity="bottom"
            android:layout_width="match_parent"
            android:layout_height="wrap_content"
            android:gravity="center"
            android:layout_marginBottom="50dp"
            >

        <androidx.appcompat.widget.AppCompatButton
                android:text="To_First"
                android:id="@+id/to_first"
                android:background="@drawable/button_background"
                android:layout_width="wrap_content"
                android:layout_height="match_parent">
        </androidx.appcompat.widget.AppCompatButton>

        <androidx.appcompat.widget.AppCompatButton
                android:layout_marginRight="50dp"
                android:layout_marginLeft="50dp"
                android:text="To_Second"
                android:id="@+id/to_second"
                android:background="@color/md_grey"
                android:layout_width="wrap_content"
                android:layout_height="match_parent">
        </androidx.appcompat.widget.AppCompatButton>

        <androidx.appcompat.widget.AppCompatButton
                android:text="To_Third"
                android:id="@+id/to_third"
                android:background="@color/md_grey"
                android:layout_width="wrap_content"
                android:layout_height="match_parent">
        </androidx.appcompat.widget.AppCompatButton>

    </LinearLayout>

</FrameLayout>
效果图如下:
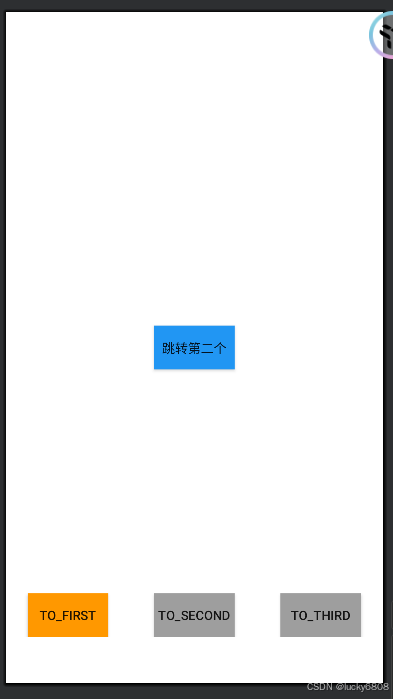
为什么这样布局,是可以为了验证Fragment内部按钮跳转和Activity底部按钮控制跳转
Activity代码如下:
代码中 实现了 View.OnClickListener 接口,这个也好用。非常方便整合按钮点击事件。
package com.example.androidktzero  // 定义当前 Kotlin 文件的包名

import android.os.Bundle                                           // 导入 Android 组件的 Bundle 类
import android.view.View
import androidx.activity.enableEdgeToEdge                          // 导入启用 Edge-to-Edge 的扩展函数
import androidx.appcompat.app.AppCompatActivity                    // 导入 AndroidX 提供的 AppCompatActivity
import androidx.navigation.NavController                           // 导入 Navigation 组件的 NavController
import androidx.navigation.NavOptions
import androidx.navigation.fragment.NavHostFragment                // 导入用于托管 Navigation 组件的 NavHostFragment
import com.example.androidktzero.databinding.ActivityFlashBinding  // 导入 ViewBinding 绑定的 ActivityFlashBinding

/**
 * `FlashActivity` 作为应用的启动 Activity,主要负责初始化导航组件 (Navigation Component)。
 * 该 Activity 主要加载 `activity_flash.xml` 布局,并初始化 `NavController` 进行 Fragment 导航控制。
 */
class FlashActivity : AppCompatActivity() , View.OnClickListener {

    // 使用 lateinit 关键字延迟初始化 ViewBinding 变量
    private lateinit var _binding: ActivityFlashBinding

    // 声明 NavController 变量用于控制 Navigation 组件的导航行为
    private lateinit var navController: NavController

    /**
     * `onCreate` 方法是 Activity 的生命周期方法之一,
     * 负责在 Activity 创建时进行 UI 初始化、ViewBinding 绑定以及 Navigation 组件的初始化。
     */
    override fun onCreate(savedInstanceState: Bundle?) {
        super.onCreate(savedInstanceState)

        // 启用 Edge-to-Edge UI,使界面能够扩展到状态栏和导航栏
        enableEdgeToEdge()

        // 使用 ViewBinding 绑定 `activity_flash.xml` 布局
        _binding = ActivityFlashBinding.inflate(layoutInflater)

        // 设置 Activity 的内容视图为绑定的根布局视图
        setContentView(_binding.root)

        // 获取 NavHostFragment  NavHostFragment 作为一个特殊的 Fragment 容器,它不直接暴露给 binding,所以你仍然需要使用
        val navHostFragment =
            supportFragmentManager.findFragmentById(R.id.nav_host_fragment) as NavHostFragment

        // 获取 NavController,用于控制 Fragment 之间的导航
        navController = navHostFragment.navController

        // 设置按钮点击事件
        _binding.toFirst.setOnClickListener(this)
        _binding.toSecond.setOnClickListener(this)
        _binding.toThird.setOnClickListener(this)
    }

    override fun onClick(p0: View?) {
        val navOptions = NavOptions.Builder()
            .setLaunchSingleTop(true)  // 避免重复加载相同的 Fragment
//            .setPopUpTo(R.id.secondFragment, true)  // 清除栈中 firstFragment 之前的所有 Fragment
            .setPopUpTo(R.id.nav_host_fragment, true) // 清除所有 Fragments
            .build()
        when(p0?.id){
            R.id.to_first  -> {
                navController.navigate(R.id.firstFragment)
            }
            R.id.to_second -> {
                navController.navigate(R.id.secondFragment, null, navOptions)
            }
            R.id.to_third  -> {
                navController.navigate(R.id.thirdFragment, null, navOptions)
            }
        }
    }
}
3、navigation的配置
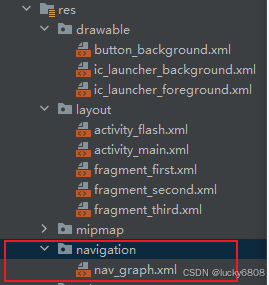
xml内容如下:
<?xml version="1.0" encoding="utf-8"?>
<navigation xmlns:android="http://schemas.android.com/apk/res/android"
            xmlns:app="http://schemas.android.com/apk/res-auto"
            xmlns:tools="http://schemas.android.com/tools"
            android:id="@+id/nav_graph"
            app:startDestination="@id/firstFragment"
        >
    <fragment
            android:id="@+id/firstFragment"
            android:name="com.example.androidktzero.fragment.FirstFragment"
            android:label="FirstFragment"
            tools:layout="@layout/fragment_first"
            >
        <action
                android:id="@+id/action_first_Fragment_to_secondFragment"
                app:destination="@+id/secondFragment"
                ></action>
    </fragment>


    <fragment
            android:id="@+id/secondFragment"
            android:name="com.example.androidktzero.fragment.SecondFragment"
            android:label="SecondFragment"
            tools:layout="@layout/fragment_second"
            >
        <action
                android:id="@+id/action_secondFragment_to_thirdFragment"
                app:destination="@+id/thirdFragment"
                ></action>
    </fragment>

    <fragment
            android:id="@+id/thirdFragment"
            android:name="com.example.androidktzero.fragment.ThirdFragment"
            android:label="ThirdFragment"
            tools:layout="@layout/fragment_third"
            >

        <action
                android:id="@+id/action_thirdFragment_to_firstFragment"
                app:destination="@id/firstFragment"
                >
        </action>

    </fragment>

</navigation>
效果图如下:
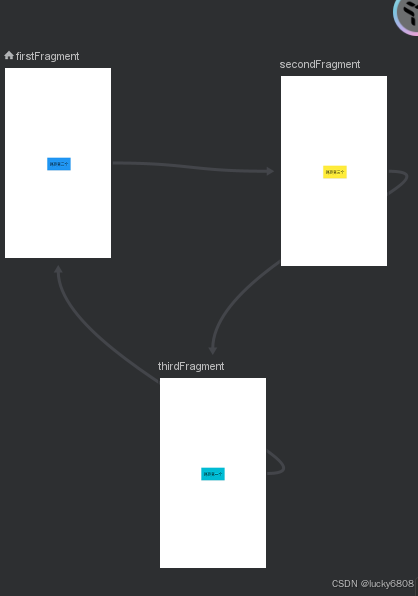
博主 博主 为什么上面有线条呢?因为我提前配置了,跳转逻辑。<action> 指定了一个跳转行为,然后设置了一个跳转id。在哪里使用了呢,就在Fragment的点击事件中有体现。当然,也可以不用提前配置。
四、关于性能问题以及OOM等等(后续补上)
想着,如果他是一个容器,那它就会被装满,装满就是异常。然后,怎么解决返回栈无限制的增大。我个人认为比较好的方法就是写一个Fragment的基类,用来管理Fragment的返回栈。至于这么实现下回说。
虽然nav 自己也可以解决,如下:
override fun onClick(p0: View?) {
        val navOptions = NavOptions.Builder()
            .setLaunchSingleTop(true)  // 避免重复加载相同的 Fragment
//            .setPopUpTo(R.id.secondFragment, true)  // 清除栈中 firstFragment 之前的所有 Fragment
            .setPopUpTo(R.id.nav_host_fragment, true) // 清除所有 Fragments
            .build()
        when(p0?.id){
            R.id.to_first  -> {
                navController.navigate(R.id.firstFragment)
            }
            R.id.to_second -> {
                navController.navigate(R.id.secondFragment, null, navOptions)
            }
            R.id.to_third  -> {
                navController.navigate(R.id.thirdFragment, null, navOptions)
            }
        }
    }
但是navOptions 好像并没有起多大作用。

Agent 垂直技术社区,欢迎活跃、内容共建。
更多推荐


 33
33 0
0- 0


 已为社区贡献1条内容

所有评论(0)