

CentOS7 离线部署Zabbix 3.4.15(server+agent节点)
在CentOS7 上离线部署Zabbix(server+agent节点)
1.基础环境配置
| 主机名 | IP地址 | 节点 |
| zabbix-server | 192.168.100.10 | Server节点 |
| zabbix-agent | 192.168.100.20 | Agent节点 |
(1)一台server节点和一台agent节点
Server节点修改主机名为zabbix-server
[root@localhost ~]# hostnamectl set-hostname zabbix-serverAgent节点修改主机名为zabbix-agent
[root@localhost ~]# hostnamectl set-hostname zabbix-agent(2)本地Yum源配置
zabbix-server节点配置:
将zabbix的本地yum文件夹上传至zabbix-server节点的/opt路径下
本地zabbiz源下载:
[root@zabbix-server ~]# mkdir -p /opt/centos
[root@zabbix-server ~]# mount /dev/cdrom /opt/centos
[root@zabbix-server ~]# mv /etc/yum.repos.d/* /media/
[root@zabbix-server ~]# vi /etc/yum.repos.d/local.repo
[centos]
name=centos
baseurl=file:///opt/centos
gpgcheck=0
enabled=1
[zabbix]
name=zabbix
baseurl=file:///opt/zabbix
gpgcheck=0
enabled=1
zabbix-agent节点配置:
安装使用vsftpd服务,zabbix-server和zabbix-agent节点需要设置防火墙
[root@zabbix-server ~]# systemctl stop firewalld
[root@zabbix-server ~]# systemctl disable firewalld
[root@zabbix-server ~]# vi /etc/selinux/config
SELINUX=permissive
[root@zabbix-server ~]# setenforce 0
在zabbix-server节点上安装vsftpd服务
[root@zabbix-server ~]# yum install vsftpd -y
[root@zabbix-server ~]# vi /etc/vsftpd/vsftpd.conf
anon_root=/opt
[root@zabbix-server ~]# systemctl start vsftpd
[root@zabbix-server ~]# systemctl status vsftpd
在zabbix-agent节点上
[root@zabbix-agent ~]# systemctl stop firewalld
[root@zabbix-agent ~]# systemctl disable firewalld
[root@zabbix-agent ~]# vi /etc/selinux/config
SELINUX=permissive
[root@zabbix-agent ~]# setenforce 0
[root@zabbix-agent ~]# mv /etc/yum.repos.d/* /media/
[root@zabbix-agent ~]# vi /etc/yum.repos.d/local.repo
[centos]
name=centos
baseurl=ftp://192.168.100.10/centos
gpgcheck=0
enabled=1
[zabbix]
name=zabbix
baseurl=ftp://192.168.100.10/zabbix
gpgcheck=0
enabled=1
2.在zabbix-server节点上配置LAMP+Zabbix服务
(1)安装LAMP和Zabbix服务
[root@zabbix-server ~]# yum install httpd -y
[root@zabbix-server ~]# yum install -y mariadb-server mariadb
[root@zabbix-server ~]# yum install -y zabbix-server-mysql zabbix-web-mysql zabbix-agent mariadb-server
[root@zabbix-server ~]# yum install trousers -y
[root@zabbix-server ~]# yum install -y net-tools
(2)在zabbix-server节点上配置并启动Zabbix服务
①启动httpd服务
[root@zabbix-server ~]# systemctl start httpd
[root@zabbix-server ~]# systemctl enable httpd
[root@zabbix-server ~]#  systemctl status httpd
②启动并配置数据库服务
[root@zabbix-server ~]# systemctl start mariadb
[root@zabbix-server ~]# systemctl enable mariadb
登录数据库,创建zabbix库(中文编码格式)
[root@zabbix-server ~]# mysql
MariaDB [(none)]> create database zabbix character set utf8 collate utf8_bin;
MariaDB [(none)]> grant all privileges on zabbix.* to zabbix@'%' identified by 'zabbix';
MariaDB [(none)]> grant all privileges on zabbix.* to zabbix@localhost identified by 'zabbix';
MariaDB [(none)]> Ctrl-C -- exit!
[root@zabbix-server ~]# cd /usr/share/doc/zabbix-server-mysql-3.4.15/
[root@zabbix-server zabbix-server-mysql-3.4.15]# ll
total 2120
-rw-r--r--. 1 root root      98 Nov 12  2018 AUTHORS
-rw-r--r--. 1 root root  866545 Nov 12  2018 ChangeLog
-rw-r--r--. 1 root root   17990 Nov 12  2018 COPYING
-rw-r--r--. 1 root root 1267039 Nov 12  2018 create.sql.gz
-rw-r--r--. 1 root root      52 Nov 12  2018 NEWS
-rw-r--r--. 1 root root    1062 Nov 12  2018 README
[root@zabbix-server zabbix-server-mysql-3.4.15]# zcat create.sql.gz |mysql -uroot zabbix
③设置时区
编辑/etc/php.ini文件,在[Date]字段下设置date.timezone=PRC
[root@zabbix-server ~]# vi /etc/php.ini
[Date]
; Defines the default timezone used by the date functions
; http://php.net/date.timezone
date.timezone = PRC编辑/etc/httpd/conf.d/zabbix.conf文件,修改时区,修改php_value date.timezone 为Asia/Shanghai
[root@zabbix-server ~]# vi /etc/httpd/conf.d/zabbix.conf
    <IfModule mod_php5.c>
        php_value max_execution_time 300
        php_value memory_limit 128M
        php_value post_max_size 16M
        php_value upload_max_filesize 2M
        php_value max_input_time 300
        php_value max_input_vars 10000
        php_value always_populate_raw_post_data -1
        # php_value date.timezone Europe/Riga
        php_value date.timezone Asia/Shanghai
    </IfModule>
[root@zabbix-server ~]# systemctl restart httpd
④修改zabbix配置文件并启动
[root@zabbix-server ~]# vi /etc/zabbix/zabbix_server.conf
[root@zabbix-server ~]# grep -n '^'[a-Z] /etc/zabbix/zabbix_server.conf
38:LogFile=/var/log/zabbix/zabbix_server.log
49:LogFileSize=0
72:PidFile=/var/run/zabbix/zabbix_server.pid
82:SocketDir=/var/run/zabbix
91:DBHost=localhost
100:DBName=zabbix
116:DBUser=zabbix
124:DBPassword=zabbix
132:DBSocket=/var/lib/mysql/mysql.sock
330:SNMPTrapperFile=/var/log/snmptrap/snmptrap.log
447:Timeout=4
489:AlertScriptsPath=/usr/lib/zabbix/alertscripts
499:ExternalScripts=/usr/lib/zabbix/externalscripts
535:LogSlowQueries=3000
[root@zabbix-server ~]# systemctl start zabbix-server
[root@zabbix-server ~]# netstat -ntpl
⑤查看端口号,验证zabbix-server的服务端口10051是否存在
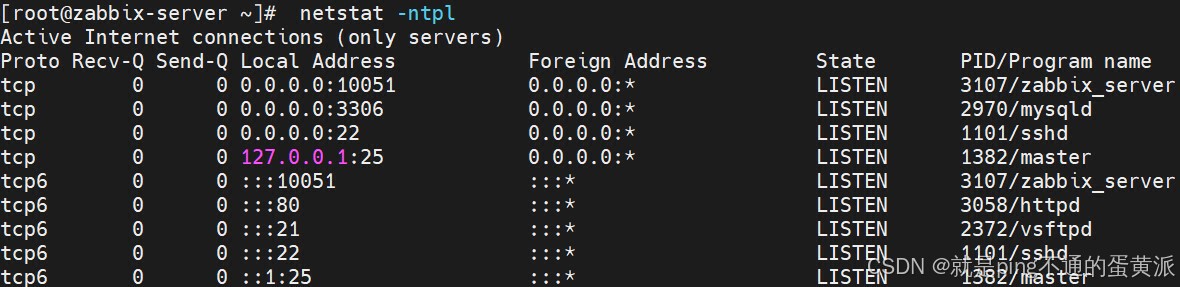
zabbix监控服务的server端配置完毕
3.配置使用zabbix服务
在浏览器访问192.168.100.10/zabbix,进入Zabbix安装向导web界面
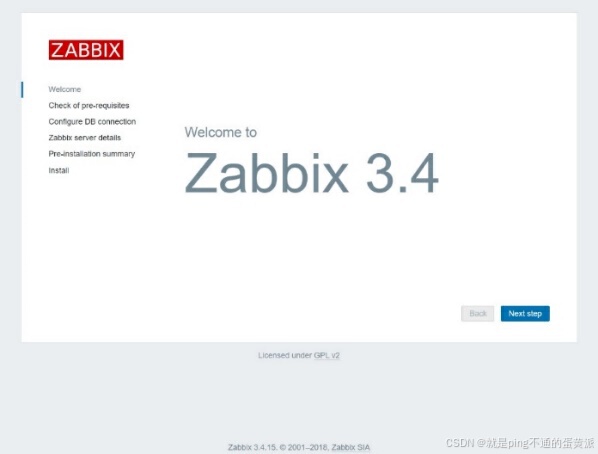
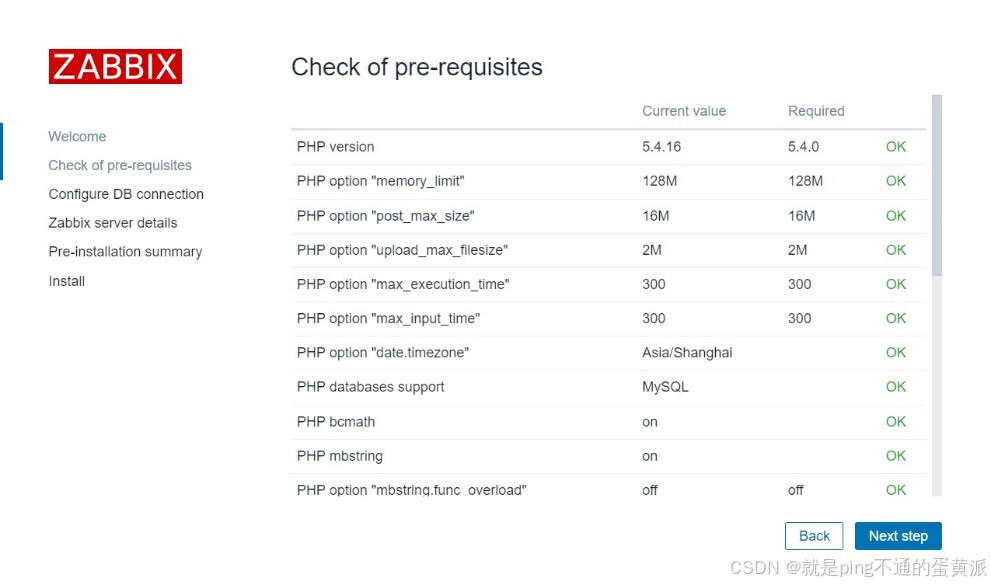
显示PHP版本信息等内容,然后单击右下角“Next step”按钮
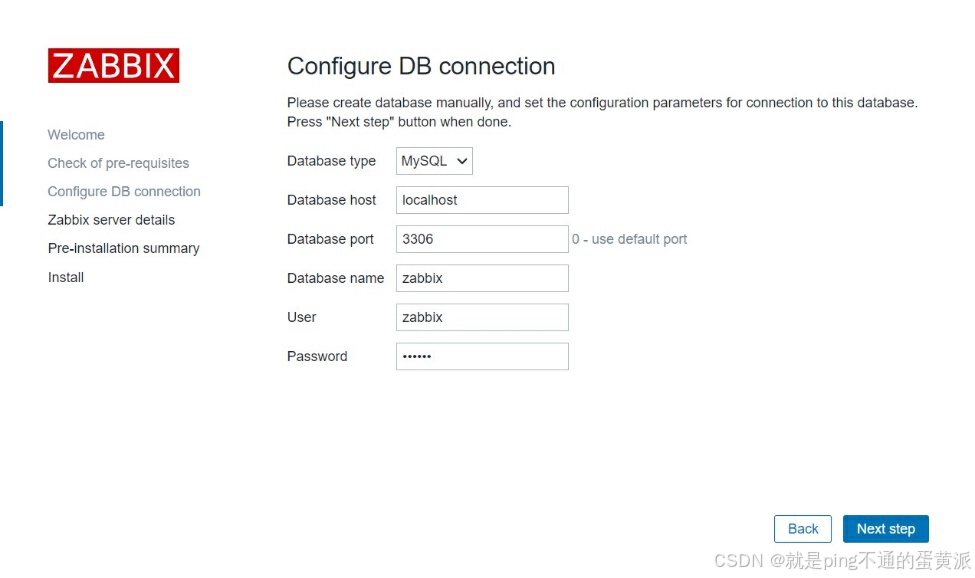
填写连接数据库的必要信息,Password为zabbix,填写完毕后单击右下角“Next step”按钮
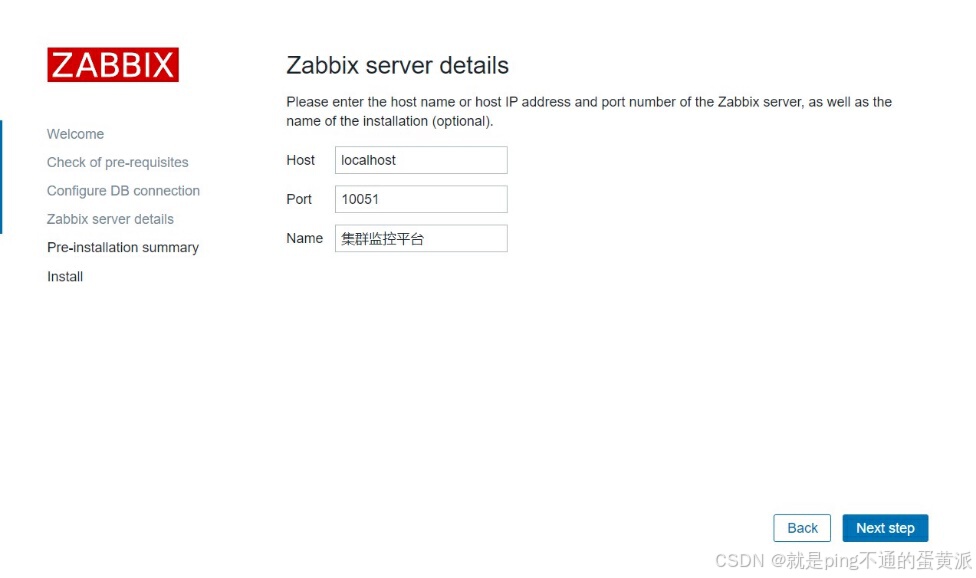
填写Zabbix服务端的详细信息,内容如图4-13-4所示,Name字段可以随意填写,是给监控平台起个名字。然后单击右下角“Next step”按钮
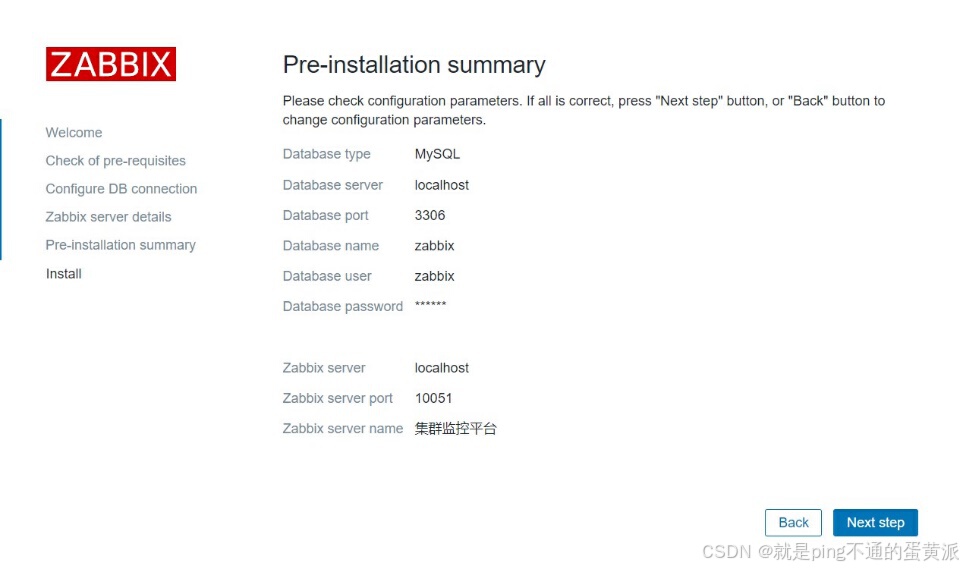
平台配置概况
安装Zabbix,安装成功后,单击右下角“Finish”按钮,结束安装

单击“Finish”按钮后,进入登录界面,使用默认的用户名和密码Admin/zabbix登录

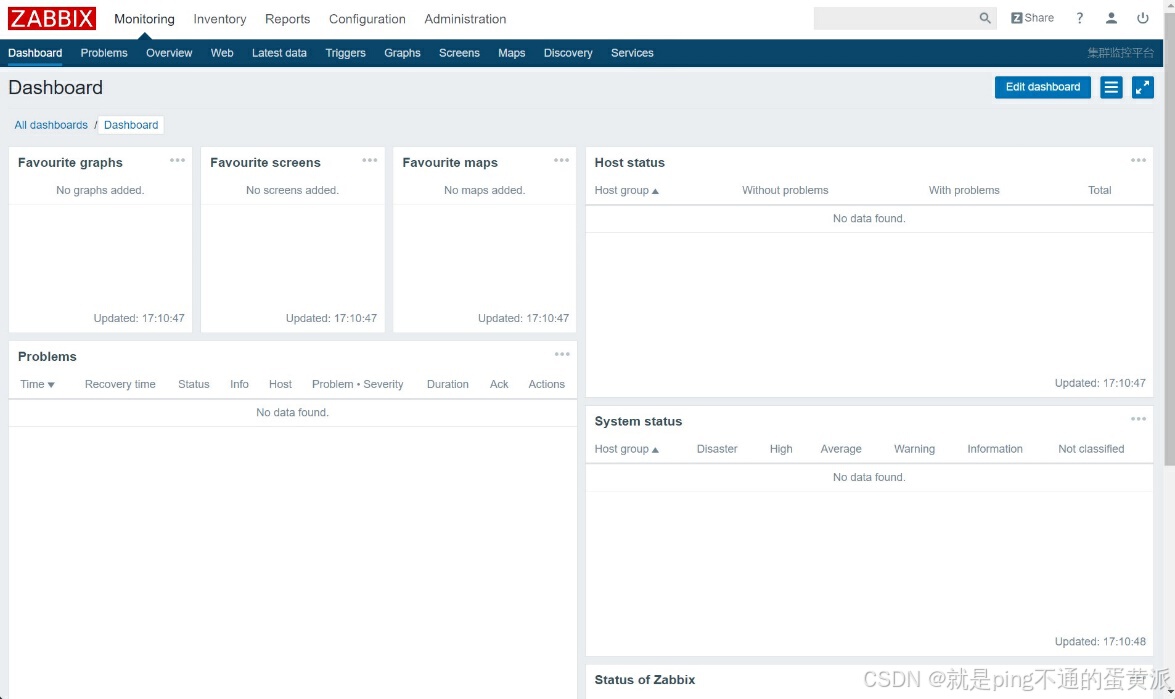
进入Zabbix主页
4.添加被监控机器
在zabbix-agent节点上,安装zabbix-agent服务
[root@zabbix-agent ~]# yum install -y net-tools
[root@zabbix-agent ~]# yum install -y zabbix-agent
修改/etc/zabbix/zabbix_agentd.conf配置文件,配置zabbix-agent
[root@zabbix-agent ~]# vi /etc/zabbix/zabbix_agentd.conf
[root@zabbix-agent ~]# grep -n '^'[a-Z] /etc/zabbix/zabbix_agentd.conf
13:PidFile=/var/run/zabbix/zabbix_agentd.pid
32:LogFile=/var/log/zabbix/zabbix_agentd.log
43:LogFileSize=0
97:Server=192.168.100.10
138:ServerActive=192.168.100.10
149:Hostname=Zabbix-agent
267:Include=/etc/zabbix/zabbix_agentd.d/*.conf
启动zabbix-agent服务,并查看10050端口是否存在
[root@zabbix-agent ~]# systemctl start zabbix-agent
5.回到Zabbix的web界面
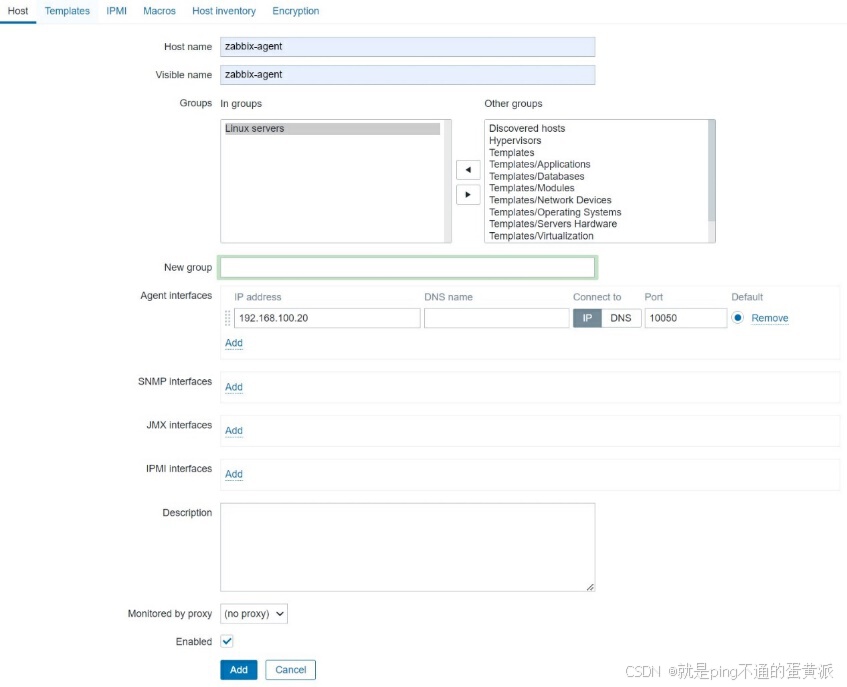
选择菜单栏“Configuration”→“Hosts”→“Create host”

填写信息,将zabbix-agent节点添加到被监控机器
添加监控项,单击“zabbix-agent”名称,然后单击“Templates”标签,选择并添加监控模板
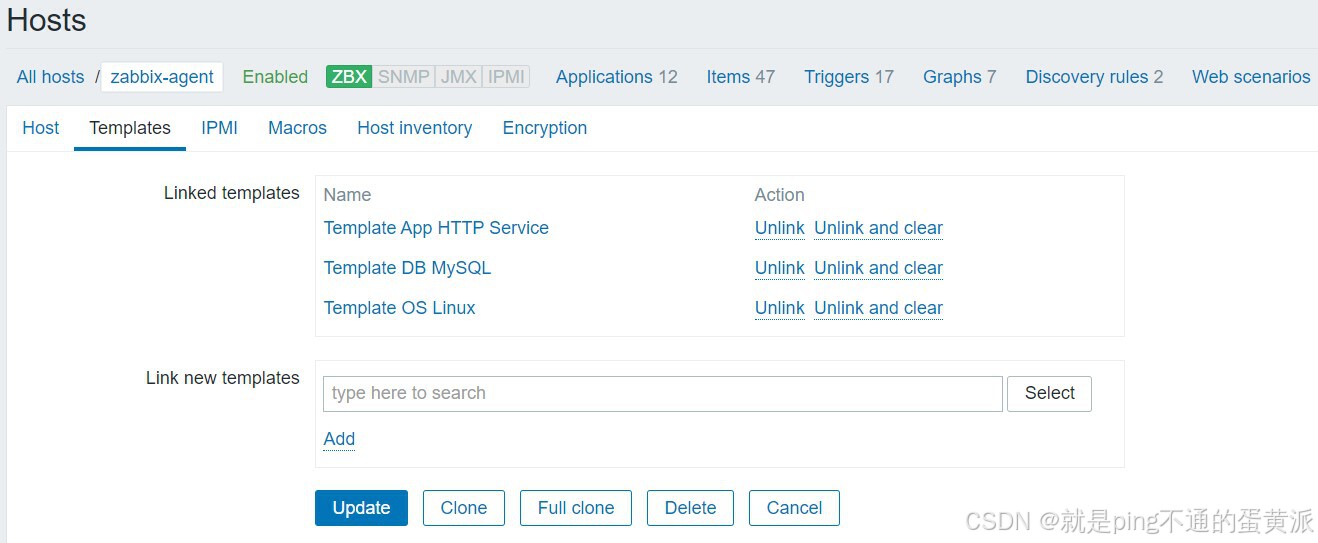
单击“更新”按钮后,zabbix-agent节点被添加到监控中
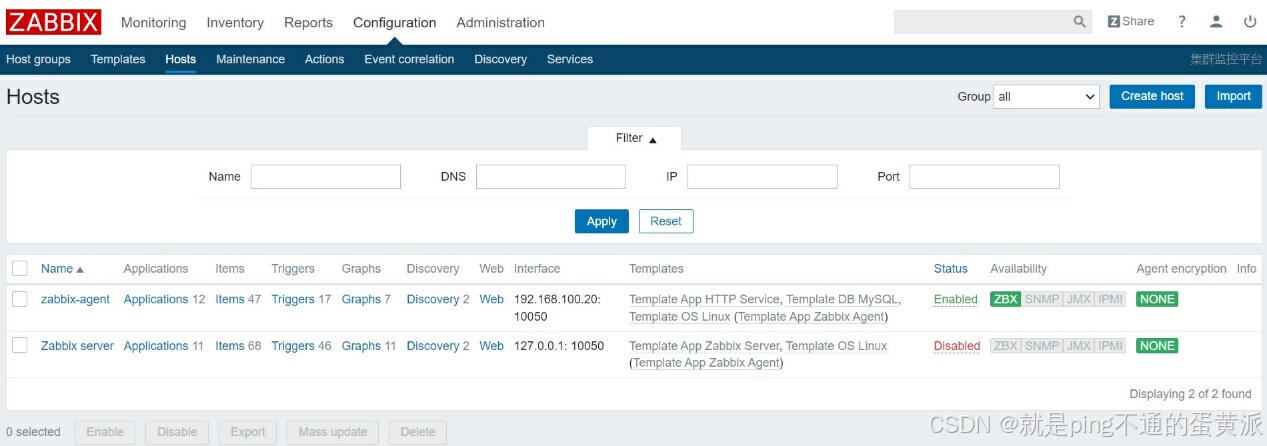
成功添加zabbix-agent节点后,就可以通过Zabbix界面进行主机的监控
(补充内容)使用zabbix_get验证zabbix-server和zabbix-agent的连通性
下载zabbix-get-3.2.0-1.el7.x86_64.rpm软件包并上传至zabbix-server节点的/root路径下
手动安装zabbix-get服务
[root@zabbix-server ~]# rpm -ivh zabbix-get-3.0.4-1.el7.x86_64.rpm
warning: zabbix-get-3.0.4-1.el7.x86_64.rpm: Header V4 RSA/SHA1 Signature, key ID f56d1621: NOKEY
Preparing... ################################# [100%]
Updating / installing...
1:zabbix-get-3.0.4-1.el7 ################################# [100%]
使用help查看zabbix_get命令的用法
[root@zabbix-server ~]# zabbix_get --help
使用zabbix_get命令验证连通性
[root@zabbix-server ~]# zabbix_get -s 192.168.100.20 -p 10050 -k system.cpu.load
0.000000
更多推荐


 29
29 0
0- 0


 已为社区贡献1条内容

所有评论(0)