AI Agent 脚手架 —— 基础Agent装配全流程实现
一、前言
前面我们把项目初始化了,这一节就正式开始装配了,本质上还是在填充API,只不过从拖拉拽的SpringAI的API变成了GoogleADK的API了,还是是按照API的填充顺序来设置节点。
稍微需要注意一下工作流节点的路由,我会在后面详细解析。
整体架构图如下:
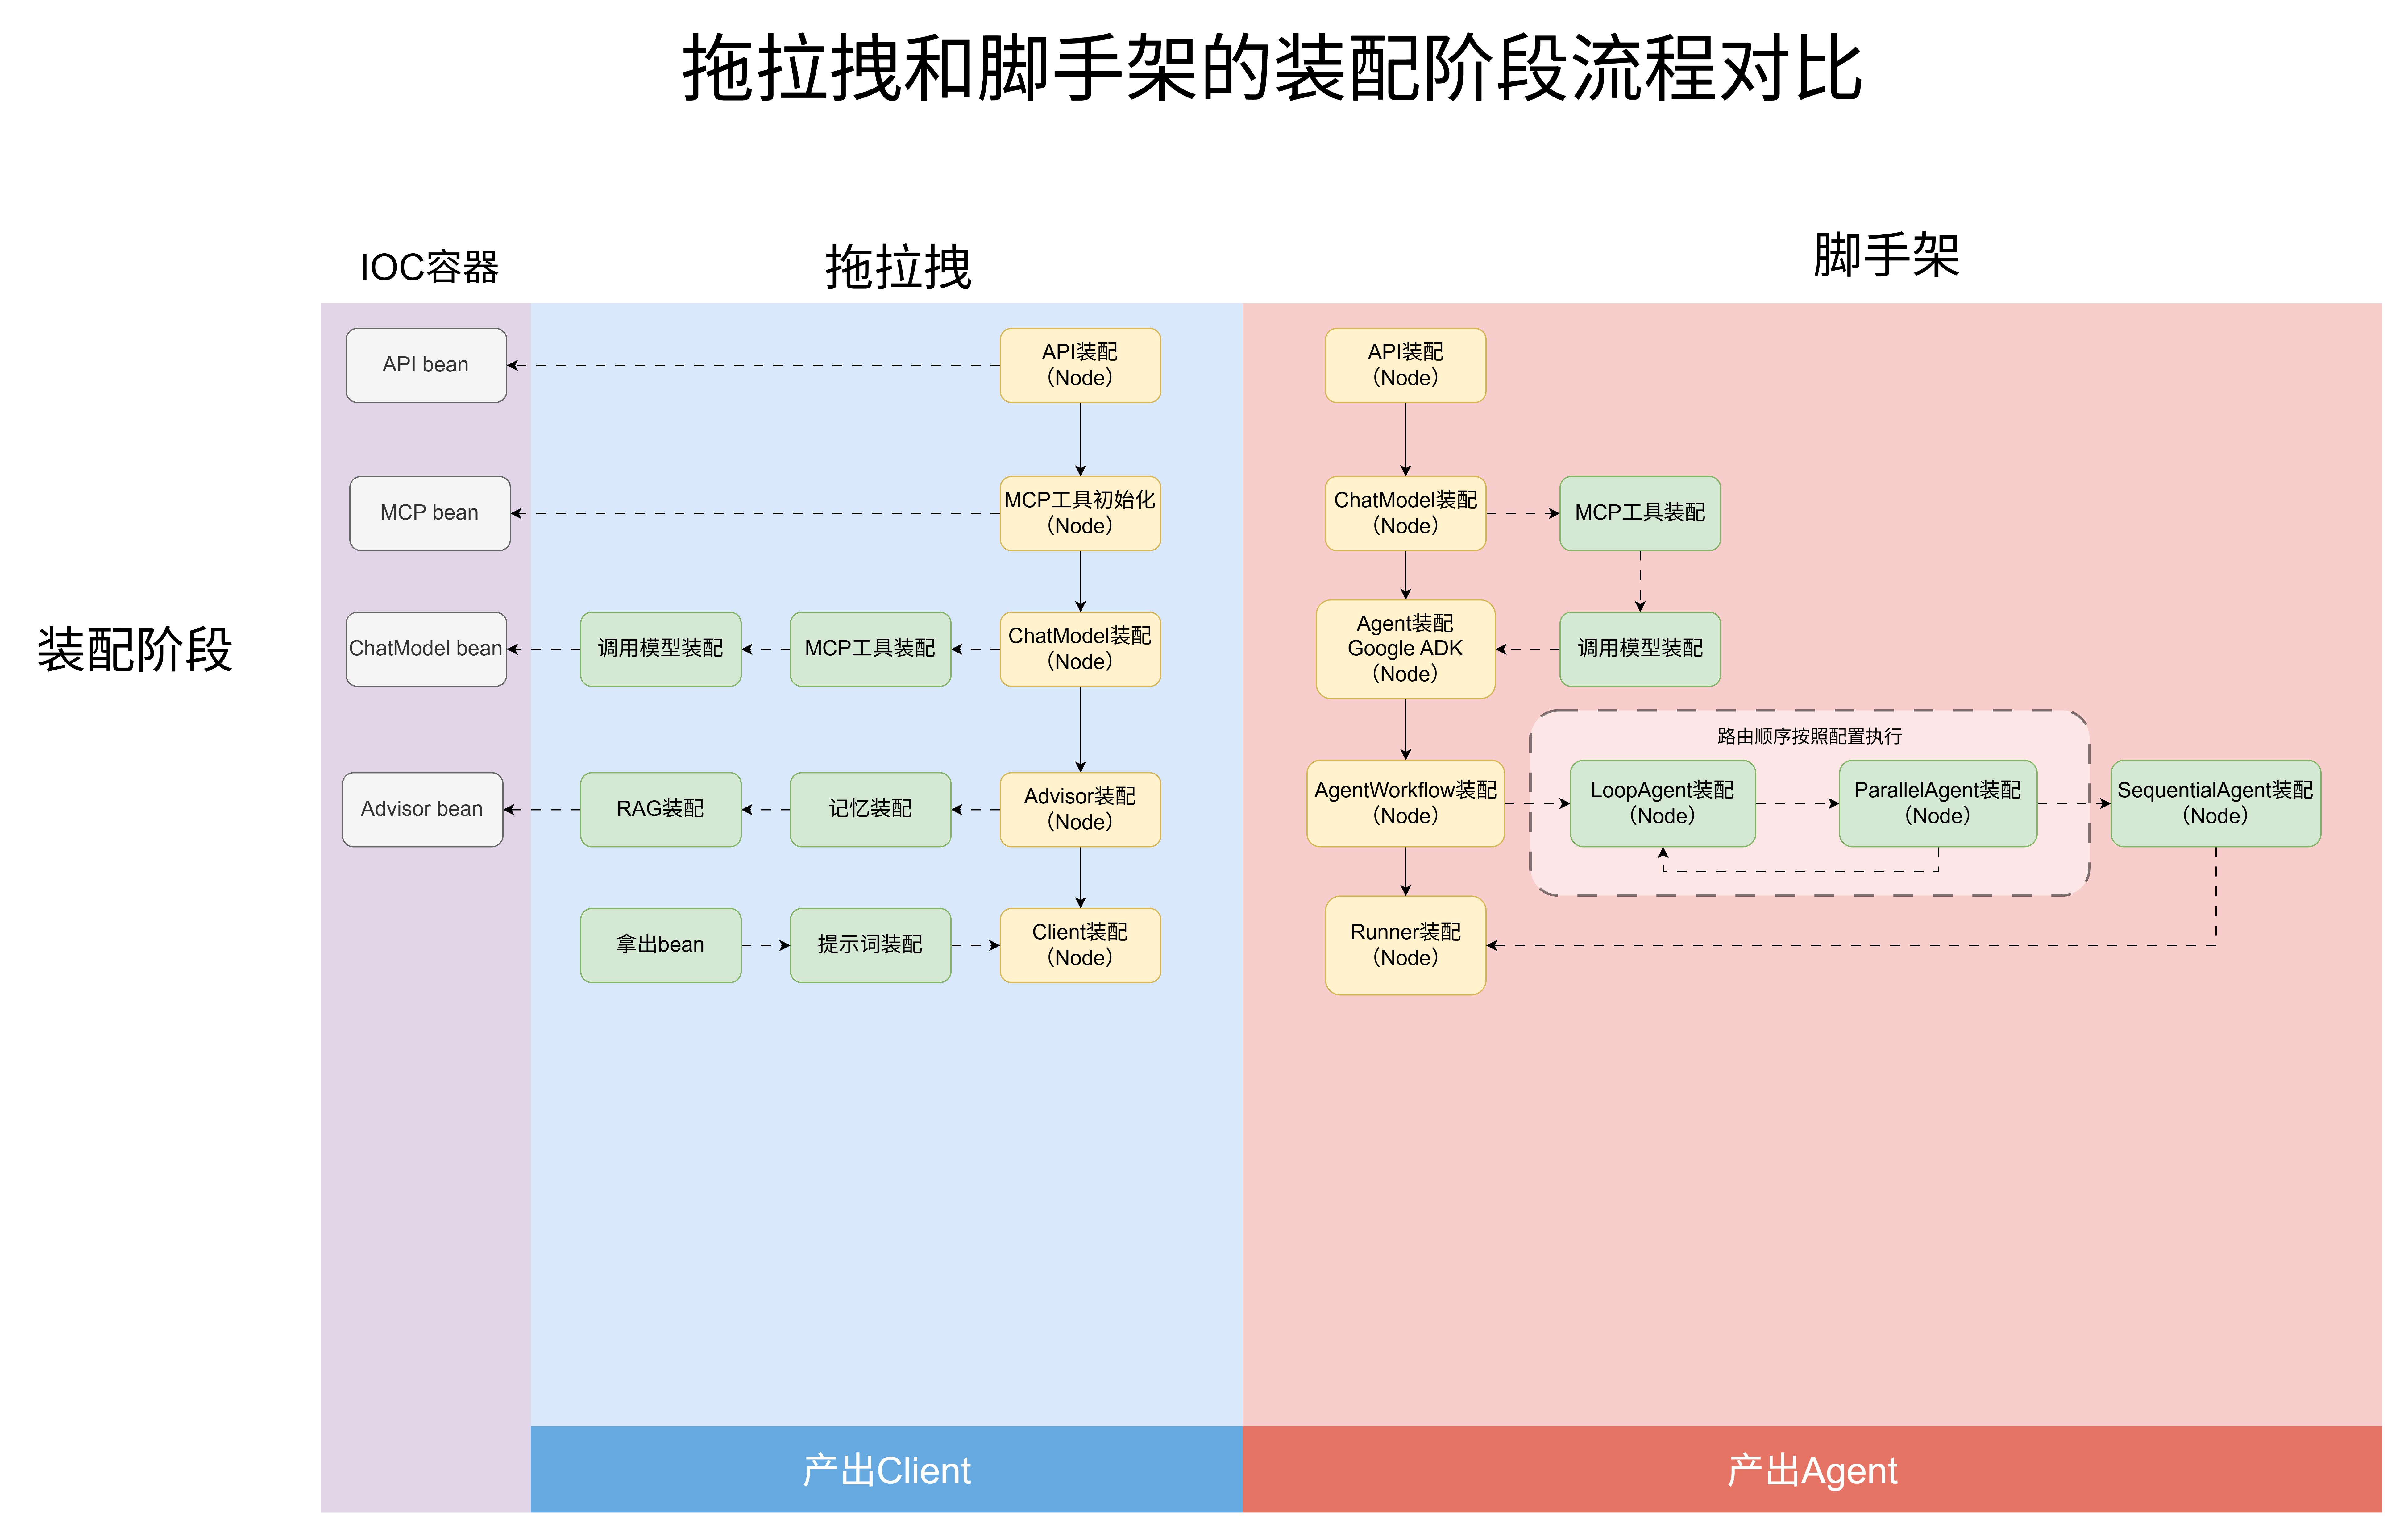
注意哈,这里面的架构图不是最终架构,是没有增强装配的阶段,也就是这一节会实现的架构。后续增强装配我会重新画图。
二、装配流程
1.AiApiNode
没什么好介绍的,完全就是装填API,唯一可以值得提一下的就是我们把这个api存储到了动态上下文中,这和前面拖拉拽存到bean中是不太一样的,个人觉得更简便了。最后路由到ChatModeNode节点。
@Slf4j
@Service
public class AiApiNode extends AbstractArmorySupport {

    @Resource
    private ChatModelNode chatModelNode;

    @Override
    protected AiAgentRegisterVO doApply(ArmoryCommandEntity requestParameter, DefaultArmoryFactory.DynamicContext dynamicContext) throws Exception {
        log.info("Ai Agent 装配操作 - AiApiNode");
        AiAgentConfigTableVO aiAgentConfigTableVO = requestParameter.getAiAgentConfigTableVO();
        AiAgentConfigTableVO.Module.AiApi aiApiConfig  = aiAgentConfigTableVO.getModule().getAiApi();

        OpenAiApi openAiApi = OpenAiApi.builder()
                .baseUrl(aiApiConfig .getBaseUrl())
                .apiKey(aiApiConfig .getApiKey())
                .completionsPath(StringUtils.isNotBlank(aiApiConfig.getCompletionsPath()) ? aiApiConfig.getCompletionsPath() : "v1/chat/completions")
                .embeddingsPath(StringUtils.isNotBlank(aiApiConfig.getEmbeddingsPath()) ? aiApiConfig.getEmbeddingsPath() : "v1/embeddings")
                .build();

        dynamicContext.setOpenAiApi(openAiApi);

        return router(requestParameter, dynamicContext);
    }

    @Override
    public StrategyHandler<ArmoryCommandEntity, DefaultArmoryFactory.DynamicContext, AiAgentRegisterVO> get(ArmoryCommandEntity requestParameter, DefaultArmoryFactory.DynamicContext dynamicContext) throws Exception {
        return chatModelNode;
    }
}
2.ChatModelNode
这个节点负责了两个事情,第一个是最简单的模型名装配(例如deepseek-v4-flash),第二个稍微会看着复杂一点,就是装配MCP服务,提出来的方法中,将配置中的MCP相关配置给拼接上了这个步骤会比较繁琐,最后调用方法生产出一个可以直接放在API中的MCPClient。路由到AgentNode。
/**
 * @author 印东升
 * @description 装配模型和工具
 * @create 2026-08-31 18:19
 */
@Slf4j
@Service
public class ChatModelNode extends AbstractArmorySupport {

    @Resource
    private AgentNode agentNode;

    @Override
    protected AiAgentRegisterVO doApply(ArmoryCommandEntity requestParameter, DefaultArmoryFactory.DynamicContext dynamicContext) throws Exception {
        log.info("Ai Agent 装配操作 - ChatModelNode");

        OpenAiApi openAiApi = dynamicContext.getOpenAiApi();
        AiAgentConfigTableVO aiAgentConfigTableVO = requestParameter.getAiAgentConfigTableVO();
        AiAgentConfigTableVO.Module.ChatModel chatModelConfig = aiAgentConfigTableVO.getModule()
                .getChatModel();

        List<McpSyncClient> mcpSyncClients = new ArrayList<>();
        List<AiAgentConfigTableVO.Module.ChatModel.ToolMcp> toolMcpList = chatModelConfig.getToolMcpList();

        //遍历加载MCP客户端,便于后续直接嵌入
        for (AiAgentConfigTableVO.Module.ChatModel.ToolMcp toolMcp : toolMcpList) {
            mcpSyncClients.add(creaateMcpSyncClient(toolMcp));
        }
        //构建chatModel
        OpenAiChatModel chatModel = OpenAiChatModel.builder()
                .openAiApi(openAiApi)
                .defaultOptions(OpenAiChatOptions.builder()
                        .model(chatModelConfig.getModel())
                        .toolCallbacks(SyncMcpToolCallbackProvider.builder()
                                .mcpClients(mcpSyncClients)
                                .build()
                                .getToolCallbacks())
                        .build())
                .build();
        dynamicContext.setOpenAiChatModel(chatModel);

        return router(requestParameter, dynamicContext);
    }

    @Override
    public StrategyHandler<ArmoryCommandEntity, DefaultArmoryFactory.DynamicContext, AiAgentRegisterVO> get(ArmoryCommandEntity requestParameter, DefaultArmoryFactory.DynamicContext dynamicContext) throws Exception {
        return agentNode;
    }

    private McpSyncClient creaateMcpSyncClient(AiAgentConfigTableVO.Module.ChatModel.ToolMcp toolMcp) throws MalformedURLException {
        AiAgentConfigTableVO.Module.ChatModel.ToolMcp.SSEServerParameters sseConfig = toolMcp.getSse();
        AiAgentConfigTableVO.Module.ChatModel.ToolMcp.StdioServerParameters stdioConfig = toolMcp.getStdio();

        if (null != sseConfig) {//处理SSE服务

            String originalBaseUri = sseConfig.getBaseUri();
            String baseUri = originalBaseUri;
            String sseEndpoint = sseConfig.getSseEndpoint();

            //拆sse的路径
            if (StringUtils.isBlank(sseEndpoint)) {

                URL url = new URL(originalBaseUri);
                String protocol = url.getProtocol();
                String host = url.getHost();
                int port = url.getPort();

                String baseUrl = port == -1 ? protocol + "://" + host : protocol + "://" + host + ":" + port;

                int index = originalBaseUri.indexOf(baseUri);
                if (index != -1) {
                    sseEndpoint = originalBaseUri.substring(index + baseUrl.length());
                }
                baseUri = baseUrl;
            }
            sseEndpoint = StringUtils.isBlank(sseEndpoint) ? "/sse" : sseEndpoint;

            HttpClientSseClientTransport sseClientTransport = HttpClientSseClientTransport.builder(baseUri)
                    .sseEndpoint(sseEndpoint)
                    .build();

            McpSyncClient mcpSyncClient = McpClient.sync(sseClientTransport)
                    .requestTimeout(Duration.ofMillis(sseConfig.getRequestTimeout()))
                    .build();
            McpSchema.InitializeResult initialize = mcpSyncClient.initialize();
            log.info("Tool SSE MCP Initialized:{}", initialize);

            return mcpSyncClient;

        }
        if (null != stdioConfig) {//处理Stdio服务
            AiAgentConfigTableVO.Module.ChatModel.ToolMcp.StdioServerParameters.ServerParameters serverParameters = stdioConfig.getServerParameters();
            // https://github.com/modelcontextprotocol/servers/tree/main/src/filesystem
            var stdioParams = ServerParameters.builder(serverParameters.getCommand())
                    .args(serverParameters.getArgs())
                    .env(serverParameters.getEnv())
                    .build();

            var mcpClient = McpClient.sync(new StdioClientTransport(stdioParams, new JacksonMcpJsonMapper(new ObjectMapper())))
                    .requestTimeout(Duration.ofSeconds(stdioConfig.getRequestTimeout()))
                    .build();
            var init_stdio = mcpClient.initialize();

            log.info("Tool Stdio MCP Initialized {}", init_stdio);
            return mcpClient;
        }

        throw new RuntimeException("Tool MCP SSE AND STDIO IS NULL");
    }
}
3.AgentNode
从这里开始就和SpringAI的API不同了,这里尤其注意,前面我们做拖拉拽的时候其实根本没有生产出一个真正封装的Agent,我们是以Client的形式模拟工作流,然后直接调用工作流使用,把整个工作流看成了一个Agent。而这里的Agent是ADK中提供的API,这里面填充出来就是真正的一个独立Agent了,至于使用独立Agent的好处,我在上一节已经说过了。这个节点生产出来的Agent我们还是存储在动态上下文中,多少是以map的形式,便于后续工作流通过键值对查询来获取子Agent。路由到AgentWorkflowNode。
/**
 * @author 印东升
 * @description 装配Agent
 * @create 2026-08-31 18:19
 */
@Slf4j
@Service
public class AgentNode extends AbstractArmorySupport {

    @Resource
    private AgentWorkflowNode agentWorkflowNode;

    @Override
    protected AiAgentRegisterVO doApply(ArmoryCommandEntity requestParameter, DefaultArmoryFactory.DynamicContext dynamicContext) throws Exception {
        log.info("Ai Agent 装配操作 - AgentNode");
        OpenAiChatModel chatModel = dynamicContext.getOpenAiChatModel();
        AiAgentConfigTableVO aiAgentConfigTableVO = requestParameter.getAiAgentConfigTableVO();

        //拿到所有配置中的agent集合
        List<AiAgentConfigTableVO.Module.Agent> agentsConfig = aiAgentConfigTableVO.getModule()
                .getAgents();

        //遍历 逐个装配
        for (AiAgentConfigTableVO.Module.Agent agentConfig : agentsConfig) {
            String agentName = agentConfig.getName();
            String agentConfigDescription = agentConfig.getDescription();
            String agentConfigInstruction = agentConfig.getInstruction();
            String agentConfigOutputKey = agentConfig.getOutputKey();

            LlmAgent llmAgent = LlmAgent.builder()
                    .model(new SpringAI(chatModel))
                    .name(agentName)
                    .description(agentConfigDescription)
                    .instruction(agentConfigInstruction)
                    .outputKey(agentConfigOutputKey)
                    .build();
            dynamicContext.getAgentGroup().put(agentConfig.getName(),llmAgent);

        }

        return router(requestParameter, dynamicContext);
    }

    @Override
    public StrategyHandler<ArmoryCommandEntity, DefaultArmoryFactory.DynamicContext, AiAgentRegisterVO> get(ArmoryCommandEntity requestParameter, DefaultArmoryFactory.DynamicContext dynamicContext) throws Exception {
        return agentWorkflowNode;
    }
}
4.AgentWorkflowNode
这里的业务处理没啥好说的,就是把工作流配置存储进动态上下文中去。
值得注意的是路由部分,我们通过配置文件中配置的Agent类型来路由,注意这里我们默认最后一个是串行的(后面会调整),因为串行最适合作为外层架构,串行中的每个处理节点(Agent)可以是并行或者循环的,也可以就是一个单独的Agent。
所以在ADK的设定下,Agent的工作流是可以随意嵌套的(比如Sequential也可以嵌套到Loop里面),但是这里先为了简便,默认最外层是串行的,因此最后再处理串行类型的Agent工作流。
比如在我们配置类中,这个就是个标准的串行工作流,没有嵌套任何其他的工作流,仅仅由三个独立Agent节点串行处理业务:
            agent-workflows:
              - type: sequential
                name: CodePipelineAgent
                description: Executes a sequence of code writing, reviewing, and refactoring.
                sub-agents:
                  - CodeWriterAgent
                  - CodeReviewerAgent
                  - CodeRefactorerAgent
这里的路由是直接路由到配置的第一个Agent。
/**
 * @author 印东升
 * @description 装配智能体工作流
 * @create 2026-08-31 18:19
 */
@Slf4j
@Service
public class AgentWorkflowNode extends AbstractArmorySupport {

    @Resource
    private LoopAgentNode loopAgentNode;
    @Resource
    private ParallelAgentNode parallelAgentNode;
    @Resource
    private SequentialAgentNode sequentialAgentNode;
    @Resource
    private RunnerNode runnerNode;

    @Override
    protected AiAgentRegisterVO doApply(ArmoryCommandEntity requestParameter, DefaultArmoryFactory.DynamicContext dynamicContext) throws Exception {
        log.info("Ai Agent 装配操作 - AgentWorkFlowNode");

        AiAgentConfigTableVO aiAgentConfigTableVO = requestParameter.getAiAgentConfigTableVO();
        List<AiAgentConfigTableVO.Module.AgentWorkflow> agentWorkflows = aiAgentConfigTableVO.getModule()
                .getAgentWorkflows();

        if (null == agentWorkflows || agentWorkflows.isEmpty()) {
            return router(requestParameter, dynamicContext);
        }

        dynamicContext.setAgentWorkflows(agentWorkflows);


        return router(requestParameter, dynamicContext);
    }

    @Override
    public StrategyHandler<ArmoryCommandEntity, DefaultArmoryFactory.DynamicContext, AiAgentRegisterVO> get(ArmoryCommandEntity requestParameter, DefaultArmoryFactory.DynamicContext dynamicContext) throws Exception {
        List<AiAgentConfigTableVO.Module.AgentWorkflow> agentWorkflows = dynamicContext.getAgentWorkflows();

        if (null == agentWorkflows || agentWorkflows.isEmpty()) {
            return runnerNode;
        }

        //拿配置文件中工作流的第一个agent
        AiAgentConfigTableVO.Module.AgentWorkflow agentWorkflow = agentWorkflows.get(0);

        String type = agentWorkflow.getType();
        AgentTypeEnum agentTypeEnum = AgentTypeEnum.formType(type);

        if (null == agentTypeEnum) {
            throw new RuntimeException("agentWorkflow type is error");
        }

        String node = agentTypeEnum.getNode();
        //路由
        return switch (node) {
            case "loopAgentNode" -> loopAgentNode;
            case "parallelAgentNode" -> parallelAgentNode;
            case "sequentialAgentNode" -> sequentialAgentNode;
            default -> defaultStrategyHandler;
        };
    }
}
5.三个工作流Node
这三个节点没啥好说的,就是对应装配配置中的三种工作流。
(1)LoopAgentNode
/**
 * @author 印东升
 * @description 循环装配节点
 * @create 2026-08-31 18:19
 */
@Slf4j
@Service("loopAgentNode")
public class LoopAgentNode extends AbstractArmorySupport {


    @Override
    protected AiAgentRegisterVO doApply(ArmoryCommandEntity requestParameter, DefaultArmoryFactory.DynamicContext dynamicContext) throws Exception {
        log.info("Ai Agent 装配操作 - LoopAgentNode");

        //移出本次的agent,便于后续路由
        List<AiAgentConfigTableVO.Module.AgentWorkflow> agentWorkflows = dynamicContext.getAgentWorkflows();
        AiAgentConfigTableVO.Module.AgentWorkflow agentWorkflow = agentWorkflows.remove(0);

        List<BaseAgent> subAgents = dynamicContext.queryAgentList(agentWorkflow.getSubAgents());

        LoopAgent loopAgent =
                LoopAgent.builder()
                        .name(agentWorkflow.getName())
                        .description(agentWorkflow.getDescription())
                        .subAgents(subAgents)
                        .maxIterations(agentWorkflow.getMaxIterations())
                        .build();

        dynamicContext.getAgentGroup().put(agentWorkflow.getName(),loopAgent);

        return router(requestParameter, dynamicContext);
    }

    @Override
    public StrategyHandler<ArmoryCommandEntity, DefaultArmoryFactory.DynamicContext, AiAgentRegisterVO> get(ArmoryCommandEntity requestParameter, DefaultArmoryFactory.DynamicContext dynamicContext) throws Exception {

        List<AiAgentConfigTableVO.Module.AgentWorkflow> agentWorkflows = dynamicContext.getAgentWorkflows();
        if (null == agentWorkflows) {
            return defaultStrategyHandler;
        }
        AiAgentConfigTableVO.Module.AgentWorkflow agentWorkflow = agentWorkflows.get(0);
        String type = agentWorkflow.getType();
        AgentTypeEnum agentTypeEnum = AgentTypeEnum.formType(type);

        if (null == agentTypeEnum) {
            throw new RuntimeException("agentWorkflow type is error");
        }

        String node = agentTypeEnum.getNode();
        //路由
        return switch (node) {
            case "loopAgentNode" -> getBean("loopAgentNode");
            case "parallelAgentNode" -> getBean("parallelAgentNode");
            case "sequentialAgentNode" -> getBean("sequentialAgentNode");
            default -> defaultStrategyHandler;
        };
    }
}
(2)ParallelAgentNode
/**
 * @author 印东升
 * @description 并行装配节点
 * @create 2026-08-31 18:19
 */
@Slf4j
@Service("parallelAgentNode")
public class ParallelAgentNode extends AbstractArmorySupport {


    @Override
    protected AiAgentRegisterVO doApply(ArmoryCommandEntity requestParameter, DefaultArmoryFactory.DynamicContext dynamicContext) throws Exception {
        log.info("Ai Agent 装配操作 - ParallelAgentNode");
        //移出本次的agent,便于后续路由
        List<AiAgentConfigTableVO.Module.AgentWorkflow> agentWorkflows = dynamicContext.getAgentWorkflows();
        AiAgentConfigTableVO.Module.AgentWorkflow agentWorkflow = agentWorkflows.remove(0);

        List<BaseAgent> subAgents = dynamicContext.queryAgentList(agentWorkflow.getSubAgents());

        ParallelAgent parallelResearchAgent =
                ParallelAgent.builder()
                        .name(agentWorkflow.getName())
                        .subAgents(subAgents)
                        .description(agentWorkflow.getDescription())
                        .build();

        dynamicContext.getAgentGroup().put(agentWorkflow.getName(),parallelResearchAgent);

        return router(requestParameter, dynamicContext);
    }

    @Override
    public StrategyHandler<ArmoryCommandEntity, DefaultArmoryFactory.DynamicContext, AiAgentRegisterVO> get(ArmoryCommandEntity requestParameter, DefaultArmoryFactory.DynamicContext dynamicContext) throws Exception {
        List<AiAgentConfigTableVO.Module.AgentWorkflow> agentWorkflows = dynamicContext.getAgentWorkflows();
        if (null == agentWorkflows) {
            return defaultStrategyHandler;
        }
        AiAgentConfigTableVO.Module.AgentWorkflow agentWorkflow = agentWorkflows.get(0);
        String type = agentWorkflow.getType();
        AgentTypeEnum agentTypeEnum = AgentTypeEnum.formType(type);

        if (null == agentTypeEnum) {
            throw new RuntimeException("agentWorkflow type is error");
        }

        String node = agentTypeEnum.getNode();
        //路由
        return switch (node) {
            case "loopAgentNode" -> getBean("loopAgentNode");
            case "parallelAgentNode" -> getBean("parallelAgentNode");
            case "sequentialAgentNode" -> getBean("sequentialAgentNode");
            default -> defaultStrategyHandler;
        };
    }
}
(3)SequentialAgentNode
/**
 * @author 印东升
 * @description 串行装配节点
 * @create 2026-08-31 18:19
 */
@Slf4j
@Service("sequentialAgentNode")
public class SequentialAgentNode extends AbstractArmorySupport {

    @Resource
    private RunnerNode runnerNode;

    @Override
    protected AiAgentRegisterVO doApply(ArmoryCommandEntity requestParameter, DefaultArmoryFactory.DynamicContext dynamicContext) throws Exception {
        log.info("Ai Agent 装配操作 - SequentialAgentNode");

        //移出本次的agent,便于后续路由
        List<AiAgentConfigTableVO.Module.AgentWorkflow> agentWorkflows = dynamicContext.getAgentWorkflows();
        AiAgentConfigTableVO.Module.AgentWorkflow agentWorkflow = agentWorkflows.remove(0);

        List<BaseAgent> subAgents = dynamicContext.queryAgentList(agentWorkflow.getSubAgents());

        SequentialAgent sequentialAgent = SequentialAgent.builder()
                .name(agentWorkflow.getName())
                .description(agentWorkflow.getDescription())
                .subAgents(subAgents)
                .build();

        dynamicContext.getAgentGroup().put(agentWorkflow.getName(), sequentialAgent);
        //注册bean
        registerBean(agentWorkflow.getName(), SequentialAgent.class, sequentialAgent);


        return router(requestParameter, dynamicContext);
    }

    @Override
    public StrategyHandler<ArmoryCommandEntity, DefaultArmoryFactory.DynamicContext, AiAgentRegisterVO> get(ArmoryCommandEntity requestParameter, DefaultArmoryFactory.DynamicContext dynamicContext) throws Exception {
        return runnerNode;
    }
}
6.Runner节点
先给一个前面测试类中的示例代码,其实也就是我们的装配目标。
        // Create an InMemoryRunner
        InMemoryRunner runner = new InMemoryRunner(codePipelineAgent, APP_NAME);
        // InMemoryRunner automatically creates a session service. Create a session using the service
        Session session = runner.sessionService().createSession(APP_NAME, USER_ID).blockingGet();
        Content userMessage = Content.fromParts(Part.fromText("Write a Java function to calculate the factorial of a number."));

        // Run the agent
        Flowable<Event> eventStream = runner.runAsync(USER_ID, session.id(), userMessage);

        // Stream event response
        eventStream.blockingForEach(
                event -> {
                    if (event.finalResponse()) {
                        System.out.println(event.stringifyContent());
                    }
                });
我们之所以在最后要装配一个Runner,就是为了便于用户直接执行配置好的Agent。而怎么让用户拿到Runner呢?很简单,还记得我们前面设置为空的AiAgentRegisterVO吗?现在就有用了,我们将整个大的项目信息以及执行器runner都注册到Bean中。这样用户只需要去IOC容器中拿出这个Bean即可直接使用。
@Getter
@AllArgsConstructor
@NoArgsConstructor
@Builder
public class AiAgentRegisterVO {

    /**
     * 智能体ID
     */
    private String agentId;
    /**
     * 智能体名称
     */
    private String appName;
    /**
     * 智能体名称
     */
    private String agentName;
    /**
     * 智能体描述
     */
    private String agentDesc;
    /**
     * 智能体执行对象
     */
    private InMemoryRunner runner;

}
/**
 * @author 印东升
 * @description 执行节点
 * @create 2026-08-31 18:19
 */
@Slf4j
@Service("loopAgentNode")
public class RunnerNode extends AbstractArmorySupport {


    @Override
    protected AiAgentRegisterVO doApply(ArmoryCommandEntity requestParameter, DefaultArmoryFactory.DynamicContext dynamicContext) throws Exception {
        log.info("Ai Agent 装配操作 - RunnerNode");

        AiAgentConfigTableVO aiAgentConfigTableVO = requestParameter.getAiAgentConfigTableVO();
        String appName = aiAgentConfigTableVO.getAppName();

        AiAgentConfigTableVO.Agent agent = aiAgentConfigTableVO.getAgent();
        String agentId = agent.getAgentId();
        String agentName = agent.getAgentName();
        String agentDesc = agent.getAgentDesc();

        //获取上下文对象
        SequentialAgent sequentialAgent = dynamicContext.getSequentialAgent();

        InMemoryRunner runner = new InMemoryRunner(sequentialAgent, appName);
        AiAgentRegisterVO aiAgentRegisterVO = AiAgentRegisterVO.builder()
                .agentId(agentId)
                .appName(appName)
                .agentName(agentName)
                .agentDesc(agentDesc)
                .runner(runner)
                .build();

        //注册到容器
        registerBean(agentId,AiAgentRegisterVO.class,aiAgentRegisterVO);

        return aiAgentRegisterVO;
    }

    @Override
    public StrategyHandler<ArmoryCommandEntity, DefaultArmoryFactory.DynamicContext, AiAgentRegisterVO> get(ArmoryCommandEntity requestParameter, DefaultArmoryFactory.DynamicContext dynamicContext) throws Exception {
        return defaultStrategyHandler;
    }
}
三、测试基础版装配流程
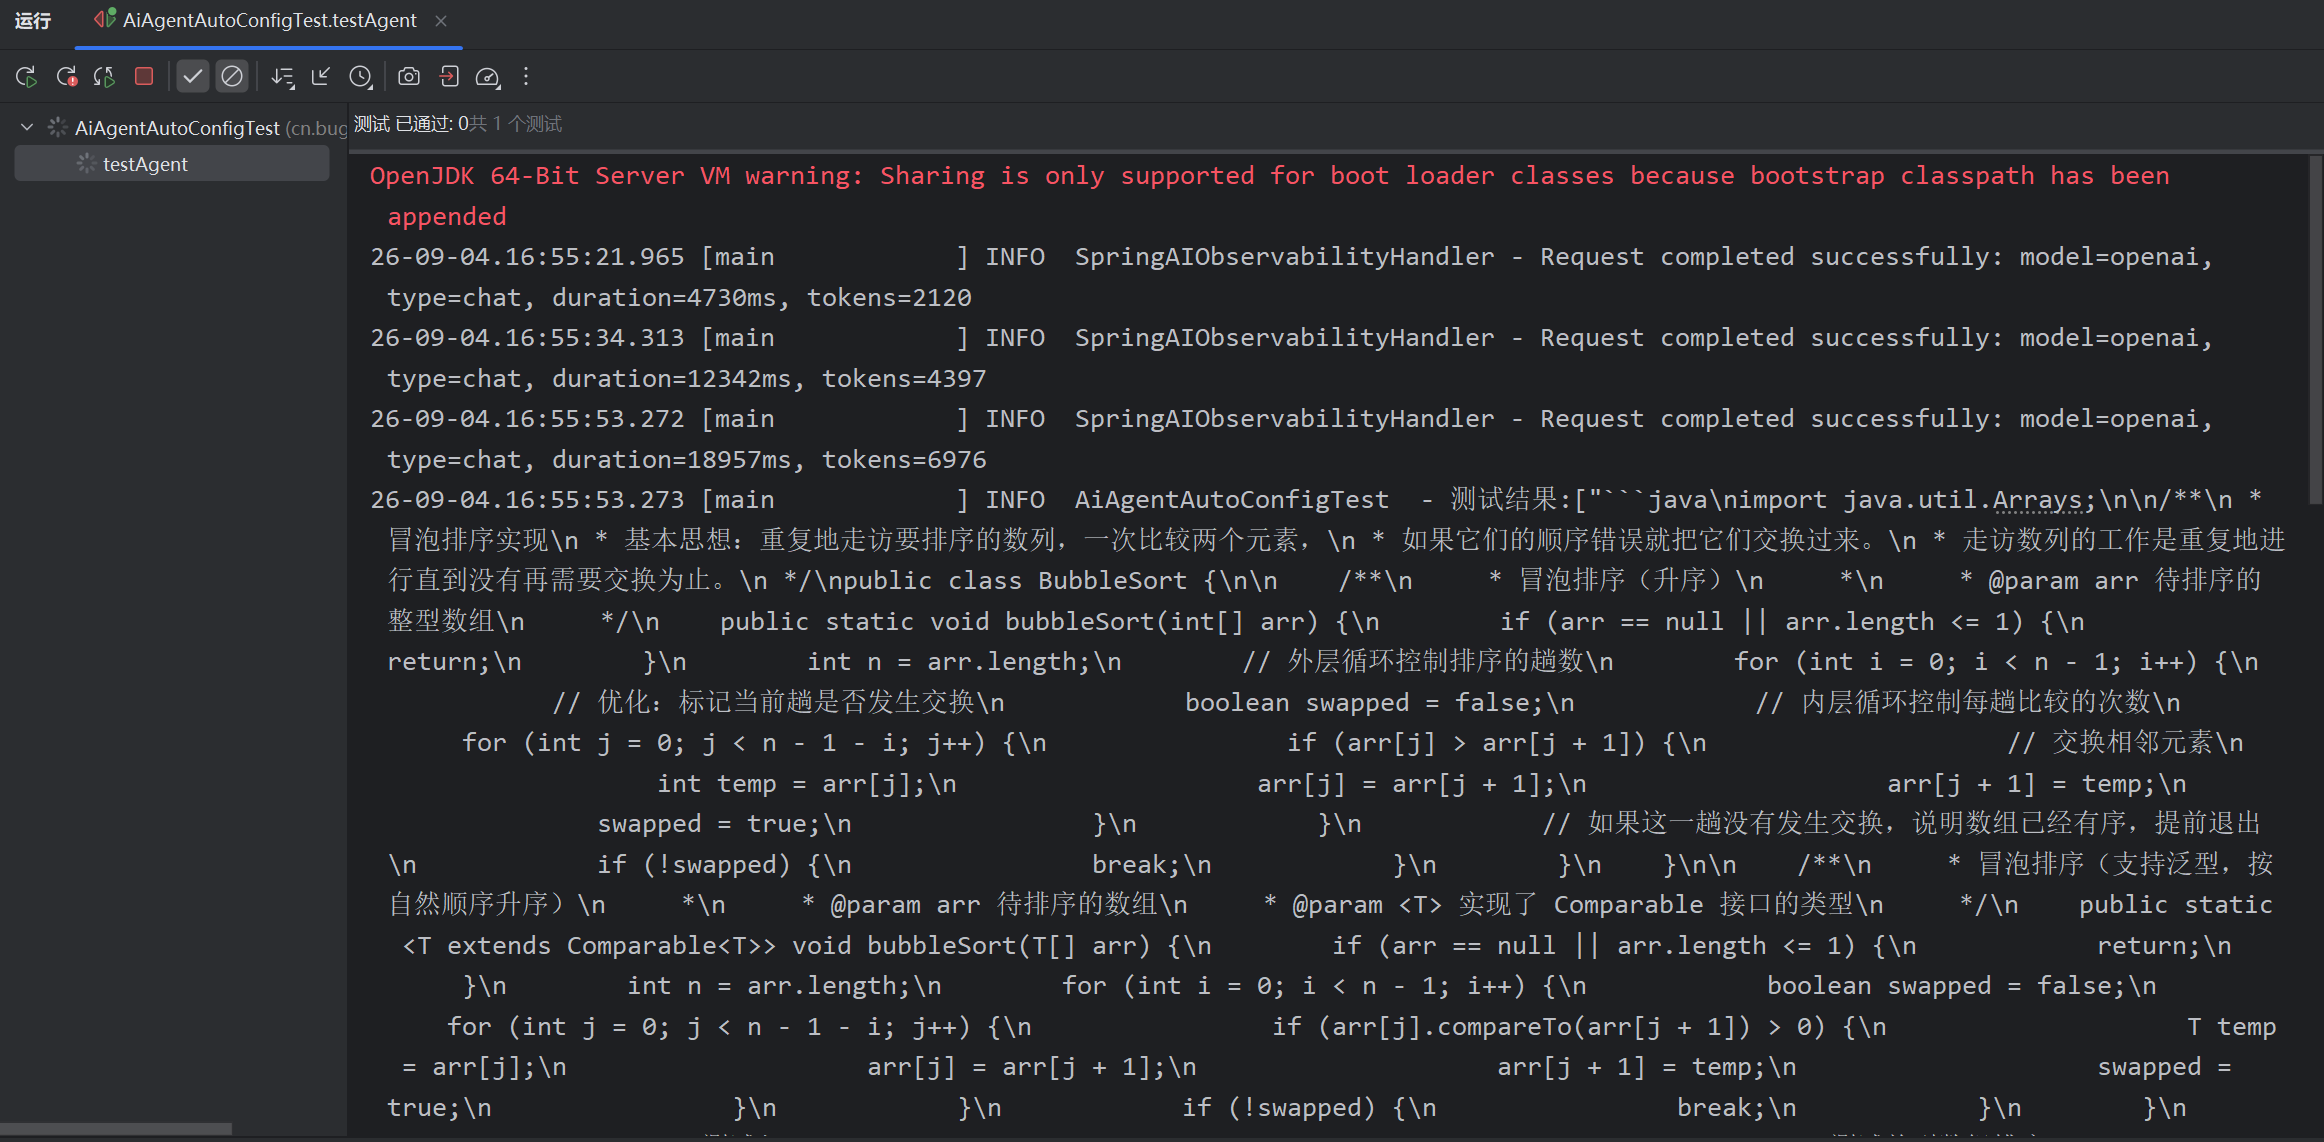
让Agent写一个冒泡排序出来:
@Slf4j
@RunWith(SpringRunner.class)
@SpringBootTest
public class AiAgentAutoConfigTest {

    @Resource
    private ApplicationContext applicationContext;

    @Test
    public void testAgent() throws InterruptedException {
        AiAgentRegisterVO aiAgentRegisterVO = applicationContext.getBean("100001", AiAgentRegisterVO.class);

        String appName = aiAgentRegisterVO.getAppName();
        InMemoryRunner runner = aiAgentRegisterVO.getRunner();

        Session session = runner.sessionService()
                .createSession(appName, "yds")
                .blockingGet();


        Content userMsg = Content.fromParts(Part.fromText("编写一个冒泡排序"));
        Flowable<Event> events = runner.runAsync("yds", session.id(), userMsg);
        List<String> outputs = new ArrayList<>();
        events.blockingForEach(event -> outputs.add(event.stringifyContent()));

        log.info("测试结果:{}", JSON.toJSONString(outputs));

        new CountDownLatch(1).await();

    }
}

Agent 垂直技术社区,欢迎活跃、内容共建。
更多推荐

 21
21 0
0- 0


 已为社区贡献4条内容

所有评论(0)