在ubuntu虚拟机上搭建LAMP架构的PHP+Python双端口web网站服务器
1.安装Apache2
1.1切换到root权限
su root1.2修改apt-get源为国内镜像源
# 备份
cp /etc/apt/sources.list /etc/apt/sources.list.bak
sudo vim /etc/apt/sources.list
替换其中内容为:
# Ubuntu sources have moved to /etc/apt/sources.list.d/ubuntu.sources
deb http://mirrors.aliyun.com/ubuntu/ bionic main restricted universe multiverse
deb http://mirrors.aliyun.com/ubuntu/ bionic-security main restricted universe multiverse
deb http://mirrors.aliyun.com/ubuntu/ bionic-updates main restricted universe multiverse
deb http://mirrors.aliyun.com/ubuntu/ bionic-proposed main restricted universe multiverse
deb http://mirrors.aliyun.com/ubuntu/ bionic-backports main restricted universe multiverse
deb-src http://mirrors.aliyun.com/ubuntu/ bionic main restricted universe multiverse
deb-src http://mirrors.aliyun.com/ubuntu/ bionic-security main restricted universe multiverse
deb-src http://mirrors.aliyun.com/ubuntu/ bionic-updates main restricted universe multiverse
deb-src http://mirrors.aliyun.com/ubuntu/ bionic-proposed main restricted universe multiverse
deb-src http://mirrors.aliyun.com/ubuntu/ bionic-backports main restricted universe multiverse
1.3更新系统包
apt update && apt upgrade -y1.4下载Apache2
apt-get install apache21.5安装网络工具查看自己的ip
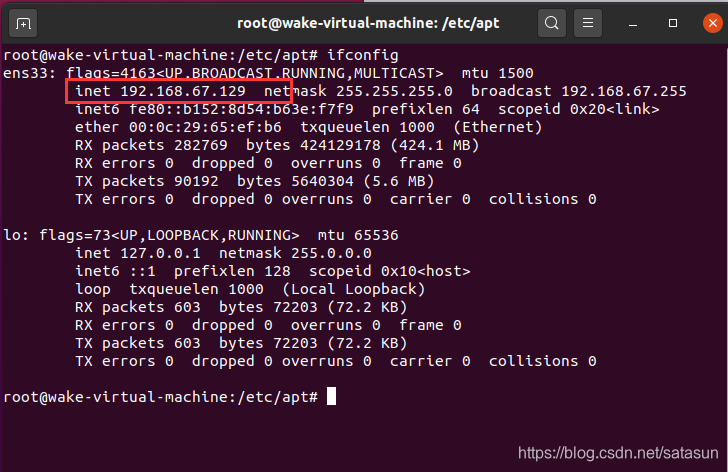
apt-get install net-tools可以在terminal下输入ifconfig查看自己的ip
1.6修复改Apache2默认开放的80端口(80端口被别的应用占用时)
1.6.1进入Apache2配置目录
cd /etc/apache21.6.2修改ports.conf文件
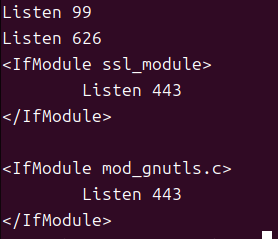
vim ports.conf我这里将80端口修改为99端口作为PHP页面,并新增626端口作为python页面
1.6.3修改sites-available文件夹下的000-default.conf文件
cd /etc/apache2/sites-available
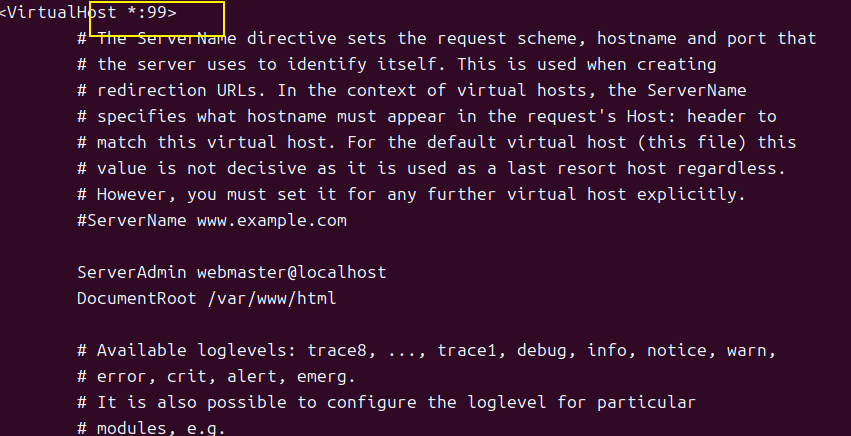
vim 000-default.conf
修改对应端口号
1.7防火墙开放99端口和626端口
1.7.1如果你发现UFW未启用,则需要启用防火墙。使用以下命令可以启用UFW:
ufw enable1.7.2可以通过执行以下命令来验证UFW的状态:
ufw status1.7.3放行99端口和626端口
ufw allow 99/tcpufw allow 626/tcp1.7.4如果你需要删除之前添加的开放端口规则,可以使用以下命令
sudo ufw delete allow <端口号>/tcp1.8虚拟机端口代理,以拱局域网其他电脑访问
1.8.1在虚拟机左上角点击编辑——>虚拟网络编辑器
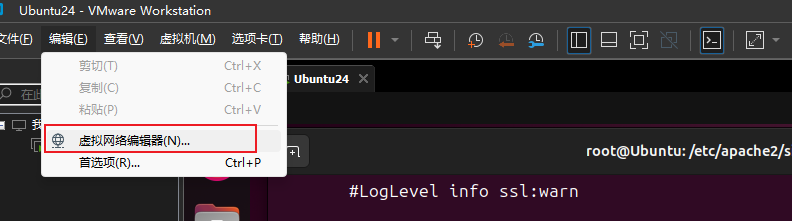
1.8.2点击更改设置
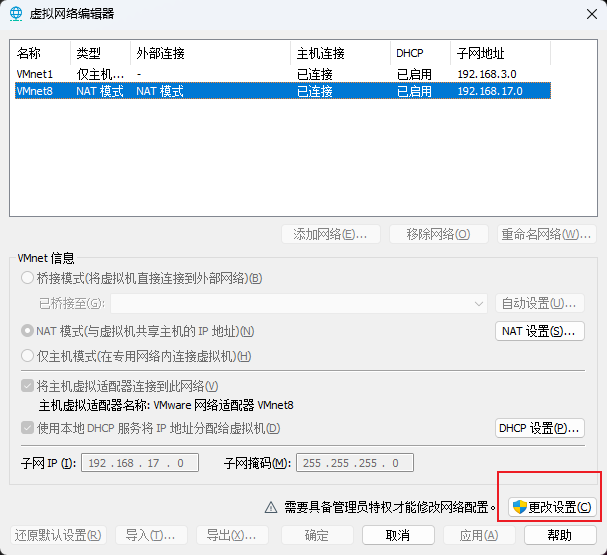
1.8.3选择VMnet8——>NAT设置
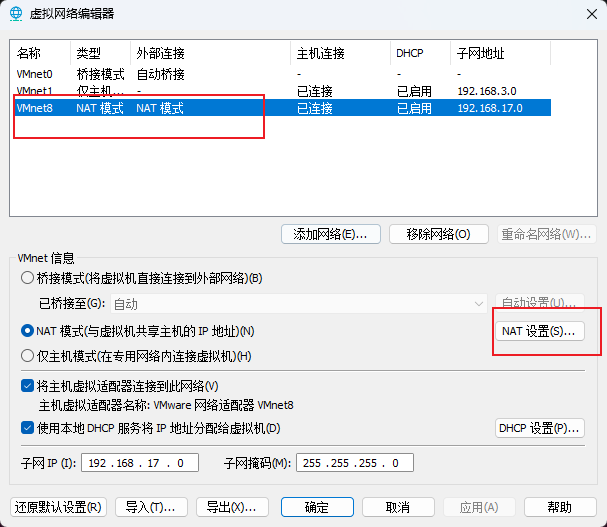
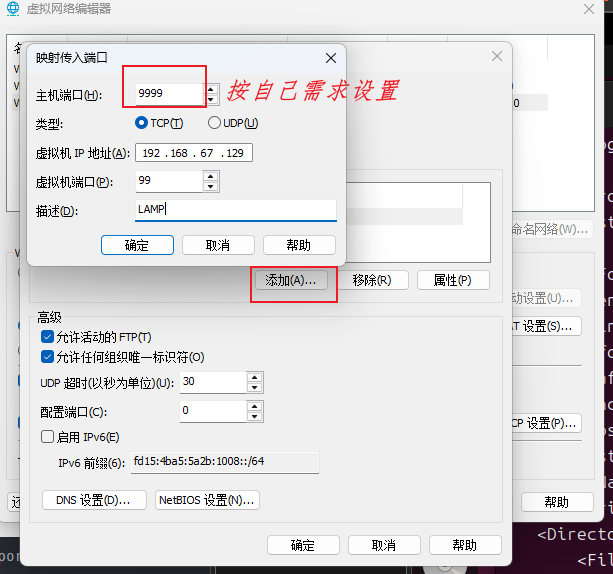
1.8.4点击添加,输入要映射的端口
1.8.5开放宿主机端口防火墙
1.8.5.1window系统在左下角搜索打开防火墙设置
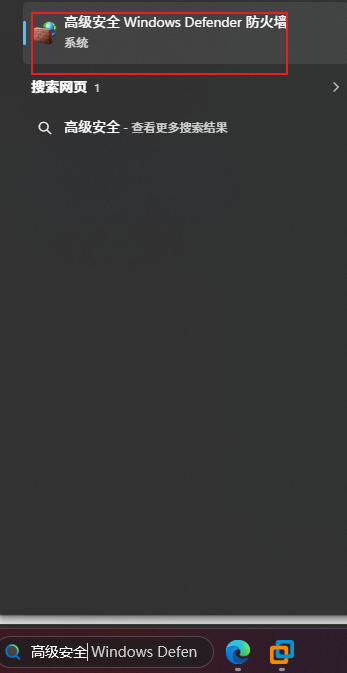
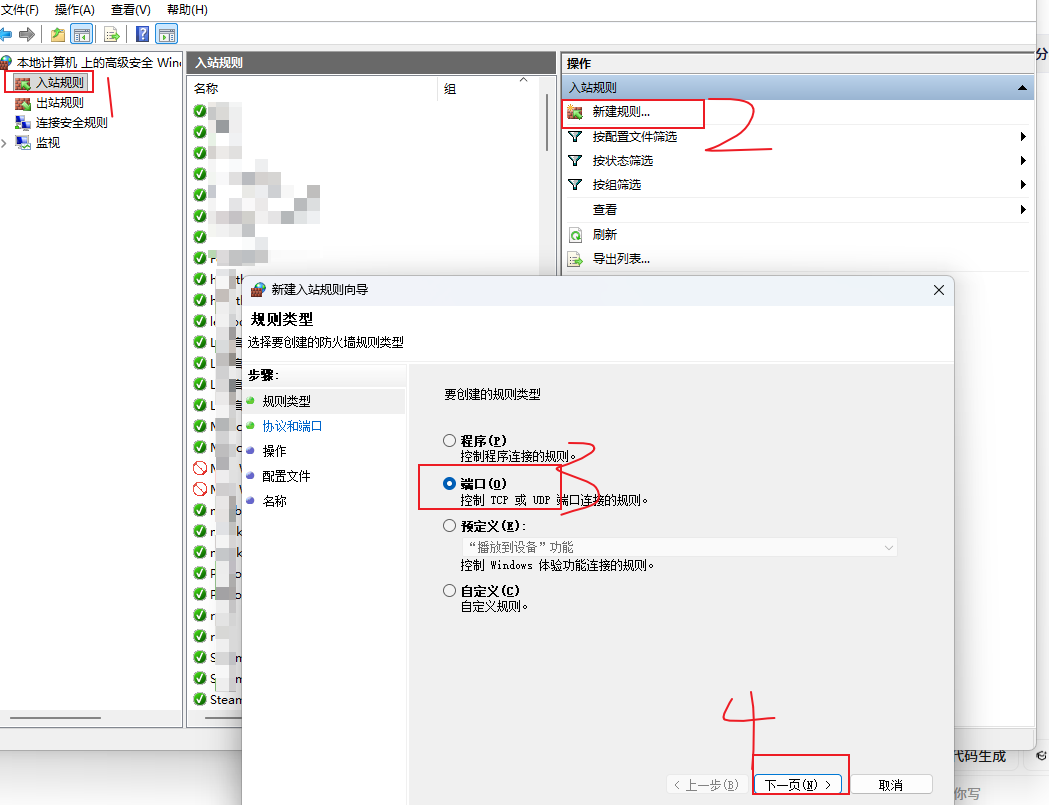
1.8.5.2依次点击入站规则——>新建规则——>端口——>下一页
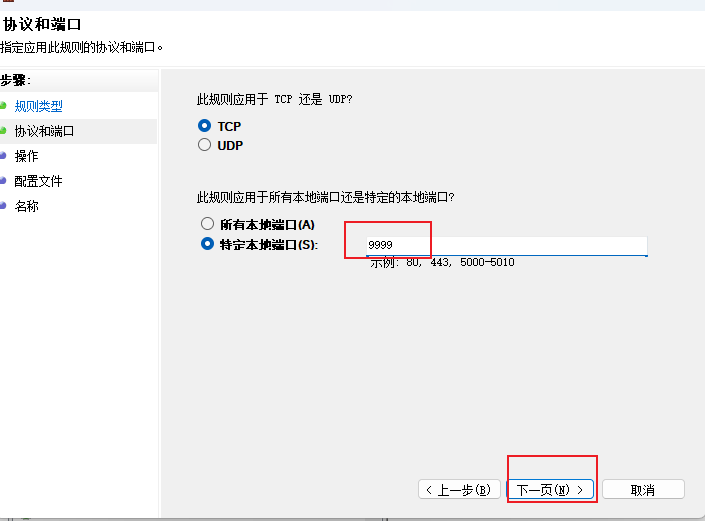
1.8.5.2输入步骤1.8.4中设置的端口号9999
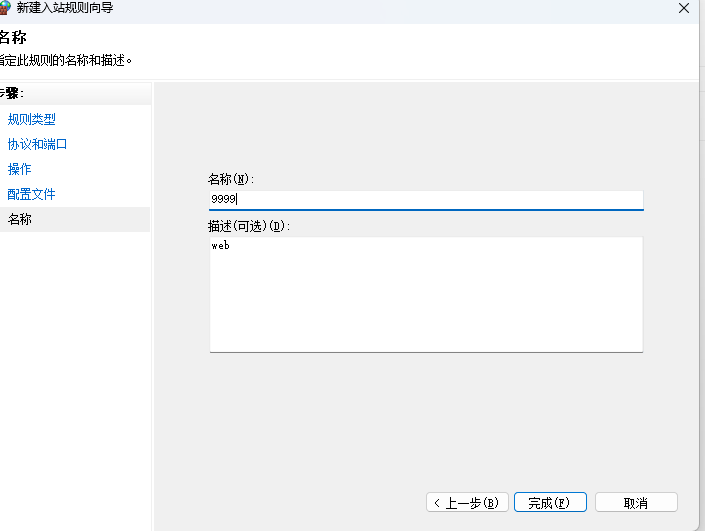
1.8.5.3然后一直下一步即可,最后点击完成,同理626端口也想要如此开放。
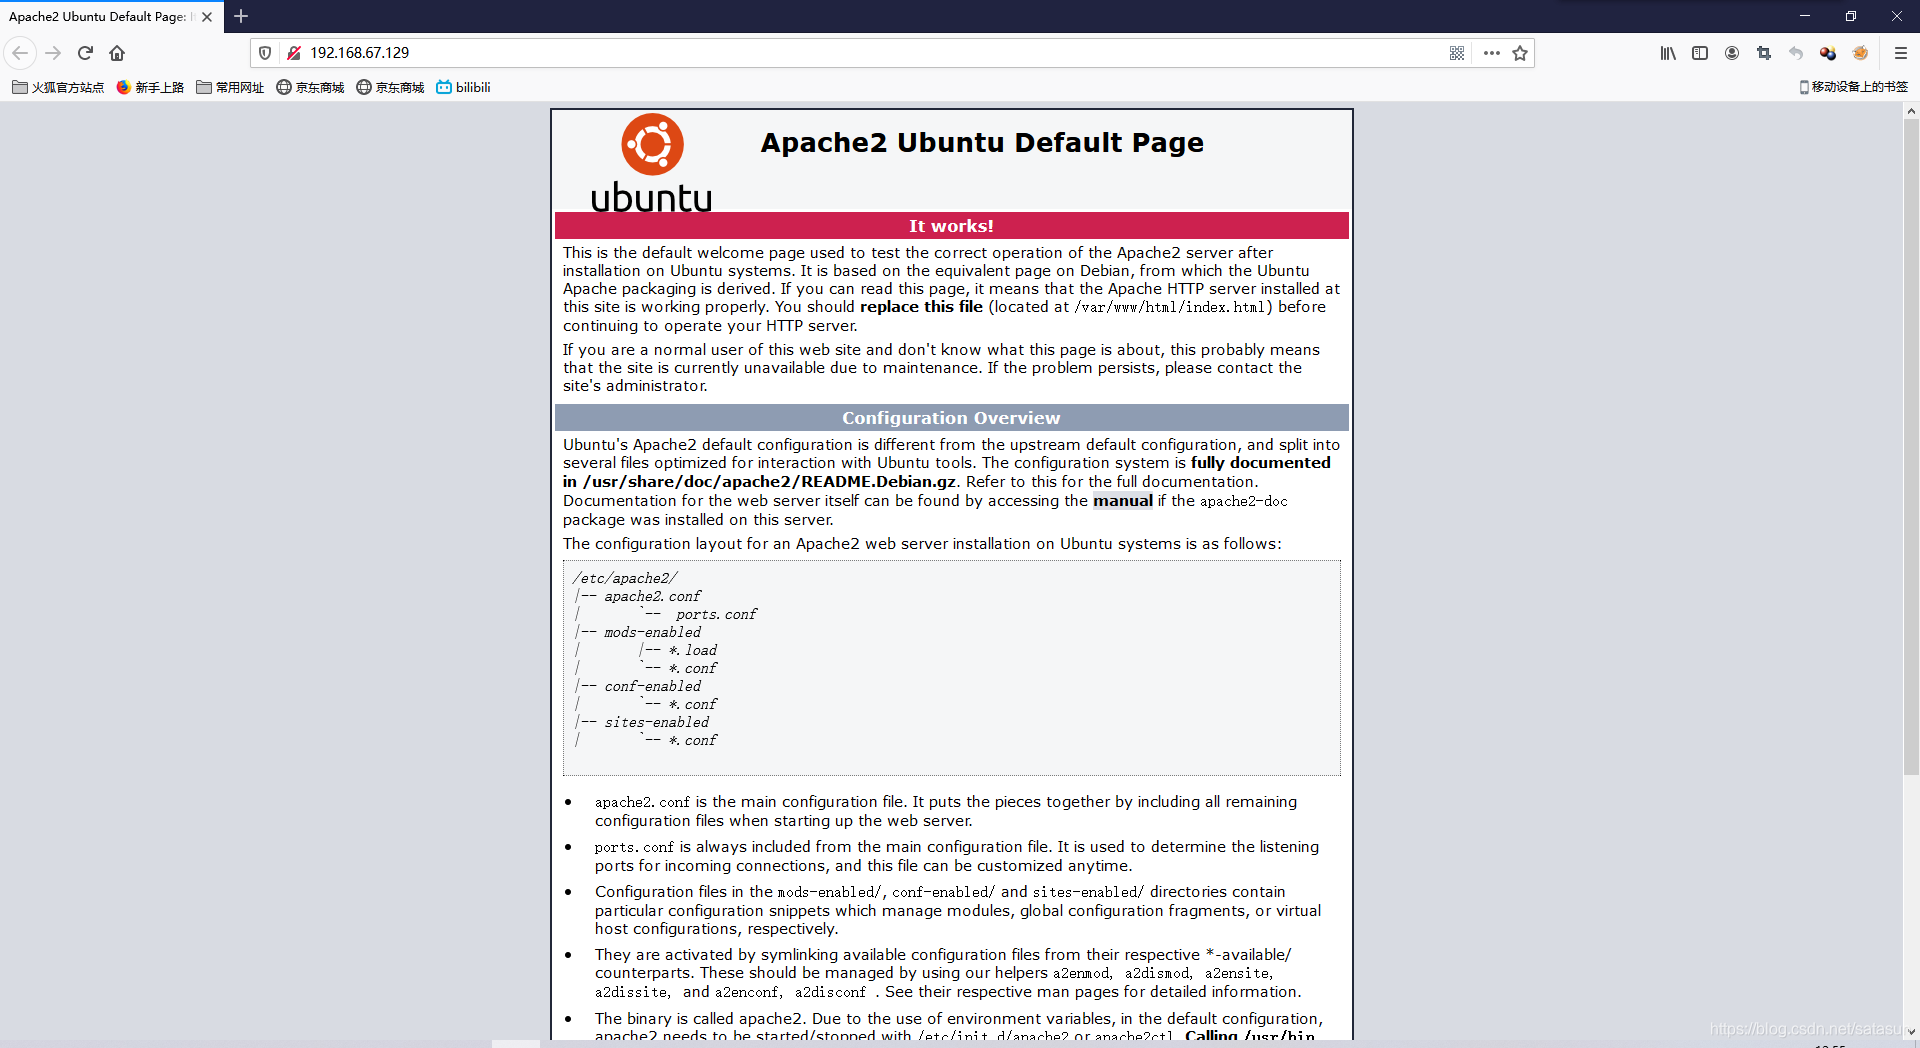
1.9现在可以在宿主机或者局域网其他电脑使用虚拟机IP地址+端口号来访问你的网站(例如:http://虚拟机IP:99 或者 http://宿主机IP:9999)
2安装MySQL数据库
2.1执行命令:
apt-get install mysql-server

apt-get install mysql-client

apt-get install libmysqlclient-dev
2.2检查是否安装成功:
sudo netstat -tap | grep mysql
2.3然后登陆MySQL看看:
mysql -u root -p 回车 输入密码(初始密码是root)然后就进入了MySQL:
可以使用show databases;查看当前已经存在的数据库:
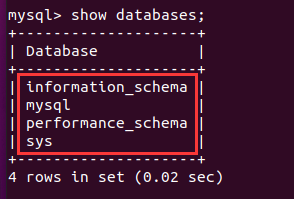
输入exit退出
2.4添加自己的数据库
# 登录MySQL
mysql -u root -p
# 输入密码后执行以下SQL语句
create database test_db; # 创建数据库test_db
use test_db; # 切换到test_db数据库
# 创建用户表users
CREATE TABLE users (
id INT AUTO_INCREMENT PRIMARY KEY,
username VARCHAR(50) NOT NULL,
email VARCHAR(100) NOT NULL UNIQUE,
create_time DATETIME DEFAULT CURRENT_TIMESTAMP
);
# 插入2条示例数据
INSERT INTO users (username, email) VALUES
('zhangsan', 'zhangsan@example.com'),
('lisi', 'lisi@example.com');
# 退出MySQL
exit;
3安装PHP
sudo apt-get install software-properties-common

sudo add-apt-repository ppa:ondrej/php && sudo apt-get update

sudo apt-get -y install php7.2
3.1安装常用扩展
sudo apt-get -y install php7.2-fpm php7.2-mysql php7.2-curl php7.2-json php7.2-mbstring php7.2-xml php7.2-intl php7.2-odbc php7.2-cgi
4.编辑PHP网站
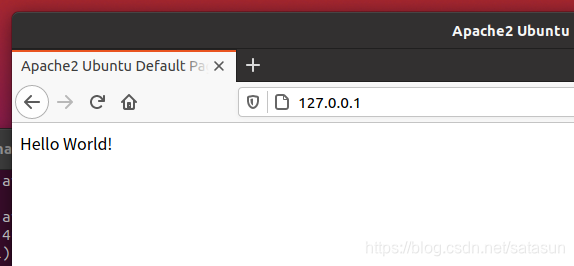
4.1输出一个简单的Hello World!
cd /var/www/html
ls    #列出当前目录下只有一个index.html文件
rm index.html    #删掉index.html
echo Hello World! > index.php
然后浏览器刷新一下/或者重新访问
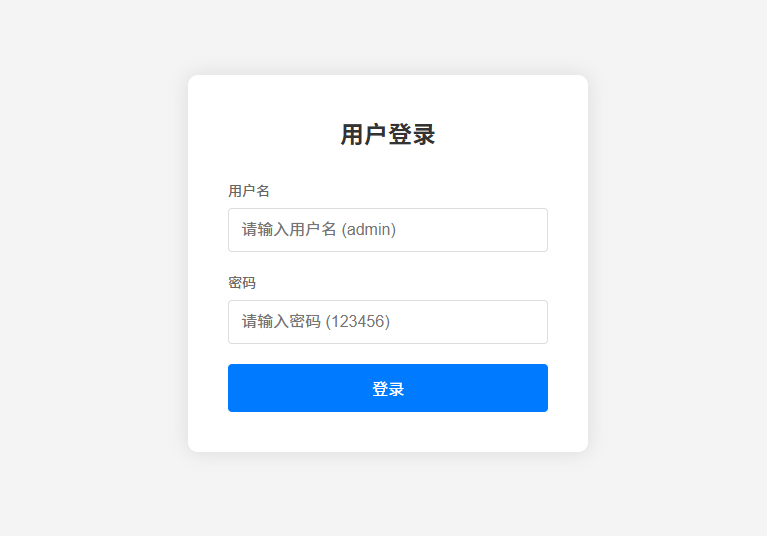
4.2征兆一个简单的登录页面
将index.php内容替换如下
<?php
// 开启 Session,用于保存登录状态
session_start();

// 模拟的用户数据库 (实际项目中请替换为 MySQL 等数据库查询)
$users = [
    'admin' => password_hash('123456', PASSWORD_DEFAULT), // 用户名: admin, 密码: 123456
    'test' => password_hash('password', PASSWORD_DEFAULT)  // 用户名: test, 密码: password
];

// 错误信息变量
$error = '';
$success = '';

// 处理表单提交
if ($_SERVER["REQUEST_METHOD"] == "POST") {
    // 获取并清理输入数据
    $username = isset($_POST['username']) ? trim($_POST['username']) : '';
    $password = isset($_POST['password']) ? $_POST['password'] : '';

    // 简单的服务端验证
    if (empty($username) || empty($password)) {
        $error = "用户名和密码不能为空!";
    } else {
        // 检查用户是否存在
        if (array_key_exists($username, $users)) {
            // 验证密码 (password_verify 用于验证哈希密码)
            if (password_verify($password, $users[$username])) {
                // 登录成功
                $_SESSION['is_logged_in'] = true;
                $_SESSION['username'] = $username;

                // 重定向到受保护的页面或刷新页面显示登录状态
                // 这里为了演示,我们直接刷新页面
                header("Location: " . $_SERVER['PHP_SELF']);
                exit;
            } else {
                $error = "密码错误!";
            }
        } else {
            $error = "用户名不存在!";
        }
    }
}

// 处理注销逻辑
if (isset($_GET['action']) && $_GET['action'] == 'logout') {
    session_destroy();
    header("Location: " . $_SERVER['PHP_SELF']);
    exit;
}

// 如果已经登录,显示欢迎界面
if (isset($_SESSION['is_logged_in']) && $_SESSION['is_logged_in'] === true) {
    $current_user = htmlspecialchars($_SESSION['username']); // 防止 XSS
    echo <<<HTML
    <!DOCTYPE html>
    <html lang="zh-CN">
    <head>
        <meta charset="UTF-8">
        <title>用户中心</title>
        <style>
            body { font-family: sans-serif; display: flex; justify-content: center; align-items: center; height: 100vh; background-color: #f0f2f5; }
            .card { background: white; padding: 2rem; border-radius: 8px; box-shadow: 0 4px 6px rgba(0,0,0,0.1); text-align: center; }
            h1 { color: #333; }
            .btn { display: inline-block; padding: 10px 20px; background: #dc3545; color: white; text-decoration: none; border-radius: 4px; margin-top: 20px; }
            .btn:hover { background: #c82333; }
        </style>
    </head>
    <body>
        <div class="card">
            <h1>欢迎回来, {$current_user}!</h1>
            <p>您已成功登录系统。</p>
            <a href="?action=logout" class="btn">退出登录</a>
        </div>
    </body>
    </html>
HTML;
    exit; // 结束脚本,不显示登录表单
}
?>

<!DOCTYPE html>
<html lang="zh-CN">
<head>
    <meta charset="UTF-8">
    <meta name="viewport" content="width=device-width, initial-scale=1.0">
    <title>系统登录</title>
    <style>
        /* 基础重置 */
        * { box-sizing: border-box; margin: 0; padding: 0; }
        body { font-family: 'Segoe UI', Tahoma, Geneva, Verdana, sans-serif; background-color: #f4f4f4; display: flex; justify-content: center; align-items: center; height: 100vh; }

        /* 登录卡片样式 */
        .login-container { background-color: #fff; padding: 40px; border-radius: 10px; box-shadow: 0 0 20px rgba(0, 0, 0, 0.1); width: 100%; max-width: 400px; }
        .login-header { text-align: center; margin-bottom: 30px; }
        .login-header h2 { color: #333; font-weight: 600; }

        /* 表单样式 */
        .form-group { margin-bottom: 20px; }
        .form-group label { display: block; margin-bottom: 8px; color: #666; font-size: 14px; }
        .form-group input { width: 100%; padding: 12px; border: 1px solid #ddd; border-radius: 4px; font-size: 16px; transition: border-color 0.3s; }
        .form-group input:focus { border-color: #007bff; outline: none; }

        /* 按钮样式 */
        .btn-submit { width: 100%; padding: 12px; background-color: #007bff; color: white; border: none; border-radius: 4px; font-size: 16px; cursor: pointer; transition: background-color 0.3s; }
        .btn-submit:hover { background-color: #0056b3; }

        /* 错误提示样式 */
        .alert { padding: 10px; background-color: #f8d7da; color: #721c24; border: 1px solid #f5c6cb; border-radius: 4px; margin-bottom: 20px; font-size: 14px; text-align: center; }
    </style>
</head>
<body>

    <div class="login-container">
        <div class="login-header">
            <h2>用户登录</h2>
        </div>

        <!-- 显示错误信息 -->
        <?php if ($error): ?>
            <div class="alert"><?php echo htmlspecialchars($error); ?></div>
        <?php endif; ?>

        <form action="<?php echo htmlspecialchars($_SERVER['PHP_SELF']); ?>" method="post">
            <div class="form-group">
                <label for="username">用户名</label>
                <input type="text" id="username" name="username" placeholder="请输入用户名 (admin)" required>
            </div>

            <div class="form-group">
                <label for="password">密码</label>
                <input type="password" id="password" name="password" placeholder="请输入密码 (123456)" required>
            </div>

            <button type="submit" class="btn-submit">登录</button>
        </form>
    </div>

</body>
</html>
5新增python端口页面
5.1安装python
# 更新系统包
apt update
# 安装Python编译依赖
apt install -y build-essential zlib1g-dev libncurses5-dev libgdbm-dev libnss3-dev libssl-dev libreadline-dev libffi-dev wget
本文安装 Python 3.13.0(最新稳定版),用altinstall避免覆盖系统默认 Python:
# 进入源码目录
cd /usr/src
# 下载Python源码
wget https://www.python.org/ftp/python/3.13.0/Python-3.13.0.tgz
# 解压源码
tar xzf Python-3.13.0.tgz
# 进入解压目录并配置
cd Python-3.13.0
./configure --enable-optimizations # --enable-optimizations启用性能优化
# 编译并安装(用altinstall避免覆盖系统Python)
make -j $(nproc)
make altinstall
5.2验证并安装web库
# 查看Python版本(显示Python 3.13.0即成功)
python3.13 --version
# 安装MySQL连接库(让Python能操作MySQL)pip3.13 install mysql-connector-python flask
5.3创建目录存放项目文件,并编写 Flask 应用:
# 创建项目目录
mkdir -p /var/www/python-apps/db_viewer
cd /var/www/python-apps/db_viewer
# 编写app.py(用vim编辑)
vim app.py
在app.py中输入以下代码(功能:连接 MySQL,查询 users 表数据,生成 HTML 表格):
from flask import Flask
import mysql.connector

app = Flask(__name__)

# MySQL 连接
def get_db_connection():
    connection = mysql.connector.connect(
        host='localhost',
        user='root',
        password='root',
        database='test_db'
    )
    return connection

# 首页展示数据库数据
@app.route('/')
def index():
    try:
        conn = get_db_connection()
        cursor = conn.cursor(dictionary=True)
        cursor.execute('SELECT * FROM users')
        users = cursor.fetchall()
        cursor.close()
        conn.close()
    except Exception as e:
        return f"数据库错误:{str(e)}"

    # 拼接正确 HTML
    html = '''
    <!DOCTYPE html>
    <html lang="zh-CN">
    <head>
        <meta charset="UTF-8">
        <title>用户数据查看器</title>
        <style>
            table {border-collapse: collapse; width: 80%; margin: 20px auto;}
            th, td {border: 1px solid #333; padding: 8px; text-align: center;}
            th {background-color: #f2f2f2;}
        </style>
    </head>
    <body>
        <h2 style="text-align:center">用户数据查看器</h2>
        <table>
            <tr>
                <th>ID</th>
                <th>用户名</th>
                <th>邮箱</th>
                <th>创建时间</th>
            </tr>
    '''

    # 循环输出用户数据
    for user in users:
        html += f'''
            <tr>
                <td>{user['id']}</td>
                <td>{user['username']}</td>
                <td>{user['email']}</td>
                <td>{user['create_time']}</td>
            </tr>
        '''

    html += '''
        </table>
    </body>
    </html>
    '''
return html5.4置 Apache 支持 WSGI
5.4.1安装
apt install libapache2-mod-wsgi-py3 -y5.4.2编写 WSGI 入口文件(db_viewer.wsgi)
vim /var/www/python-apps/db_viewer/db_viewer.wsgi输入以下内容:
import sys
sys.path.insert(0, '/var/www/python-apps/db_viewer')
from app import app as application
5.5配置app.py和db_viewer.wsgi文件的权限
sudo chown -R www-data:www-data /var/www/python-apps/db_viewer
sudo chmod -R 755 /var/www/python-apps/db_viewer
5.6将mysql-connector-python和flask库安装到/var/www/python-apps/db_viewer目录下
pip3.13 install mysql-connector-python -t /var/www/python-apps/db_viewerpip3.13 install flask -t /var/www/python-apps/db_viewer5.7cd进入/etc/apache2/sites-available目录在000-default.conf文件中添加port口
vim /etc/apache2/sites-available/000-default.conf修改如下(192.168.67.129为你自己的IP地址):
<VirtualHost *:99>
# The ServerName directive sets the request scheme, hostname and port that
# the server uses to identify itself. This is used when creating
# redirection URLs. In the context of virtual hosts, the ServerName
# specifies what hostname must appear in the request's Host: header to
# match this virtual host. For the default virtual host (this file) this
# value is not decisive as it is used as a last resort host regardless.
# However, you must set it for any further virtual host explicitly.
#ServerName www.example.comServerAdmin webmaster@localhost
DocumentRoot /var/www/html# Available loglevels: trace8, ..., trace1, debug, info, notice, warn,
# error, crit, alert, emerg.
# It is also possible to configure the loglevel for particular
# modules, e.g.
#LogLevel info ssl:warnErrorLog ${APACHE_LOG_DIR}/error.log
CustomLog ${APACHE_LOG_DIR}/access.log combined# For most configuration files from conf-available/, which are
# enabled or disabled at a global level, it is possible to
# include a line for only one particular virtual host. For example the
# following line enables the CGI configuration for this host only
# after it has been globally disabled with "a2disconf".
#Include conf-available/serve-cgi-bin.conf
</VirtualHost><VirtualHost *:626>
ServerName 192.168.67.129
WSGIScriptAlias / /var/www/python-apps/db_viewer/db_viewer.wsgi
<Directory /var/www/python-apps/db_viewer>
<Files db_viewer.wsgi>
Require all granted
</Files>
</Directory>
ErrorLog ${APACHE_LOG_DIR}/db_viewer_error.log
CustomLog ${APACHE_LOG_DIR}/db_viewer_access.log combined
</VirtualHost>
5.8修改数据库登录方式
- 默认 MySQL 用 auth_socket 认证,只能服务器本地登录
- 我们把它改成 密码登录
mysql
USE mysql;
ALTER USER 'root'@'localhost' IDENTIFIED WITH mysql_native_password BY 'root';
FLUSH PRIVILEGES;
EXIT;
5.9重启服务,用IP地址+626端口访问新python网站
systemctl reload apache2systemctl restart apache2

Agent 垂直技术社区,欢迎活跃、内容共建。
更多推荐


 10
10 0
0- 0


 已为社区贡献1条内容

所有评论(0)