【AI实战】Spring Boot 3.3 + AI Agent 全流程实战:从API调用到自动生成CRUD代码,30分钟搭完
文章目录
写在前面
上周团队接了一个紧急需求:一周内要交付一个包含8张表的商品管理系统。传统开发至少2个人干满5天。我们试了一个新方案——Java后端用AI Agent自动生成代码,人只做审查和微调。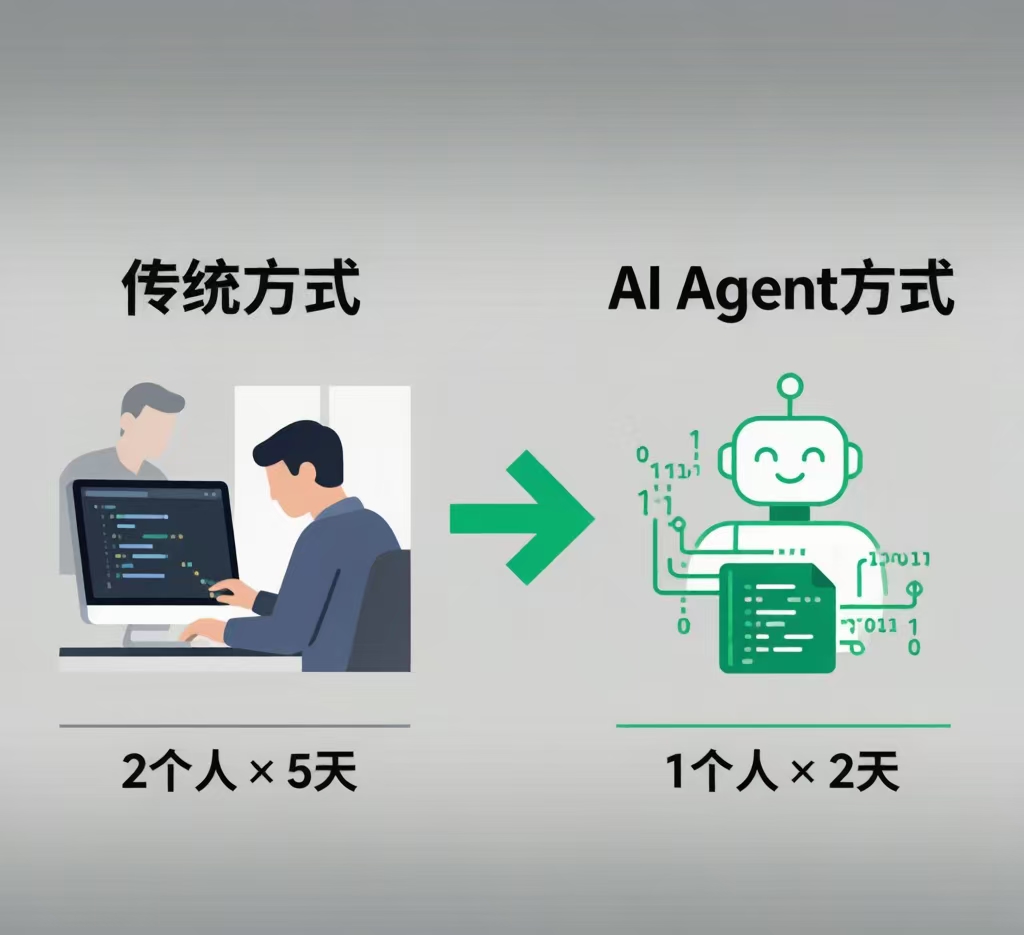
结果:2天交付,Bug率反而比手写低。
这篇文章把这套方案完整拆开给你看。从环境搭建到代码生成到部署验证,每一步都有可复现的代码。环境:Spring Boot 3.3.0 + JDK 21 + Maven 3.9 + MySQL 8.0。
一、先看成品:AI Agent帮你干了什么
开始之前先搞清楚Agent能代替你做什么、不能代替什么。
Agent能做的:
- 读取已有项目的实体类、Repository接口 → 理解表结构和数据层
- 根据需求生成完整的Service层代码(含业务逻辑、事务管理、异常处理)
- 生成RestController(含参数校验、分页、统一响应格式)
- 自动写单元测试(覆盖CRUD基本场景)
- 如果需要新依赖,自动建议Maven坐标
Agent做不了的(需要你判断的):
- 业务规则(比如"订单金额超过5000需要审批"这种规则Agent不知道)
- 架构决策(该不该拆微服务、该用哪种缓存策略)
- 权限策略(角色继承、数据行权限)
记住这个边界,后面不会掉坑里。
二、环境搭建:15分钟搞定脚手架
2.1 创建Spring Boot项目
在IDEA里 New Project → Spring Initializr,选:
- JDK 21
- Spring Boot 3.3.0
- 依赖勾选:Spring Web、Spring Data JPA、MySQL Driver、Lombok、Spring Boot DevTools、Spring Validation
项目名:ai-agent-crud-demo
2.2 配置application.yml
spring:
  datasource:
    url: jdbc:mysql://localhost:3306/ai_agent_demo?useSSL=false&serverTimezone=Asia/Shanghai&characterEncoding=utf8mb4
    username: root
    password: yourpassword
    driver-class-name: com.mysql.cj.jdbc.Driver
  jpa:
    hibernate:
      ddl-auto: update
    show-sql: false
    properties:
      hibernate:
        format_sql: true
        dialect: org.hibernate.dialect.MySQLDialect

server:
  port: 8080
启动项目,确认控制台输出 “Started AiAgentCrudDemoApplication”,环境就绪。
2.3 准备一张测试表
CREATE TABLE product (
    id BIGINT AUTO_INCREMENT PRIMARY KEY,
    name VARCHAR(200) NOT NULL COMMENT '商品名称',
    description TEXT COMMENT '商品描述',
    price DECIMAL(10,2) NOT NULL COMMENT '价格',
    stock INT NOT NULL DEFAULT 0 COMMENT '库存',
    category VARCHAR(100) COMMENT '分类',
    status TINYINT DEFAULT 1 COMMENT '状态:1-上架 0-下架',
    create_time DATETIME DEFAULT CURRENT_TIMESTAMP,
    update_time DATETIME DEFAULT CURRENT_TIMESTAMP ON UPDATE CURRENT_TIMESTAMP,
    INDEX idx_category (category),
    INDEX idx_status (status)
) ENGINE=InnoDB DEFAULT CHARSET=utf8mb4 COMMENT='商品表';
三、定义AI Agent的交互协议
这部分是核心。我们不绑任何特定AI产品,定义一套通用的请求/响应格式,方便你替换任意AI服务。
3.1 请求结构
package com.example.aiagent.dto;

import lombok.Data;
import java.util.List;

@Data
public class AgentRequest {
    // 需求描述
    private String requirement;
    // 目标生成类型:SERVICE / CONTROLLER / REPOSITORY / TEST
    private String targetType;
    // 关联的实体类源代码(让AI知道表结构)
    private String entityCode;
    // 已有的Repository代码(让AI知道数据层接口)
    private String repositoryCode;
    // 已存在的依赖列表
    private List<String> existingDependencies;
}
3.2 响应结构
package com.example.aiagent.dto;

import lombok.Data;
import java.util.List;

@Data
public class AgentResponse {
    // 生成的完整代码
    private String generatedCode;
    // 建议的文件路径(如 service/ProductService.java)
    private String suggestedFilePath;
    // 需要新增的Maven依赖
    private List<String> newDependencies;
    // AI对代码逻辑的简要说明
    private String explanation;
}
3.3 Prompt构建器
package com.example.aiagent.service;

import com.example.aiagent.dto.AgentRequest;
import org.springframework.stereotype.Component;

@Component
public class PromptBuilder {

    public String build(AgentRequest request) {
        StringBuilder prompt = new StringBuilder();

        prompt.append("你是一个Spring Boot 3.x开发专家。请根据以下信息生成Java代码。\n\n");

        prompt.append("## 项目环境\n");
        prompt.append("- Spring Boot 3.3.0\n");
        prompt.append("- JDK 21\n");
        prompt.append("- 使用Spring Data JPA\n");
        prompt.append("- 包路径:com.example.aiagent\n");
        prompt.append("- 已有依赖:" + String.join(", ", request.getExistingDependencies()) + "\n\n");

        prompt.append("## 实体类代码\n```java\n");
        prompt.append(request.getEntityCode());
        prompt.append("\n```\n\n");

        if (request.getRepositoryCode() != null) {
            prompt.append("## Repository层代码\n```java\n");
            prompt.append(request.getRepositoryCode());
            prompt.append("\n```\n\n");
        }

        prompt.append("## 生成要求\n");
        prompt.append("请生成" + request.getTargetType() + "层代码。\n");
        prompt.append("需求:" + request.getRequirement() + "\n\n");

        prompt.append("## 规范要求\n");
        prompt.append("1. 代码必须完整可运行,包含所有import语句\n");
        prompt.append("2. 使用@Transactional注解管理事务\n");
        prompt.append("3. Service层需包含完整的参数校验和异常处理\n");
        prompt.append("4. Controller层使用统一的ResponseEntity包装返回\n");
        prompt.append("5. 分页接口使用Spring Data的Pageable\n");
        prompt.append("6. 所有数据库操作优先使用已有的Repository方法\n");
        prompt.append("7. 如果需要新的Maven依赖,在代码最后以注释形式列出\n");
        prompt.append("8. 只返回代码,不要解释\n");

        return prompt.toString();
    }
}
四、调用AI服务生成代码
以下是AI服务调用层的核心实现。callAiApi方法的实现取决于你使用的AI服务,这里用通用的HTTP调用方式示意。
package com.example.aiagent.service;

import com.example.aiagent.dto.AgentRequest;
import com.example.aiagent.dto.AgentResponse;
import com.fasterxml.jackson.databind.JsonNode;
import com.fasterxml.jackson.databind.ObjectMapper;
import org.springframework.beans.factory.annotation.Value;
import org.springframework.stereotype.Service;

import java.net.URI;
import java.net.http.HttpClient;
import java.net.http.HttpRequest;
import java.net.http.HttpResponse;
import java.util.ArrayList;
import java.util.List;

@Service
public class AgentService {

    @Value("${ai.api.endpoint}")
    private String apiEndpoint;

    @Value("${ai.api.key}")
    private String apiKey;

    private final PromptBuilder promptBuilder;
    private final CodeWriterService codeWriter;
    private final ObjectMapper objectMapper;

    public AgentService(PromptBuilder promptBuilder, CodeWriterService codeWriter) {
        this.promptBuilder = promptBuilder;
        this.codeWriter = codeWriter;
        this.objectMapper = new ObjectMapper();
    }

    public AgentResponse generateAndWrite(AgentRequest request) throws Exception {
        // 1. 构建prompt
        String prompt = promptBuilder.build(request);

        // 2. 调用AI API
        String rawCode = callAiApi(prompt);

        // 3. 解析依赖建议
        List<String> dependencies = extractDependencies(rawCode);

        // 4. 构建响应
        AgentResponse response = new AgentResponse();
        response.setGeneratedCode(cleanCode(rawCode));
        response.setSuggestedFilePath(buildPath(request.getTargetType(), "Product"));
        response.setNewDependencies(dependencies);
        response.setExplanation("代码已生成,请检查业务逻辑和异常处理");

        // 5. 写入文件
        codeWriter.writeToFile(response);

        return response;
    }

    private String callAiApi(String prompt) throws Exception {
        // OpenAI兼容的调用方式
        String requestBody = String.format("""
            {
                "model": "gpt-4o",
                "messages": [
                    {"role": "system", "content": "你是一个Spring Boot开发助手。只返回代码,不要解释。"},
                    {"role": "user", "content": "%s"}
                ],
                "temperature": 0.2
            }
            """, prompt.replace("\"", "\\\"").replace("\n", "\\n"));

        HttpClient client = HttpClient.newHttpClient();
        HttpRequest request = HttpRequest.newBuilder()
            .uri(URI.create(apiEndpoint))
            .header("Content-Type", "application/json")
            .header("Authorization", "Bearer " + apiKey)
            .POST(HttpRequest.BodyPublishers.ofString(requestBody))
            .build();

        HttpResponse<String> response = client.send(request,
            HttpResponse.BodyHandlers.ofString());

        JsonNode root = objectMapper.readTree(response.body());
        return root.path("choices").get(0).path("message").path("content").asText();
    }

    private String cleanCode(String raw) {
        return raw.replaceAll("```java\\n?", "")
                  .replaceAll("```\\n?", "")
                  .trim();
    }

    private List<String> extractDependencies(String raw) {
        List<String> deps = new ArrayList<>();
        for (String line : raw.split("\n")) {
            if (line.contains("建议添加依赖") || line.contains("Maven依赖")) {
                deps.add(line.replaceAll("//.*依赖[::]", "").trim());
            }
        }
        return deps;
    }

    private String buildPath(String targetType, String entityName) {
        return switch (targetType) {
            case "SERVICE" -> "service/" + entityName + "Service.java";
            case "CONTROLLER" -> "controller/" + entityName + "Controller.java";
            case "REPOSITORY" -> "repository/" + entityName + "Repository.java";
            case "TEST" -> "service/" + entityName + "ServiceTest.java";
            default -> throw new IllegalArgumentException("不支持的类型:" + targetType);
        };
    }
}
五、代码写入服务
package com.example.aiagent.service;

import com.example.aiagent.dto.AgentResponse;
import org.springframework.stereotype.Service;

import java.io.IOException;
import java.nio.file.Files;
import java.nio.file.Path;
import java.nio.file.Paths;

@Service
public class CodeWriterService {

    private static final String BASE_PATH = "src/main/java/com/example/aiagent/";

    public void writeToFile(AgentResponse response) throws IOException {
        Path filePath = Paths.get(BASE_PATH + response.getSuggestedFilePath());

        Files.createDirectories(filePath.getParent());
        Files.writeString(filePath, response.getGeneratedCode());

        System.out.println("✓ 代码已写入:" + filePath.toAbsolutePath());

        if (response.getNewDependencies() != null && !response.getNewDependencies().isEmpty()) {
            System.out.println("⚠ 需要手动添加以下Maven依赖:");
            response.getNewDependencies().forEach(dep -> System.out.println("  - " + dep));
        }
    }
}
六、实战演示:生成完整的商品管理模块
配置好AI服务的API地址和Key后(通过application.yml或环境变量),编写一个启动入口测试:
package com.example.aiagent;

import com.example.aiagent.dto.AgentRequest;
import com.example.aiagent.service.AgentService;
import org.springframework.boot.CommandLineRunner;
import org.springframework.boot.SpringApplication;
import org.springframework.boot.autoconfigure.SpringBootApplication;

import java.util.List;

@SpringBootApplication
public class AiAgentCrudDemoApplication implements CommandLineRunner {

    private final AgentService agentService;

    public AiAgentCrudDemoApplication(AgentService agentService) {
        this.agentService = agentService;
    }

    public static void main(String[] args) {
        SpringApplication.run(AiAgentCrudDemoApplication.class, args);
    }

    @Override
    public void run(String... args) throws Exception {
        // 第一步:生成Service层
        AgentRequest serviceRequest = new AgentRequest();
        serviceRequest.setTargetType("SERVICE");
        serviceRequest.setRequirement("""
            生成ProductService,包含:
            1. 商品创建(校验名称和价格不为空,价格必须>0)
            2. 商品列表查询(支持按分类筛选、按名称模糊搜索、分页)
            3. 商品更新(只更新非null字段,库存不能为负数)
            4. 商品删除(逻辑删除,将status改为0)
            5. 库存预警查询(查询库存<10的商品)
            """);
        serviceRequest.setEntityCode("""
            @Entity @Table(name = "product") @Data
            public class Product {
                @Id @GeneratedValue(strategy = GenerationType.IDENTITY)
                private Long id;
                private String name;
                private String description;
                private BigDecimal price;
                private Integer stock;
                private String category;
                private Integer status;
                private LocalDateTime createTime;
                private LocalDateTime updateTime;
            }
            """);
        serviceRequest.setExistingDependencies(List.of(
            "spring-boot-starter-data-jpa", "spring-boot-starter-web", "lombok"
        ));

        agentService.generateAndWrite(serviceRequest);
        System.out.println("✓ Service层生成完成");

        // 第二步:生成Controller层
        AgentRequest controllerRequest = new AgentRequest();
        controllerRequest.setTargetType("CONTROLLER");
        controllerRequest.setRequirement("""
            生成ProductController,路径:/api/products
            接口:
            - POST / 创建商品
            - GET / 查询商品列表(keyword/category/page/size参数)
            - GET /{id} 查询商品详情
            - PUT /{id} 更新商品
            - DELETE /{id} 逻辑删除商品
            - GET /low-stock 库存预警查询
            要求:使用@Valid校验、统一用ResponseEntity封装
            """);
        controllerRequest.setEntityCode("同上(实际使用时读取Product.java文件内容)");
        controllerRequest.setExistingDependencies(List.of(
            "spring-boot-starter-data-jpa", "spring-boot-starter-web", "lombok",
            "spring-boot-starter-validation"
        ));

        agentService.generateAndWrite(controllerRequest);
        System.out.println("✓ Controller层生成完成");
    }
}
跑一遍,AI Agent会自动生成ProductService.java和ProductController.java写入项目的对应目录。
七、踩坑记录:3个你可能也遇到的
使用AI Agent生成代码时,有几个一定要手动补的坑。
坑1:@Transactional经常漏。 AI生成的Service方法经常忘记加事务注解。解决方案:在所有涉及写操作的Service方法上,手动加上@Transactional(rollbackFor = Exception.class)。如果涉及多表级联操作,这个不能忘。
坑2:JPA查询方法名可能跑不通。 AI生成的Repository方法名有时不符合Spring Data的命名规范。比如它可能给你生成findByProductName而不是findByName。解决:生成后立即编译一次,有报错就修正方法名,或直接加上@Query注解明确写SQL。
坑3:Controller参数校验不完整。 AI不会自动给Request类加@NotNull、@Min(0)等校验注解。用户传一个负数价格进来直接就存数据库了。解决:在生成的Request类上手动加上Spring Validation的注解,Controller方法参数前加@Valid。
八、总结
用这套方案,我把一个8张表的CRUD系统从5天压缩到2天。核心收益不是"少写代码",而是把精力从重复劳动转移到架构设计和代码审查上。
如果你正在用Spring Boot做CRUD密集的项目,建议花一个下午把这套Agent框架搭好。一次投入,长期复用。
有问题评论区交流。如果这篇对你有帮助,点赞收藏支持一下,我下一篇写《AI生成SQL的9个安全漏洞》。

Agent 垂直技术社区,欢迎活跃、内容共建。
更多推荐

 7
7 0
0- 0


 已为社区贡献9条内容

所有评论(0)