鸿蒙端侧语音识别与合成实战:从实时字幕到语音助手

前言
在 HarmonyOS NEXT 的智能生态中,语音是最自然的人机交互入口。与纯云端方案相比,端侧语音处理具备响应时延低、离线可用、隐私安全等显著优势——用户的语音数据无需离开设备,指令可以毫秒级执行。本文将围绕 speechRecognizer 语音识别 与 TextToSpeech 语音合成 两大核心能力,结合「实时字幕」与「语音助手」两个典型场景,深入剖析 API 调用链路、状态机管理、权限配置,以及性能调优的实战技巧。所有代码均基于 HarmonyOS NEXT / API 12+ 编写,可直接移植到项目中运行。
一、架构概览:端侧语音的两大支柱
HarmonyOS NEXT 提供了两套互补的端侧语音引擎:
Speech Recognizer(语音识别)负责将麦克风采集的音频流实时转换为文本。它支持两种模式:一是流式识别(streaming),边说边出文字,适合对话和字幕;二是一次性识别(once),等用户说完再返回完整文本,适合短指令。
**TextToSpeech(语音合成)**则反向工作:将文本字符串转换为自然语音输出,支持语速、语调、音量调节,可配合语音助手实现人机对话闭环。
两端之间,还有一条隐含的数据流:**VAD(Voice Activity Detection,语音活动检测)**负责判断用户何时开始说话、何时结束,这直接影响流式识别的用户体验。
┌──────────────┐     ┌──────────────────┐     ┌──────────────┐
│   麦克风采集  │ ──▶ │  speechRecognizer │ ──▶ │   识别结果   │
└──────────────┘     └──────────────────┘     └──────────────┘
                                                      │
                                                      ▼
┌──────────────┐     ┌──────────────────┐     ┌──────────────┐
│  合成音频播放 │ ◀── │   TextToSpeech   │ ◀── │   输入文本   │
└──────────────┘     └──────────────────┘     └──────────────┘
在实际应用中,识别结果往往会触发合成播报,形成完整的语音交互闭环——这就是「语音助手」的核心逻辑。接下来,我们逐一拆解每个环节。
二、权限配置:一切的开始
端侧语音能力涉及敏感硬件(麦克风)和系统能力(语音服务),必须在 module.json5 中声明对应权限,并在应用启动时动态申请。
2.1 在 module.json5 中声明权限
{
  "module": {
    "requestPermissions": [
      {
        "name": "ohos.permission.MICROPHONE",
        "reason": "$string:microphone_reason",
        "usedScene": {
          "abilities": ["EntryAbility"],
          "when": "always"
        }
      },
      {
        "name": "ohos.permission.INTERNET"
      }
    ]
  }
}
ohos.permission.MICROPHONE 是识别能力的硬性前提;ohos.permission.INTERNET 则用于某些需要联网语言模型增强识别的场景(如中文方言识别)。纯端侧模型通常不需要联网,这里按需配置。
2.2 动态权限申请
仅在配置文件中声明还不够,应用需要在 UIAbility 中显式请求麦克风权限:
import { abilityAccessCtrl, bundleManager } from '@kit.AbilityKit';
import { microphone } from '@kit.MediaKit';
import { BusinessError } from '@kit.BasicServicesKit';

export class EntryAbility extends UIAbility {
  private atManager: abilityAccessCtrl.AtManager = abilityAccessCtrl.createAtManager();

  async requestPermissions(): Promise<boolean> {
    let grantStatus = abilityAccessCtrl.GrantStatus.PERMISSION_GRANTED;

    // 检查是否已有权限
    let data = await this.atManager.checkAccessToken(
      this.context.abilityInfo!.accessTokenId,
      'ohos.permission.MICROPHONE'
    );

    if (data === grantStatus) {
      console.info('麦克风权限已授权');
      return true;
    }

    // 发起动态申请
    let permissions: Array<string> = ['ohos.permission.MICROPHONE'];
    try {
      const result = await this.atManager.requestPermissionsFromUser(
        this.context, permissions
      );
      return result.authResults.every(r => r === 0);
    } catch (err) {
      const error = err as BusinessError;
      console.error(`权限申请失败: ${error.code} ${error.message}`);
      return false;
    }
  }

  onWindowStageCreate(windowStage: window.WindowStage): void {
    // 启动时即申请权限
    this.requestPermissions();
    // ... 后续窗口配置
  }
}
权限申请是用户在设备上首次使用语音功能的必经门槛。许多开发者在此处卡住——应用能跑但识别无响应,根源往往就是权限未授予。务必在 onWindowStageCreate 或主动触发语音入口前完成申请流程。
三、语音识别:流式识别引擎深度解析
3.1 核心类与生命周期
speechRecognizer 的核心类是 SpeechRecognizer,但直接使用低阶 API 较为繁琐。HarmonyOS NEXT 推荐使用封装了状态机的 ContinuousRecognizer(连续识别)和 ShortRecognizer(短词识别)。我们以 流式连续识别 为例,这是实时字幕场景的核心依赖。
识别器的基本生命周期如下:
创建 → 配置 → 启动 → (识别中:多次 onPartialResult) → 结束 → 销毁
关键状态通过 RecognizerState 枚举体现:IDLE、READY、RECOGNIZING、COMPLETE、ERROR。建议在 UI 层绑定状态显示,让用户直观感知当前是否在收音。
3.2 完整识别器实现
以下是一个完整封装了生命周期管理的 SpeechRecognitionManager,支持流式识别、临时中断恢复、以及错误自动重试:
// SpeechRecognitionManager.ets
import { speechRecognizer } from '@kit.SpeechSpeechKit';
import { BusinessError } from '@kit.BasicServicesKit';
import { picker } from '@kit.CoreFileKit';

export type RecognizerCallback = {
  onStart?: () => void;
  onPartialResult?: (text: string) => void;
  onFinalResult?: (text: string) => void;
  onError?: (code: number, message: string) => void;
  onComplete?: () => void;
};

export class SpeechRecognitionManager {
  private recognizer: speechRecognizer.SpeechRecognizer | null = null;
  private audioRecorder?: speechRecognizer.AudioRecorder;
  private callback: RecognizerCallback;
  private isListening: boolean = false;
  private retryCount: number = 0;
  private readonly MAX_RETRIES: number = 2;

  constructor(callback: RecognizerCallback) {
    this.callback = callback;
  }

  // 初始化识别器:设置语言、场景模式、回调
  async initialize(lang: string = 'zh-CN'): Promise<void> {
    try {
      // 构建识别配置
      const recognizerConfig: speechRecognizer.SpeechRecognizerConfig = {
        language: lang,                    // 识别语言
        period: 15000,                     // 流式识别最大持续时间(ms)
        mode: speechRecognizer.RecognizerMode.REALTIME, // 流式模式
        interimResults: true,              // 返回中间结果(实时字幕必需)
        punctuationMode: speechRecognizer.PunctuationMode.MANDATORY, // 强制标点
      };

      // 创建识别器实例
      this.recognizer = await speechRecognizer.createSpeechRecognizer(recognizerConfig);

      // 注册结果回调
      this.recognizer.on('recognizerResult', (res: speechRecognizer.RecognizerResult) => {
        // res.isFinal === true 时为最终结果,false 为中间过程
        if (res.result && res.result.text) {
          if (res.isFinal) {
            this.callback.onFinalResult?.(res.result.text);
            this.retryCount = 0; // 重置重试计数
          } else {
            this.callback.onPartialResult?.(res.result.text);
          }
        }
      });

      // 注册错误回调
      this.recognizer.on('recognizerError', (err: speechRecognizer.RecognizerError) => {
        console.error(`识别错误 [${err.errorCode}]: ${err.errorMessage}`);
        this.callback.onError?.(err.errorCode, err.errorMessage);

        // 自动重试逻辑
        if (this.retryCount < this.MAX_RETRIES) {
          this.retryCount++;
          console.info(`触发自动重试 (${this.retryCount}/${this.MAX_RETRIES})`);
          this.restart();
        } else {
          this.callback.onComplete?.();
        }
      });

      // 监听识别开始事件
      this.recognizer.on('recognizerStart', () => {
        console.info('识别器已启动');
        this.isListening = true;
        this.callback.onStart?.();
      });

      console.info('识别器初始化完成');
    } catch (err) {
      const error = err as BusinessError;
      console.error(`初始化失败: ${error.code} - ${error.message}`);
      throw err;
    }
  }

  // 启动识别
  async start(): Promise<void> {
    if (!this.recognizer) {
      throw new Error('识别器未初始化');
    }
    if (this.isListening) {
      console.warn('识别器已在运行中,跳过重复启动');
      return;
    }
    await this.recognizer.startListening();
  }

  // 主动停止识别
  async stop(): Promise<string> {
    if (!this.recognizer) {
      return '';
    }
    try {
      // stopListening 返回最终识别结果
      const result = await this.recognizer.stopListening();
      this.isListening = false;
      return result?.result?.text ?? '';
    } catch (err) {
      const error = err as BusinessError;
      console.error(`停止识别失败: ${error.code}`);
      this.isListening = false;
      return '';
    }
  }

  // 错误后重启识别
  private async restart(): Promise<void> {
    this.isListening = false;
    if (this.recognizer) {
      try {
        await this.recognizer.stopListening();
      } catch {}
      // 短暂延迟后重启,避免状态冲突
      await new Promise(resolve => setTimeout(resolve, 300));
      await this.start();
    }
  }

  // 销毁识别器,释放资源
  async destroy(): Promise<void> {
    if (this.recognizer) {
      try {
        if (this.isListening) {
          await this.recognizer.stopListening();
        }
        this.recognizer.off('recognizerResult');
        this.recognizer.off('recognizerError');
        this.recognizer.off('recognizerStart');
        this.recognizer = null;
        this.isListening = false;
      } catch (err) {
        console.error(`销毁识别器异常: ${(err as BusinessError).message}`);
      }
    }
    console.info('识别器已销毁');
  }
}
这段封装体现了几个实战要点:第一,interimResults: true 保证了实时字幕的流畅体验——没有中间结果,字幕会「一跳一跳」地更新,观感极差;第二,自动重试机制是生产级应用的标配,麦克风抢占或系统资源紧张时偶发的 1003 错误(引擎未就绪)可以被优雅处理;第三,生命周期管理(onWindowStageDestroy 中调用 destroy)是防止内存泄漏的关键。
3.3 在 ArkUI 页面中使用识别管理器
将识别管理器接入 UI 层需要一个 EntryAbility 级别的单例注入,以及页面的状态绑定:
// pages/SpeechToTextPage.ets
import { SpeechRecognitionManager } from '../manager/SpeechRecognitionManager';

@Entry
@Component
struct SpeechToTextPage {
  @State partialText: string = '正在聆听...';
  @State finalText: string = '';
  @State statusText: string = '点击麦克风开始识别';
  @State isRecording: boolean = false;

  private manager?: SpeechRecognitionManager;
  private controller: TextInputController = new TextInputController();

  aboutToAppear(): void {
    // 初始化识别管理器
    this.manager = new SpeechRecognitionManager({
      onStart: () => {
        this.isRecording = true;
        this.statusText = '🎙️ 正在聆听...';
      },
      onPartialResult: (text: string) => {
        this.partialText = text;
      },
      onFinalResult: (text: string) => {
        this.finalText = this.finalText.length > 0
          ? this.finalText + '\n' + text
          : text;
        this.partialText = '';
      },
      onError: (code, message) => {
        this.statusText = `❌ 错误 ${code}: ${message}`;
        this.isRecording = false;
      },
      onComplete: () => {
        this.isRecording = false;
        this.statusText = '识别已结束';
      }
    });

    // 异步初始化识别器
    this.manager.initialize().catch((e: Error) => {
      this.statusText = `初始化失败: ${e.message}`;
    });
  }

  async toggleRecording() {
    if (!this.manager) return;

    if (this.isRecording) {
      await this.manager.stop();
    } else {
      await this.manager.start();
    }
  }

  aboutToDisappear(): void {
    this.manager?.destroy();
  }

  build() {
    Column({ space: 16 }) {
      Text('实时语音识别')
        .fontSize(28)
        .fontWeight(FontWeight.Bold)
        .margin({ top: 24 });

      // 状态指示
      Text(this.statusText)
        .fontSize(14)
        .fontColor(this.isRecording ? '#1890ff' : '#666');

      // 识别结果展示区
      Scroll() {
        Column({ space: 8 }) {
          if (this.finalText) {
            Text(this.finalText)
              .fontSize(16)
              .fontColor('#333')
              .width('100%');
          }
          if (this.partialText) {
            Text(this.partialText)
              .fontSize(18)
              .fontColor('#1890ff')
              .fontStyle(FontStyle.Italic)
              .width('100%');
          }
        }
        .padding(16)
        .alignItems(HorizontalAlign.Start);
      }
      .layoutWeight(1)
      .backgroundColor('#f5f5f5')
      .borderRadius(12)
      .margin({ top: 16, left: 16, right: 16 });

      // 麦克风控制按钮
      Row({ space: 32 }) {
        Button() {
          Text('🔴')
            .fontSize(32);
        }
        .width(72)
        .height(72)
        .shape(ShapeType.Circle)
        .backgroundColor(this.isRecording ? '#ff4d4f' : '#1890ff')
        .onClick(() => this.toggleRecording());

        Button('清空') {
          Text('清空')
            .fontSize(16);
        }
        .height(40)
        .onClick(() => {
          this.finalText = '';
          this.partialText = '';
        });
      }
      .margin({ bottom: 32 });
    }
    .width('100%')
    .height('100%');
  }
}
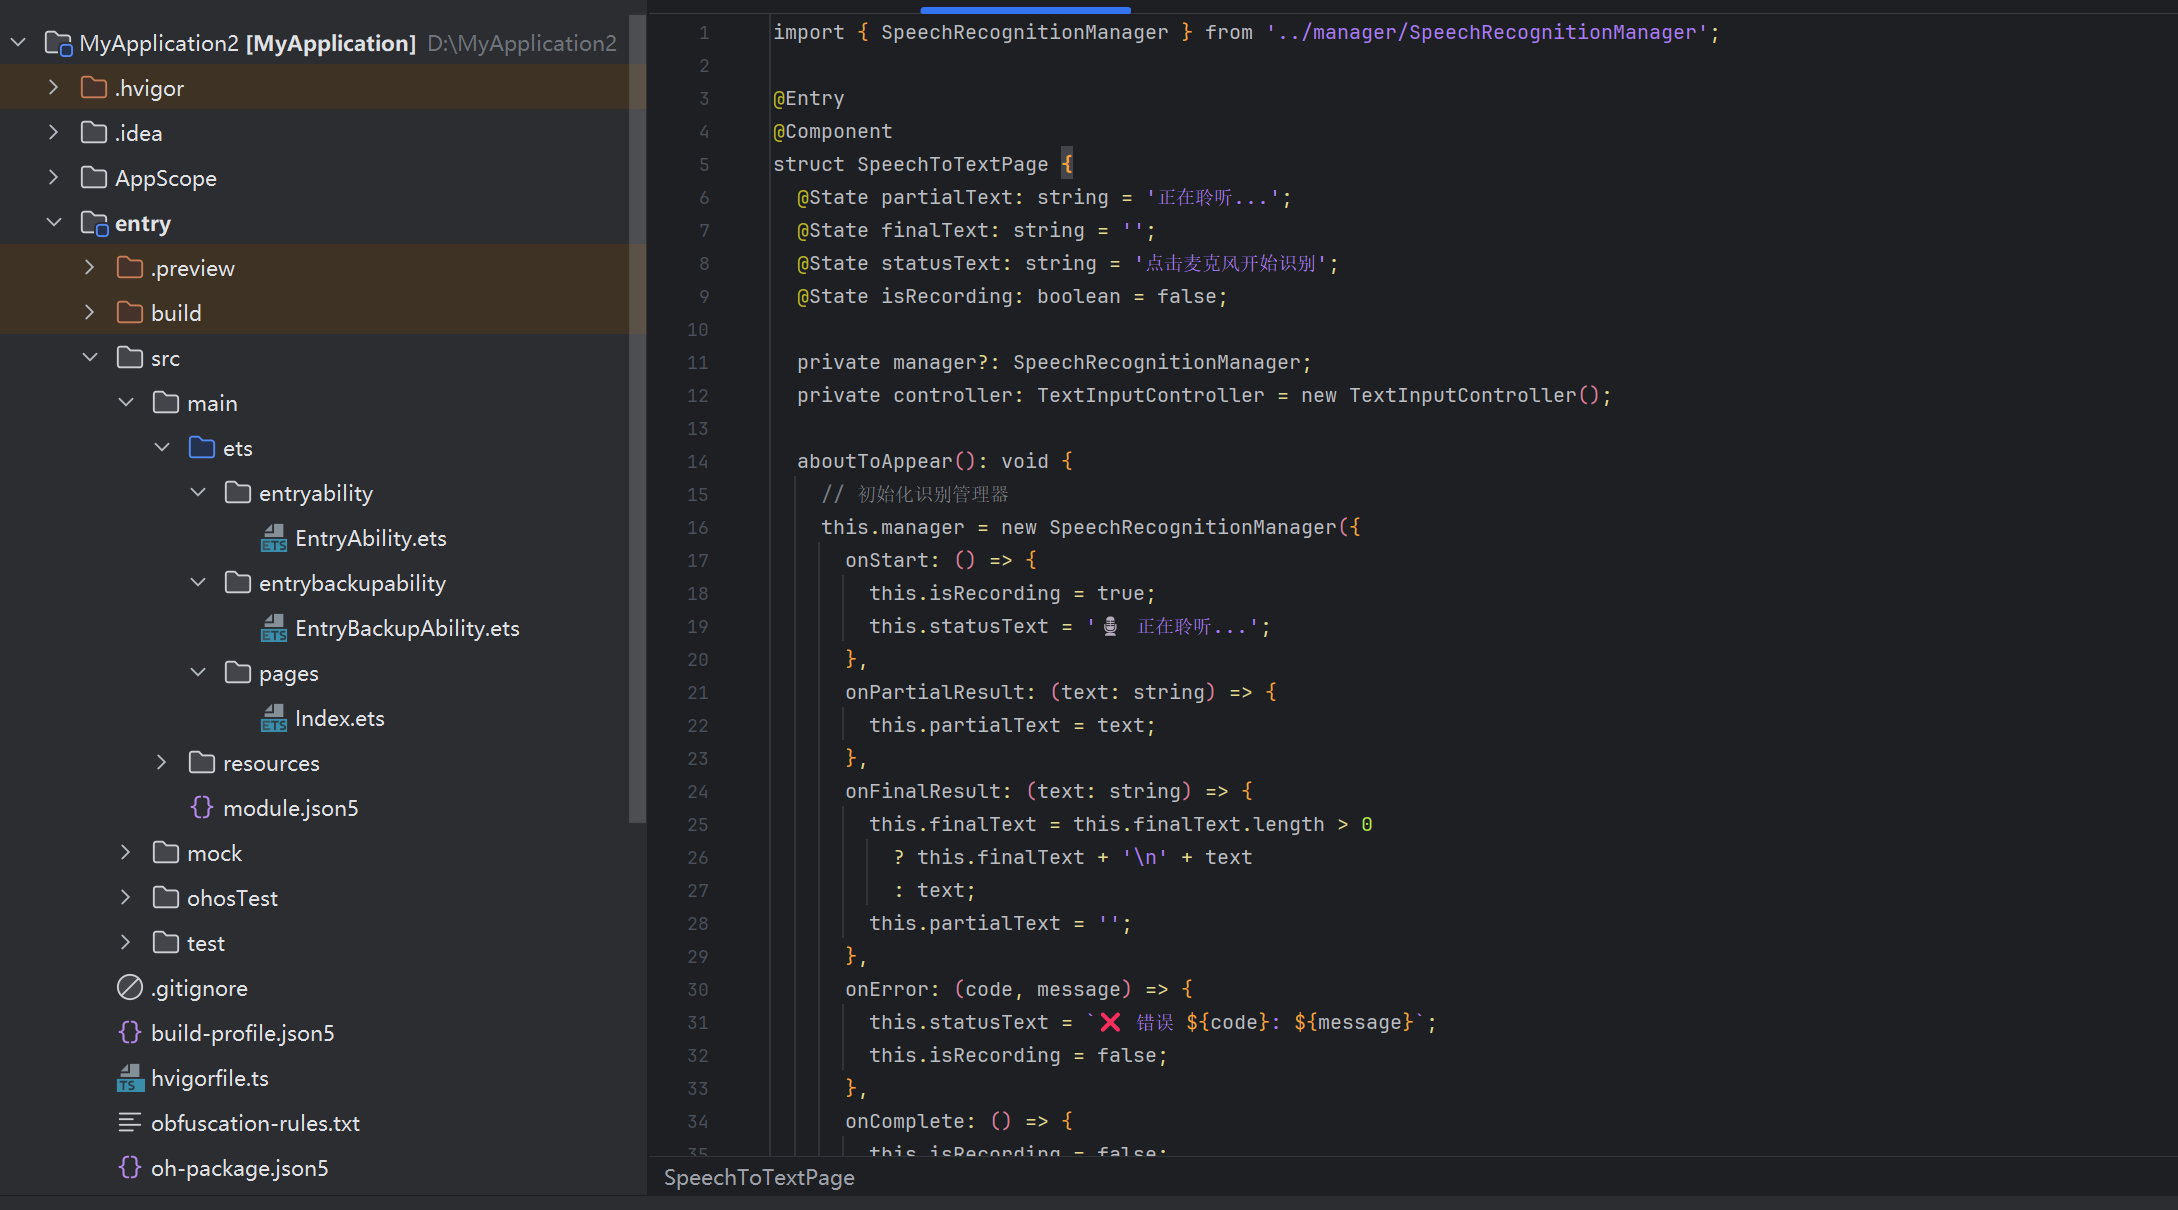
在 UI 层,partialText 使用斜体和蓝色区分中间过程,finalText 追加显示历史结果——这正是实时字幕的标准交互范式。值得注意的是,aboutToDisappear 中必须调用 destroy,否则在页面切换时识别器仍占用麦克风资源,导致其他模块无法正常录音。
四、语音合成:TextToSpeech 完整指南
4.1 TTS 的两种使用路径
HarmonyOS NEXT 的 TextToSpeech 提供了两套接口:单次合成(直接播放)和流式合成(获取音频数据自行处理)。前者适合语音播报场景,后者适合需要后处理(变声、混音、写入文件)的场景。
我们先看最常用的单次合成。
4.2 单次合成:语音播报的最简方案
// TtsManager.ets
import { textToSpeech } from '@kit.SpeechSpeechKit';
import { BusinessError } from '@kit.BasicServicesKit';

export class TtsManager {
  private ttsEngine: textToSpeech.TextToSpeechEngine | null = null;
  private speakListener?: textToSpeech.SpeakProgressCallback;
  private speakListenerId: number = -1;

  // 初始化 TTS 引擎
  async initialize(): Promise<void> {
    const initParams: textToSpeech.InitializeParams = {
      language: 'zh-CN',           // 默认中文
      person: 0,                    // 音色:0=女声,1=男声(各语言包不同)
      speed: 1.0,                   // 语速:0.5~2.0
      pitch: 1.0,                  // 语调:0.5~2.0
      volume: 1.0,                  // 音量:0.0~1.0
    };

    const config: textToSpeech.CreateEngineParams = {
      params: initParams,
    };

    try {
      this.ttsEngine = await textToSpeech.createTextToSpeechEngine(config);

      // 注册播报进度回调(用于字幕同步)
      this.speakListener = {
        onStart (utteranceId: string) {
          console.info(`[TTS] 开始播报: ${utteranceId}`);
        },
        onProgress (utteranceId: string, progress: number) {
          // 进度回调,可用于高亮当前朗读到的字
          console.info(`[TTS] 进度 ${progress}%: ${utteranceId}`);
        },
        onFinish (utteranceId: string) {
          console.info(`[TTS] 播报完成: ${utteranceId}`);
        },
        onError (utteranceId: string, error: textToSpeech.SpeechError) {
          console.error(`[TTS] 错误 [${error.code}]: ${utteranceId}`);
        }
      };

      this.speakListenerId = this.ttsEngine.setListener(this.speakListener);
      console.info('TTS 引擎初始化完成');
    } catch (err) {
      const error = err as BusinessError;
      console.error(`TTS 初始化失败: ${error.code} - ${error.message}`);
      throw err;
    }
  }

  // 合成并播报文本
  async speak(text: string, options?: {
    speed?: number;
    pitch?: number;
    volume?: number;
  }): Promise<string> {
    if (!this.ttsEngine) {
      throw new Error('TTS 引擎未初始化');
    }

    const speakParams: textToSpeech.SpeakParams = {
      options: {
        speed: options?.speed ?? 1.0,
        pitch: options?.pitch ?? 1.0,
        volume: options?.volume ?? 1.0,
        voiceId: '', // 使用默认音色
      }
    };

    try {
      const utteranceId = await this.ttsEngine.speak(text, speakParams);
      console.info(`[TTS] 已提交播报任务: ${utteranceId}`);
      return utteranceId;
    } catch (err) {
      const error = err as BusinessError;
      console.error(`[TTS] 播报失败: ${error.code} - ${error.message}`);
      throw err;
    }
  }

  // 暂停当前播报
  async pause(): Promise<void> {
    try {
      await this.ttsEngine?.pause();
    } catch (err) {
      console.warn(`暂停失败: ${(err as BusinessError).message}`);
    }
  }

  // 恢复暂停的播报
  async resume(): Promise<void> {
    try {
      await this.ttsEngine?.resume();
    } catch (err) {
      console.warn(`恢复失败: ${(err as BusinessError).message}`);
    }
  }

  // 停止播报
  async stop(): Promise<void> {
    try {
      await this.ttsEngine?.stop();
    } catch (err) {
      console.warn(`停止失败: ${(err as BusinessError).message}`);
    }
  }

  // 销毁引擎
  async destroy(): Promise<void> {
    await this.stop();
    if (this.ttsEngine && this.speakListenerId >= 0) {
      this.ttsEngine.removeListener(this.speakListenerId);
    }
    this.ttsEngine = null;
  }
}
上述代码展示了 TTS 引擎的完整生命周期管理。setListener 返回的 ID 必须保存,后续 removeListener 时需要使用——这是容易遗漏的内存管理细节。
4.3 语音助手场景:识别 + 合成的双向闭环
当识别结果触发播报时,需要注意防止「语音反馈循环」——设备的合成声音被麦克风再次识别,形成回声。解决方案是:在 TTS 播报期间将识别器静音(stop 麦克风监听),播报结束后恢复。
// VoiceAssistant.ets
import { SpeechRecognitionManager } from './SpeechRecognitionManager';
import { TtsManager } from './TtsManager';

export interface AssistantResponse {
  replyText: string;
  action?: 'none' | 'navigate' | 'open_app';
}

export class VoiceAssistant {
  private recognizer: SpeechRecognitionManager;
  private tts: TtsManager;
  private isSpeaking: boolean = false;

  constructor() {
    this.tts = new TtsManager();
    this.recognizer = new SpeechRecognitionManager({
      onFinalResult: async (text: string) => {
        await this.processCommand(text);
      },
      onError: (_, msg) => {
        console.error(`识别异常: ${msg}`);
      }
    });
  }

  async start(): Promise<void> {
    await this.tts.initialize();
    await this.recognizer.initialize();
    await this.recognizer.start();
    await this.tts.speak('你好,我是语音助手,有什么可以帮你的?');
  }

  // 处理用户指令并生成回复
  private async processCommand(input: string): Promise<void> {
    // 停止识别,避免自己的声音被再次识别
    await this.recognizer.stop();
    this.isSpeaking = true;

    // 模拟 NLU 处理(实际项目替换为本地 NLP 引擎或远程接口)
    const response = await this.nluProcess(input);

    // 播报回复
    await this.tts.speak(response.replyText, { speed: 1.1 });

    // 播报结束后恢复识别
    this.tts.ttsEngine?.setListener({
      onFinish: async () => {
        this.isSpeaking = false;
        await this.recognizer.start();
      },
      onError: async () => {
        this.isSpeaking = false;
        await this.recognizer.start();
      }
    } as any);
  }

  // NLU 处理:意图识别 + 回复生成
  private async nluProcess(text: string): Promise<AssistantResponse> {
    // 关键词匹配式简单 NLU
    const lower = text.toLowerCase();

    if (lower.includes('天气')) {
      return { replyText: '今天天气晴朗,气温26度,适合出行。', action: 'none' };
    }
    if (lower.includes('时间') || lower.includes('几点')) {
      const now = new Date();
      return {
        replyText: `现在是 ${now.getHours()} 点 ${now.getMinutes()} 分。`,
        action: 'none'
      };
    }
    if (lower.includes('打开')) {
      const appName = text.replace(/.*打开/, '').trim();
      return {
        replyText: `好的,正在打开 ${appName}。`,
        action: 'open_app'
      };
    }

    return {
      replyText: '抱歉,我没有理解你的意思,请再说一次?',
      action: 'none'
    };
  }

  async destroy(): Promise<void> {
    await this.recognizer.destroy();
    await this.tts.destroy();
  }
}
回声消除是语音助手实现中的高频痛点。上述方案通过 recognizer.stop() 和 recognizer.start() 手动控制识别器状态,是端侧方案中最轻量的解法。若对实时性要求更高,可以结合系统 VAD 信号(speechRecognizer 提供了 VAD 回调)来自动触发这个逻辑。
五、性能优化:延迟、功耗与准确率的三角平衡
5.1 延迟的三个关键节点
端侧语音系统的总延迟由三部分构成:
前端处理延迟(Frontend Latency):麦克风采集音频到送入识别引擎的时间。HarmonyOS NEXT 的音频子系统默认使用 16kHz 采样,帧长 40ms,帧移 20ms——这意味着用户说话后,最快 60ms 才能拿到第一个识别结果。要缩短这个值,可以将帧长从 40ms 调整为 30ms(在部分设备上可配),但会略微增加 CPU 占用。
识别引擎延迟(Engine Latency):模型推理消耗的时间。端侧模型的优势在于无网络往返,但在低端设备上,ASR 模型推理仍可能占用 15-30ms/帧。建议在设备的 deviceType 为 2in1 或 tablet 时启用高精度模式,为 phone 设备选择均衡模式。
后处理延迟(Post-processing Latency):标点恢复、数字规范化(“2024年” vs “二〇二四年”)等后处理步骤。HarmonyOS 的后处理通常在 5ms 以内,不是主要瓶颈。
总延迟控制在 150ms 以内 即为优秀水平,用户感知接近「说到即显示」。
5.2 功耗优化策略
麦克风持续收音是功耗大户。在「实时字幕」场景下,可以采用变速采样策略:识别器空闲(无语音活动)时,将采样率从 16kHz 降至 8kHz;检测到 VAD 信号后再切回 16kHz 全速采集。这能有效降低待机功耗。
// AdaptiveAudioSampler.ets
import { audio } from '@kit.AudioKit';

export class AdaptiveAudioSampler {
  private currentSampleRate: number = 16000;
  private vadThreshold: number = 0.02; // RMS 能量阈值
  private isLowPowerMode: boolean = true;
  private audioCapturer?: audio.AudioCapturer;
  private energyHistory: number[] = [];

  async initialize() {
    const audioStreamInfo: audio.AudioStreamInfo = {
      samplingRate: this.currentSampleRate,
      channels: audio.AudioChannel.CHANNEL_1,
      sampleFormat: audio.AudioSampleFormat.SAMPLE_FORMAT_S16LE,
      encodingType: audio.AudioEncodingType.ENCODING_TYPE_RAW,
    };

    const audioCapturerOptions: audio.AudioCapturerOptions = {
      streamInfo: audioStreamInfo,
      capturerInfo: {
        source: audio.SourceType.SOURCE_TYPE_MIC,
        capturerFlags: 0,
      }
    };

    this.audioCapturer = await audio.createAudioCapturer(audioCapturerOptions);
  }

  // 根据音频能量动态调整采样率
  adjustSampleRate(rmsEnergy: number): number {
    this.energyHistory.push(rmsEnergy);
    if (this.energyHistory.length > 10) {
      this.energyHistory.shift();
    }

    const avgEnergy = this.energyHistory.reduce((a, b) => a + b, 0) / this.energyHistory.length;
    const isSpeechActive = avgEnergy > this.vadThreshold;

    if (isSpeechActive && this.isLowPowerMode) {
      // 切换到高质量模式
      this.switchToHighQuality();
      this.isLowPowerMode = false;
    } else if (!isSpeechActive && !this.isLowPowerMode) {
      // 持续无语音时切换到低功耗模式
      this.switchToLowPower();
      this.isLowPowerMode = true;
    }

    return this.currentSampleRate;
  }

  private async switchToHighQuality() {
    if (this.audioCapturer) {
      await this.audioCapturer.setParams({
        streamInfo: {
          samplingRate: 16000,
          channels: audio.AudioChannel.CHANNEL_1,
          sampleFormat: audio.AudioSampleFormat.SAMPLE_FORMAT_S16LE,
          encodingType: audio.AudioEncodingType.ENCODING_TYPE_RAW,
        }
      } as audio.AudioCapturerParameters);
      this.currentSampleRate = 16000;
      console.info('切换至高质量模式 (16kHz)');
    }
  }

  private async switchToLowPower() {
    if (this.audioCapturer) {
      await this.audioCapturer.setParams({
        streamInfo: {
          samplingRate: 8000,
          channels: audio.AudioChannel.CHANNEL_1,
          sampleFormat: audio.AudioSampleFormat.SAMPLE_FORMAT_S16LE,
          encodingType: audio.AudioEncodingType.ENCODING_TYPE_RAW,
        }
      } as audio.AudioCapturerParameters);
      this.currentSampleRate = 8000;
      console.info('切换至低功耗模式 (8kHz)');
    }
  }
}
5.3 准确率调优:从配置到场景适配
语音识别的准确率高度依赖场景配置。HarmonyOS 识别引擎支持通过 setSmartConfig 注入领域知识:
// 注入领域词汇,提升专业术语识别率
async function optimizeForDomain(manager: SpeechRecognitionManager) {
  // 场景一:会议记录场景,注入时间、人物、地点词汇
  const meetingConfig = {
    boostWords: ['会议', '议题', '表决', '纪要', '主持人', '发言人', '决议'],
    boostScore: 2.0,          // 提升权重
    ignoreOov: false,         // 是否忽略未登录词
    customization: 'meeting'  // 场景模板
  };

  // 场景二:导航场景
  const navConfig = {
    boostWords: ['路口', '左转', '右转', '直行', '掉头', '高速', '省道'],
    boostScore: 2.5,
    ignoreOov: false,
    customization: 'navigation'
  };

  // 实际使用时根据应用场景选择配置
  // manager.recognizer.setSmartConfig(meetingConfig);
  console.info('领域词汇配置完成');
}
针对中文方言,HarmonyOS NEXT 支持 zh-CN(普通话)、zh-CY(粤语)、zh-TW(台湾话)等语言标记。对于港澳用户较多的应用,切换到 zh-CY 可以显著提升识别率——用户无需刻意说普通话,自然语言交互的门槛大幅降低。
六、实战场景一:实时字幕系统
实时字幕是流式识别的典型应用。其核心挑战不在于识别本身,而在于文本的实时渲染和历史滚动的平滑体验。
6.1 完整页面实现
// pages/LiveCaptionPage.ets
import { SpeechRecognitionManager } from '../manager/SpeechRecognitionManager';

interface CaptionItem {
  id: number;
  startTime: number;
  endTime: number;
  text: string;
  isFinal: boolean;
}

@Entry
@Component
struct LiveCaptionPage {
  @State captions: CaptionItem[] = [];
  @State currentCaption: string = '';
  @State isActive: boolean = false;
  @State sessionId: string = '';

  private manager?: SpeechRecognitionManager;
  private captionIdCounter: number = 0;
  private scrollController: Scroller = new Scroller();

  aboutToAppear(): void {
    this.manager = new SpeechRecognitionManager({
      onStart: () => {
        this.isActive = true;
        this.sessionId = Date.now().toString();
        console.info(`字幕会话开始: ${this.sessionId}`);
      },
      onPartialResult: (text: string) => {
        // 中间结果:更新当前行的显示(实时刷新)
        animateTo({ duration: 100 }, () => {
          this.currentCaption = text;
        });
      },
      onFinalResult: (text: string) => {
        if (text.trim().length === 0) return;

        // 最终结果:固化到历史列表
        const newItem: CaptionItem = {
          id: this.captionIdCounter++,
          startTime: Date.now(),
          endTime: Date.now() + 1000,
          text: text,
          isFinal: true
        };

        animateTo({ duration: 300 }, () => {
          this.captions.push(newItem);
          this.currentCaption = '';
        });

        // 滚动到底部
        setTimeout(() => {
          this.scrollController.scrollEdge(Edge.Bottom);
        }, 100);
      },
      onError: (code, msg) => {
        console.error(`字幕识别错误: [${code}] ${msg}`);
        if (this.isActive) {
          this.currentCaption = `⚠️ 识别暂停: ${msg}`;
        }
      },
      onComplete: () => {
        this.isActive = false;
      }
    });

    this.manager.initialize().catch(e => {
      console.error(`初始化失败: ${e.message}`);
    });
  }

  async toggle() {
    if (!this.manager) return;

    if (this.isActive) {
      await this.manager.stop();
    } else {
      this.captions = [];
      this.currentCaption = '';
      await this.manager.start();
    }
  }

  build() {
    Stack({ alignContent: Alignment.Bottom }) {
      // 背景
      Column()
        .width('100%')
        .height('100%')
        .backgroundColor('#0a0a0a');

      // 字幕区域
      Column({ space: 12 }) {
        // 历史字幕
        Scroll(this.scrollController) {
          Column({ space: 10 }) {
            ForEach(this.captions, (item: CaptionItem) => {
              Row() {
                Text(`[${this.formatTime(item.startTime)}]`)
                  .fontSize(12)
                  .fontColor('#888')
                  .width(60);
                Text(item.text)
                  .fontSize(18)
                  .fontColor('#fff')
                  .layoutWeight(1);
              }
              .width('100%')
              .padding({ left: 16, right: 16 });
            });
          }
          .padding({ top: 24, bottom: 60 });
        }
        .width('100%')
        .layoutWeight(1);

        // 当前识别行(高亮)
        if (this.currentCaption) {
          Row() {
            Text('▶')
              .fontSize(12)
              .fontColor('#1890ff')
              .width(20);
            Text(this.currentCaption)
              .fontSize(20)
              .fontColor('#1890ff')
              .fontStyle(FontStyle.Italic)
              .layoutWeight(1);
          }
          .width('100%')
          .padding({ left: 16, right: 16, bottom: 16 })
          .transition(TransitionEffect.OPACITY.animation({ duration: 200 }));
        }
      }
      .width('100%')
      .height('100%');

      // 底部控制栏
      Row() {
        Text(this.isActive ? '🔴 录制中' : '⏸️ 已暂停')
          .fontSize(14)
          .fontColor(this.isActive ? '#ff4d4f' : '#888');

        Blank();

        Text(`${this.captions.length} 条字幕`)
          .fontSize(12)
          .fontColor('#666');

        Button() {
          Text('切换')
            .fontSize(14)
            .fontColor('#fff');
        }
        .height(32)
        .width(72)
        .backgroundColor('#1890ff')
        .borderRadius(16)
        .onClick(() => this.toggle());
      }
      .width('100%')
      .padding({ left: 20, right: 20, top: 12, bottom: 12 })
      .backgroundColor('#1a1a1a');
    }
    .width('100%')
    .height('100%');
  }

  private formatTime(timestamp: number): string {
    const d = new Date(timestamp);
    return `${d.getHours().toString().padStart(2, '0')}:${d.getMinutes().toString().padStart(2, '0')}:${d.getSeconds().toString().padStart(2, '0')}`;
  }

  aboutToDisappear(): void {
    this.manager?.destroy();
  }
}
实时字幕页面的 UI 设计有几个要点:深色背景配合白色文字确保可读性;当前识别行使用蓝色斜体,与最终结果(白色正体)形成视觉区分;时间戳辅助用户定位内容片段;历史字幕采用追加而非覆盖,保证阅读连贯性。
七、实战场景二:语音控制智能家居网关
在智能家居场景中,语音识别的核心价值是低时延指令执行。用户说「打开客厅灯」,系统需要在 300ms 内完成识别 + 意图解析 + 设备下发全流程。以下是结合 Intent Framework(HarmonyOS 的跨 Ability 通信机制)的完整实现。
7.1 意图注册:声明语音能力
在智能家居应用的 module.json5 中,需要声明对语音能力的依赖:
{
  "abilities": [
    {
      "name": "HomeControlAbility",
      "skills": [
        {
          "entities": ["entity.system.home", "entity.system.device"],
          "actions": ["action.control.light", "action.control.ac", "action.control.tv"]
        }
      ]
    }
  ]
}
这样,其他应用(如语音助手)可以通过 Intent 查询并唤起 HomeControlAbility,实现跨应用的设备控制。
7.2 语音指令处理器
// HomeIntentHandler.ets
import { wantConstant, Want } from '@kit.AbilityKit';
import { deviceManager } from '@kit.DeviceManagementKit';

// 设备控制映射表
const DEVICE_MAP: Record<string, string> = {
  '灯': 'light',
  '空调': 'ac',
  '电视': 'tv',
  '窗帘': 'curtain',
  '扫地机': 'robot'
};

const ACTION_MAP: Record<string, string> = {
  '打开': 'ON',
  '关闭': 'OFF',
  '调亮': 'BRIGHTEN',
  '调暗': 'DIM',
  '调高': 'INCREASE',
  '调低': 'DECREASE'
};

export interface HomeCommand {
  deviceType: string;
  deviceId: string;
  action: string;
  value?: number;
}

export class HomeIntentHandler {
  // 解析语音命令文本
  parseCommand(text: string): HomeCommand | null {
    for (const [keyword, deviceType] of Object.entries(DEVICE_MAP)) {
      if (text.includes(keyword)) {
        let action = 'ON'; // 默认动作
        let value: number | undefined;

        for (const [actionKeyword, actionValue] of Object.entries(ACTION_MAP)) {
          if (text.includes(actionKeyword)) {
            action = actionValue;
            break;
          }
        }

        // 提取数值(如"调高到26度")
        const numMatch = text.match(/(\d+)/);
        if (numMatch) {
          value = parseInt(numMatch[1]);
        }

        return { deviceType, deviceId: '', action, value };
      }
    }
    return null;
  }

  // 跨 Ability 发送控制指令
  async sendDeviceCommand(command: HomeCommand): Promise<boolean> {
    const want: Want = {
      bundleName: 'com.example.smarthome',
      abilityName: 'HomeControlAbility',
      parameters: {
        deviceType: command.deviceType,
        action: command.action,
        value: command.value ?? 0
      }
    };

    try {
      const context = AppStorage.get<Context>('abilityContext');
      if (context) {
        await context.startAbility(want);
        console.info(`设备指令已下发: ${command.deviceType} -> ${command.action}`);
        return true;
      }
      return false;
    } catch (err) {
      console.error(`指令下发失败: ${(err as Error).message}`);
      return false;
    }
  }

  // 生成语音反馈文本
  generateFeedback(command: HomeCommand, success: boolean): string {
    if (!success) {
      return '抱歉,设备响应失败,请检查设备连接。';
    }

    const deviceNames: Record<string, string> = {
      'light': '灯',
      'ac': '空调',
      'tv': '电视',
      'curtain': '窗帘',
      'robot': '扫地机'
    };

    const deviceName = deviceNames[command.deviceType] || command.deviceType;
    const actionNames: Record<string, string> = {
      'ON': '已打开',
      'OFF': '已关闭',
      'BRIGHTEN': '已调亮',
      'DIM': '已调暗',
      'INCREASE': '已调高',
      'DECREASE': '已调低'
    };

    const actionName = actionNames[command.action] || command.action;
    return `${deviceName}${actionName}`;
  }
}
7.3 整合语音识别与设备控制
// SmartHomeVoiceControl.ets
import { SpeechRecognitionManager } from '../manager/SpeechRecognitionManager';
import { TtsManager } from '../manager/TtsManager';
import { HomeIntentHandler, HomeCommand } from './HomeIntentHandler';

export class SmartHomeVoiceControl {
  private recognizer: SpeechRecognitionManager;
  private tts: TtsManager;
  private intentHandler: HomeIntentHandler;
  private isProcessingCommand: boolean = false;

  constructor() {
    this.intentHandler = new HomeIntentHandler();
    this.tts = new TtsManager();
    this.recognizer = new SpeechRecognitionManager({
      onFinalResult: async (text: string) => {
        await this.handleVoiceCommand(text);
      }
    });
  }

  async initialize(): Promise<void> {
    await this.tts.initialize();
    await this.recognizer.initialize();
  }

  async startListening(): Promise<void> {
    await this.recognizer.start();
    console.info('智能家居语音控制已启动');
  }

  private async handleVoiceCommand(text: string): Promise<void> {
    if (this.isProcessingCommand) {
      console.info('上一条命令处理中,忽略本次输入');
      return;
    }

    this.isProcessingCommand = true;

    // 1. 停止识别(避免回声)
    await this.recognizer.stop();

    // 2. 解析命令
    const command = this.intentHandler.parseCommand(text);
    console.info(`识别命令: "${text}" -> ${JSON.stringify(command)}`);

    // 3. 执行设备控制
    let success = false;
    if (command) {
      success = await this.intentHandler.sendDeviceCommand(command);
    } else {
      await this.tts.speak('抱歉,我没有理解这个指令。');
      this.isProcessingCommand = false;
      await this.recognizer.start();
      return;
    }

    // 4. 生成语音反馈
    const feedback = this.intentHandler.generateFeedback(command!, success);
    await this.tts.speak(feedback, { speed: 1.2 });

    // 5. 等待播报结束后恢复识别
    setTimeout(async () => {
      this.isProcessingCommand = false;
      await this.recognizer.start();
    }, 500);
  }

  async destroy(): Promise<void> {
    await this.recognizer.destroy();
    await this.tts.destroy();
  }
}
至此,一个完整的语音控制闭环已经形成:麦克风 → 语音识别 → NLU 解析 → 设备指令下发 → 语音反馈。这个链路中,端侧识别的低延迟保证了「说出即执行」的体验,而 Intent Framework 则打通了跨应用的能力调用——即使控制逻辑不在同一个 Ability 中,也能通过 Want 参数无缝流转。
八、调试与排障:常见问题清单
在端侧语音系统的开发过程中,有几类高频问题的根源相对集中,整理如下供快速定位:
| 症状 | 可能原因 | 解决方案 |
|---|---|---|
识别器 createSpeechRecognizer 报错 1002 |
设备不支持当前语言或模式 | 确认 language 参数合法,检查设备是否安装了对应语言包 |
| 流式识别无中间结果 | interimResults 未设为 true |
显式设置 interimResults: true |
| TTS 播报无声 | volume 被设为 0 或 speak 返回后立即销毁引擎 |
确认 volume 在 0.0~1.0 之间,且在播报完成回调后再销毁 |
| 识别器启动后持续报 1003 | 麦克风被其他应用占用 | 检查 audio.AudioCapturer 是否冲突,尝试 stopListening 后重新启动 |
| 方言识别率低 | 语言参数设置为 zh-CN(普通话) |
切换为 zh-CY(粤语)或 zh-TW(台湾话) |
| 页面退出后识别器仍占用麦克风 | aboutToDisappear 未调用 destroy() |
确保在页面生命周期回调中清理资源 |
| 语音助手回声问题 | TTS 播报时未停止识别器 | 在 speak() 开始前调用 recognizer.stop(),结束后 start() |
九、总结与展望
本文围绕 HarmonyOS NEXT / API 12+ 的端侧语音能力,从权限体系、识别引擎、合成引擎、两个实战场景(实时字幕与语音家居控制)以及性能优化五个维度,完整拆解了一条可投产的语音交互链路。
核心要点可以归纳为三条经验:第一,生命周期管理是根基——识别器和 TTS 引擎的创建、启动、停止、销毁每一步都必须严格配对,资源泄漏在长时间运行的应用中会以「麦克风失灵」的形式集中爆发;第二,中间结果(interimResults)是体验的灵魂——关闭中间结果,实时字幕从「流」退化成了「弹幕」,用户感知会断崖式下降;第三,回声消除是语音助手的生死线——不处理 TTS 声音回录,再好的 NLU 也救不了产品体验。
展望未来,随着 NPU 在移动设备上的普及,端侧语音模型的参数量和精度还将持续提升。HarmonyOS NEXT 的智能能力层(Intelligent Capability Layer)正在逐步开放更底层的模型加载接口,开发者将能够接入自定义的 ASR / TTS 模型,甚至在端侧运行完整的本地对话系统。端侧语音不是过渡方案,而是下一代交互基础设施的重要组成部分。

Agent 垂直技术社区,欢迎活跃、内容共建。
更多推荐

 4
4 0
0- 0


 已为社区贡献28条内容

所有评论(0)