C++部署YOLO11的onnx模型
·
1.软件安装下载:Visual Studio 2022软件安装
官方下载网址:Visual Studio: 面向软件开发人员和 Teams 的 IDE 和代码编辑器
参考链接:
【2025版】最新visual studio之安装详解_visual studio安装教程,(非常详细)零基础入门到精通,收藏这篇就够了-CSDN博客
2.环境配置
我是根据一个博主的教学视频进行的配置学习,博主教的很简洁和方便。大家可参考,记得帮博主点赞哦!
c++部署yolov10详细教程,yolov10 cpp部署_哔哩哔哩_bilibili
3.代码编写
这里给大家展示部分的代码
#include <iostream>          // 输入输出流库,用于控制台输入输出
#include <onnxruntime_cxx_api.h> // ONNX Runtime的C++接口,用于加载和运行ONNX模型
#include <opencv2/opencv.hpp> // OpenCV计算机视觉库,用于图像处理和显示
#include <sstream>           // 字符串流库,用于字符串格式化
#include <vector>            // 动态数组容器
#include <string>            // 字符串操作库
#include <iomanip>           // 输入输出格式控制库
#include <algorithm>         // 算法库(排序、查找等)
#include <cmath>             // 数学函数库

using namespace std;        // 使用标准命名空间
using namespace cv;         // 使用OpenCV命名空间
using namespace Ort;        // 使用ONNX Runtime命名空间

// 单类别名称(划痕检测)
static const vector<string> class_name = { "S" }; // 类别标签,只有一个"S"类别

// 图像预处理函数:Resize+Letterbox填充(保持原图比例)
vector<float> preprocess(const Mat& img, bool is_rgb = true, int input_w = 640, int input_h = 640) {
    Mat resized_img, padded_img; // 存储缩放和填充后的图像

    // 计算缩放比例(取最小缩放因子,避免拉伸)
    float scale = min(static_cast<float>(input_w) / img.cols, static_cast<float>(input_h) / img.rows);
    int new_w = static_cast<int>(img.cols * scale); // 计算新宽度
    int new_h = static_cast<int>(img.rows * scale); // 计算新高度

    // 缩放图像(保持比例,使用线性插值)
    resize(img, resized_img, Size(new_w, new_h), 0, 0, INTER_LINEAR);

    // Letterbox填充(添加黑色边框)
    int pad_w = (input_w - new_w) / 2; // 计算水平填充量
    int pad_h = (input_h - new_h) / 2; // 计算垂直填充量
    copyMakeBorder(                 // 执行填充操作
        resized_img, padded_img,    // 输入/输出图像
        pad_h, input_h - new_h - pad_h, // 上下填充量
        pad_w, input_w - new_w - pad_w, // 左右填充量
        BORDER_CONSTANT, Scalar(0, 0, 0) // 黑色填充
    );

    // 通道转换(BGR→RGB,符合模型输入要求)
    Mat processed_img;
    if (is_rgb) {
        cvtColor(padded_img, processed_img, COLOR_BGR2RGB); // 转换为RGB格式
    }
    else {
        processed_img = padded_img.clone(); // 不转换则直接复制
    }

    // 归一化(将像素值从0-255缩放到0-1)
    processed_img.convertTo(processed_img, CV_32F, 1.0 / 255.0);

    // 转换为NCHW格式(模型输入要求:批次大小x通道数x高度x宽度)
    vector<float> input_data; // 存储最终输入数据
    input_data.reserve(3 * input_h * input_w); // 预分配内存
    vector<Mat> channels(3); // 存储分离的RGB通道
    split(processed_img, channels); // 分离图像通道
    for (int c = 0; c < 3; ++c) {
        Mat flat = channels[c].reshape(1, 1); // 将单通道展平为1行
        input_data.insert(input_data.end(), (float*)flat.data, (float*)flat.data + flat.total()); // 添加到输入数据
    }

    return input_data; // 返回预处理后的浮点数组
}
4.结果可视化
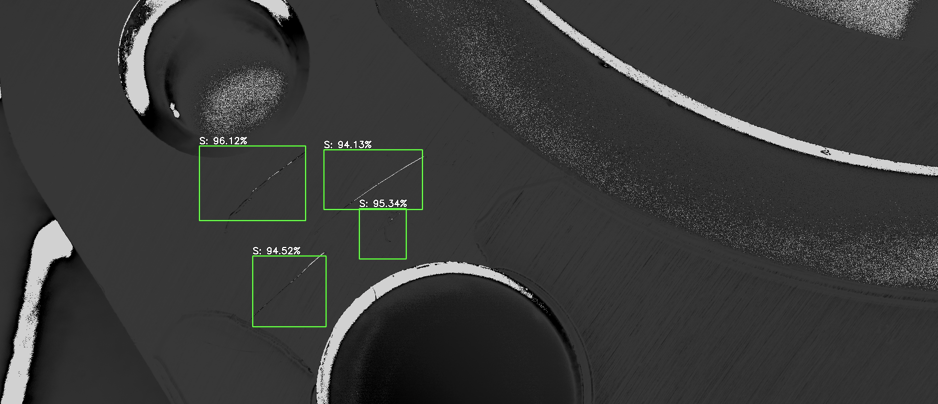
完整代码需要请私信我,帮忙点个关注和赞赞吧!

Agent 垂直技术社区,欢迎活跃、内容共建。
更多推荐
 10
10 0
0- 0


 已为社区贡献1条内容

所有评论(0)