C#程序中,如何制作一个简单好看的 素描 滤镜
今天来模仿一个素描图的滤镜效果,先看一下目标效果图:
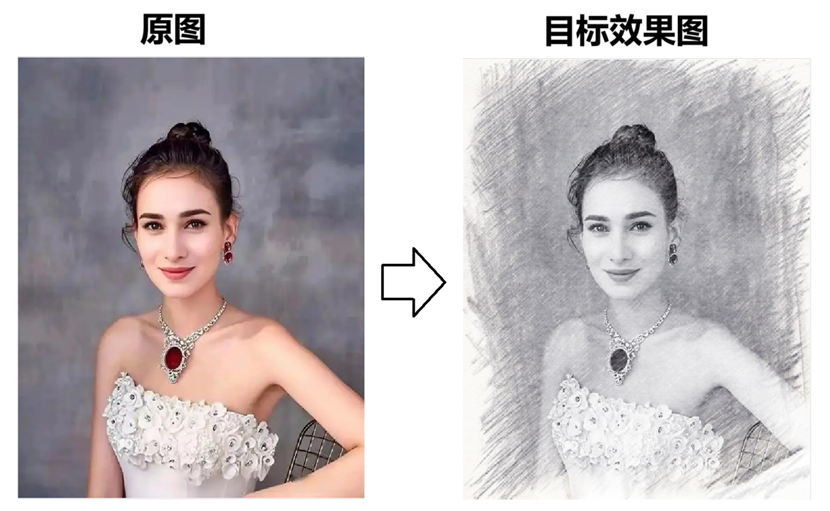
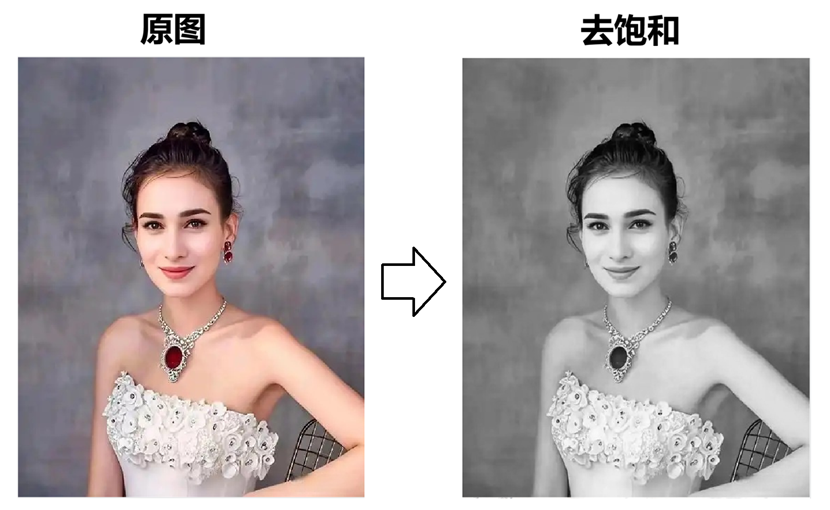
根据效果图,我们可以观察到一些特点,结果图的对比度是没有发生变化的,但是没有了色彩,失去了饱和度,变成了全灰的图片,因此我们可以确定一点,需要对图片进行去饱和处理;
另外可以观察到,图像的背景像是被抠像替换的感觉 但是右下角椅子的位置又可以观察到其实并不是抠像,
那么我们让它来对一张 空图 进行处理,看它的效果是怎样的: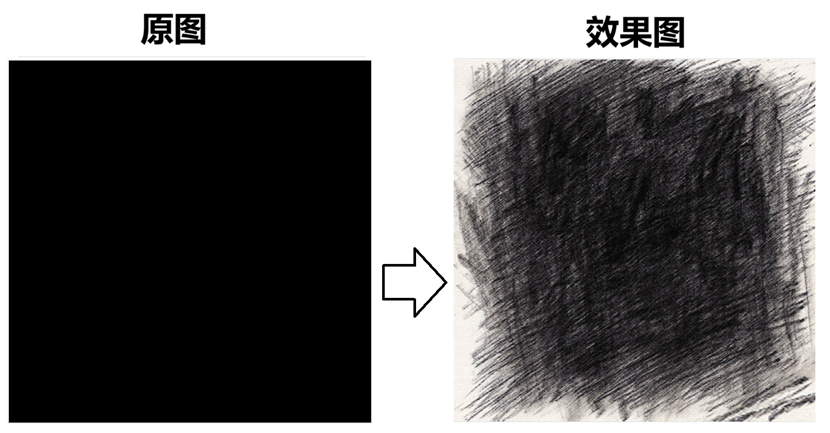
发现规律没有?两个效果图的素描的线条是完全一致的,只是尺寸不同 ,而且对于任意的图片,仿佛都是附加了相同的一层素描图层,我们上面看到的类似抠像的被扣掉的内容,实际上是把原图进行去饱和度之后,仅仅保留了与素描图层有交叉内容部分,那么交叉后如适合保留的呢?这里我们暂且使用 灰度值 作为 原图的透明通道,也就是说,这个素描图层越黑的地方,表示原图越不透明,素描图层越亮的地方,表示原图越透明,相当于仅仅保留了素描线条区域,会给人一种类似抠像的感觉,由于素描图层和原图都进行了去饱和处理,因此当两点的色彩叠加到一起之后也看不到冲突。
首先我们对原图进行去饱和度处理:
接下来对去饱和后的图片与素描图层进行融合处理,以素描图层的灰度值作为 去饱和图的透明通道值:
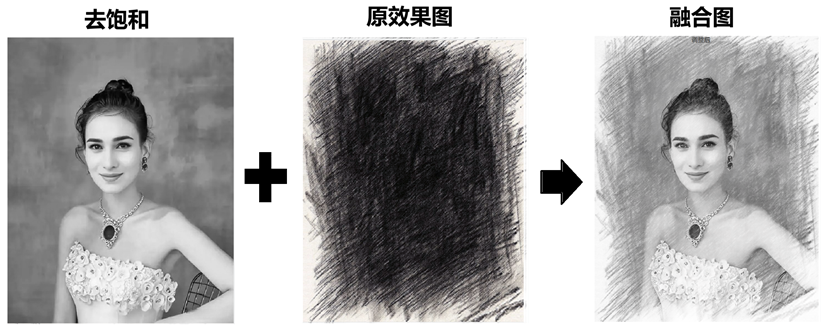
每个颜色点的转换过程:
public System.Drawing.Color ChangeColor(Color color, float brightnessAdjustment = 0f, float saturationAdjustment = 0f)
{
    float r = color.R / 255f;
    float g = color.G / 255f;
    float b = color.B / 255f;

    float max = Math.Max(r, Math.Max(g, b));
    float min = Math.Min(r, Math.Min(g, b));
    float h, s, l;

    l = (max + min) / 2f;

    if (max == min)
    {
        h = s = 0;
    }
    else
    {
        float d = max - min;
        s = l > 0.5f ? d / (2f - max - min) : d / (max + min);

        if (max == r)
            h = ((g - b) / d + (g < b ? 6f : 0f)) / 6f;
        else if (max == g)
            h = ((b - r) / d + 2f) / 6f;
        else
            h = ((r - g) / d + 4f) / 6f;
    }

    // 调整饱和度计算:使用乘法而不是加法,确保-1时完全灰度,0时原色
    float newS = s;
    if (saturationAdjustment < 0)
    {
        // 负值时:-1 = 完全灰度(s=0),0 = 原始饱和度
        newS = s * (1f + saturationAdjustment);
    }
    else
    {
        // 正值时:增加饱和度,但不超过1
        newS = Math.Min(1f, s + saturationAdjustment);
    }

    l = Math.Max(0f, Math.Min(1f, l + brightnessAdjustment));

    float newR, newG, newB;
    if (newS == 0)
    {
        newR = newG = newB = l;
    }
    else
    {
        float q = l < 0.5f ? l * (1f + newS) : l + newS - l * newS;
        float p = 2f * l - q;
        newR = HueToRgb(p, q, h + 1f / 3f);
        newG = HueToRgb(p, q, h);
        newB = HueToRgb(p, q, h - 1f / 3f);
    }

    return System.Drawing.Color.FromArgb(
        color.A,
        (int)(newR * 255),
        (int)(newG * 255),
        (int)(newB * 255)
    );
}

private float HueToRgb(float p, float q, float t)
{
    if (t < 0f) t += 1f;
    if (t > 1f) t -= 1f;
    if (t < 1f / 6f) return p + (q - p) * 6f * t;
    if (t < 1f / 2f) return q;
    if (t < 2f / 3f) return p + (q - p) * (2f / 3f - t) * 6f;
    return p;
}
来看一下效果比对:
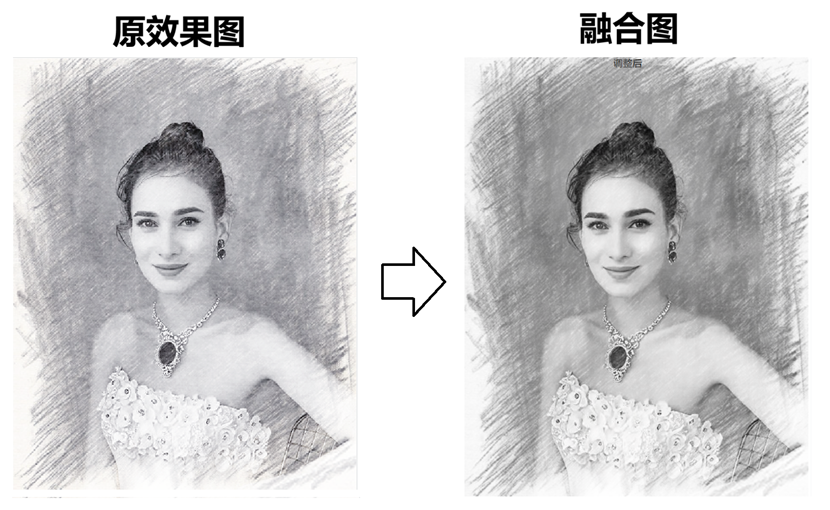
原效果图色调是有一点点偏蓝的,它没有将饱和度降到最低,而且背景色不是纯白色,是有一点泛黄的纸张色,这里也可以给R通道和G通道分别进行微量的增值,使泛黄;
另外我们融合的素描图层,因为是基于一张纯黑色图得到的效果图来作为的素描图层,它是不纯粹的素描图层,所以看起来填充的更满一些,缺少了一些线条灯缝隙感。假设这里我们换成其他的图层看看效果:
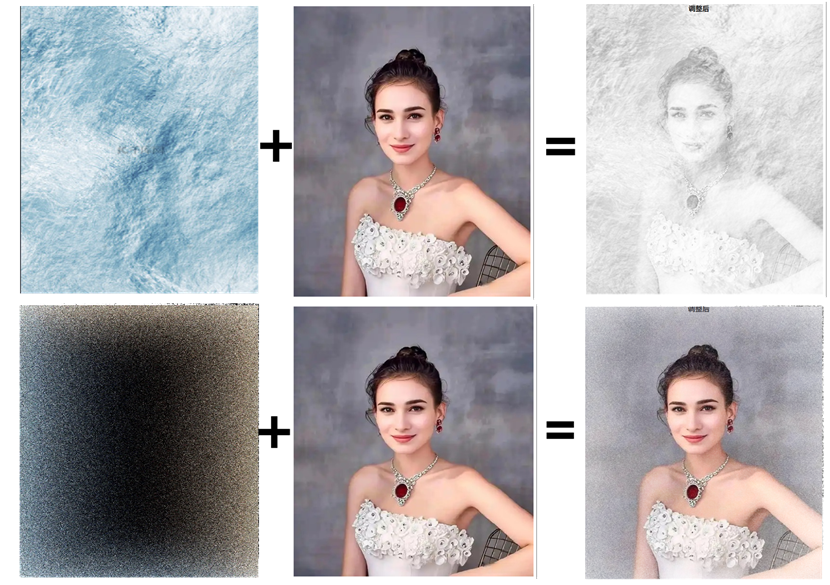
是不是瞬间现有了新发现 ,有点神奇。可以组合很多不同的效果出来。
去饱和和融合处理代码:
private void UpdateAdjustedImage()
{
    if (originalBitmap == null || adjustedBitmap == null)
        return;

    float brightness = (float)BrightnessSlider.Value;
    float saturation = (float)SaturationSlider.Value;

    int width = adjustedBitmap.PixelWidth;
    int height = adjustedBitmap.PixelHeight;
    int stride = width * 4;
    byte[] originalPixels = new byte[stride * height];
    byte[] adjustedPixels = new byte[stride * height];
    byte[] maskPixels = null;

    originalBitmap.CopyPixels(originalPixels, stride, 0);

    BitmapSource maskBitmap = null;
    if (true&&File.Exists(blur_mask_img_file))
    {
        try
        {
            BitmapImage tempMask = new BitmapImage(new Uri(blur_mask_img_file));

            TransformedBitmap scaledMask = new TransformedBitmap(
                tempMask,
                new ScaleTransform(
                    (double)width / tempMask.PixelWidth,
                    (double)height / tempMask.PixelHeight
                )
            );

            FormatConvertedBitmap formatMask = new FormatConvertedBitmap();
            formatMask.BeginInit();
            formatMask.Source = scaledMask;
            formatMask.DestinationFormat = PixelFormats.Bgra32;
            formatMask.EndInit();

            maskBitmap = formatMask;
            maskPixels = new byte[stride * height];
            maskBitmap.CopyPixels(maskPixels, stride, 0);
        }
        catch (Exception ex)
        {
            maskBitmap = null;
            maskPixels = null;
        }
    }

    float centerX = width / 2f;
    float centerY = height / 2f;
    float maxDistance = Math.Min(centerX, centerY);

    for (int y = 0; y < height; y++)
    {
        for (int x = 0; x < width; x++)
        {
            int index = (y * stride) + (x * 4);

            byte b = originalPixels[index];
            byte g = originalPixels[index + 1];
            byte r = originalPixels[index + 2];
            byte a = originalPixels[index + 3];

            Color wpfColor = Color.FromArgb(a, r, g, b);
            System.Drawing.Color adjustedColor = ChangeColor(wpfColor, brightness, saturation);

            adjustedPixels[index] = (byte)Math.Min(255, adjustedColor.B + 0);
            adjustedPixels[index + 1] = (byte)Math.Min(255, adjustedColor.G + 0);
            adjustedPixels[index + 2] = (byte)Math.Min(255, adjustedColor.R + 0);

            byte finalAlpha = adjustedColor.A;
            if (maskPixels != null)
            {
                byte maskAlpha = (byte)(255- (byte)((int)(( maskPixels[index + 0] + maskPixels[index + 1] + maskPixels[index + 2] )/3)));

                finalAlpha = maskAlpha;
            }
            else
            {
                finalAlpha = (byte)(adjustedColor.A);
            }

            adjustedPixels[index + 3] = finalAlpha;
        }
    }

    adjustedBitmap.WritePixels(new Int32Rect(0, 0, width, height), adjustedPixels, stride, 0);
}
Agent 垂直技术社区,欢迎活跃、内容共建。
更多推荐



 4
4 0
0- 0


 已为社区贡献2条内容

所有评论(0)