【C++】C++11 新特性详解(上)
上文链接
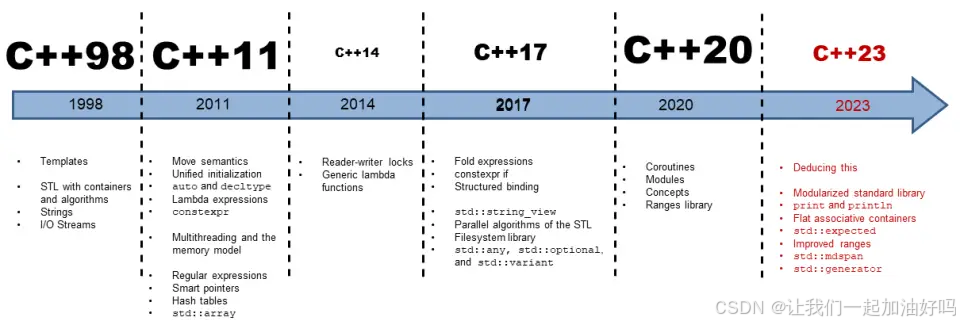
一、C++11 发展历史
C++11 是 C++ 的第二个主要版本,它引入了大量更改,是从 C++98 起的最重要更新。在它最终由 ISO 在 2011 年 8 月 12 日采纳前,人们曾使用名称 “C++0x”,因为它曾被期待在 2010 年之前发布。C++03 与 C++11 期间花了 8 年时间,故而这是迄今为止最长的版本间隔。从那时起,C++ 有规律地每 3 年更新一次。
二、列表初始化
1. C++98 的 {}
在 C++98 中一般只有数组和结构体可以用 {} 进行初始化。
struct Point
{
 int _x;
 int _y;
};

int main()
{
	int array1[] = { 1, 2, 3, 4, 5 };
	int array2[5] = { 0 };
	Point p = { 1, 2 };

	return 0;
}
2. C++11 的 {}
C++11 版本以后想统一初始化方式,试图实现一切对象皆可用 {} 初始化,{} 初始化也叫做列表初始化。
内置类型支持列表初始化,自定义类型也支持。自定义类型本质是类型转换,中间会构造出一个临时对象再拷贝构造给当前对象,编译器最后优化以后变成直接构造。
{} 初始化的过程中,可以省略掉 =。
C++11 列表初始化的本意是想实现一个大统一的初始化方式,它在有些场景下带来的不少便利,如容器 push/inset 多参数构造的对象时,{} 初始化会很方便。
#include<iostream>
#include<vector>

using namespace std;

struct Point
{
	int _x;
	int _y;
};

class Date
{
public:
	Date(int year = 1, int month = 1, int day = 1)
		:_year(year)
		, _month(month)
		, _day(day)
	{
		cout << "Date(int year, int month, int day)" << endl;
	}

	Date(const Date& d)
		:_year(d._year)
		, _month(d._month)
		, _day(d._day)
	{
		cout << "Date(const Date& d)" << endl;
	}

private:
	int _year;
	int _month;
	int _day;
};

// 一切皆可用列表初始化,且可以不加 =
int main()
{
	// C++98 支持的
	int a1[] = { 1, 2, 3, 4, 5 };
	int a2[5] = { 0 };
	Point p = { 1, 2 };

	// C++11 支持的
	// 内置类型支持
	int x1 = { 2 };

	// 自定义类型支持
	// 这里本质是用 { 2025, 1, 1 } 构造一个 Date 临时对象
	// 临时对象再去拷⻉构造 d1,编译器优化后合二为一变成 { 2025, 1, 1 } 直接构造初始化
	// 运⾏一下,我们就可以验证上面的理论,发现是没调用拷贝构造的
	Date d1 = { 2025, 1, 1 };

	// 这里 d2 引用的是 { 2024, 7, 25 } 构造的临时对象
	const Date& d2 = { 2024, 7, 25 };

	// 需要注意的是 C++98 支持单参数时类型转换,也可以不用 {}
	Date d3 = { 2025 };
	Date d4 = 2025;

	// 可以省略掉 =
	Point p1{ 1, 2 };
	int x2{ 2 };
	Date d6{ 2024, 7, 25 };
	const Date& d7{ 2024, 7, 25 };

	// 下面这种写法不支持,只有 {} 初始化时,才能省略 =
	// Date d8 2025;

	// 使用场景
	vector<Date> v;
	// 比起有名对象和匿名对象传参,这里 {} 更有性价比
	v.push_back({ 2025, 1, 1 });

	return 0;
}
- 输出
Date(int year, int month, int day)
Date(int year, int month, int day)
Date(int year, int month, int day)
Date(int year, int month, int day)
Date(int year, int month, int day)
Date(int year, int month, int day)
Date(int year, int month, int day)
Date(const Date& d)
3. std::initializer_list
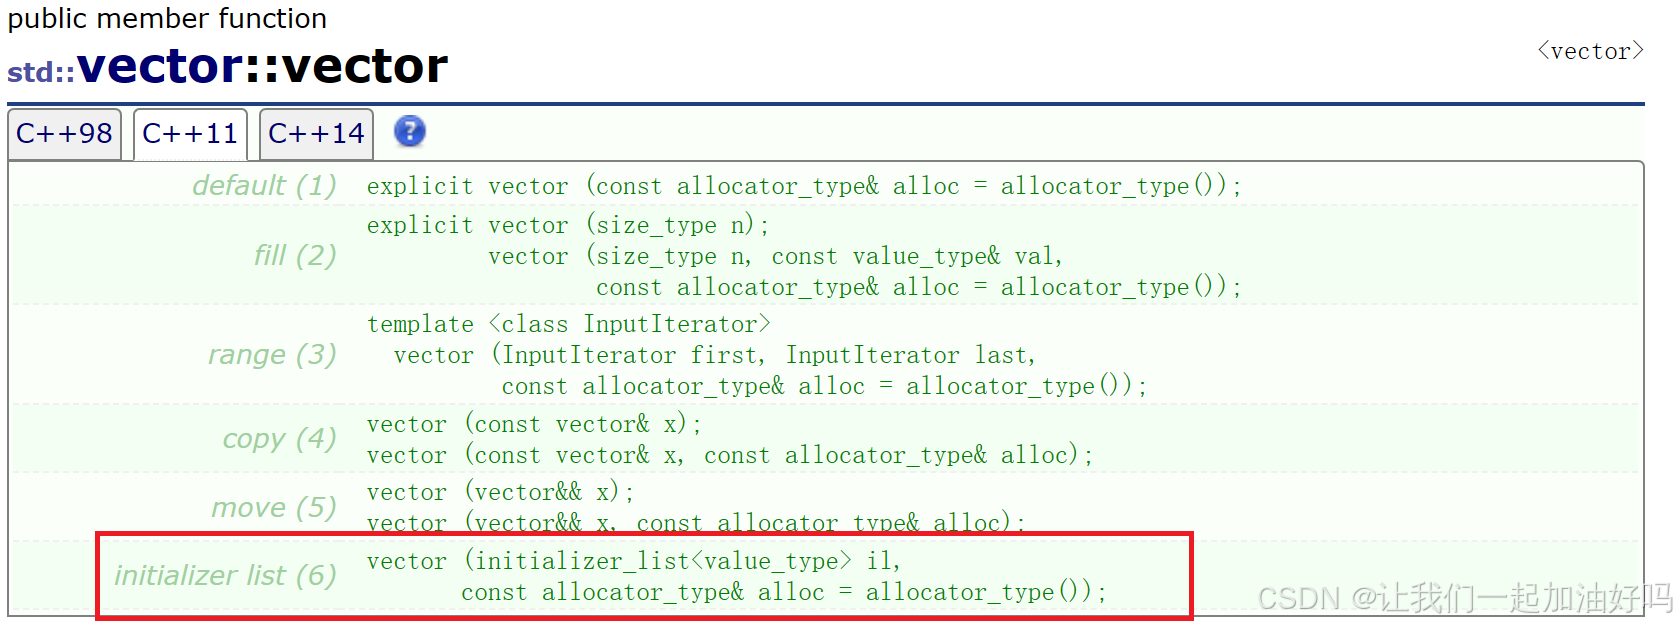
上面的初始化已经很方便,但是对某些容器初始化还是不太方便,比如一个 vector 对象,我想用 N 个值去构造初始化,比如我们经常看到有形如 vector v1 = {1,2,3}; vector v2 = {1,2,3,4,5}; 这样的初始化,那么我们得实现很多个构造函数才能支持,但实际上这种初始化是由库中的 std::initializer_list 实现的。

auto il = { 10, 20, 30 }; // the type of il is an initializer_list
initializer_list 是一个类,支持迭代器遍历。使用它初始化的本质是底层开一个数组,将数据拷贝过来,initializer_list 内部有两个指针分别指向数组的开始和结束。
这样一来,容器支持一个 initializer_list 的构造函数,也就支持任意多个值构成的 {x1,x2,x3...} 进行初始化。STL 中的容器支持任意多个值构成的 {x1,x2,x3...} 进行初始化,就是通过 initializer_list 的构造函数支持的。
int main()
{
	std::initializer_list<int> mylist;
	mylist = { 10, 20, 30 };
	cout << sizeof(mylist) << endl;  // 输出两个指针的大小

	// 这里 begin 和 end 返回的值 initializer_list 对象中存的两个指针
	// 这两个指针的值跟 i 的地址跟接近,说明数组存在栈上
	int i = 0;
	cout << mylist.begin() << endl;
	cout << mylist.end() << endl;
	cout << &i << endl;

	// {}列表中可以有任意多个值
	// 这两个写法语义上还是有差别的,第一个 v1 是直接构造
	// 第二个 v2 是构造临时对象 + 临时对象拷贝 v2 -> 优化为直接构造
	vector<int> v1({ 1,2,3,4,5 });
	vector<int> v2 = { 1,2,3,4,5 };
	const vector<int>& v3 = { 1,2,3,4,5 };

	// 这里是 pair 对象的{}初始化和 map 的 initializer_list 构造结合到一起用了
	map<string, string> dict = { {"sort", "排序"}, {"string", "字符串"} };

	// initializer_list 版本的赋值⽀持
	v1 = { 10,20,30,40,50 };

	return 0;
}
- 输出
16
00000023975FF6D8
00000023975FF6E4
00000023975FEF54
三、右值引用和移动语义
1. 左值和右值
左值是一个表示数据的表达式 (如变量名或解引用的指针),一般是有持久状态,存储在内存中,我们可以获取它的地址,左值可以出现赋值符号的左边,也可以出现在赋值符号右边。用 const 修饰符后的左值,不能给它赋值,但是可以取它的地址。
右值也是一个表示数据的表达式,要么是字面值常量、要么是表达式求值过程中创建的临时对象等。右值只能出现在赋值符号的右边,不能出现出现在赋值符号的左边,右值不能取地址。
值得一提的是,左值的英文简写为 lvalue,右值的英文简写为 rvalue。传统认为它们分别是 left value 和 right value的缩写。现代C++中,lvalue 被解释为 loactor value 的缩写,可意为存储在内存中、有明确存储地址、可以取地址的对象。而 rvalue 被解释为read value,指的是那些可以提供数据值,但是不可以寻址的对象,例如:临时变量,字面量常量,存储于寄存器中的变量等。
也就是说左值和右值的核心区别就是能否取地址。
int main()
{
	// 左值: 可以取地址
	// 以下的 p、b、c、*p、s、s[0] 就是常见的左值
	int* p = new int(0);
	int b = 1;
	const int c = b;
	*p = 10;
	string s("111111");
	s[0] = 'x';

	// 右值: 不能取地址
	double x = 1.1, y = 2.2;
	// 以下的 10、x + y、fmin(x, y)、string("11111") 都是常见的右值
	10;
	x + y;
	fmin(x, y);
	string("11111");  // 匿名对象

	return 0;
}
2. 左值引用和右值引用
我们平时说的引用一般都指的是左值引用,即引用的对象为左值,比如:
int i = 1;
int& ri = i;
实际上引用分左值引用和右值引用。
Type& r1 = x;     // 左值引用
Type&& rr1 = y;   // 右值引用
第一个语句就是左值引用,左值引用就是给左值取别名。第二个就是右值引用,同样的道理,右值引用就是给右值取别名。
-
左值引用不能直接引用右值,但是 const 左值引用可以引用右值;
-
右值引用不能直接引用左值,但是右值引用可以引用 move(左值);
// move 是库里面的一个函数模板,本质内部是进⾏强制类型转换,当然他还涉及一些引⽤折叠的知识,这个后面会细讲。
template  typename remove_reference::type&& move (T&&  arg);
-
需要注意的是变量表达式都是左值属性,也就意味着一个右值被右值引用绑定后,右值引用变量变量表达式的属性是左值。也就意味着右值本身不能被直接修改,但是右值引用可以修改。
-
语法层面看,左值引用和右值引用都是取别名,不开空间。从汇编底层的角度看下面代码中
r1和rr1汇编层,都是用指针实现的,没什么区别。底层汇编等实现和上层语法表达的意义有时是背离的,所以不要弄到一起去理解。
int main()
{
	int* p = new int(0);
	int b = 1;
	const int c = b;
	*p = 10;
	string s("111111");
	s[0] = 'x';
	double x = 1.1, y = 2.2;

	// 左值引用给左值取别名
	int& r1 = b;
	int*& r2 = p;
	int& r3 = *p;
	string& r4 = s;
	char& r5 = s[0];

	// 右值引用给右值取别名
	int&& rr1 = 10;
	double&& rr2 = x + y;
	double&& rr3 = fmin(x, y);
	string&& rr4 = string("11111");

	// 左值引用不能直接引用右值,但是 const 左值引用可以引用右值
	const int& rx1 = 10;
	const double& rx2 = x + y;
	const double& rx3 = fmin(x, y);
	const string& rx4 = string("11111");

	// 右值引用不能直接引用左值,但是右值引用可以引用 move(左值)
	int&& rrx1 = move(b);
	int*&& rrx2 = move(p);
	int&& rrx3 = move(*p);
	string&& rrx4 = move(s);
	// 本质类似于下面这样,是一种强制类型转换
	string&& rrx5 = (string&&)s;

	// b、r1、rr1 都是变量表达式,都是左值,因此都可以取地址
	cout << &b << endl;
	cout << &r1 << endl;
	cout << &rr1 << endl;

	// 这里要注意的是,rr1 的属性是左值,所以不能再被右值引用绑定,除非 move 一下
	int& r6 = r1;
	// int&& rrx6 = rr1;     // ERROR
	int&& rrx6 = move(rr1);  // OK

	return 0;
}
3. 左值和右值的参数匹配
在 C++98 中,我们实现一个 const 左值引用作为参数的函数,那么实参传递左值和右值都可以匹配。
C++11 以后,分别重载左值引用、const 左值引用、右值引用作为形参的一个 f 函数,那么其参数匹配规则如下:
- 实参是左值会匹配
f(左值引用); - 实参是 const 左值则会匹配
f(const 左值引用); - 实参是右值会匹配
f(右值引用)。
void f(int& x)
{
	std::cout << "左值引用重载 f(" << x << ")\n";
}

void f(const int& x)
{
	std::cout << "到 const 的左值引用重载 f(" << x << ")\n";
}

void f(int&& x)
{
	std::cout << "右值引用重载 f(" << x << ")\n";
}

int main()
{
	int i = 1;
	const int ci = 2;
	f(i); // 调用 f(int&)
	f(ci); // 调用 f(const int&)
	f(3); // 调用 f(int&&),如果没有 f(int&&) 重载则会调用 f(const int&)
	f(std::move(i)); // 调用 f(int&&)

	// 右值引用变量在用于表达式时是左值
	int&& x = 1;
	f(x); // 调用 f(int& x)
	f(std::move(x)); // 调用 f(int&&)

	return 0;
}
- 输出
左值引用重载 f(1)
到 const 的左值引用重载 f(2)
右值引用重载 f(3)
右值引用重载 f(1)
左值引用重载 f(1)
右值引用重载 f(1)
4. 右值引用和移动语义的使用场景
(1) 左值引用的使用场景回顾
左值引用主要是在函数中用左值引用传参和左值引用传返回值时减少拷贝,同时这样还可以修改实参和修改返回对象。左值引用已经解决大多数场景的拷贝效率问题,但是有些场景不能使用传左值引用返回,如下面的 addStrings 和 generate 函数。
C++98 中的解决方案只能是被迫使用输出型参数解决。
class Solution
{
public:
	// 实现两个字符串形式的数字相加
	// 这里的 str 是局部对象,函数结束就销毁了,不能用引用返回,左右值引用都不行
    // 直接传值返回,传值返回要生成拷贝对象
	string addStrings(string num1, string num2)
	{
		string str;
		int end1 = num1.size() - 1, end2 = num2.size() - 1;
		// 进位
		int next = 0;
		while (end1 >= 0 || end2 >= 0)
		{
			int val1 = end1 >= 0 ? num1[end1--] - '0' : 0;
			int val2 = end2 >= 0 ? num2[end2--] - '0' : 0;
			int ret = val1 + val2 + next;
			next = ret / 10;
			ret = ret % 10;
			str += ('0' + ret);
		}
		if (next == 1)
			str += '1';
		reverse(str.begin(), str.end());
		return str;
	}
};

class Solution
{
public:
    // 生成杨辉三角
	// C++98 版本这里的传值返回拷贝代价就太大了
	vector<vector<int>> generate(int numRows)
    {
		vector<vector<int>> vv(numRows);
		for (int i = 0; i < numRows; ++i)
		{
			vv[i].resize(i + 1, 1);
		}
		for (int i = 2; i < numRows; ++i)
		{
			for (int j = 1; j < i; ++j)
			{
				vv[i][j] = vv[i - 1][j] + vv[i - 1][j - 1];
			}
		}
		return vv;
	}
};

// C++98 中的解决方案只能是被迫使用输出型参数解决
vector<vector<int>> generate(int numRows, vector<vector<int>>& vv)
{
	// ...

    return vv;
}
但是在 C++11 中,像 vector<vector<int>> generate(int numRows) 这样写效率就很高,不用担心拷贝代价太大的问题。那么 C++11 之后是如何解决这种问题的呢?
(2) 移动构造和移动赋值
① 移动构造
移动构造函数是一种构造函数,类似拷贝构造函数,移动构造函数要求第一个参数是该类类型的引用,但是不同的是要求这个参数是右值引用,如果还有其他参数,额外的参数必须有缺省值。
Type(const Type& x);  // 拷贝构造
Type(Type&& x);       // 移动构造
这样一来移动构造就和普通的拷贝构造构成了函数重载,当传入的对象是一个左值时就调用拷贝构造,而如果传入对象是一个右值时就调用移动构造。
为什么要这么设计呢?因为自定义类型 (如 string) 的右值一般都是临时对象或者匿名对象,它们都有一个特点就是只在当前一行起作用,过了当前行就没了。那么我想用这个右值 (临时对象或匿名对象) 去构造一个对象时我可以直接把这个右值的值和我想要构造出的对象进行交换,反正这个右值之后马上就要销毁,它交换后是什么都无所谓。也就是说移动构造的本质是要 “窃取” 引用的右值对象的资源,而不是像拷贝构造那样去拷贝资源,从而提高效率。
// 拷贝构造
string(const string& s)
	:_str(nullptr)
{
	reserve(s._capacity);
	for (auto ch : s)
	{
		push_back(ch);
	}
}

// 移动构造
string(string&& s)
{
    // s 是我们想要的,我们只需把它的值交换过来即可,反正它马上就嘎了
	swap(s);
}
② 移动赋值
移动赋值的原理和移动构造的原理一样,移动赋值是一个赋值运算符的重载,它跟拷贝赋值构成函数重载。类似拷贝赋值函数,移动赋值函数要求第一个参数是该类类型的引用,但是不同的是要求这个参数是右值引用。
// 拷贝赋值
string& operator=(const string& s)
{
	if (this != &s)
	{
		_str[0] = '\0';
		_size = 0;
		reserve(s._capacity);
		for (auto ch : s)
		{
			push_back(ch);
		}
	}
	return *this;
}

// 移动赋值
string& operator=(string&& s)
{
	swap(s);
	return *this;
}
③ 实现含移动语义的 string 类
下面简单模拟实现一个 string 类,加上移动构造和移动赋值。
#include<iostream>
#include<cassert>

using namespace std;

namespace mine
{
	class string
	{
	public:
		typedef char* iterator;
		typedef const char* const_iterator;

		iterator begin(){ return _str; }
		iterator end(){ return _str + _size; }
		const_iterator begin() const{ return _str; }
		const_iterator end() const{ return _str + _size; }
		const char* c_str() const { return _str; }
		size_t size() const { return _size; }

        // 构造
		string(const char* str = "")
			:_size(strlen(str))
			, _capacity(_size)
		{
			cout << "string(char* str)-构造" << endl;
			_str = new char[_capacity + 1];
			strcpy(_str, str);
		}

		void swap(string& s)
		{
			::swap(_str, s._str);
			::swap(_size, s._size);
			::swap(_capacity, s._capacity);
		}

        // 拷贝构造
		string(const string& s)
			:_str(nullptr)
		{
			cout << "string(const string& s) -- 拷贝构造" << endl;
			reserve(s._capacity);
			for (auto ch : s)
			{
				push_back(ch);
			}
		}

		// 移动构造
		string(string&& s)
		{
			cout << "string(string&& s) -- 移动构造" << endl;
			swap(s);
		}

        // 拷贝赋值
		string& operator=(const string& s)
		{
			cout << "string& operator=(const string& s) -- 拷贝赋值" << endl;
			if (this != &s)
			{
				_str[0] = '\0';
				_size = 0;
				reserve(s._capacity);
				for (auto ch : s)
				{
					push_back(ch);
				}
			}
			return *this;
		}

		// 移动赋值
		string& operator=(string&& s)
		{
			cout << "string& operator=(string&& s) -- 移动赋值" << endl;
			swap(s);
			return *this;
		}

		~string()
		{
			cout << "~string() -- 析构" << endl;
			delete[] _str;
			_str = nullptr;
		}

		char& operator[](size_t pos)
		{
			assert(pos < _size);
			return _str[pos];
		}

		void reserve(size_t n)
		{
			if (n > _capacity)
			{
				char* tmp = new char[n + 1];
				if (_str)
				{
					strcpy(tmp, _str);
					delete[] _str;
				}
				_str = tmp;
				_capacity = n;
			}
		}

		void push_back(char ch)
		{
			if (_size >= _capacity)
			{
				size_t newcapacity = _capacity == 0 ? 4 : _capacity *

					2;
				reserve(newcapacity);
			}
			_str[_size] = ch;
			++_size;
			_str[_size] = '\0';
		}

		string& operator+=(char ch)
		{
			push_back(ch);
			return *this;
		}

	private:
		char* _str = nullptr;
		size_t _size = 0;
		size_t _capacity = 0;
	};
}

int main()
{
	// 直接构造
	mine::string s1("xxxxx");
	// 拷贝构造
	mine::string s2 = s1;
	// 构造 + 移动构造 -> 编译器优化后变成直接构造
	mine::string s3 = mine::string("yyyyy");
	// 移动构造
	mine::string s4 = move(s1);

    // 这里 s1 被 move 之后变成了右值属性,因此走的是移动构造
    // 但同时 s1 的数据也和 s4 进行了交换,这个时候相当于 s1 已经变成空了
    // 所以 move 这样做也有一定的风险

	cout << "******************************" << endl;

	return 0;
}
- 输出
string(char* str)-构造
string(const string& s) -- 拷贝构造
string(char* str)-构造
string(string&& s) -- 移动构造
******************************
~string() -- 析构
~string() -- 析构
~string() -- 析构
~string() -- 析构
(3) 右值引用与移动语义在传值返回方面的优化
有了移动构造之后,传值返回时就由拷贝构造变成了移动构造,就不用担心传值返回时拷贝代价太大的问题了。
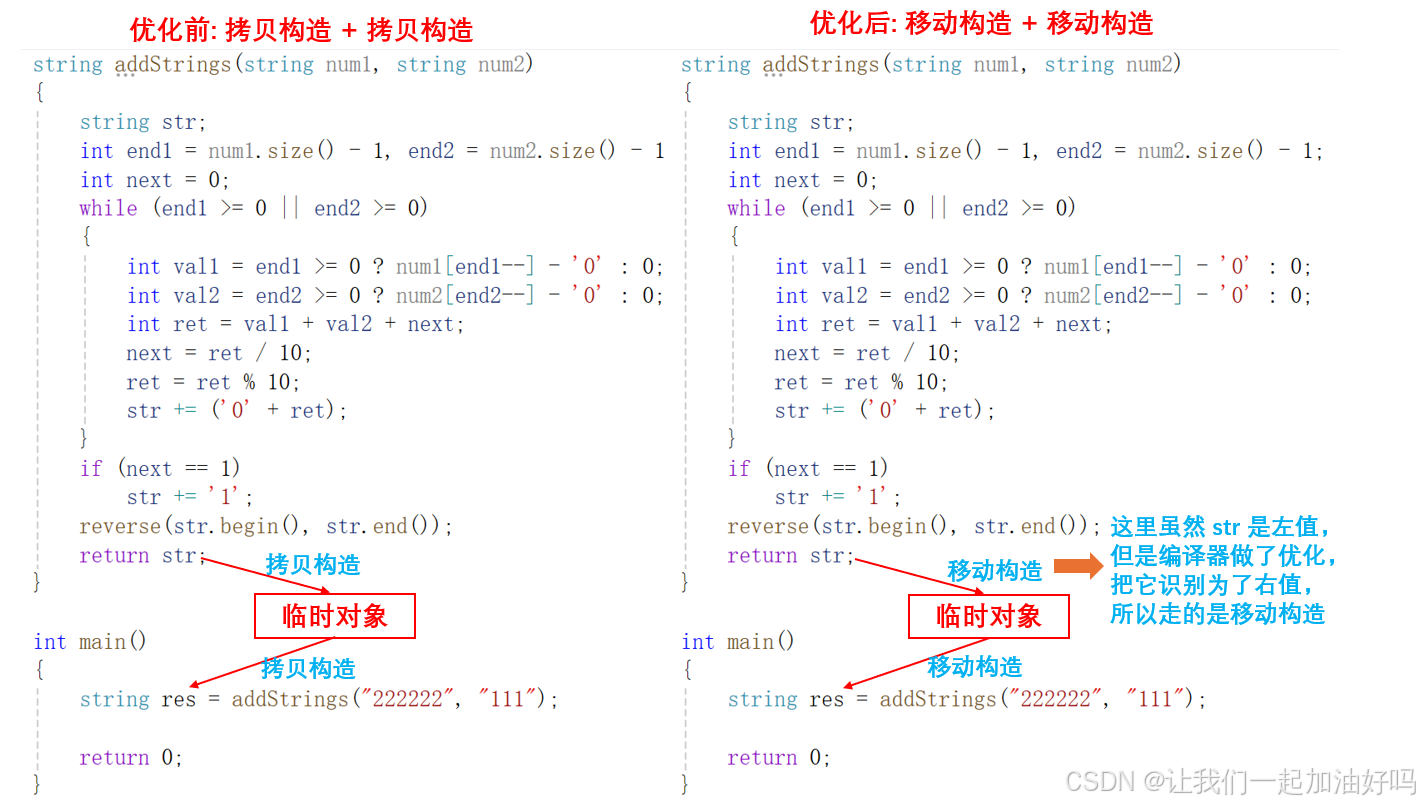
有的编译器还会进行更进一步的优化,比如下图中的左边所展示的 vs2019 debug 环境下编译器的优化,省去了创建临时对象的过程,直接拷贝或移动构造给 res 对象。
下图中右侧则是更恐怖的一种优化,vs2019 的 release 和 vs2022 的 debug 和 release 环境下,省去了创建 str 的步骤,直接把它当作 res 的引用,一步到位,实现了零拷贝。这种优化牛的点就在于即使没有移动构造的情况下也能实现零拷贝,效率很高。
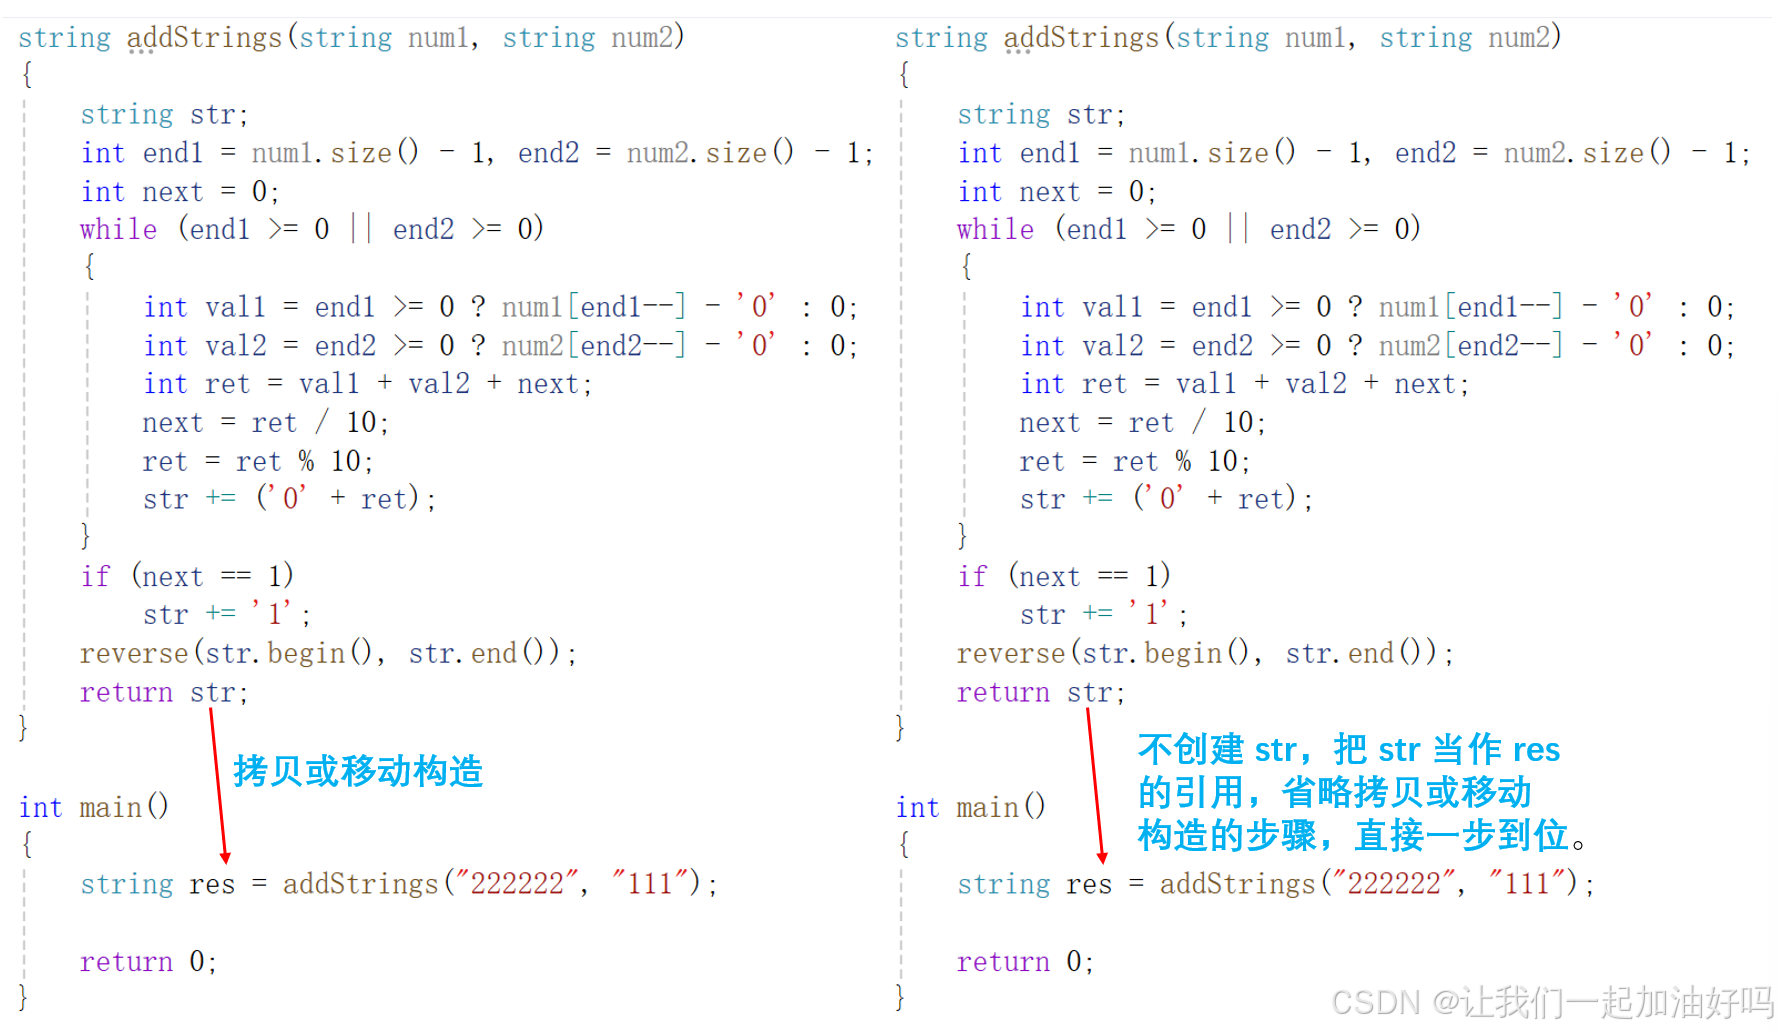
需要注意的是,像上图右边这种优化不是 C++ 的标准规定,是由编译器决定的。也就意味着不是所有的编译器都会这么优化,只有在比较新的一些编译器中才会这么优化。
(4) 右值引用与移动语义在函数传参方面的优化
仔细观察 STL 中的容器接口会发现,在 C++ 11 版本中,很多容器接口比如 push_back 都新增了一个传右值引用的版本。
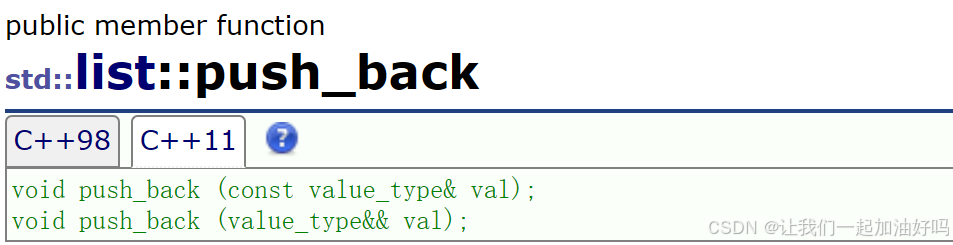
这样一来,传左值就会调用第一个版本,传右值就会调用第二个版本。这样做的目的就是减少拷贝。因为当我们传入一个右值时,比如:
list<string> l;
string s = "11111";

l.push_back(s);
l.push_back(move(s));
如果直接插入 s,即调用第一个版本的 push_back,那么插入时会根据这个 s 的内容拷贝出一份新的字符串插入,原字符串 s 不变。但是如果插入 move(s),此时调用的则是第二个版本的 push_back,此时插入将不会拷贝出一个新的字符串,而是用 string 的默认构造生成出的一个空串与 s 进行交换,没有拷贝的过程 ,插入后 s 变为空串。
下面是简单实现的一份含两种版本的 push_back 的 list:
namespace mine
{
	template<class T>
	struct ListNode

	{
		ListNode<T>* _next;
		ListNode<T>* _prev;
		T _data;

		ListNode(const T& data = T())
			:_next(nullptr)
			, _prev(nullptr)
			, _data(data)  // 走 T 的普通构造 (如果 T 是自定义类型)
		{}

        // 移动构造
		ListNode(T&& data)
			:_next(nullptr)
			, _prev(nullptr)
			, _data(move(data))  // 走 T 的移动构造
		{}
	};

	template<class T, class Ref, class Ptr>
	struct ListIterator
	{
		typedef ListNode<T> Node;
		typedef ListIterator<T, Ref, Ptr> Self;
		Node* _node;
		ListIterator(Node* node)
			:_node(node)
		{}

		Self& operator++()
		{
			_node = _node->_next;
			return *this;
		}

		Ref operator*() { return _node->_data; }
		bool operator!=(const Self& it) { return _node != it._node; }

	};
	template<class T>
	class list
	{
		typedef ListNode<T> Node;
	public:
		typedef ListIterator<T, T&, T*> iterator;
		typedef ListIterator<T, const T&, const T*> const_iterator;

		iterator begin() { return iterator(_head->_next); }
		iterator end() { return iterator(_head); }

		void empty_init()
		{
			_head = new Node();
			_head->_next = _head;
			_head->_prev = _head;
		}

		list() { empty_init(); }

		void push_back(const T& x) { insert(end(), x); }

        // move(s1) 整体是一个左值属性,即这里的 x 是左值
        // 想要调用 iterator insert(iterator pos, T&& x) 必须要再 move 一下
		void push_back(T&& x) { insert(end(), move(x)); }

		iterator insert(iterator pos, const T& x)
		{
			Node* cur = pos._node;
			Node* newnode = new Node(x);
			Node* prev = cur->_prev;
			// prev newnode cur

			prev->_next = newnode;
			newnode->_prev = prev;
			newnode->_next = cur;
			cur->_prev = newnode;
			return iterator(newnode);
		}

		iterator insert(iterator pos, T&& x)
		{
			Node* cur = pos._node;
			Node* newnode = new Node(move(x));  // 走移动构造
			Node* prev = cur->_prev;
			// prev newnode cur

			prev->_next = newnode;
			newnode->_prev = prev;
			newnode->_next = cur;
			cur->_prev = newnode;
			return iterator(newnode);
		}

	private:
		Node* _head;
	};
}

int main()
{
	mine::list<string> lt;
	string s1("111111111111111111111");

    // 传左值,调用 void push_back(const T& x)
	lt.push_back(s1);
	for (auto& e : lt) cout << e << endl;
	cout << "s1: " << s1 << endl;

    // 传右值,调用 void push_back(T&& x)
	lt.push_back(move(s1));
	for (auto& e : lt) cout << e << endl;
	cout << "s1: " << s1 << endl;

	return 0;
}
- 输出
111111111111111111111
s1: 111111111111111111111
111111111111111111111
111111111111111111111
s1:
5. 引用延长生命周期
右值引用可用于为临时对象延长生命周期,const 的左值引用也能延长临时对象生命周期,但这些被 const 修饰的对象无法被修改。
int main()
{
	std::string s1 = "Test";
	// std::string&& r1 = s1; // ERROR: 不能绑定左值

	const std::string& r2 = s1 + s1; // OK: s1 + s1 返回的临时对象到了 const 的左值引用被延长生命周期
	// r2 += "Test"; // ERROR: 不能通过 const 的引用修改

	std::string&& r3 = s1 + s1; // OK: 右值引用延长生命周期
	r3 += "Test"; // OK: 能通过非 const 的引用修改

	std::cout << r3 << '\n';  // TestTestTest

	return 0;
}
6. 引用折叠
(1) 引用折叠规则
C++ 中不能直接定义引用的引用如 int& && r = i;,这样写会直接报错,但是通过 typedef 或模板可以构成引用的引用,这种现象称为引用折叠。
通过 typedef 或者模板操作构成引用的引用时,这时 C++11 给出了一个引用折叠的规则:右值引用的右值引用折叠成右值引用,所有其他组合均折叠成左值引用。
// 由于引用折叠限定,f1 实例化以后总是一个左值引用
template<class T>
void f1(T& x)
{}

// 由于引用折叠限定,f2 实例化后可以是左值引用,也可以是右值引用
template<class T>
void f2(T&& x)
{}

int main()
{
    typedef int& lref;
	typedef int&& rref;

	int n = 0;
	lref& r1 = n;  // r1 的类型是 int&
	lref&& r2 = n; // r2 的类型是 int&
	rref& r3 = n;  // r3 的类型是 int&
	rref&& r4 = 1; // r4 的类型是 int&&

	// 没有折叠->实例化为void f1(int& x)
	f1<int>(n);
	f1<int>(0); // 报错

	// 折叠->实例化为void f1(int& x)
	f1<int&>(n);
	f1<int&>(0); // 报错

	// 折叠->实例化为void f1(int& x)
	f1<int&&>(n);
	f1<int&&>(0); // 报错

	// 折叠->实例化为void f1(const int& x)
	f1<const int&>(n);
	f1<const int&>(0);

	// 折叠->实例化为void f1(const int& x)
	f1<const int&&>(n);
	f1<const int&&>(0);

	// 没有折叠->实例化为void f2(int&& x)
	f2<int>(n); // 报错
	f2<int>(0);

	// 折叠->实例化为void f2(int& x)
	f2<int&>(n);
	f2<int&>(0); // 报错

	// 折叠->实例化为void f2(int&& x)
	f2<int&&>(n); // 报错
	f2<int&&>(0);

	return 0;
}
(2) 万能引用
像 f2 这样的函数模板中,T&& x 参数看起来是右值引用参数,但是由于引用折叠的规则,它传递左值时就是左值引用,传递右值时就是右值引用,有些地方也把这种函数模板的参数叫做万能引用。
// 万能引用
template<class T>
void Function(T&& t)
{
	int a = 0;
	T x = a;
	// x++;

	cout << &a << endl;
	cout << &x << endl << endl;
}

int main()
{
	// 10 是右值,推导出 T 为 int,模板实例化为 void Function(int&& t)
	Function(10); // 右值

	int a;
	// a 是左值,推导出 T 为 int&,引用折叠,模板实例化为 void Function(int& t)
	Function(a); // 左值

	// std::move(a) 是右值,推导出 T 为 int,模板实例化为 void Function(int&& t)
	Function(std::move(a)); // 右值

	const int b = 8;
	// b 是左值,推导出 T 为 const int&,引用折叠,模板实例化为 void Function(const int& t)
	// 所以 Function 内部 x 不能++
	Function(b); // const 左值

	// std::move(b) 是右值,推导出 T 为 const int,模板实例化为 void Function(const int&& t)
	// 所以 Function 内部 x 不能++
	Function(std::move(b)); // const 右值

    // 所以说只要传的是左值,Function 中的 T 就为 int& 或者 const T&, 实例化出来的一定是左值引用
    // 传的是右值,T 就为 int 或者 const int,实例化出来的一定是右值引用

	return 0;
}
通过观察输出的地址我们可以判断哪些 x 是 a 的引用哪些不是,如果地址一样说明是引用,反之不是。
00000017FC0FF8C4
00000017FC0FF8E4

00000017FC0FF8C4
00000017FC0FF8C4

00000017FC0FF8C4
00000017FC0FF8E4

00000017FC0FF8C4
00000017FC0FF8C4

00000017FC0FF8C4
00000017FC0FF8E4
有了万能引用的概念,我们反过来再看一下我们之前讨论的 list 中 push_back 的右值引用版本。
void push_back(T&& x) { insert(end(), move(x)); }
它是万能引用吗?答案是否定的,它不是万能引用。因为这里 T 的类型不是实参传递给形参推出来的,而是类模板实例化时确定的,它永远是右值引用。
除非我们在类中这样写才是万能引用:
template<class X>
void push_back(X&& x) { insert(end(), move(x)); }
7. 完美转发
(1) forward
上面的 Function(T&& t) 函数模板,传左值实例化以后是左值引用的 Function 函数,传右值实例化以后是右值引用的 Function 函数。但是结合之前的讲解,变量表达式都是左值属性,即一个右值被右值引用绑定后,右值引用变量表达式的属性是左值,也就是说 Function 函数中 t 的属性是左值,那么如果我们把 t 传递给下一层函数 Fun,那么匹配的都是左值引用版本的 Fun 函数。
void Fun(int& x) { cout << "左值引用" << endl; }
void Fun(const int& x) { cout << "const 左值引用" << endl; }
void Fun(int&& x) { cout << "右值引用" << endl; }
void Fun(const int&& x) { cout << "const 右值引用" << endl; }

template<class T>
void Function(T&& t)
{
	Fun(t);
}

int main()
{
	int a = 0;
	Function(a);  // 实例化为左值引用
	Function(move(a));  // 实例化为右值引用

	return 0;
}
- 输出
左值引用
左值引用
这里如果我们想要保持 t 对象的属性, 就需要使用完美转发实现,如下:
template<class T>
void Function(T&& t)
{
	Fun(forward<T>(t);
}
完美转发本质是一个函数模板 forward,它主要还是通过引用折叠的方式实现。

下面示例中传递给 Function 的实参是右值,T 被推导为 int,没有折叠,forward 内部 t 被强转为右值引用返回;传递给 Function 的实参是左值,T 被推导为 int&,引用折叠为左值引用,forward 内部 t 被强转为左值引用返回。简而言之就是用 forward 函数将 t 转换为对应的引用版本保持和原来一致。
void Fun(int& x) { cout << "左值引用" << endl; }
void Fun(const int& x) { cout << "const 左值引用" << endl; }
void Fun(int&& x) { cout << "右值引用" << endl; }
void Fun(const int&& x) { cout << "const 右值引用" << endl; }

template<class T>
void Function(T&& t)
{
	Fun(forward<T>(t));
}

int main()
{
	int a = 0;
	Function(a);
	Function(move(a));

	return 0;
}
- 输出
左值引用
右值引用
(2) 万能引用 + 完美转发的应用
有了完美转发 forward,我们可以针对之前实现的 list 做一点改动,把左右值引用两个版本的 push_back 合二为一。
namespace mine
{
	// ...

	template<class T>
	class list
	{
		// ...

        // 只保留一个 push_back 版本,即万能引用版本
		template<class X>
		void push_back(X&& x) { insert(end(), forward<X>(x)); }  // 保留 x 的属性

		template<class X>
		iterator insert(iterator pos, X&& x)
		{
			Node* cur = pos._node;
			Node* newnode = new Node(forward<X>(x));  // 保留 x 的属性
			Node* prev = cur->_prev;
			// prev newnode cur

			prev->_next = newnode;
			newnode->_prev = prev;
			newnode->_next = cur;
			cur->_prev = newnode;
			return iterator(newnode);
		}

	private:
		Node* _head;
	};
}

int main()
{
	mine::list<string> lt;
	string s1("111111111111111111111");

	lt.push_back(s1);
	for (auto& e : lt) cout << e << endl;
	cout << "s1: " << s1 << endl;

	lt.push_back(move(s1));
	for (auto& e : lt) cout << e << endl;
	cout << "s1: " << s1 << endl;

	return 0;
}
- 输出
111111111111111111111
s1: 111111111111111111111
111111111111111111111
111111111111111111111
s1:
四、可变参数模板
1. 基本语法和原理
C++11 支持可变参数模板,也就是说支持可变参数数量的函数模板和类模板,可变数目的参数被称为参数包,存在两种参数包:
- 模板参数包:表示零或多个模板参数;
- 函数参数包:表示零或多个函数参数。
它的语法如下:
template<class ...Args>
void Func(Args... args) {}

template<class ...Args>
void Func(Args&... args) {}

template<class ...Args>
void Func(Args&&... args) {}
我们用省略号来表示一个模板参数或函数参数中的参数包,在模板参数列表中,class... 或 typename... 指出接下来的参数表示零或多个类型列表;在函数参数列表中,类型名后面跟 ... 指出接下来表示的零或多个形参对象列表。函数参数包可以用左值引用或右值引用表示,跟前面普通模板一样,每个参数实例化时遵循引用折叠规则。
可变参数模板的原理跟模板类似,本质还是去实例化对应类型和个数的多个函数。
我们可以使用 sizeof... 运算符去计算参数包中参数的个数。
template <class ...Args>
void Print(Args&&... args)
{
	cout << sizeof...(args) << endl;
}

int main()
{
	double x = 2.2;
	Print(); // 包里有 0 个参数
	Print(1); // 包里有 1 个参数
	Print(1, string("xxxxx")); // 包里有 2 个参数
	Print(1, string("xxxxx"), x); // 包里有 3 个参数

	return 0;
}
- 输出
0
1
2
3
// 原理1:编译本质这里会结合引用折叠规则实例化出以下四个函数
void Print();
void Print(int&& arg1);
void Print(int&& arg1, string&& arg2);
void Print(int&& arg1, string&& arg2, double& arg3);

// 原理2:更本质去看没有可变参数模板,我们实现出这样的多个函数模板才能支持
// 这里的功能,有了可变参数模板,我们进一步被解放,它是类型泛化基础
// 上叠加数量变化,让我们泛型编程更灵活。
void Print();

template <class T1>
void Print(T1&& arg1);

template <class T1, class T2>
void Print(T1&& arg1, T2&& arg2);

template <class T1, class T2, class T3>
void Print(T1&& arg1, T2&& arg2, T3&& arg3);

// ...
2. 包扩展
包扩展是可变参数模板的核心特性之一,扩展一个包就是将它替换为构成它的元素的列表。比如,如果我们想要打印函数参数包中的每个元素时,我们可以使用包扩展。
void ShowList()
{
	// 编译器时递归的终⽌条件,参数包是0个时,直接匹配这个函数
	cout << endl;
}

template <class T, class ...Args>
void ShowList(T x, Args... args)
{
	cout << x << " ";
	// 递归调用
	// 同样的这里的 args 有 N - 1 个参数,再次调用 ShowList 时,第一个参数给 x,剩下 N - 2 个给 args
	// 这样一直调用下去,就能依次打印出包中的元素了,直到包中没有元素
	// 此时需要设置递归出口,即上面的 ShowList
	ShowList(args...);
}

template <class ...Args>
void Print(Args... args)
{
	// args 是 N 个参数的参数包
    // 语法上,在 args 的后面加上省略号来触发扩展操作,此时 args... 就替换为了包中的元素的列表
	// 此时调用 ShowList,参数包的第一个参数传给 x,剩下 N - 1 个参数传给上面 ShowList 的参数包 args
	ShowList(args...);
}

int main()
{
	Print();
	Print(1);
	Print(1, string("xxxxx"));
	Print(1, string("xxxxx"), 2.2);

	return 0;
}
- 输出
1
1 xxxxx
1 xxxxx 2.2
需要注意的是,设置递归出口时,不能够在 ShowList 中这样写:
if (sizeof...(args) == 0)
	return;
因为可变参数模板是编译时递归推导解析参数,而上面这种写法是运行时的逻辑。这样写的话在编译阶段就找不到 0 个参数的 ShowList 函数,因此会报错。
下面用图示简单演示一下上面包扩展的逻辑:
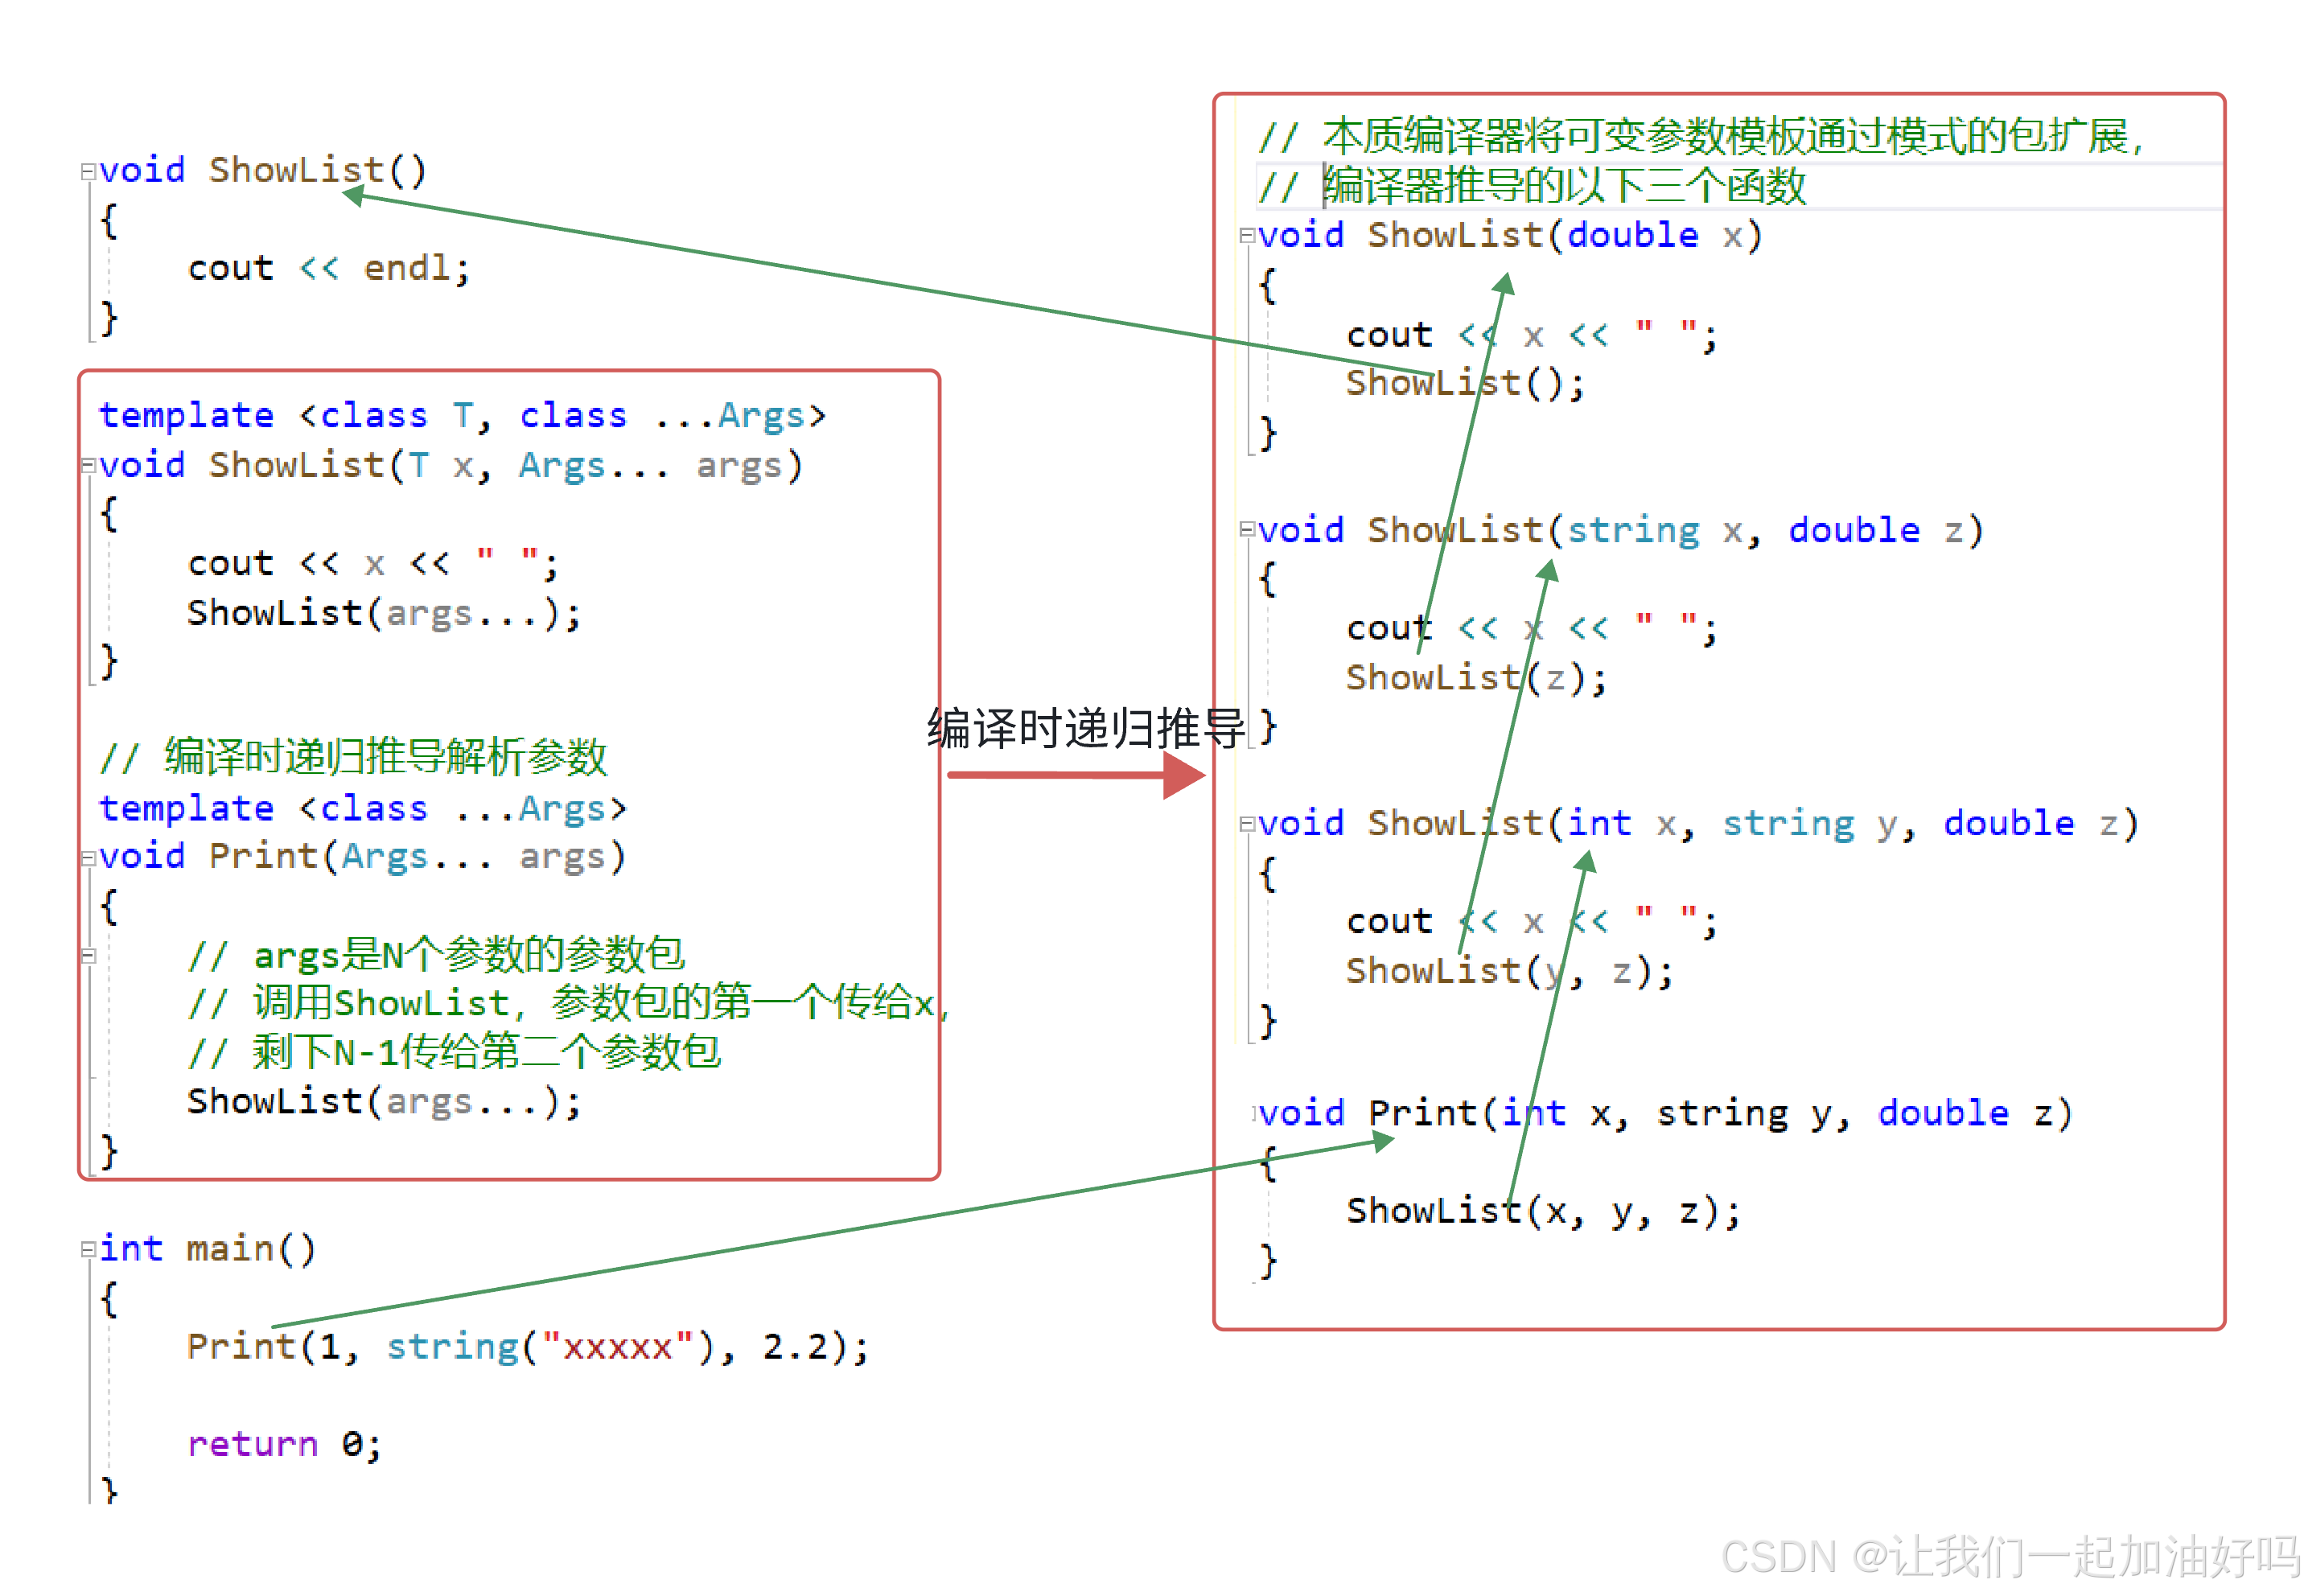
除了上面那样使用以外,包扩展还可以像下面这样使用:
template <class T>
const T& GetArg(const T& x)
{
	cout << x << " ";
	return x;
}

template <class ...Args>
void Arguments(Args... args)
{}

template <class ...Args>
void Print(Args... args)
{
    // GetArg 的返回值组成实参参数包,传给 Arguments
	Arguments(GetArg(args)...);
}

// 本质可以理解为编译器编译时
// 将上面的函数模板扩展实例化为下面的函数
// void Print(int x, string y, double z)
// {
//     Arguments(GetArg(x), GetArg(y), GetArg(z));
// }
3. emplace 系列接口
C++11 以后 STL 容器新增了 empalce 系列的接口,比如 vector 中新增有 emplace 和 emplace_back。

empalce 系列的接口均为模板可变参数,功能上兼容 push 和 insert 系列。但 emplace 系列总体而言是更高效,推荐以后使用 emplace 系列替代 insert 和 push 系列。下面以 list 中的 push_back 和 emplace_back 为例对比二者的区别。
#include<list>

// emplace_back 总体而言是更⾼效,推荐以后使用 emplace 系列替代 insert 和 push 系列
int main()
{
	list<mine::string> lt;

	// 传左值,跟 push_back 的功能和效率一样,走拷贝构造
	mine::string s1("111111111111");
	lt.push_back(s1);
	lt.emplace_back(s1);
	cout << "*********************************" << endl;

	// 传右值,跟 push_back 的功能和效率一样,走移动构造
	lt.push_back(move(s1));
	lt.emplace_back(move(s1));
	cout << "*********************************" << endl;

    // 这种情况下 emplace 效率更高
	lt.push_back("111111111111");
	lt.emplace_back("111111111111");
	cout << "*********************************" << endl;

	return 0;
}
- 输出
string(char* str)-构造
string(const string& s) -- 拷贝构造
string(const string& s) -- 拷贝构造
*********************************
string(string&& s) -- 移动构造
string(string&& s) -- 移动构造
*********************************
string(char* str)-构造
string(string&& s) -- 移动构造
~string() -- 析构
string(char* str)-构造
*********************************
~string() -- 析构
~string() -- 析构
~string() -- 析构
~string() -- 析构
~string() -- 析构
~string() -- 析构
~string() -- 析构
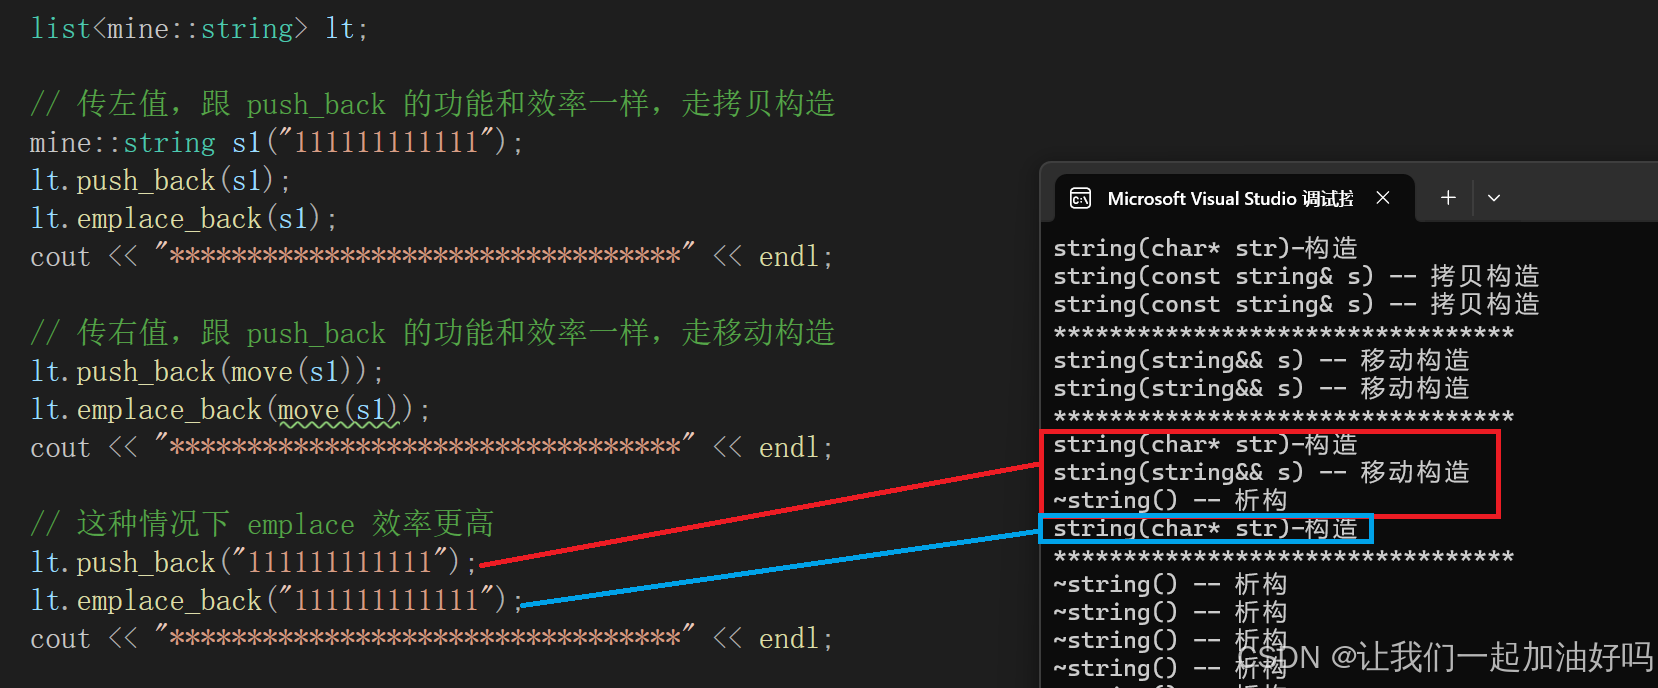
从输出结果上来看,前面传左值和右值的情况都是一样的,但是不同的是当直接传入一个 111111111111 时,push_back 是先构造出一个临时对象,然后再用移动构造将这个临时对象的资源与要插入的节点的资源进行交换最后析构这个临时对象。而 emplace_back 则是直接走构造,明显效率会更高。
这时因为 push_back 是一个普通函数,它的参数类型在类模板实例化时就确定了是 string,之后需要正常走 string 类的拷贝或者移动构造才能达到目的。而 emplace_back 是一个函数模板,它的形参类型是实参传入时推演出来的,这里就是 const char* 而非 string,因此之后直接走构造即可。没有临时对象,因此也就不需要拷贝或者移动。
empalce 还支持新玩法,假设容器为 container<T>,empalce 支持直接传入构造 T 对象的参数包,这样有些场景会更高效一些,可以直接在容器空间上构造 T 对象。
int main()
{
	list<pair<mine::string, int>> lt1;

	// 跟 push_back 一样
	pair<mine::string, int> kv("苹果", 1);
	lt1.push_back(kv);
	lt1.emplace_back(kv);
	cout << "*********************************" << endl;

	// 跟 push_back 一样
	lt1.push_back(move(kv));
	lt1.emplace_back(move(kv));
	cout << "*********************************" << endl;

	// 直接把构造 pair 参数包往下传,直接用 pair 参数包构造 pair
	// 这里达到的效果是 push_back 做不到的
	lt1.push_back({ "苹果", 1 });  // 隐式类型转换,构造出临时对象,然后拷贝或移动
	// lt1.emplace_back({ "苹果", 1 });  // 不支持这样写
	lt1.emplace_back("苹果", 1);

    // 这里的原理也是一样,使用 emplace_back 传参之后才推演出来形参的类型
    // 类型是 const char* 和 int,这几个参数构成参数包
    // emplace_back 内部用这个参数包直接构造容器上的对象

	cout << "*********************************" << endl;

	return 0;
}
- 输出
string(char* str)-构造
string(const string& s) -- 拷贝构造
string(const string& s) -- 拷贝构造
*********************************
string(string&& s) -- 移动构造
string(string&& s) -- 移动构造
*********************************
string(char* str)-构造
string(string&& s) -- 移动构造
~string() -- 析构
string(char* str)-构造
*********************************
~string() -- 析构
~string() -- 析构
~string() -- 析构
~string() -- 析构
~string() -- 析构
~string() -- 析构
~string() -- 析构
4. 实现含 emplace_back 接口的 list
namespace mine
{
	template<class T>
	struct ListNode
	{
		ListNode<T>* _next;
		ListNode<T>* _prev;
		T _data;

		ListNode(T&& data)
			:_next(nullptr)
			, _prev(nullptr)
			, _data(move(data))
		{}

		template <class... Args>
		ListNode(Args&&... args)
			: _next(nullptr)
			, _prev(nullptr)
			, _data(std::forward<Args>(args)...)
		{}
	};

	template<class T, class Ref, class Ptr>
	struct ListIterator
	{
		typedef ListNode<T> Node;
		typedef ListIterator<T, Ref, Ptr> Self;
		Node* _node;
		ListIterator(Node* node)
			:_node(node)
		{}

		Self& operator++()
		{
			_node = _node->_next;
			return *this;
		}
		Self& operator--()
		{
			_node = _node->_prev;
			return *this;
		}

		Ref operator*(){ return _node->_data; }
		bool operator!=(const Self& it){ return _node != it._node; }
	};

	template<class T>
	class list
	{
		typedef ListNode<T> Node;
	public:
		typedef ListIterator<T, T&, T*> iterator;
		typedef ListIterator<T, const T&, const T*> const_iterator;

		iterator begin(){ return iterator(_head->_next); }
		iterator end(){ return iterator(_head); }

		void empty_init()
		{
			_head = new Node();
			_head->_next = _head;
			_head->_prev = _head;
		}

		list(){ empty_init(); }
		void push_back(const T& x){ insert(end(), x); }
		void push_back(T&& x){ insert(end(), move(x)); }

		iterator insert(iterator pos, const T& x)
		{
			Node* cur = pos._node;
			Node* newnode = new Node(x);
			Node* prev = cur->_prev;
			// prev newnode cur

			prev->_next = newnode;
			newnode->_prev = prev;
			newnode->_next = cur;
			cur->_prev = newnode;
			return iterator(newnode);
		}

		iterator insert(iterator pos, T&& x)
		{
			Node * cur = pos._node;
			Node* newnode = new Node(move(x));
			Node* prev = cur->_prev;
			// prev newnode cur

			prev->_next = newnode;
			newnode->_prev = prev;
			newnode->_next = cur;
			cur->_prev = newnode;
			return iterator(newnode);
		}

		template <class... Args>
		void emplace_back(Args&&... args)
		{
			insert(end(), std::forward<Args>(args)...);
		}

		// 原理:本质编译器根据可变参数模板生成对应参数的函数
		/*
		void emplace_back(string& s)
		{
			insert(end(), std::forward<string>(s));
		}
		void emplace_back(string&& s)
		{
			insert(end(), std::forward<string>(s));
		}
		void emplace_back(const char* s)
		{
			insert(end(), std::forward<const char*>(s));
		}
		*/

		template <class... Args>
		iterator insert(iterator pos, Args&&... args)
		{
			Node* cur = pos._node;
			Node* newnode = new Node(std::forward<Args>(args)...);
			Node* prev = cur->_prev;
			// prev newnode cur

			prev->_next = newnode;
			newnode->_prev = prev;
			newnode->_next = cur;
			cur->_prev = newnode;
			return iterator(newnode);
		}

	private:
		Node* _head;
	};
}
下文链接

Agent 垂直技术社区,欢迎活跃、内容共建。
更多推荐
 45
45 0
0- 0


 已为社区贡献2条内容

所有评论(0)