Java 多线程编程入门:从创建到并发控制
·
目录
一、线程简介
1. 线程 VS 进程
进程:一个运行中的程序(浏览器)
线程:进程内的执行单元(浏览器中的标签)
2. 为什么需要多线程?
为了充分利用CPU资源和提升程序响应性与吞吐量。
单线程只能顺序执行,无法发挥多核优势;多线程允许并发处理任务,如同时处理多个请求、后台计算与UI响应分离等,是高性能服务的基础。
3. Java中的线程模型是什么?
Java 线程基于 “共享内存 + 线程通信” 模型:
所有线程共享堆内存,通过 synchronized、volatile 等机制协调对共享数据的访问;每个线程有独立栈空间。底层依赖操作系统线程(1:1 模型),由 JVM 和 OS 共同调度。
二、创建线程
1. 通过实现 Runnable 接口
import javax.naming.InterruptedNamingException;

class RunnableDemo implements Runnable{
    private String threadName;
    private Thread t;

    //创建线程
    RunnableDemo(String name){
        threadName=name;
        System.out.println("Creating "+threadName);
    }
    // Runnable 接口必须实现的方法
    // 当线程被调度执行时,会自动调用 run() 方法中的代码
    public void run(){
        System.out.println("Running "+threadName);

        try {
            for(int i=4;i>0;i--){
                System.out.println("Thread: " + threadName + ", " + i);
                Thread.sleep(50); // 使当前线程暂停 50ms(模拟工作)
            }
        }catch(InterruptedException e) {
            // 如果线程在 sleep 时被中断,会抛出此异常
            System.out.println("Thread " + threadName + " interrupted.");
        }
        // 循环结束,线程任务完成
        System.out.println("Thread " + threadName + " exiting.");
    }

    //自定义方法:用于启动线程
    public void start(){
        System.out.println("Starting "+ threadName);
        // 防止重复创建线程
        if(t==null){
            t=new Thread(this,threadName);
            // 调用 Thread 的 start() 方法,真正启动新线程
            t.start();
        }
    }
}

public class TestThread {
    public static void main(String[] args) {
        // 创建第一个任务对象
        RunnableDemo R1 = new RunnableDemo("Thread-1");
        // 启动第一个线程
        R1.start();

        RunnableDemo R2= new RunnableDemo("thread-2");
        R2.start();

        // main 方法结束,但程序不会立即退出
        // 因为还有两个子线程在运行
    }
}
2. 通过继承 Thread 类本身
/**
 * MyThread 类:通过继承 Thread 类来定义一个线程任务
 * 每个 MyThread 对象本身就是一个线程
 */
class MyThread extends Thread {

    // 构造方法:接收线程名称
    public MyThread(String name) {
        super(name); // 调用父类 Thread 的构造方法,设置线程名
    }

    /**
     * run() 方法:线程的执行体
     * 当调用线程的 start() 方法后,JVM 会自动调用这个方法
     * 注意:不能直接调用 run(),否则不会开启新线程!
     */
    @Override
    public void run() {
        System.out.println(Thread.currentThread().getName() + " 开始运行");

        // 模拟线程执行任务:打印 3 次消息,每次间隔 500ms
        for (int i = 1; i <= 3; i++) {
            System.out.println(Thread.currentThread().getName() + " 输出第 " + i + " 条消息");

            try {
                // 让当前线程暂停 500 毫秒(模拟耗时操作)
                Thread.sleep(500);
            } catch (InterruptedException e) {
                // 如果线程在 sleep 时被中断,会抛出此异常
                System.out.println(Thread.currentThread().getName() + " 被中断!");
                break; // 退出循环
            }
        }

        // 线程任务完成
        System.out.println(Thread.currentThread().getName() + " 执行结束");
    }
}

/**
 * 主类:用于测试继承 Thread 的方式创建线程
 */
public class TestThread2 {
    public static void main(String[] args) {
        // 创建两个线程对象
        MyThread thread1 = new MyThread("线程-A");
        MyThread thread2 = new MyThread("线程-B");

        // 启动线程
        // 调用 start() 方法 → JVM 会自动调用 run() 方法(在新线程中执行)
        thread1.start();
        thread2.start();

        // 主线程继续执行
        System.out.println("主线程:两个子线程已启动,我继续做自己的事...");

        // 主方法结束,但程序不会立即退出
        // 因为还有 thread1 和 thread2 在运行
    }
}
3. 通过 Callable 和 Future 创建线程
import java.util.concurrent.Callable;
import java.util.concurrent.ExecutionException;
import java.util.concurrent.FutureTask;

/**
 * 演示如何使用 Callable + FutureTask 创建线程并获取返回值
 */
public class CallableFutureExample {

    public static void main(String[] args) {
        // 1. 创建一个 Callable 任务:它会计算 1 到 10 的和,并返回结果
        Callable<Integer> task = new SumTask();

        // 2. 把 Callable 包装成 FutureTask(因为 Thread 只能直接运行 Runnable)
        FutureTask<Integer> futureTask = new FutureTask<>(task);

        // 3. 创建线程,传入 FutureTask(它实现了 Runnable)
        Thread thread = new Thread(futureTask, "计算线程");

        // 4. 启动线程
        thread.start();

        // 主线程可以先做其他事...
        System.out.println("主线程:我已经让子线程去计算了,我先干点别的...");

        try {
            // 5. 获取计算结果(阻塞等待,直到结果出来)
            System.out.println("主线程:正在等待结果...");
            Integer result = futureTask.get(); // ⏳ 如果还没算完,这里会等待
            System.out.println("主线程:拿到结果了!1+2+...+10 = " + result);
        } catch (InterruptedException e) {
            System.out.println("主线程:等待结果时被中断了");
        } catch (ExecutionException e) {
            System.out.println("主线程:计算过程中出错了:" + e.getCause());
        }
    }
}

/**
 * 一个可调用任务:计算 1 到 10 的和
 * Callable<V> 中的 V 表示返回值的类型
 */
class SumTask implements Callable<Integer> {

    @Override
    public Integer call() throws Exception {
        System.out.println(Thread.currentThread().getName() + " 开始计算...");

        int sum = 0;
        for (int i = 1; i <= 10; i++) {
            sum += i;
            Thread.sleep(200); // 模拟耗时操作
        }

        System.out.println(Thread.currentThread().getName() + " 计算完成!");
        return sum; // ✅ 有返回值!
    }
}
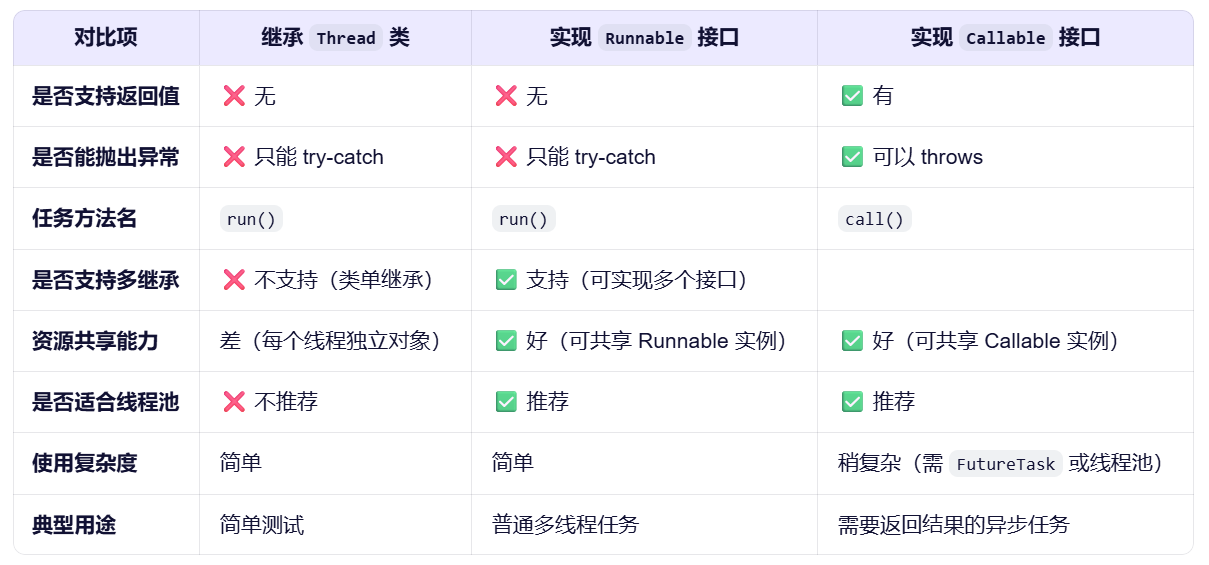
💡3种方式对比
三、线程的生命
1. 五种状态
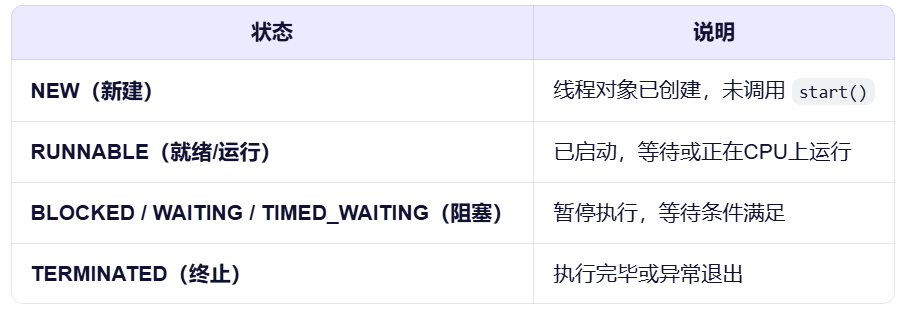
- 🔁 核心流转:
NEW → start() → RUNNABLE ⇄ 阻塞状态 → TERMINATED - 阻塞状态细分:
1 sleep() → TIMED_WAITING
2 wait() → WAITING
3 竞争锁失败 → BLOCKED
2. sleep()、join()、yield()
- 分别对应延时、同步、让步三种场景。
- 这三个方法都使线程主动进入阻塞或让出状态,从而影响调度,是实现线程协作的基础。
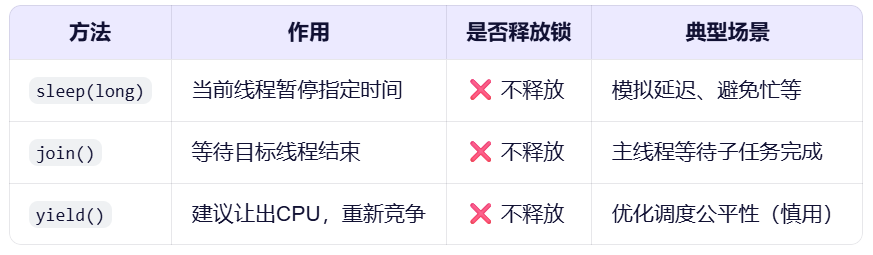
- 使用要点:
1、sleep() 和 join()可能抛出InterruptedException,需处理。
2、yield()是建议性的,效果依赖JVM实现,不保证生效。
3. 守护线程(Daemon Thread):后台服务者
- 守护线程是为其他线程提供后台服务的线程,它的存在不影响JVM退出。
- 典型用途:
垃圾回收、监控、心跳、日志写入后台等任务。 - 使用方式:
Thread daemon = new Thread(() -> {
    // 后台任务
});
daemon.setDaemon(true); // 必须在 start() 前设置
daemon.start();
四、线程安全与同步(synchronized, volatile)
共享变量为何出错?如何保护数据?
问题:count++为啥不准?
public class Counter {
    public static int count = 0;

    public static void increment() {
        count++; // 看似简单,实则三步:读 → 加 → 写
    }
}

// 测试:两个线程各加 1000 次
public class UnsafeExample {
    public static void main(String[] args) throws InterruptedException {
        Runnable task = () -> {
            for (int i = 0; i < 1000; i++) {
                Counter.increment();
            }
        };

        Thread t1 = new Thread(task);
        Thread t2 = new Thread(task);

        t1.start(); t2.start();
        t1.join(); t2.join(); // 等待结束

        System.out.println("最终结果:" + Counter.count); // 很可能 < 2000!
    }
}
count++ 不是原子操作,两个线程可能同时读到旧值,导致“丢失一次加法”。
所以,多个线程修改共享变量,必须同步!
1.什么是线程安全?
线程安全 = 多线程访问时,结果正确且不崩溃
2. synchronized:Java 内建的锁机制
- 修复上面的问题:
public class SafeCounter {
    public static int count = 0;

    // 加 synchronized,确保同一时刻只有一个线程能执行
    public synchronized static void increment() {
        count++;
    }
}
- 或者使用同步代码块:
public class SafeCounter {
    public static int count = 0;
    private static final Object lock = new Object(); // 锁对象

    public static void increment() {
        synchronized (lock) {
            count++;
        }
    }
}
- 执行以上操作,无论运行多少次,结果都正确。
- 关键:锁的是对象。
synchronized static锁类对象,synchronized(this)锁实例。
3.volatile:轻量级的同步手段
用标志位控制线程运行。
public class StopExample {
    // 不加 volatile,主线程修改 running,子线程可能永远看不到!
    private static volatile boolean running = true;

    public static void main(String[] args) throws InterruptedException {
        Thread worker = new Thread(() -> {
            while (running) {
                // 模拟工作
                System.out.println("工作线程运行中...");
                try {
                    Thread.sleep(100);
                } catch (InterruptedException e) { break; }
            }
            System.out.println("工作线程已停止");
        });

        worker.start();

        Thread.sleep(500); // 运行 0.5 秒
        running = false; // 主线程通知停止
        System.out.println("已发出停止信号");
    }
}
-
volatile保证:主线程修改 running = false,工作线程立即可见。 -
⚠️ 注意:
volatile不能替代synchronized,因为它不保证原子性。
4.死锁
- 四个必要条件
互斥、占有等待、不可抢占、循环等待
五、并发工具类(JUC)
synchronized 能解决问题,但不够灵活。本章带你使用 JUC 中的高级工具,写出更高效、更可控的并发程序。
1 ReentrantLock:可控制的锁
- 为什么需要它?
synchronized 是“自动锁”,不能中断、不能超时;
ReentrantLock 是“手动锁”,更灵活。 - 示例:尝试获取锁,超时则放弃
import java.util.concurrent.locks.ReentrantLock;
import java.util.concurrent.TimeUnit;

public class LockExample {
private static final ReentrantLock lock = new ReentrantLock();

public static void main(String[] args) {
Thread t1 = new Thread(() -> {
lock.lock(); // 获取锁
try {
System.out.println("线程1 获取锁,开始长时间操作...");
Thread.sleep(3000);
} catch (InterruptedException e) {
} finally {
lock.unlock(); // 必须手动释放!
}
});

Thread t2 = new Thread(() -> {
System.out.println("线程2 尝试获取锁...");
try {
// 尝试获取锁,最多等 1 秒
if (lock.tryLock(1, TimeUnit.SECONDS)) {
try {
System.out.println("线程2 成功获取锁!");
} finally {
lock.unlock();
}
} else {
System.out.println("线程2 获取锁失败,放弃执行");
}
} catch (InterruptedException e) {
System.out.println("线程2 被中断");
}
});

t1.start();
t2.start();
}
}
输出:
线程1 获取锁,开始长时间操作...
线程2 尝试获取锁...
线程2 获取锁失败,放弃执行
💡优势:可中断、可超时、可公平锁。
2 AtomicInteger:无锁的原子操作
- 为什么需要它?
synchronized 加锁有性能开销;
AtomicInteger 使用 CAS(Compare and Swap) 实现无锁并发,性能更高。 - 示例:用 AtomicInteger 修复计数问题
import java.util.concurrent.atomic.AtomicInteger;

public class AtomicExample {
private static AtomicInteger count = new AtomicInteger(0);

public static void main(String[] args) throws InterruptedException {
Runnable task = () -> {
for (int i = 0; i < 1000; i++) {
count.incrementAndGet(); // 原子自增
}
};

Thread t1 = new Thread(task);
Thread t2 = new Thread(task);

t1.start(); t2.start();
t1.join(); t2.join();

System.out.println("最终结果:" + count.get()); // 一定是 2000
}
}
- 特点:无锁、高性能、线程安全。
- 适用:计数器、序列号生成等高频读写场景。
3 CountDownLatch:倒计时门栓
- 作用:
让一个或多个线程等待“其他线程完成任务”后再继续。 - 示例:主线程等待所有子线程准备就绪
import java.util.concurrent.CountDownLatch;

public class LatchExample {
public static void main(String[] args) throws InterruptedException {
CountDownLatch latch = new CountDownLatch(3); // 需要等待 3 个线程

for (int i = 1; i <= 3; i++) {
final int no = i;
new Thread(() -> {
System.out.println("线程" + no + " 开始准备工作...");
try {
Thread.sleep(1000); // 模拟准备
} catch (InterruptedException e) {}
System.out.println("线程" + no + " 准备完成!");
latch.countDown(); // 完成一个,倒计时减一
}).start();
}

System.out.println("主线程等待所有线程准备完成...");
latch.await(); // 阻塞,直到 count 变为 0
System.out.println("所有线程已就绪,主线程继续执行!");
}
}
输出:
主线程等待所有线程准备完成...
线程1 开始准备工作...
线程2 开始准备工作...
线程3 开始准备工作...
线程1 准备完成!
线程2 准备完成!
线程3 准备完成!
所有线程已就绪,主线程继续执行!
💡适用:并发测试、资源初始化、批量任务协调。
4 CyclicBarrier:循环栅栏
- 作用:
让多个线程互相等待,直到“大家都到齐了”,再一起出发。 - 示例:3 个运动员等齐后一起起跑
import java.util.concurrent.BrokenBarrierException;
import java.util.concurrent.CyclicBarrier;

public class BarrierExample {
public static void main(String[] args) {
CyclicBarrier barrier = new CyclicBarrier(3,
() -> System.out.println("所有人到齐,比赛开始!"));

for (int i = 1; i <= 3; i++) {
final int no = i;
new Thread(() -> {
System.out.println("运动员" + no + " 到达起点...");
try {
Thread.sleep((int)(Math.random() * 2000)); // 到达时间不同
barrier.await(); // 等待其他人
} catch (InterruptedException BrokenBarrierException e) {}
System.out.println("运动员" + no + " 开始跑步!");
}).start();
}
}
}
- 特点:可重复使用(“Cyclic”),适合循环协作场景。
5 Semaphore:信号量——控制并发数量
- 作用:
限制同时访问某个资源的线程数量,比如数据库连接池。 - 示例:限制最多 2 个线程同时访问
import java.util.concurrent.Semaphore;

public class SemaphoreExample {
private static final Semaphore sem = new Semaphore(2); // 允许 2 个并发

public static void main(String[] args) {
for (int i = 1; i <= 5; i++) {
final int no = i;
new Thread(() -> {
try {
sem.acquire(); // 获取许可
System.out.println("线程" + no + " 获得许可,开始工作...");
Thread.sleep(2000);
System.out.println("线程" + no + " 工作完成,释放许可");
} catch (InterruptedException e) {
} finally {
sem.release(); // 释放许可
}
}).start();
}
}
}
- 输出:每次最多 2 个线程在“工作”,其余等待。
- 适用:限流、资源池(连接、线程)、并发控制。
以下未完待续
六、线程池
七、ThreadLocal
八、实战项目

Agent 垂直技术社区,欢迎活跃、内容共建。
更多推荐


 26
26 0
0- 0


 已为社区贡献4条内容

所有评论(0)