springboot-mybatis
·
1、开启日志功能
logging:
  level:
    com.kr.springbootmybatis.mapper: debug
1、获得自增主键和驼峰命名
mybatis:
  mapper-locations: classpath:mapper/*.xml
  configuration:
    map-underscore-to-camel-case: true
2、$和#{}区别
${}有sql注入的问题,而且#{}只能在条件参数中使用,其他地方只能拼接,也就是使用${};
2、参数处理
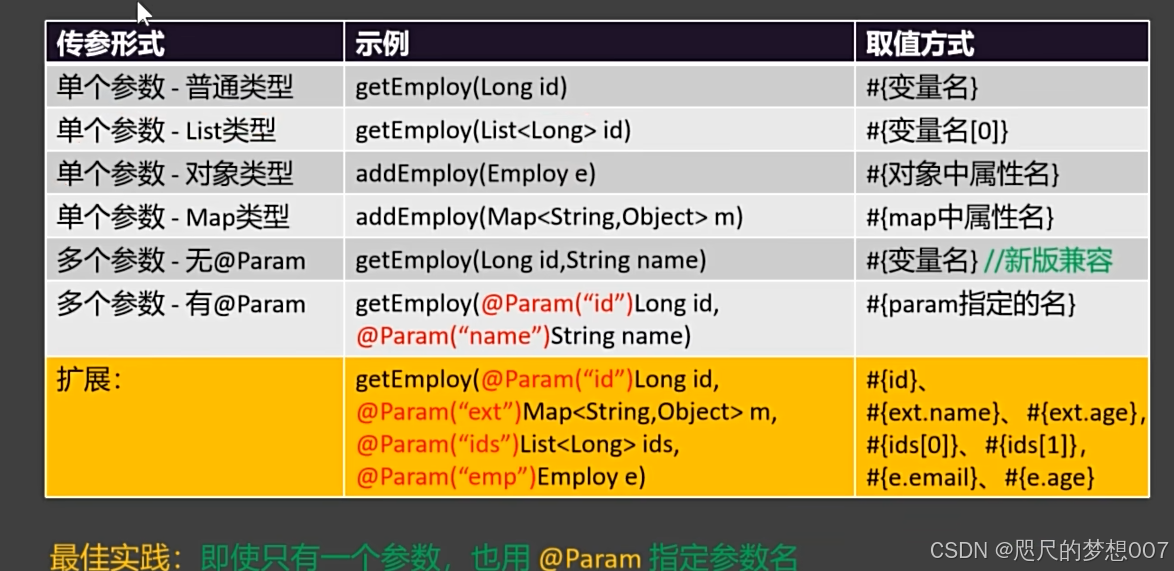
1、单个参数
多个参数
Emp getEmpAndDept(@Param("id") Integer id, @Param("empName") String name);
3、返回结果
1.单个对象
<select id="getEmpAndDept" resultType="com.kr.springbootmybatis.bean.Emp">
        select * from t_emp where id = #{id} and emp_name = #{empName}
    </select>
2.多个对象
    <select id="getEmpList" resultType="com.kr.springbootmybatis.bean.Emp">
        select * from t_emp
    </select>
3.返回map
用@MapKey("id")指定key的值
    @MapKey("id")
    Map<Integer, Emp> getEmpAndDeptByMap(Integer id);
返回结果复杂,自定义结果集
数据关联关系:
一对一;
一对多;
多对多;
例如:一个订单对应一个客户,一个客户对于多个订单;
一对多:关联关系放在多的一端;
多对多:需要中间表;
一对一查询(常用)
@Data
public class Order {
    private long id;
    private String address;
    private BigDecimal amount;
    private long customerId;
    private Customer customer;
}
@Data
public class Customer {
    private long id;
    private String customerName;
    private String Phone;

}
<resultMap id="orderMap" type="com.kr.springbootmybatis.bean.Order"> <id property="id" column="id"/> <result property="address" column="address"/> <result property="amount" column="amount"/> <result property="customerId" column="customer_id"/> <association property="customer" javaType="com.kr.springbootmybatis.bean.Customer"> <id property="id" column="customer_id"/> <result property="customerName" column="customer_name"/> <result property="phone" column="phone"/> </association> </resultMap> <select id="getOrderById" resultType="com.kr.springbootmybatis.bean.Order" resultMap="orderMap"> SELECT * FROM t_order o LEFT JOIN t_customer c ON o.customer_id =c.id where o.id =#{id} </select>
一对多查询(常用)
@Data
public class Order {
    private long id;
    private String address;
    private BigDecimal amount;
    private long customerId;
    private Customer customer;
}
<resultMap id="customerMap" type="com.kr.springbootmybatis.bean.Customer"> <id property="id" column="id"/> <result property="customerName" column="customer_name"/> <result property="phone" column="phone"/> <collection property="orders" ofType="com.kr.springbootmybatis.bean.Order"> <id property="id" column="id"/> <result property="address" column="address"/> <result property="amount" column="amount"/> <result property="customerId" column="customer_id"/> </collection> </resultMap>
4、分步查询
安装id查询用户以及他所有的订单
原生就是用先查id用户,然后查订单,然后设置到用户中放回给前端;
mybatis有自动分步
    <resultMap id="customerOrdersStepM" type="com.kr.springbootmybatis.bean.Customer">
        <id property="id" column="id"/>
        <result property="customerName" column="customer_name"/>
        <result property="phone" column="phone"/>
        <!--        告诉mybatis。封装order属性时候,属性是一个集合,需要调用另一个方法查询:
                            select指定的方法,column指定的参数
        -->
        <collection property="orders"
                    ofType="com.kr.springbootmybatis.bean.Order"
                    select="com.kr.springbootmybatis.mapper.orderMapper.getAllOrdersById"
                    column="{id=id,name = customer_name}">
        </collection>
    </resultMap>
    <select id="getCoustomerByIdAndOrders" resultType="com.kr.springbootmybatis.bean.Customer" resultMap="customerOrdersStepM">
        select * FROM t_customer where id=#{id}
    </select>
    <select id="getCoustomerByIdOrNameAndOrders" resultType="com.kr.springbootmybatis.bean.Customer" resultMap="customerOrdersStepM">
        select * FROM t_customer where id= #{id} or customer_name = #{name}
延迟加载
mybatis:
  mapper-locations: classpath:mapper/*.xml
  configuration:
    map-underscore-to-camel-case: true
    #开启懒加载
    aggressive-lazy-loading: false
    lazy-loading-enabled: true
5、动态sql(常用)
    <select id="getEmpByIdAndSalary" resultType="com.kr.springbootmybatis.bean.Emp">
        select * from t_emp
        <where>
            <if test="id != null">
                and id = #{id}
            </if>
            <if test="salary != null">
                and emp_salary = #{salary}
            </if>
        </where>
    </select>
set
   <update id="updateEmpSalary">
        update t_emp
            <set>
                <if test="empName != null">
                    emp_name = #{empName},
                </if>
                <if test="age != null">
                    age = #{age},
                </if>
                <if test="email != null">
                    email = #{email},
                </if>
            </set>
        where id = #{id}
    </update>
    <select id="get
foreach标签
批量查询
List<Emp> getEmpAndDeptByMap(@Param("id") List<Integer> id);


    <select id="getEmpAndDeptByMap" resultType="com.kr.springbootmybatis.bean.Emp">
        select * from t_emp
        <if test="id != null">
            <foreach item="item" index="index" collection="id" open="where id in ( " separator="," close=")">
                #{item}
            </foreach>
        </if>

    </select>
批量插入
    int addEmps(@Param("emps") List<Emp> emps);


    <insert id="addEmps">
        insert into t_emp(emp_name, age, email) values
        <foreach item="emp" index="index" collection="empList" separator=",">
            (#{emp.empName}, #{emp.age}, #{emp.email})
        </foreach>
    </insert>
6、缓存
一级缓存
一级缓存当前事务共享,同一个事务共享;
7、分页插件
分页重点:
第一页:limit 0,10
第二页:limit 10,10
第三页:limit 20,10
start = (pageNum-1)*pagesize
1、操作
首先导入依赖
        <dependency>
            <groupId>com.github.pagehelper</groupId>
            <artifactId>pagehelper</artifactId>
            <version>5.2.0</version>
        </dependency>
导入一个类
@Configuration
public class PageHelperConfig {

    @Bean
    PageInterceptor getPageHelper() {
        PageInterceptor pageHelper = new PageInterceptor();
        //设置参数
        Properties properties = new Properties();
        //合理化参数
        properties.setProperty("reasonable", "true");
        pageHelper.setProperties( properties);

        return pageHelper;
    }
}
然后在使用
    @Override
    public int getEmpList() {
        PageHelper.startPage(1,5);
        empMapper.getEmpList();
        return 0;
    }
2、前后端联动
@RequestMapping("/findAll")
public String findAll(Integer pageNum,Model model){
    // 分页  pageNum当前页,页面传递
    if (pageNum == null){
        pageNum = 1;// 默认1
    }
    int size = 5;// 每页显示条数
    // 设置分页
    PageHelper.startPage(pageNum,size);
    // 查询数据
    List<Product> products = productService.selectAll();
    // 将查询出的结构封装到 PageInfo 对象中
    PageInfo<Product> productPageInfo = new PageInfo<Product>(products);

    model.addAttribute("productPageInfo",productPageInfo);
    return "productManager";
}
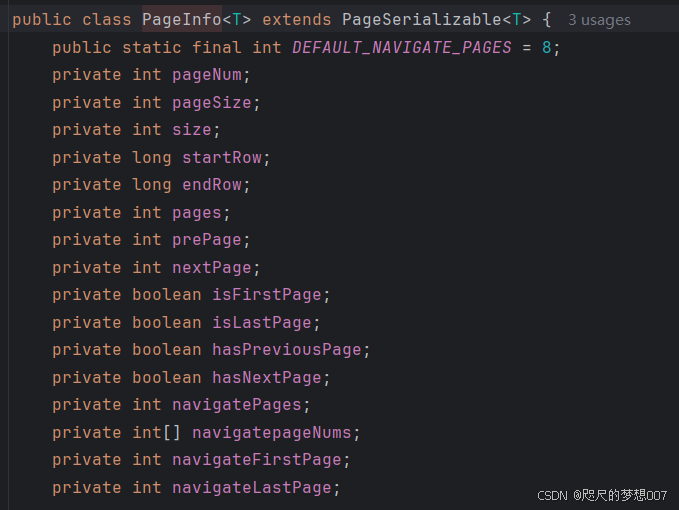
全部属性如下

Agent 垂直技术社区,欢迎活跃、内容共建。
更多推荐


 7
7 0
0- 0


 已为社区贡献3条内容

所有评论(0)