【实践原创】纯 CPU 环境下的 RuoYi-Vue-Plus 数学验证码识别全流程
·
一、前言
本文基于开源项目 CalculateCaptcha_Recognition,提供 三个核心脚本的完整实现与详解:
- train.py —— 纯 CPU 训练模型
- test.py —— 验证集评估 + 单张预测
- to_onnx.py —— 导出 ONNX 模型(CPU 推理专用)
所有脚本均 不依赖 CUDA,适用于服务器、边缘设备、Docker 容器等 纯 CPU 环境。
二、环境准备(CPU 专用)
# requirements.txt (本人用的python10)

numpy
onnxruntime
Pillow
requests
torch
torchvision
pip install -r requirements.txt关键:+cpu 后缀确保安装 CPU-only PyTorch,避免 CUDA 依赖。
数据集
datasets/
├── train/     → 2000 张
└── test/      → 200 张
三、运行 train.py
python train.py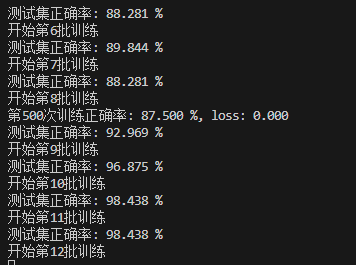
四、模型验证与单张预测
python test.py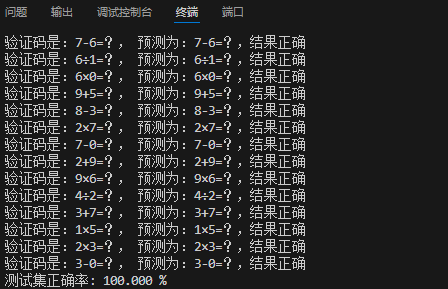
五、to_onnx.py:导出 ONNX 模型(CPU 推理专用)
python to_onnx.py六、修改 onnx_test.py
import onnxruntime
import torch
from PIL import Image
import torchvision.transforms as transforms
import numpy as np
import common


def vec2Text(vec):
    vec = torch.argmax(vec, dim=1)
    return ''.join(common.captcha_array[i] for i in vec)


def to_numpy(tensor):
    return tensor.detach().cpu().numpy() if tensor.requires_grad else tensor.cpu().numpy()


if __name__ == '__main__':
    path = "datasets/test/8×0=?_309eb130ab954d179a5d85d6e2626d34.png"
    onnxFile = 'mathcode.onnx'

    #  强制转为RGB三通道
    img = Image.open(path).convert('RGB')

    trans = transforms.Compose([
        transforms.Resize((60, 160)),
        transforms.ToTensor()
    ])
    img_tensor = trans(img).unsqueeze(0)  # [1, 3, 60, 160]

    ort_session = onnxruntime.InferenceSession(onnxFile)
    modelInputName = ort_session.get_inputs()[0].name

    # 推理
    onnx_out = ort_session.run(None, {modelInputName: to_numpy(img_tensor)})
    onnx_out = torch.tensor(np.array(onnx_out))
    onnx_out = onnx_out.view(-1, len(common.captcha_array))
    print(vec2Text(onnx_out))
运行结果
(py10) PS C:\Users\Administrator\Downloads\CalculateCaptcha_Recognition-main\CalculateCaptcha_Recognition-main> python .\onnx_test.py
0-0=?
七、总结
本人没有独显 如有请自行测试
参考这个实现自动化测试
https://blog.csdn.net/weixin_46244623/article/details/154332290?spm=1001.2014.3001.5501

Agent 垂直技术社区,欢迎活跃、内容共建。
更多推荐
 3
3 0
0- 0


 已为社区贡献31条内容

所有评论(0)