SpringAI:Java 程序员踏入大模型世界的最佳入口
AI 的爆发让无数传统业务急需“智能化升级”。当 DeepSeek-R1 以低成本高性能震撼全球之后,Java 开发者迎来了前所未有的窗口期:如何把现有的海量 Java 系统,与新一代大模型无缝连接?SpringAI 正是在这个问题上给出了优雅答案。
1. AI 浪潮下,Java 程序员的机会在哪里?
- 从旁观者变成参与者:2022 年 ChatGPT 上线后,AI 工具从实验室拓展到个人与企业日常。普通用户通过对话即可完成内容创作、调试代码,企业也在探索智能客服、辅助决策等场景。
- DeepSeek 的“低门槛革命”:2025 年发布的 DeepSeek-R1,以约 560 万美元的训练成本实现堪比 OpenAI o1 的性能。算力投入不再高不可攀,中小企业也能负担 AI 项目,需求自然指向懂行业、懂系统的 Java 团队。
- 传统系统的天然优势:全球运行中的 Java 应用超过 25 亿个,超 90% 的服务端系统依赖 Java。要让这些系统焕发生命,最稳妥的方法就是在既有生态上“加 AI 模块”,而不是推倒重来。
2. 为什么要选择 SpringAI?
- 与 Spring 生态深度耦合:SpringAI 基于 Spring 的 IOC、AOP 能力,调用 LLM、构建 Agent、串联工具链都能沿用熟悉的编程模式。
- 工程化能力成熟:配置管理、鉴权、监控、部署流程与现有 SpringBoot 项目一致。团队无需“换语言、换框架”,即可扩展 AI 功能。
- 与 DeepSeek 配合默契:将 SpringAI 的模型驱动能力与 DeepSeek 的推理性能结合,可快速搭建低成本、高性能的智能应用。
- 版本要求与兼容策略:
- SpringAI 需要 JDK 17+ 与 SpringBoot 3.x。
- 老项目暂无法升级时,可在外围模块采用 LangChain4j 等方案,逐步迁移。
- 最佳实践是先升级关键服务,再集中落地 SpringAI,以保持长期维护一致性。
AI 技术正从“遥不可及”变为“触手可及”。对 我们Java 开发者而言,把握 SpringAI 与 DeepSeek 的组合,就像给现有业务插上一套智能引擎。在这场变革中,最重要的不是等待完美时机,而是从今天开始动手实践。
大模型开发实战:
- 从提示词工程,多轮对话状态管理,FunctionCalling (Tool) ,RAG 检索增强、Agent 工作流。
SpringAI 核心组件拆解(Model、Vector Store、Tool、Agent 等)。
SpringAI整合了全球(主要是国外)的大多数大模型,而且对于大模型开发的三种技术架构都有比较好的封装和支持,开发起来非常方便。
不同的模型能够接收的输入类型、输出类型不一定相同。SpringAI根据模型的输入和输出类型不同对模型进行了分类:
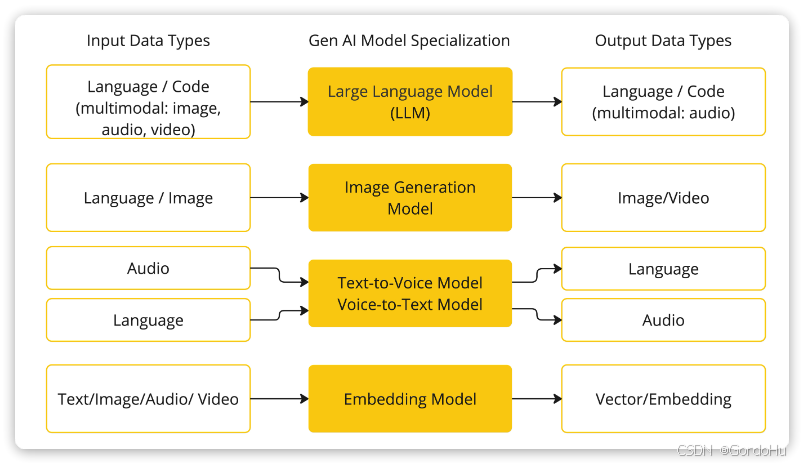 大模型应用开发大多数情况下使用的都是基于对话模型(Chat Model),也就是输出结果为自然语言或代码的模型。
目前SpringAI支持的大约19种对话模型,
- 模型覆盖广:官方适配 19+ 家主流模型,DeepSeek、OpenAI、Gemini 到 Moonshot,应对多模态、流式、函数调用等需求。
从对话问答到 Function Calling、RAG、记忆管理、日志与安全防护,按业务需求逐级启用。
一:创建工程:
基于 Spring Initializr,新建 Spring Boot 3.x + JDK 17 项目。
通过IDE创建SpringBoot版本为3.4.3版本的SpringBoot项目,选择JDK为17
二:引入依赖:
添加 spring-ai-spring-boot-starter 与目标模型的 starter。
| 模型/平台 | starter |
|---|---|
|
Ollama |
|
|
DeepSeek |
|
| Hugging Face |
|
|
OpenAI |
|
根据以上不同的平台选择引用不用的依赖,大部分本地部署都是选择Ollama模型。
在项目pom.xml中映入spring-ai版本
<spring-ai.version>1.0.0</spring-ai.version>

<dependencyManagement>
        <dependencies>
            <dependency>
                <groupId>org.springframework.ai</groupId>
                <artifactId>spring-ai-bom</artifactId>
                <version>${spring-ai.version}</version>
                <type>pom</type>
                <scope>import</scope>
            </dependency>
        </dependencies>
    </dependencyManagement>
<dependency>
<groupId>org.springframework.ai</groupId>
<artifactId>spring-ai-ollama-spring-boot-starter</artifactId>
</dependency>三:配置模型信息:
设置 API Key、Base URL、超时和流式开关。
以ollama为例,我们将application.properties修改为application.yaml,然后添加下面的内容:
spring:
  application:
    name: ai-demo
  ai:
    ollama:
      base-url: http://localhost:11434 # ollama服务地址, 这就是默认值
      chat:
        model: deepseek-r1:7b # 模型名称
        options:
          temperature: 0.8 # 模型温度,影响模型生成结果的随机性,越小越稳定
四:定义 ChatClient:
通过 @Bean 注入,支持同步调用与响应式/流式输出。
import org.springframework.ai.chat.client.ChatClient;
import org.springframework.ai.chat.client.advisor.SimpleLoggerAdvisor;
import org.springframework.ai.ollama.OllamaChatModel;
import org.springframework.context.annotation.Bean;
import org.springframework.context.annotation.Configuration;

@Configuration
public class CommonConfiguration {

    // 注意参数中的model就是使用的模型,这里用了Ollama,也可以选择OpenAIChatModel
    @Bean
    public ChatClient chatClient(OllamaChatModel model) {
        return ChatClient.builder(model) // 创建ChatClient工厂
                .build(); // 构建ChatClient实例

    }
}
到这里我们IOC中就有ChatClient(Ollama)的实例了,下面调用模型。
1:.call()进行同步调用。
import lombok.RequiredArgsConstructor;
import org.springframework.ai.chat.client.ChatClient;
import org.springframework.web.bind.annotation.RequestMapping;
import org.springframework.web.bind.annotation.RequestParam;
import org.springframework.web.bind.annotation.RestController;

@RequiredArgsConstructor
@RestController
@RequestMapping("/ai")
public class ChatController {

    private final ChatClient chatClient;


    @RequestMapping("/chat")
    public String chat(@RequestParam(defaultValue = "世界上最高的人是谁")
                        String prompt)
{
        return chatClient
                .prompt(prompt) // 传入user提示词
                .call() // 同步请求,会等待AI全部输出完才返回结果
                .content(); //返回响应内容
    }
}
.call()这里属于同步调用,需要响应结果全部返回后才能返回给前端,前端进行渲染。
2:.stream()进行流式调用。
同步调用需要等待很长时间页面才能看到结果,用户体验不好。为了解决这个问题,我们可以改进调用方式为流式调用(流式调用就是页面中展示的几个字几个字的不断的返回)。
在SpringAI中使用了WebFlux技术实现流式调用。
// 注意看返回值,是Flux<String>,也就是流式结果,另外需要设定响应类型和编码,不然前端会乱码
@RequestMapping(value = "/chat", produces = "text/html;charset=UTF-8")
public Flux<String> chat(@RequestParam(defaultValue = "世界上最高的人是谁")
                          String prompt) {
    return chatClient
            .prompt(prompt)
            .stream() // 流式调用
            .content();
}
到这里通过 SpringAI框架来对本地部署的Ollama中的DeepSeek模型进行调用的配置和代码就全部完成了。通过接口调用就可以获得流式的接口调用的大模型返回的数据了。

五:System 设定与提示词:
编写角色说明、约束条件,控制模型语气与输出格式。
就是我们希望AI按照某一种设定的方式进行工作,那就需要给它设定一个System背景信息。
@Bean
public ChatClient chatClient(OllamaChatModel model) {
    return ChatClient.builder(model) // 创建ChatClient工厂实例
            .defaultSystem("你是一个非常擅长写技术类文章的专家,主要负责CSDN平台的文章撰写,你的名字叫小美,乐于帮助网友解答任何关于技术相关的问题。")
            .build(); // 构建ChatClient实例

}
上面已经回答说是小美了,并且角色是 在CSDN平台写技术类文章的职责了。
六:调用示例:使用 chatClient.call(prompt) 流式处理回复
SpringAI基于AOP机制实现与大模型对话过程中的增强、拦截、修改等功能,所有的增强通知都需要实现Advisor接口。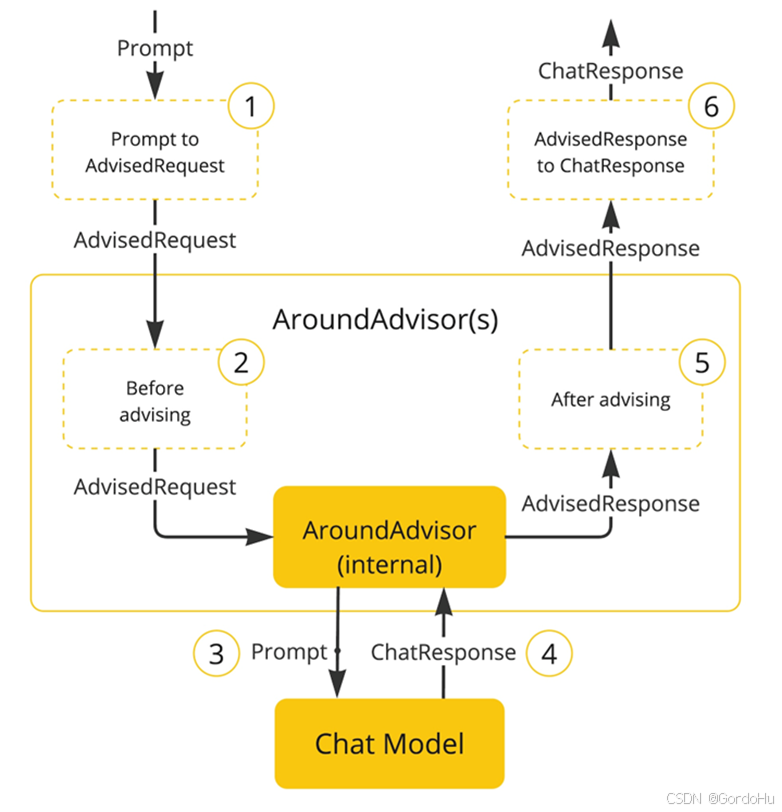
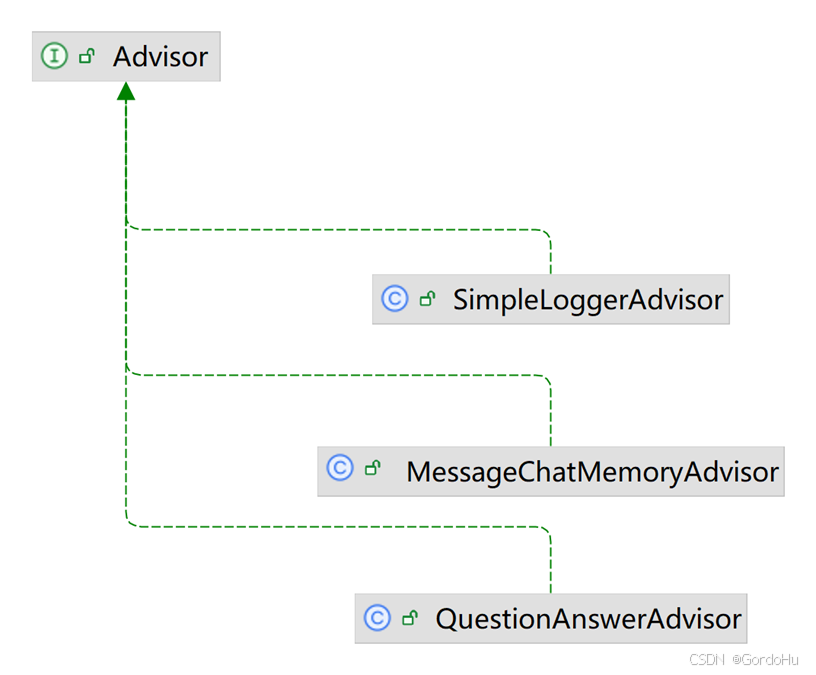
Spring提供了一些Advisor的默认实现,来实现一些基本的增强功能:
-
SimpleLoggerAdvisor:日志记录的Advisor
-
MessageChatMemoryAdvisor:会话记忆的Advisor
-
QuestionAnswerAdvisor:实现RAG的Advisor
-
自定义Advisor具体可以参考:
 https://docs.spring.io/spring-ai/reference/api/advisors.html#_implementing_an_advisor
通过.defaultAdvisors(new SimpleLoggerAdvisor())来记录日志。记得把配置文件中的日志级别修改为debug级别。
@Bean
public ChatClient chatClient(OllamaChatModel model) {
    return ChatClient.builder(model) // 创建ChatClient工厂实例
            .defaultSystem("你是一个非常擅长写技术类文章的专家,主要负责CSDN平台的文章撰写,你的名字叫小美,乐于帮助网友解答任何关于技术相关的问题。")
            .defaultAdvisors(new SimpleLoggerAdvisor())
            .build(); // 构建ChatClient实例

}
剩下的其他的Advisor原理都是一样的,不过要实现对应的ChatMemory接口哦~后面再继续更新。
  @Bean
    public ChatClient chatClient(AlibabaOpenAiChatModel model, ChatMemory chatMemory) {
        return ChatClient
                .builder(model)
                .defaultOptions(ChatOptions.builder().model("qwen-omni-turbo").build())
                .defaultSystem("你是一个热心、可爱的智能助手,你的名字叫小团团,请以小团团的身份和语气回答问题。")
                .defaultAdvisors(
                        new SimpleLoggerAdvisor(),
                        new MessageChatMemoryAdvisor(chatMemory)
                )
                .build();
    }


Agent 垂直技术社区,欢迎活跃、内容共建。
更多推荐


 17
17 0
0- 0


 已为社区贡献1条内容

所有评论(0)