Rust 解析之`Fnnce、FnMut与Fn`
目录
📝 文章摘要
闭包(Closures)是 Rust 中强大的函数式编程特性,它们是可捕获其环境的匿名函数。与函数不同,闭包具有“状态”。rustc(Rust 编译器)会根据闭包如何使用其捕获的环境,自动为其推导实现三个核心 Trait 之一:FnOnce、FnMut 或 Fn。本文将深入剖析这三个 Trait 的区别、闭包的捕获机制(Move、Copy、Borrow),以及编译器如何将闭包脱糖(Desugar)为匿名结构体,帮助您精确掌控闭包的生命周期和性能。
一、背景介绍
闭包是一种匿名函数,它可以“捕获”(Capture)其定义时所在作用域中的变量。
fn main() {
    let x = 10;

    // 这是一个闭包,它捕获了 `x`
    let my_closure = |y: i32| -> i32 {
        x + y // 可以在内部使用 `x`
    };

    println!("Result: {}", my_closure(5)); // 输出 15
}
这个特性非常强大,但也带来了复杂性:x 是如何被捕获的?是复制、借用还是移动?如果闭包修改了 x 呢?Rust 的 Fn Trait 家族就是为了在编译时精确回答这些问题。
二、原理详解
2.1 闭包的本质:匿名结构体
在编译时,rustc 会将闭包脱糖(Desugar)为一个匿名结构体,该结构体存储了捕获的环境,并为该结构体实现 FnOnce、FnMut 或 Fn Trait。
源代码:
let color = String::from("blue");
let my_closure = |num: u32| {
    println!("Color: {}, Num: {}", color, num);
};
编译器脱糖(概念上):
// 1. 编译器创建一个匿名结构体来存储捕获的环境
struct __ClosureEnv<'a> {
    color: &'a String, // 捕获了 &color
}

// 2. 编译器为该结构体实现 Fn Trait (因为是不可变借用)
impl<'a> FnOnce(u32) for __ClosureEnv<'a> {
    type Output = ();
    extern "rust-call" fn call_once(self, (num,): (u32,)) -> Self::Output {
        // ...
    }
}
impl<'a> FnMut(u32) for __ClosureEnv<'a> {
    extern "rust-call" fn call_mut(&mut self, (num,): (u32,)) -> Self::Output {
        // ...
    }
}
impl<'a> Fn(u32) for __ClosureEnv<'a> {
    // 3. 闭包的 "()" 操作符实际调用的是 call()
    extern "rust-call" fn call(&self, (num,): (u32,)) -> Self::Output {
        // 闭包体在这里
        println!("Color: {}, Num: {}", self..color, num);
    }
}

// 4. `my_closure` 变量是该结构体的一个实例
let my_closure= __ClosureEnv {
    color: &color,
};
2.2 Fn Trait 家族:捕获方式
编译器根据闭包如何使用环境,来决定实现哪个 Trait(总是实现最通用的那个):
Fn:不可用(&self)。闭包可以被调用任意多次,甚至并发调用。FnMut:可变借用(&mut self)。闭包可以被调用任意多次,但不能并发。FnOnce:**获取所有权**(self`)。闭包只能被调用一次**,调用后其环境被消耗(Move)。
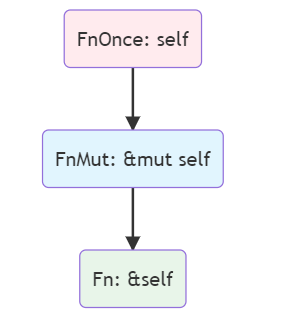
Trait 的继承关系:
Fn 是 FnMut 的子集,FnMut 是 FnOnce 的子集。
2.3 捕获机制实例
1. Fn (不可变借用 - &T)
let color = String::from("blue");
// 闭包只是读取 `color`,所以捕获 `&color`
let print_color = || {
    println!("Color is {}", color);
};

print_color(); // 调用 call()
print_color(); // 可以可以再次调用
println!("Original color: {}", color); // color 仍有效
- 编译器推导:
impl Fn() -> ()2.FnMut(可变借用 -&mut T)
let mut count = 0;
// 闭包修改了 `count`,所以捕获 `&mut count`
let mut increment = || {
    count += 1;
    println!("Count is {}", count);
};

increment(); // 调用 call_mut()
increment(); // 可以再次调用
println!("Final count: {}", count); // count 已被修改
- 编译器推导:
impl FnMut() -> () - 注意:
increment必须声明为mut,因为它在调用call_mut时需要&mut self。
**3. FnOnce (获取所有- T)**
let s = String::from("hello");
// 闭包消耗了 `s`,所以捕获 `s` (Move)
let consume_string = || {
    drop(s);
};

consume_string(); // 调用 call_once()
// consume_string(); // ❌ 编译错误:use of moved value
// println!("{}", s); // ❌ 编译错误:use of moved value
- 编译器推导:
impl FnOnce() -> ()
2.4 move 关键字
move 关键字会强制闭包获取其捕获变量的所有权,无论闭包体是否消耗它们。这在多线程中至关重要。
use std::thread;

let data = vec![1, 2, 3];

// ❌ 编译错误
// thread::spawn(|| {
//     println!("Data in thread: {:?}", data);
// });
// 错误:`data` may not live long enough
// 编译器不知道新线程会活多久,闭包默认借用 &data,
// 但 main 函数可能先结束,导致 &data 悬垂。

// ✓ 正确:使用 move
let handle = thread::spawn(move || {
    // `move` 关键字强制闭包获取 `data` 的所有权
    println!("Data in thread: {:?}", data);
}); // `data` 的所有权被转移到新线程

// println!("{:?}", data); // ❌ 错误:data 已被 moved

handle.join().unwrap();
三、代码实战
3.1 实战:move 闭包与 FnOnce
// `move` 关键字并不总是 `FnOnce`。
// 如果捕获的类型是 `Copy`,它仍然是 `Fn`。

// 1. `Copy` 类型
let x: i32 = 10;
let add_x = move |y: i32| -> i32 {
    x + y // x (i32) 是 Copy,所以闭包是 `Fn`
};
println!("{}", add_x(5)); // 15
println!("{}", add_x(6)); // 16
println!("x is still valid: {}", x); // x 仍有效

// 2. `Move` 类型
let s = String::from("Hello");
let move_s = move |suffix: &str| -> String {
    s + suffix // s (String) 是 Move,闭包是 `FnOnce`
               // ... 吗? 不!
               // `s + &str` 的 `+` 操作符是 `fn add(self, s: &str) -> String`
               // 它消耗了 self (s),所以 `move_s` 是 `FnOnce`
};
// println!("{}", move_s(" world")); // "Hello world"
// println!("{}", move_s(" againn")); // ❌ 错误:use of moved value

// 3. `move` + `Fn`
let s2 = String::from("Hello");let move_s_ref = move |suffix: &str| -> String {
    s2.clone() + suffix // 闭包拥有 s2,但只借用了它
};
println!("{}", move_s_ref(" world")); // "Hello world"
println!("{}", move_s_ref(" again")); // "Hello again"
// `move_s_ref` 实现了 `Fn`,因为它只 `clone()` s2
3.2 实战:在函数中接受闭包
// 泛型函数,接受一个实现了 `Fn(u32) -> u32` 的闭包
fn apply_twice<F>(x: u32, f: F) -> u32
where
    F: Fn(u32) -> u32,
{
    f(f(x))
}

// 接受一个可变闭包
fn apply_mut<F>(f: &mut F)
where
    F: FnMut(),
{
    f();
    f();
}

fn main() {
    // 1. Fn
    let double = |x: u32| x * 2;
    println!("Apply twice (double): {}", apply_twice(5, double)); // 5 * 2 * 2 = 20

    let add_five = |x: u32| x + 5;
    println!("Apply twice (add_five): {}", apply_twice(5, add_five)); // 5 + 5 + 5 = 15

    // 2. FnMut
    let mut counter = 0;
    let mut increment = || { counter += 1; };
    apply_mut(&mut increment);
    println!("Counter: {}", counter); // 2
}
四、结果分析
4.1 闭包的内存占用
闭包的 struct 大小等于其捕获的环境的大小。
use std::mem::size_of_val;

fn main() {
    let x: i64 = 10;
    let y: String = String::from("hello");
    let z: &str = "world";

    // 1. 不捕获环境 (ZST - Zero Sized Type)
    let c1 = || println!("No capture");
    println!("c1 size: {}", size_of_val(&c1)); // 0 字节

    // 2. 捕获 &i64 (一个指针)
    let c2 = || println!("{}", x);
    println!("c2 size: {}", size_of_val(&c2)); // 8 字节 (64位指针)

    // 3. 捕获 String (所有权)
    let c3 = move || println!("{}", y);
    println!("c3 size: {}", size_of_val(&c3)); // 24 字节 (String 的大小)

    // 4. 捕获 &str (两个指针)
    let c4 = || println!("{}", z);
    println!("c4 size: {}", size_of_val(&c4)); // 16 字节 (ptr + len)
}
闭包是“零成本抽象”。它们的内存开销是精确且最小的,仅为它们实际捕获的数据。
五、总结与讨论
5.1 核心要点
-
闭包的本质:是编译器自动生成的、用于存储捕获环境的匿名结构体。
-
FnTrait 家族:Fn:通过&self调用,捕获&T。(可多次、可并发)FnMut:通过&mut self调用,捕获 `&ut T`。(可多次、不可并发)FnOnce:通过self调用,捕获T。(只能调用一次)
-
move关键字:强制闭包获取环境的所有权,是多线程编程的必备工具。 -
零开销:闭包的内存占用和调用开销与手写的结构体和方法完全相同。
5.2 讨论问题
- 为什么
thread::spawn要求闭包是move并且是'static的? - 在什么场景下,你需要在一个函数签名中显式地写
F: FnOnce(u32)而不是F: Fn(u32)?(提示:Option::mapvsOption::take) - 异步(
async)闭包目前(Rust 1.78)仍然不稳定,为什么它比普通闭包实现起来更困难?
参考链接

Agent 垂直技术社区,欢迎活跃、内容共建。
更多推荐


 16
16 0
0- 0


 已为社区贡献4条内容

所有评论(0)