【C#学习笔记05】GDI+图形图像技术
#近期沉迷跑步,上周六,完成了一个人的半马,前一次半马距今已将近10年,对比10年前,速度虽然比不上,但跑完之后状态要强很多,遥想当年,跑完半马感觉腿都不是自己的了,这次跑完还能淡定的去加班;
身体是革命的本钱,希望大家都能保持好身体状态!
20251120今天称了下体重,距离第一阶段目标还有0.1Kg,这个月坚持下来应该可以达成,达成之后我想去大吃一顿!
前期用C#主要是作业Winfrom应用程序,GDI确实没做过多了解和接触,开始好好学习了!#
1. GDI+绘图基础
1.1 GDI+概述
GDI+指的是.NET Framework中提供的二维图形、图像处理等功能,是构成Windows操作系统的一个子系统,提供了图形图像操作的应用程序API。使用GDI+可以用相同的方式在品目或打印机上显示信息,而无需考虑特定显示设备的细节。
GDI+提供编程人员用来绘制的方法,这些方法会调用特定设备的驱动程序,它将应用程序与图形硬件分离,使得我们可以创建与设备无关的应用。主要用于在窗体上绘制各种图形图像,可以绘制各种数据图形,数据仿真等;可以在窗体程序中产生很多自定义图形,便于展示各种图形化的数据。
1.2 Graphics对象
Graphics类是GDI+的核心,它的对象表示GDI+的绘图表面,提供将对象绘制到显示设备的方法。其对象与特定的设备上下关联,是用于创建图形图像的对象,封装了绘制直线、曲线、图形、图和文本的方法,是进行一切GDI+操作的基础类。
创建Graphics对象的方法:
1)在窗体或控件的Paint事件中创建
private void Form1_Paint(object sender, PaintEventArgs e)   //窗体的Paint事件
{
    Graphics graphics = e.Graphics;     //创建Graphics对象
}
2)调用控件或窗体的CreateGraphics()方法以获取对Graphics对象的引用
private void Form1_Load(object sender, EventArgs e)         //窗体的Load事件
{
    Graphics graphics;      //声明一个Graphics对象
    graphics = this.CreateGraphics();   //使用CreateGraphics方法创建Graphics对象
}
3)从Image继承的任何对象创建Graphics对象,可用于更改已存在的图像
private void Form1_Load(object sender, EventArgs e)         //窗体的Load事件
{
    Bitmap bitmap = new Bitmap(@"C:\test.bmp");  //实例化Bitmap类
    Graphics graphics = Graphics.FromImage(bitmap); //通过FromImage()方法创建Graphics对象
}
2. 画笔与画刷
2.1 设置画笔
Pen类主要用于设置画笔,构造函数如下:
public Pen(Color color, float width)
//参数说明:
//1)color:设置pen的颜色
//2)width:设置pen的宽度
创建一个pen对象,颜色为红色,宽度为3
Pen pen = new Pen(Color.Red, 3);
2.2 设置画刷
Brush类主要用与设置画刷,用以填充几何图形,比如将三角形填充为灰色等。Brush类是一个抽象基类,不能进行实例化,需要使用从Brush的派生类:如SolidBrush,HatchBrush等:
2.2.1 SoidBrush类
SoidBrush用于定义单色画笔,可以填充图形形状,比如矩形、三角形、圆形等粉笔路径,语法格式:
public SolidBrush(Color color)
参数说明:
1)color:表示画刷的颜色
例:创建一个Windows应用程序,通过Brush对象将绘制的矩形填充为蓝色
private void button1_Click(object sender, EventArgs e)
{
    Graphics graphics = this.CreateGraphics();          //创建Graphics对象
    Brush brush=new SolidBrush(Color.Blue);             //使用SoldBrush创建一个Brush对象
    Rectangle rectangle=new Rectangle(10,10,100,100);   //绘制一个矩形
    graphics.FillRectangle(brush, rectangle);           //使用Brush填充Rectangle
}
2.2.2 HatchBrush类
HatchBrush类提供了一些特定样式图形,用来绘制填满整个封闭区域的绘图效果,该类位于System.Drawing.Drawing2D命名空间,语法格式:
public HatchBrush(HatchStyle hatchstyle, Color foreColor)
//参数说明:
//1)hatchstyle:HatchStyle的值之一,表示所绘制的图案
//2)foreColor:Color结构,表示绘制图案的线条颜色
例:创建一个Windows应用程序,通过HatchStyle的值绘制6个长条图形:
private void button1_Click(object sender, EventArgs e)
{
    Graphics graphics =this.CreateGraphics();             //创建Graphics对象
    for (int i = 1; i < 7; i++)                           //使用for循环
    {
        HatchStyle style = (HatchStyle)(6 + i);           //设置HatchStyle的值
        HatchBrush hatchBrush = new HatchBrush(style, Color.Green); //实例化HatchBrush类
        Rectangle rectangle = new Rectangle(10,50*i,50*i,50); //根据i绘制矩形
        graphics.FillRectangle(hatchBrush, rectangle);    //填充矩形
    }
}
2.2.3 LinearGradientBrush类
LinearGradientBrush类提供渐变色特效,填满图形内部区域,语法格式如下
public LinearGradientBrush(PointF point1, PointF point2, Color color1, Color color2)
//参数说明
//1)point1:表示线性渐变开始点
//2)point2:表示线性渐变结束点
//3)color1:表示线性渐变开始颜色
//4)color2:表示线性渐变结束颜色
例:绘制渐变图形
private void button1_Click(object sender, EventArgs e)
{
    Point p1 = new Point(100,100);          //实例化Point用于起始位置坐标
    Point p2 = new Point(150,150);          //实例化Point用于起始位置坐标
    //实例化LinearGradientBrush类,设置蓝绿色进行渐变
    LinearGradientBrush linearGradientBrush=new LinearGradientBrush(p1,p2,Color.Blue,Color.Green);
    Graphics graphics=this.CreateGraphics();    //实例化Graphics类
    linearGradientBrush.WrapMode = (WrapMode)WarpMode.Bilinear; //设置环绕模式
    graphics.FillRectangle(linearGradientBrush, 15, 15, 150, 150);  //填充绘制矩形
}
3. 基本图形绘制
3.1 GDI+中的直线和矩形
3.1.1 绘制直线
调用Graphics类的DrawLine()方法,结合Pen对象可以绘制直线,DrawLine方法有两种构造函数:
//重载1:
public void DrawLine(Pen pen, int x1, int y1, int x2, int y2)
//参数说明:
//pen:Pen对象,确定线条的颜色、宽度、样式
//x1:第一个点的x坐标
//y1:第一个点的y坐标
//x2:第二个点的x坐标
//y2:第二个点的y坐标
//重载2:
public void DrawLine(Pen pen, Point pt1, Point pt2)
//参数说明:
//pen:Pen对象,确定线条的颜色、宽度、样式
//pt1:Point对象,表示要连接的第一个点
//pt2:Point对象,表示要连接的第二个点
//注:实际实现中,重载二方法内部直接调用了重载1
例,绘制相交的直线,坐标的是以绘图窗口左上角为(0,0)坐标起始位置计算的,横轴为x,纵轴为y
private void button1_Click(object sender, EventArgs e)
{
    Pen pen = new Pen(Color.Red, 3);    //实例化Pen
    Point point1 = new Point(10,50);    //实例化一个Point
    Point point2 = new Point(100, 50);  //实例化第二个Point
    Graphics graphics=this.CreateGraphics();//实例化一个Graphics
    graphics.DrawLine(pen, point1, point2); //调用DrapLine绘制直线
}
private void button2_Click(object sender, EventArgs e)
{
    Graphics graphics=this.CreateGraphics();//实例化一个Graphics
    Pen pen = new Pen(Color.Red, 3);        //实例化Pen
    graphics.DrawLine(pen, 55, 0, 55, 100);  //调用DrawLine绘制直线
}
3.1.2 绘制矩形
通过Graphics类的DrawRectangle方法,可以绘制矩形图形:
public void DrawRectangle(pen, rect.X, rect.Y, rect.Width, rect.Height);
//参数说明
//pen:Pen对象,确定矩形的颜色,宽度,样式
//x:左上角的x坐标
//y:左上角的y坐标
//width:宽度
//height:高度
//注意:当width和height值为负数,矩形不在矿体内显示。
例:绘制矩形
private void button1_Click(object sender, EventArgs e)
{
    Graphics graphics=this.CreateGraphics();    //声明Graphic对象
    Pen pen = new Pen(Color.Green, 4);          //实例化Pen对象
    graphics.DrawRectangle(pen, 50, 50, 60, 90);//调用DrawRectangle方法绘制矩形
}
3.2 GDI+中的椭圆、圆弧和扇形
3.2.1. 绘制椭圆
通过Graphics类中的DrawEllipse方法绘制,语法格式
public void DrawEllipse(Pen pen, int x, int y, int width, int height)
//参数说明:
//pen:Pen对象,确定曲线的颜色、宽度和样式
//x:左上角的x坐标
//y:左上角的y坐标
//width:椭圆边框的宽度
//height:椭圆边框的高度
例:绘制椭圆
private void button1_Click(object sender, EventArgs e)
{
    Graphics graphics=this.CreateGraphics();    //声明Graphic对象
    Pen pen = new Pen(Color.Green, 4);          //实例化Pen对象
    graphics.DrawEllipse(pen, 100, 50, 100, 200); //绘制椭圆
}
3.2.2. 绘制圆弧
通过Graphics类中的DrawArc方法绘制,语法格式
public void DrawArc(Pen pen, Rectangle rect, float startAngle, float sweepAngle)
//参数说明:
//pen:Pen对象,确定曲线的颜色、宽度和样式
//rectangel:Reacangle结构,用于定义圆弧的边界,也就是一个刚刚能包裹圆弧所属圆形的矩形,如果是正方形,那么圆弧所属原因也就是正圆,如果是长方形,圆弧所属圆形是椭圆形
//startAngle:从x轴到弧线的起始点沿顺时针方向度量的角度(以度为单位)X轴与Y轴交叉点右侧为0度
//sweepAngle:从startAngle参数的到弧线的结束点沿顺时针方向度量的角(以度数为单位)
例:绘制圆弧
private void button3_Click(object sender, EventArgs e)
{
    Graphics graphics = this.CreateGraphics();    //声明Graphic对象
    Pen pen = new Pen(Color.Green, 4);          //实例化Pen对象
    Rectangle rectangle = new Rectangle(70,20,100,60); //定义一个rectangle结构
    graphics.DrawArc(pen, rectangle, 180, 90);  //绘制圆弧
}
3.2.3. 绘制扇形
通过Draphics类中的DrawPie方法绘制,语法格式:
public void DrawPie(Pen pen, float x, float y, float width, float height, float startAngle, float sweepAngle)
//参数说明:
//pen:pen对象,确定扇形的颜色,宽度和样式
//x:扇形属椭圆所属矩形左上角的x坐标(窗体左上角边框位置是0)
//y:扇形属椭圆所属矩形左上角的y坐标(窗体左上角边框位置是0)
//width:扇形所属椭圆所属矩形的长的一半(横向)
//height:扇形所属椭圆所属矩形的高的一般(纵向)
//startAngle:x轴三点钟方向顺时针起始角度;
//sweepAngle:x轴三点钟方向顺时针截至角度;
例:绘制扇形,除了例子中的方法,还有其他类似于绘制圆弧的重构方法,将x、y、width、height替换为依此定义的rectangle对象
private void button4_Click(object sender, EventArgs e)
{
    Graphics graphics = this.CreateGraphics();      //声明Graphics对象
    Pen pen =new Pen(Color.Blue, 2);                //实例化Pen对象
    graphics.DrawPie(pen, 50, 50, 200, 100, 0, 90); //绘制扇形
}
3.3 GDI+中的多边形
通过Draphics类中的DrawPolygon方法绘制,语法格式:
public void DrawPolygon(Pen pen, Point[] points)
//参数说明:
//pen:线条属性
//points:多边形的顶点,根据数组顺序依次链接
例:绘制多边形,多边形的边是根据points的顺序依次连接,如果最后一个点与第一个点不重合,会再次连接第一个点
private void button5_Click(object sender, EventArgs e)
{
    Graphics graphics = this.CreateGraphics();      //声明Graphics对象
    Pen pen = new Pen(Color.Blue, 2);               //实例化Pen对象
    Point point1 = new Point(80, 20);               //实例化Point对象
    Point point2 = new Point(40, 40);               //实例化Point对象
    Point point3 = new Point(80, 60);               //实例化Point对象
    Point point4 = new Point(160, 60);               //实例化Point对象
    Point point5 = new Point(200, 40);               //实例化Point对象
    Point point6 = new Point(160, 20);               //实例化Point对象
    Point[] points = {point1, point2, point3, point4, point5, point6}; //创建Point结构数组
    //绘制多边形
    graphics.DrawPolygon(pen, points);
}
3.4 绘制文本
通过Draphics类中的DrawString方法绘制,语法格式:
public void DrawString(string s, Font font, Brush brush, float x, float y)
//参数说明:
//s:要绘制的字符串
//font:文本格式,字体之类的
//brush:颜色和纹理
//x:左上角的x轴坐标
//y:左上角的y轴坐标
例:绘制文本
private void button6_Click(object sender, EventArgs e)
{
    string str = "努力学习,持续进步!";              //定义要绘制的文本
    Font myFont= new Font("微软雅黑",20,FontStyle.Bold);//创建字体对象
    SolidBrush myBrush=new SolidBrush(Color.Black);     //创建画刷对象
    Graphics graphics = this.CreateGraphics();          //声明Graphics对象
    graphics.DrawString(str, myFont, myBrush,100,100);  //绘制文本
}
3.5 绘制图像
通过Graphics的DrawImage方法绘制,常用语法格式:
//重载1:
public void DrawImage(Image image, int x, int y)
//重载2:
public void DrawImage(Image image, int x, int y, int width, int height)
//参数说明:
//image:要绘制的图像
//x:左上角的x坐标
//y:左上角的y坐标
//width:图像的宽度
//height:图像的高度
例:绘制图像
private void button7_Click(object sender, EventArgs e)
{
    Image img = Image.FromFile("logo.png");         //创建image对象默认为debug或者Realace目录
    Graphics graphics = this.CreateGraphics();      //声明Graphics对象
    graphics.DrawImage(img,50,20,100,100);          //绘制图像
}
4. GDI+绘图应用
4.1 绘制柱形图
柱形图也叫条形图,通过Graphics类中的FillRectangle方法实现,用于填充一对坐标、一个宽度和一个高度指定的矩形内部,语法格式:
public void FillRectangle(Brush brush, int x, int y, int width, int height)
//参数说明:
//brush:确定填充特性的brush,设置背景之类的信息
//x:要填充的矩形左上角的x坐标
//y:要填充的矩形左上角的y坐标
//width:要填充的矩形的宽度
//heigth:要填充的矩形的高度
例:
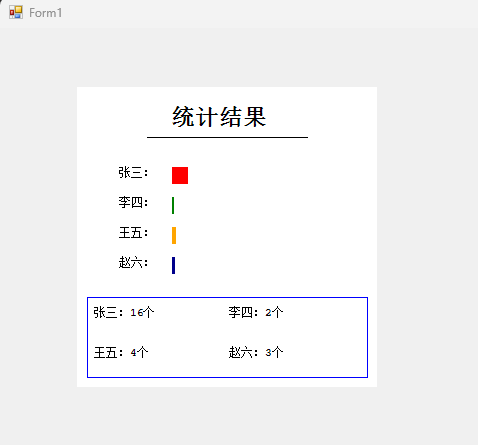
代码如下:
--数据库表创建语句如下
CREATE TABLE t_test1 (
    id INT AUTO_INCREMENT PRIMARY KEY,
    option_name VARCHAR(50) NOT NULL COMMENT '选项名称',
    vote_count INT NOT NULL COMMENT '票数',
    created_at TIMESTAMP DEFAULT CURRENT_TIMESTAMP COMMENT '创建时间'
);
INSERT INTO t_test1 (option_name, vote_count) VALUES
('张三', 16),
('李四', 2),
('王五', 4),
('赵六', 3);
private int Sum;        //声明int类型变量Sum
//声明MysqlConnection变量,这里用的是MySQL数据库如果是SqlServer则声明SqlConnection变量
//MySql需要安装MySqlConnectorNuGet包
MySqlConnection conn;
private void CreateImage()  //建立方法,用于绘制图形
{
    //实例化MySqlConnection变量conn,连接数据库
    //strConnUrl为连接字符串,示例如下3306是MySql的默认端口,请自行确认端口是否允许访问
    //"server=服务器ip;port=3306;user=数据库用户名;password=数据库密码;database=数据库名称; SslMode=Preferred;AllowLoadLocalInfile=true;AllowUserVariables=true";
    conn = new MySqlConnection(strConnUrl);
    conn.Open();                            //打开连接
    //创建一个SqlCommand对象
    string strSelect ="select sum(vote_count) from my_studay.t_test1";
    //
    MySqlDataAdapter mySqlDataAdapter = new MySqlDataAdapter();
    mySqlDataAdapter.SelectCommand = new MySqlCommand(strSelect, coon);
    DataSet ds1 = new DataSet();
    Sum = int.Parse(ds1.Tables[0].Rows[0][0].ToString());
    //Sum = (int)cmd.ExecuteScalar();
    //实例化MySqlDataAdapter对象
    MySqlDataAdapter msda=new MySqlDataAdapter("SELECT option_name, vote_count FROM my_studay.t_test1",conn);
    DataSet ds = new DataSet();             //实例化DataSet对象
    msda.Fill(ds);                          //使用MySqlDataAdapter的Fill方法填充DataSet
    int TP1 = Convert.ToInt32(ds.Tables[0].Rows[0][1].ToString());  //获取第一个选项的统计数量
    int TP2 = Convert.ToInt32(ds.Tables[0].Rows[1][1].ToString());  //获取第二个选项的统计数量
    int TP3 = Convert.ToInt32(ds.Tables[0].Rows[2][1].ToString());  //获取第三个选项的统计数量
    int TP4 = Convert.ToInt32(ds.Tables[0].Rows[3][1].ToString());  //获取第四个选项的统计数量
    //计算每一项的百分比
    float tp1 = Convert.ToSingle(Convert.ToSingle(TP1) * 100 / Convert.ToSingle(Sum));
    float tp2 = Convert.ToSingle(Convert.ToSingle(TP2) * 100 / Convert.ToSingle(Sum));
    float tp3 = Convert.ToSingle(Convert.ToSingle(TP3) * 100 / Convert.ToSingle(Sum));
    float tp4 = Convert.ToSingle(Convert.ToSingle(TP4) * 100 / Convert.ToSingle(Sum));
    //声明宽和高
    int width = 300, height = 300;
    Bitmap bitmap = new Bitmap(width, height);  //创建一个Bitmap对象
    Graphics g = Graphics.FromImage(bitmap);    //创建一个Graphics对象
    try
    {
        g.Clear(Color.White);           //使用Celar方法使画布为白色
        //创建6个Brush对象,用于填充颜色
        Brush brush1 = new SolidBrush(Color.White);
        Brush brush2 = new SolidBrush(Color.Black);
        Brush brush3 = new SolidBrush(Color.Red);
        Brush brush4 = new SolidBrush(Color.Green);
        Brush brush5 = new SolidBrush(Color.Orange);
        Brush brush6 = new SolidBrush(Color.DarkBlue);
        //创建2个Font对象用于设置字体
        Font font1 = new Font("Courier New", 16, FontStyle.Bold);
        Font font2 = new Font("Courier New", 8);

        g.FillRectangle(brush1, 0, 0, width, height);       //背景从左上角坐标开始到宽高全部填充为brush1
        g.DrawString("统计结果", font1, brush2, new Point(90, 20));//绘制标题
        //设置坐标
        Point p1 = new Point(70, 50);
        Point p2 = new Point(230, 50);
        //绘制直线
        g.DrawLine(new Pen(Color.Black), p1, p2);
        //绘制文字
        g.DrawString("张三:", font2, brush2, new Point(40, 80));
        g.DrawString("李四:", font2, brush2, new Point(40, 110));
        g.DrawString("王五:", font2, brush2, new Point(40, 140));
        g.DrawString("赵六:", font2, brush2, new Point(40, 170));
        //绘制条形图
        g.FillRectangle(brush3, 95, 80, TP1, 17);
        g.FillRectangle(brush4, 95, 110, TP2, 17);
        g.FillRectangle(brush5, 95, 140, TP3, 17);
        g.FillRectangle(brush6, 95, 170, TP4, 17);
        //绘制所有选项的统计数量显示
        g.DrawRectangle(new Pen(Color.Blue), 10, 210, 280, 80); //绘制范围
        g.DrawString("张三:" + TP1.ToString() + "个", font2, brush2, new Point(15, 220));
        g.DrawString("李四:" + TP2.ToString() + "个", font2, brush2, new Point(150, 220));
        g.DrawString("王五:" + TP3.ToString() + "个", font2, brush2, new Point(15, 260));
        g.DrawString("赵六:" + TP4.ToString() + "个", font2, brush2, new Point(150, 260));
        pictureBox1.Image=bitmap;
    }
    catch (Exception ex)
    {
        MessageBox.Show(ex.Message);
    }
}

private void Form1_Paint(object sender, PaintEventArgs e)
{
    CreateImage();
}
说明:如果要实现动态主星图标,在重新绘制前,要以助兴图标的会止于区以及当前控件的背景颜色对柱形图进行清空;如果要关联动态数据源,数据分类变化,可使提前设定多种颜色组合,并利用循环结构设定计算条形图的绘制位置和引用颜色。
4.2 绘制折线图
折线图是通过绘制点和折现实现的,绘制点是通过Graphics类中的FillEllipse方法实现
例:
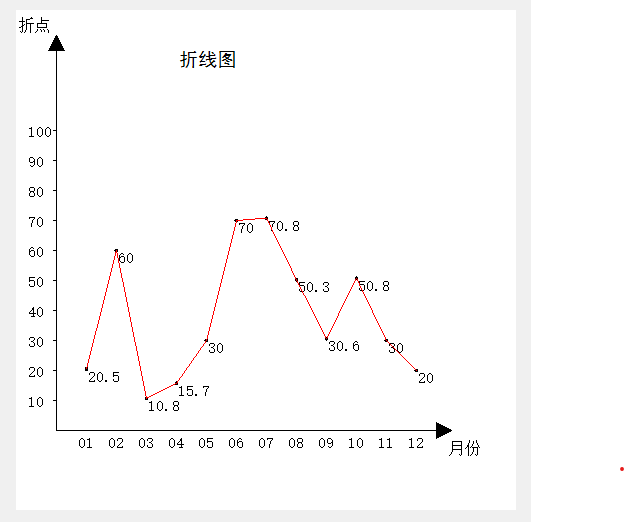
代码如下:
private void Form1_Paint(object sender, PaintEventArgs e)
{
    //声明一个string类型的数组,用于存储一年中的12个月
    string[] month = new string[] { "01", "02", "03", "04", "05", "06", "07", "08", "09", "10", "11", "12" };
    float[] d = new float[] { 20.5F, 60, 10.8F, 15.7F, 30, 70, 70.8F, 50.3F, 30.6F, 50.8F, 30, 20 };
    //画图初始化
    Bitmap bmap=new Bitmap(500,500);
    Graphics graphics=Graphics.FromImage(bmap);
    graphics.Clear(Color.White);
    PointF pointF= new PointF(40,420);  //xy轴交叉点
    //x轴三角形
    PointF[] xPointF = new PointF[3] { new PointF(pointF.Y + 15, pointF.Y), new PointF(pointF.Y, pointF.Y - 8), new PointF(pointF.Y, pointF.Y + 8) };
    //y轴三角形
    PointF[] yPointF = new PointF[3] { new PointF(pointF.X, pointF.X - 15), new PointF(pointF.X - 8, pointF.X), new PointF(pointF.X + 8, pointF.X) };
    //图标标题
    graphics.DrawString("折线图", new Font("黑体", 14), Brushes.Black, new PointF(pointF.X + 120, pointF.X));
    //画X轴
    graphics.DrawLine(Pens.Black, pointF.X, pointF.Y, pointF.Y, pointF.Y);
    graphics.DrawPolygon(Pens.Black, xPointF);
    graphics.FillPolygon(new SolidBrush(Color.Black), xPointF);
    graphics.DrawString("月份", new Font("宋体", 12), Brushes.Black, new PointF(pointF.Y+10,pointF.Y+10));
    //画Y轴
    graphics.DrawLine(Pens.Black, pointF.X, pointF.Y, pointF.X, pointF.X);
    graphics.DrawPolygon(Pens.Black,yPointF);
    graphics.FillPolygon(new SolidBrush(Color.Black), yPointF);
    graphics.DrawString("折点", new Font("宋体", 12), Brushes.Black, new PointF(0, 7));

    for(int i = 1; i <= 12; i++)
    {
        //画Y轴刻度
        if (i < 11)
        {
            graphics.DrawString((i * 10).ToString(), new Font("宋体", 11), Brushes.Black, new PointF(pointF.X - 30, pointF.Y - i * 30 - 6));
            graphics.DrawLine(Pens.Black, pointF.X - 3, pointF.Y - i * 30, pointF.X, pointF.Y - i * 30);
        }
        //画X轴刻度
        graphics.DrawString(month[i - 1].Substring(0, 2), new Font("宋体", 11), Brushes.Black, new PointF(pointF.X + i * 30 - 10, pointF.Y + 5));
        //画点
        graphics.DrawEllipse(Pens.Black, pointF.X + i * 30 - 1.5F, pointF.Y - d[i - 1] * 3 - 1.5F, 3, 3);
        graphics.FillEllipse(new SolidBrush(Color.Black), pointF.X + i * 30 - 1.5F, pointF.Y - d[i - 1] * 3 - 1.5F, 3, 3);
        //画数值
        graphics.DrawString(d[i - 1].ToString(), new Font("宋体", 11), Brushes.Black, new PointF(pointF.X + i * 30, pointF.Y - d[i - 1] * 3));
        //画折现
        if (i > 1)
        {
            graphics.DrawLine(Pens.Red,  pointF.X + (i - 1) * 30, pointF.Y - d[i - 2] * 3, pointF.X + i * 30, pointF.Y - d[i - 1] * 3);
        }
    }
    //窗体插入PictureBox控件
    pictureBox1.Image = bmap;

}
4.3 绘制饼形图
通过Graphics类中的FillPie方法绘制
public void FillPie(Brush brush, float x, float y, float width, float height, float startAngle, float sweepAngle)
//参数说明:
//brush:确定填充特性的Brush
//x:边框左上角的x坐标
//y:边框左上角的y坐标
//width:边框的宽度
//height:边框的高度
//startAngle:开始的角度,水平右侧为0度,顺时针增加角度
//sweepAngle:结束的角度
例:
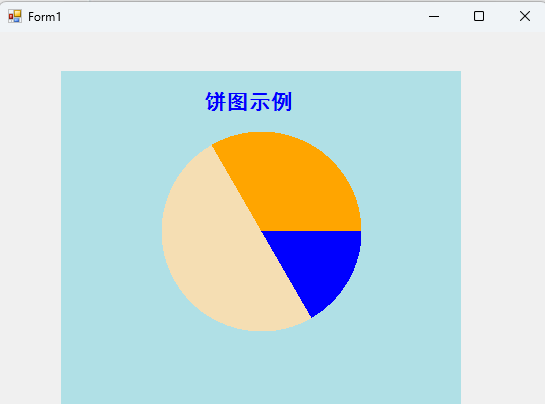
代码:
private void Form1_Paint(object sender, PaintEventArgs e)
{
    //创建绘图对象
    int width = 400, height = 450;
    Bitmap bitmap = new Bitmap(width, height);
    Graphics g = Graphics.FromImage(bitmap);
    //清空背景色
    g.Clear(Color.White);
    //实例化Pen
    Pen pen1 = new Pen(Color.Red);
    //创建4个Brush用于设置颜色
    Brush b1 = new SolidBrush(Color.PowderBlue);
    Brush b2 = new SolidBrush(Color.Blue);
    Brush b3 = new SolidBrush(Color.Wheat);
    Brush b4 = new SolidBrush(Color.Orange);
    //创建两个Font对象用于设置字体
    Font font1 =new Font("黑体",16, FontStyle.Bold);
    Font font2 = new Font("黑体", 8);
    //绘制背景图
    g.FillRectangle(b1,0,0,width,height);
    //书写标题
    g.DrawString("饼图示例", font1, b2, new Point(140, 20));
    int piex = 100, piey = 60, piew = 200, pieh = 200;

    float t1 = 100F, t2 = 300F, t3 = 200F;
    //计算角度
    float type1 = 360F/ (t1 + t2 + t3) * t1;
    float type2 = 360F / (t1 + t2 + t3) * t2;
    float type3 = 360F / (t1 + t2 + t3) * t3;

    //绘制各类型占比
    g.FillPie(b2, piex, piey, piew, pieh, 0, type1);
    g.FillPie(b3, piex, piey, piew, pieh, type1, type2);
    g.FillPie(b4, piex, piey, piew, pieh, type1 + type2, type3);

    pictureBox1.Image = bitmap;
}

Agent 垂直技术社区,欢迎活跃、内容共建。
更多推荐



 5
5 0
0- 0


 已为社区贡献6条内容

所有评论(0)