AI_Agents(十)_AI智能体RAG系统
本文基于开源项目进行解读与拓展
- 官方项目地址:GitHub - microsoft/ai-agents-for-beginners
- 项目许可证:MIT License
3. 矫正 RAG 系统
首先,让我们先了解 RAG 工具和抢占式上下文加载之间的区别
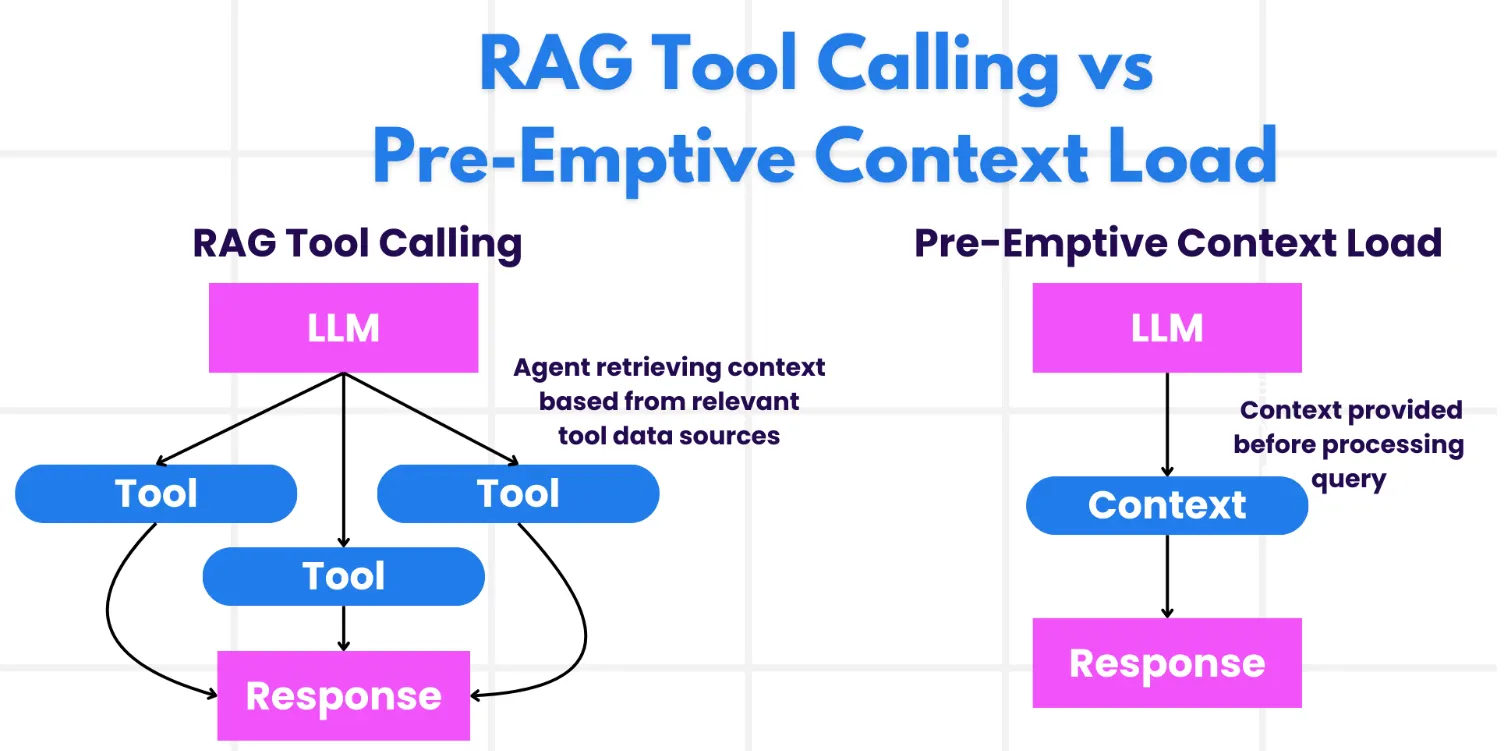
3.1 RAG矫正基础
1、检索增强生成 (RAG)
RAG 将检索系统与生成模型相结合。进行查询时,检索系统从外部来源获取相关文档或数据,这些检索到的信息用于增强生成模型的输入。这有助于模型生成更准确且与上下文相关的响应。
在 RAG 系统中,代理从知识库中检索相关信息,并利用这些信息生成合适的回答或行动。
2、矫正 RAG 方法
纠正 RAG 方法侧重于使用 RAG 技术来纠正错误并提高 AI 代理的准确性。这包括:
- Prompting Technique: 提示技术 : 使用特定的提示来指导代理检索相关信息。
- Tool: 工具 :实施算法和机制,使代理能够评估检索到的信息的相关性并生成准确的响应。
- Evaluation: 评估 :持续评估代理的性能并进行调整以提高其准确性和效率。
示例:搜索代理中的纠正 RAG
- Prompting Technique:提示技术 :根据用户的输入制定搜索查询。
- Tool: 工具 :使用自然语言处理和机器学习算法对搜索结果进行排名和筛选。
- Evaluation: 评估 :分析用户反馈以识别和更正检索到的信息中的不准确之处。
3、旅行代理中的矫正 RAG
Corrective RAG in Travel Agent
Corrective RAG(纠正型 检索增强生成)增强了 AI 检索和生成信息的能力,同时纠正任何不准确之处。让我们看看 Travel Agent 如何使用 Corrective RAG 方法提供更准确和相关的旅行建议。
在 Travel Agent 中实施纠正 RAG 的步骤
-
Initial User Interaction 初始用户交互
-
从用户那里收集初始偏好,例如目的地、旅行日期、预算和兴趣。
-
例:
preferences = {
    "destination": "Paris",
    "dates": "2025-04-01 to 2025-04-10",
    "budget": "moderate",
    "interests": ["museums", "cuisine"]
}
-
-
Retrieval of Information 信息检索
-
根据用户偏好检索有关航班、住宿、景点和餐厅的信息。
-
例:
flights = search_flights(preferences)
hotels = search_hotels(preferences)
attractions = search_attractions(preferences)
-
-
Generating Initial Recommendations生成初始建议
-
使用检索到的信息生成个性化行程。
-
例:
itinerary = create_itinerary(flights, hotels, attractions)
print("Suggested Itinerary:", itinerary)
-
-
Collecting User Feedback 收集用户反馈
-
会询问用户对初始建议的反馈。
-
例:
feedback = {
    "liked": ["Louvre Museum"],
    "disliked": ["Eiffel Tower (too crowded)"]
}
-
-
Corrective RAG Process 纠正 RAG 流程
-
Prompting Technique:提示技术 :Travel Agent 根据用户反馈制定新的搜索查询。
-
例:
if "disliked" in feedback:
    preferences["avoid"] = feedback["disliked"]
-
-
Tool: 工具 :Travel Agent 使用算法对新的搜索结果进行排名和过滤,并根据用户反馈强调相关性。
-
例:
new_attractions = search_attractions(preferences)
new_itinerary = create_itinerary(flights, hotels, new_attractions)
print("Updated Itinerary:", new_itinerary)
-
-
Evaluation: 评估 : Travel Agent 通过分析用户反馈并进行必要的调整,不断评估其建议的相关性和准确性。
-
例:
def adjust_preferences(preferences, feedback):
    if "liked" in feedback:
        preferences["favorites"] = feedback["liked"]
    if "disliked" in feedback:
        preferences["avoid"] = feedback["disliked"]
    return preferences

preferences = adjust_preferences(preferences, feedback)
-
-
Practical Example 实例
以下是在 Travel Agent 中合并 Corrective RAG 方法的简化 Python 代码示例:
class Travel_Agent:
    def __init__(self):
        self.user_preferences = {}
        self.experience_data = []

    def gather_preferences(self, preferences):
        self.user_preferences = preferences

    def retrieve_information(self):
        flights = search_flights(self.user_preferences)
        hotels = search_hotels(self.user_preferences)
        attractions = search_attractions(self.user_preferences)
        return flights, hotels, attractions

    def generate_recommendations(self):
        flights, hotels, attractions = self.retrieve_information()
        itinerary = create_itinerary(flights, hotels, attractions)
        return itinerary

    def adjust_based_on_feedback(self, feedback):
        self.experience_data.append(feedback)
        self.user_preferences = adjust_preferences(self.user_preferences, feedback)
        new_itinerary = self.generate_recommendations()
        return new_itinerary

# Example usage
travel_agent = Travel_Agent()
preferences = {
    "destination": "Paris",
    "dates": "2025-04-01 to 2025-04-10",
    "budget": "moderate",
    "interests": ["museums", "cuisine"]
}
travel_agent.gather_preferences(preferences)
itinerary = travel_agent.generate_recommendations()
print("Suggested Itinerary:", itinerary)
feedback = {"liked": ["Louvre Museum"], "disliked": ["Eiffel Tower (too crowded)"]}
new_itinerary = travel_agent.adjust_based_on_feedback(feedback)
print("Updated Itinerary:", new_itinerary)
3.2 抢占式上下文加载
Pre-emptive Context Load
抢占式上下文加载 (Pre-emptive Context Load) 涉及在处理查询之前将相关的上下文或背景信息加载到模型中。这意味着模型从一开始就可以访问这些信息,这可以帮助它生成更明智的响应,而无需在此过程中检索其他数据。
下面是一个简化的示例,说明了抢占式上下文加载如何在 Python 中查找 travel agent 应用程序:
class TravelAgent:
    def __init__(self):
        # Pre-load popular destinations and their information
        self.context = {
            "Paris": {"country": "France", "currency": "Euro", "language": "French", "attractions": ["Eiffel Tower", "Louvre Museum"]},
            "Tokyo": {"country": "Japan", "currency": "Yen", "language": "Japanese", "attractions": ["Tokyo Tower", "Shibuya Crossing"]},
            "New York": {"country": "USA", "currency": "Dollar", "language": "English", "attractions": ["Statue of Liberty", "Times Square"]},
            "Sydney": {"country": "Australia", "currency": "Dollar", "language": "English", "attractions": ["Sydney Opera House", "Bondi Beach"]}
        }

    def get_destination_info(self, destination):
        # Fetch destination information from pre-loaded context
        info = self.context.get(destination)
        if info:
            return f"{destination}:\\nCountry: {info['country']}\\nCurrency: {info['currency']}\\nLanguage: {info['language']}\\nAttractions: {', '.join(info['attractions'])}"
        else:
            return f"Sorry, we don't have information on {destination}."

# Example usage
travel_agent = TravelAgent()
print(travel_agent.get_destination_info("Paris"))
print(travel_agent.get_destination_info("Tokyo"))
Explanation 解释
- Initialization (
__init__method): 初始化(__init__方法):TravelAgent类预加载一个字典,其中包含有关热门目的地(如巴黎、东京、纽约和悉尼)的信息。该词典包括每个目的地的国家、货币、语言和主要景点等详细信息。 - Retrieving Information (
get_destination_infomethod): 检索信息(get_destination_info方法): 当用户查询特定目标时,get_destination_info方法会从预加载的上下文字典中获取相关信息。
通过预加载上下文,Travel Agent 应用程序可以快速响应用户查询,而无需从外部源实时检索此信息。这使应用程序更高效、响应更快
3.3 迭代前以目标启动计划
Bootstrapping the Plan with a Goal Before Iterating
制定一个有目标的计划需要在头脑中有一个明确的目标或目标结果。通过预先定义此目标,模型可以将其用作整个迭代过程的指导原则。这有助于确保每次迭代都更接近实现预期结果,从而使流程更加高效和专注。
以下示例说明了在 Python 中迭代 travel agent 之前如何引导具有目标的旅行计划:
1)场景
一家旅行社希望为客户计划一个定制的假期。目标是创建一个旅行行程,根据客户的喜好和预算最大限度地提高他们的满意度。
2)步骤
- 定义客户的偏好和预算。
- 基于这些偏好启动初始计划。
- 迭代优化计划,以提升客户满意度。
class TravelAgent:
    def __init__(self, destinations):
        self.destinations = destinations

    def bootstrap_plan(self, preferences, budget):
        plan = []
        total_cost = 0

        for destination in self.destinations:
            if total_cost + destination['cost'] <= budget and self.match_preferences(destination, preferences):
                plan.append(destination)
                total_cost += destination['cost']

        return plan

    def match_preferences(self, destination, preferences):
        for key, value in preferences.items():
            if destination.get(key) != value:
                return False
        return True

    def iterate_plan(self, plan, preferences, budget):
        for i in range(len(plan)):
            for destination in self.destinations:
                if destination not in plan and self.match_preferences(destination, preferences) and self.calculate_cost(plan, destination) <= budget:
                    plan[i] = destination
                    break
        return plan

    def calculate_cost(self, plan, new_destination):
        return sum(destination['cost'] for destination in plan) + new_destination['cost']

# Example usage
destinations = [
    {"name": "Paris", "cost": 1000, "activity": "sightseeing"},
    {"name": "Tokyo", "cost": 1200, "activity": "shopping"},
    {"name": "New York", "cost": 900, "activity": "sightseeing"},
    {"name": "Sydney", "cost": 1100, "activity": "beach"},
]

preferences = {"activity": "sightseeing"}
budget = 2000

travel_agent = TravelAgent(destinations)
initial_plan = travel_agent.bootstrap_plan(preferences, budget)
print("Initial Plan:", initial_plan)

refined_plan = travel_agent.iterate_plan(initial_plan, preferences, budget)
print("Refined Plan:", refined_plan)
- Initialization (
__init__method): 初始化(__init__方法):TravelAgent类使用潜在目的地列表进行初始化,每个目的地具有名称、成本和活动类型等属性。 - Bootstrapping the Plan (
bootstrap_planmethod): 启动计划(bootstrap_plan方法):此方法根据客户的偏好和预算创建初始旅行计划。它遍历目的地列表,如果目的地符合客户偏好且在预算范围内,则将其添加到计划中。 - Matching Preferences (
match_preferencesmethod): 匹配偏好(match_preferences方法):此方法检查目的地是否与客户偏好匹配。 - Iterating the Plan (
iterate_planmethod):此方法通过尝试用更好的匹配项替换计划中的每个目的地来优化初始计划,同时考虑客户的偏好和预算限制。 - Calculating Cost (
calculate_costmethod): 计算成本(方法calculate_cost):此方法计算当前计划的总成本,包括潜在的新目的地。
Example Usage 示例用法
- Initial Plan: 初始计划:旅行顾问根据客户对观光的偏好和 2000 美元的预算创建初始计划。
- Refined Plan: 优化方案:旅行顾问迭代计划,优化客户偏好和预算。
通过以明确目标(例如,最大化客户满意度)为基础启动计划,并通过迭代细化计划,旅行顾问可以为客户创建定制和优化的旅行行程。这种方法确保旅行计划从一开始就与客户的偏好和预算保持一致,并在每次迭代中不断改进。
3.4 利用 LLM 重新排序评分
Taking Advantage of LLM for Re-ranking and Scoring
大型语言模型(LLMs)可用于重新排序和评分,通过评估检索到的文档或生成的响应的相关性和质量。其工作原理如下:
- Retrieval检索:初始检索步骤根据查询获取一组候选文档或响应。
- Re-ranking重新排序:LLM 评估这些候选文档并基于其相关性和质量重新排序。这一步骤确保最相关且高质量的信息首先呈现。
- Scoring评分:LLM 为每个候选文档分配分数,反映其相关性和质量。这有助于为用户选择最佳响应或文档。
通过利用 LLM 进行重新排序和评分,系统可以提供更准确且具有上下文相关性的信息,从而提升整体用户体验。
这是一个旅行代理如何使用大型语言模型(LLM)在 Python 中根据用户偏好对旅行目的地进行重新排序和评分的示例:
场景 - 基于偏好旅行
一位旅行代理希望根据客户的偏好向他们推荐最佳旅行目的地。LLM 将帮助重新排序和评分这些目的地,以确保展示最相关的选项。
1)步骤:
- 收集用户偏好。
- 获取潜在旅行目的地的列表。
- 使用 LLM 根据用户偏好重新排序和评分目的地。
这是如何更新前面的示例以使用 Azure OpenAI 服务:
需求 Requirements
- 您需要拥有一个 Azure 订阅。
- 创建一个 Azure OpenAI 资源并获取您的 API 密钥。
import requests
import json

class TravelAgent:
    def __init__(self, destinations):
        self.destinations = destinations

    def get_recommendations(self, preferences, api_key, endpoint):
        # Generate a prompt for the Azure OpenAI
        prompt = self.generate_prompt(preferences)

        # Define headers and payload for the request
        headers = {
            'Content-Type': 'application/json',
            'Authorization': f'Bearer {api_key}'
        }
        payload = {
            "prompt": prompt,
            "max_tokens": 150,
            "temperature": 0.7
        }

        # Call the Azure OpenAI API to get the re-ranked and scored destinations
        response = requests.post(endpoint, headers=headers, json=payload)
        response_data = response.json()

        # Extract and return the recommendations
        recommendations = response_data['choices'][0]['text'].strip().split('\\n')
        return recommendations

    def generate_prompt(self, preferences):
        prompt = "Here are the travel destinations ranked and scored based on the following user preferences:\\n"
        for key, value in preferences.items():
            prompt += f"{key}: {value}\\n"
        prompt += "\\nDestinations:\\n"
        for destination in self.destinations:
            prompt += f"- {destination['name']}: {destination['description']}\\n"
        return prompt

# Example usage
destinations = [
    {"name": "Paris", "description": "City of lights, known for its art, fashion, and culture."},
    {"name": "Tokyo", "description": "Vibrant city, famous for its modernity and traditional temples."},
    {"name": "New York", "description": "The city that never sleeps, with iconic landmarks and diverse culture."},
    {"name": "Sydney", "description": "Beautiful harbour city, known for its opera house and stunning beaches."},
]

preferences = {"activity": "sightseeing", "culture": "diverse"}
api_key = 'your_azure_openai_api_key'
endpoint = '<https://your-endpoint.com/openai/deployments/your-deployment-name/completions?api-version=2022-12-01>'

travel_agent = TravelAgent(destinations)
recommendations = travel_agent.get_recommendations(preferences, api_key, endpoint)
print("Recommended Destinations:")
for rec in recommendations:
    print(rec)
代码解释 - 偏好预订器 Code Explanation - Preference Booker
- Initialization 初始化:
TravelAgent类使用潜在旅行目的地列表进行初始化,每个目的地具有名称和描述等属性。 - Getting Recommendations (
get_recommendationsmethod): 获取推荐(get_recommendations方法):此方法根据用户的偏好为 Azure OpenAI 服务生成提示,并向 Azure OpenAI API 发起 HTTP POST 请求以获取重新排序和评分的目的地。 - Generating Prompt (
generate_promptmethod): 生成提示(generate_prompt方法):此方法为 Azure OpenAI 构建提示,包括用户的偏好和目的地列表。该提示指导模型根据提供的偏好重新排序和评分目的地。 - API Call: API 调用:使用
requests库向 Azure OpenAI API 端点发起 HTTP POST 请求。响应内容包含重新排序和评分的目的地。 - Example Usage: 示例用法:旅行代理收集用户偏好(例如,对观光和多元文化的兴趣),并使用 Azure OpenAI 服务获取旅行目的地的重新排序和评分建议。
请确保将 your_azure_openai_api_key 替换为您的实际 Azure OpenAI API 密钥,将 https://your-endpoint.com/... 替换为您的 Azure OpenAI 部署的实际端点 URL。
通过利用 LLM 进行重新排序和评分,旅行代理可以为客户提供更个性化和相关的旅行建议,提升他们的整体体验。
3.5 RAG:提示技术 vs 工具
1)RAG: Prompting Technique vs Tool
检索增强生成(RAG)既是一种提示技术,也是开发 AI 代理的工具。理解这两种之间的区别可以帮助你在项目中更有效地利用 RAG。
RAG 作为提示技术
RAG as a Prompting Technique
作为提示技术,RAG 涉及制定特定的查询或提示,以从大型语料库或数据库中检索相关信息。这些信息随后用于生成响应或执行操作。
工作原理:
- Formulate Prompts:制定提示:根据当前任务或用户输入,创建结构良好的提示或查询。
- Retrieve Information:检索信息:使用提示从现有的知识库或数据集中搜索相关数据。
- Generate Response:生成回复:将检索到的信息与生成式 AI 模型结合,生成全面且连贯的回复。
Example in Travel Agent: 旅行代理示例:
- 我想去巴黎的博物馆参观。
- 提示:"查找巴黎最好的博物馆。"
- 检索信息:关于卢浮宫、奥赛博物馆等详情。
- 生成的回复:"这里是一些巴黎的顶级博物馆:卢浮宫、奥赛博物馆和蓬皮杜中心。"
RAG 作为工具
RAG as a Tool
作为工具,RAG 是一个集成系统,自动化了检索和生成过程,使开发者能够更轻松地实现复杂的 AI 功能,而无需为每个查询手动编写提示。
工作原理:
- Integration:集成:将 RAG 嵌入 AI 代理的架构中,使其能够自动处理检索和生成任务。
- Automation: 自动化:该工具管理整个流程,从接收用户输入到生成最终响应,无需为每个步骤提供明确提示。
- Efficiency:效率:通过简化检索和生成过程,提升代理的性能,使其能够更快、更准确地做出响应。
Example in Travel Agent: 旅行代理示例:
- 我想去巴黎的博物馆参观。
- RAG 工具:自动检索有关博物馆的信息并生成回复。
- 生成的回复:"这里是一些巴黎的顶级博物馆:卢浮宫、奥赛博物馆和蓬皮杜中心。"
2)Comparison 比较
| Aspect 方面 | Prompting Technique 提示技巧 | Tool 工具 |
|---|---|---|
| Manual vs Automatic 手动与自动 | 手动为每个查询制定提示。 | 自动检索和生成过程。 |
| Control 控制 | 提供对检索过程更多的控制。 | 简化并自动化检索和生成。 |
| Flexibility 灵活性 | 允许根据特定需求定制提示。 | 更适合大规模实施。 |
| Complexity 复杂性 | 需要精心设计和调整提示。 | 更容易集成到 AI 代理的架构中。 |
3)Practical Examples 实用示例
Prompting Technique Example:提示技巧示例:
def search_museums_in_paris():
    prompt = "Find top museums in Paris"
    search_results = search_web(prompt)
    return search_results

museums = search_museums_in_paris()
print("Top Museums in Paris:", museums)
Tool Example: 工具示例:
class Travel_Agent:
    def __init__(self):
        self.rag_tool = RAGTool()

    def get_museums_in_paris(self):
        user_input = "I want to visit museums in Paris."
        response = self.rag_tool.retrieve_and_generate(user_input)
        return response

travel_agent = Travel_Agent()
museums = travel_agent.get_museums_in_paris()
print("Top Museums in Paris:", museums)
3.6 评估相关性
Evaluating Relevancy
评估相关性是 AI 代理性能的关键方面。它确保代理检索和生成的信息对用户是恰当、准确和有用的。让我们探讨如何评估 AI 代理的相关性,包括实际示例和技术。
1)评估相关性的关键概念
Key Concepts in Evaluating Relevancy
- Context Awareness: 上下文感知:
- 智能体必须理解用户查询的上下文,以便检索和生成相关信息。
- 示例:如果用户询问“巴黎最好的餐厅”,代理应该考虑用户的偏好,例如菜系类型和预算。
- Accuracy: 准确率:
- 代理提供的信息应当是准确且最新的。
- 示例:推荐当前营业且评价良好的餐厅,而不是过时或关闭的选项。
- User Intent: 用户意图:
- 代理应当推断查询背后的用户意图,以提供最相关的信息。
- 示例:如果用户询问“经济型酒店”,智能体应优先考虑价格实惠的选项。
- Feedback Loop: 反馈循环:
- 持续收集和分析用户反馈有助于智能体优化其相关性评估过程。
- 示例:结合用户对先前推荐的评价和反馈来改进未来的响应。
2)评估相关性的实用技巧
Practical Techniques for Evaluating Relevancy
-
Relevance Scoring: 相关性评分:
-
根据检索到的每个项目与用户查询和偏好的匹配程度,为其分配一个相关性分数。
-
Example: 示例:
def relevance_score(item, query):
    score = 0
    if item['category'] in query['interests']:
        score += 1
    if item['price'] <= query['budget']:
        score += 1
    if item['location'] == query['destination']:
        score += 1
    return score
-
-
Filtering and Ranking: 过滤和排序:
-
过滤掉无关项,并根据其相关性分数对剩余项进行排序。
-
Example: 示例:
def filter_and_rank(items, query):
    ranked_items = sorted(items, key=lambda item: relevance_score(item, query), reverse=True)
    return ranked_items[:10]  # Return top 10 relevant items
函数参数
items: 一个可迭代的对象(通常是列表),包含需要排序和过滤的项目query: 搜索查询字符串,用于计算每个项目的相关性函数工作原理
排序过程:
ranked_items = sorted(items, key=lambda item: relevance_score(item, query), reverse=True)- 使用Python内置的
sorted()函数对items进行排序 key=lambda item: relevance_score(item, query)指定排序依据:每个项目的相关性分数reverse=True表示按降序排列(分数高的排在前面)
相关性评分:
- 假设存在一个
relevance_score(item, query)函数,它计算每个项目与查询的相关性分数 - 这个函数的具体实现没有显示,但通常它会考虑如文本匹配度、关键词频率等因素
返回结果:
return ranked_items[:10]# Return top 10 relevant items- 只返回排序后列表中的前10个项目(相关性最高的10个)
示例使用场景
假设我们有一个简单的文档集合:
documents = [
    {"id": 1, "text": "apple banana orange"},
    {"id": 2, "text": "banana cherry"},
    {"id": 3, "text": "apple pie recipe"}
]

def relevance_score(doc, query):
    # 简单的相关性计算:查询词在文档中出现的次数
    return sum(word in doc["text"] for word in query.split())
调用函数:
results = filter_and_rank(documents, "apple banana")
# 结果会是文档1和文档3(文档2不包含"apple")
为什么不是文档2而是文档3,banana字母占比不是更多吗?
实现没有考虑词频或占比,只是简单的布尔匹配。如果你想考虑词在文档中的重要性(占比),需要修改评分函数,就像上面展示的那样。在信息检索中,词频和文档长度通常是重要的考虑因素。如果要考虑词频或占比,我们需要修改评分函数:
def relevance_score(doc, query): text_words = doc["text"].split() score = 0 for q_word in query.split(): # 计算查询词在文档中的出现比例 score += sum(1 for word in text_words if word == q_word) / len(text_words) return score - 使用Python内置的
-
-
Natural Language Processing (NLP):自然语言处理 (NLP):
-
使用 NLP 技术理解用户查询并检索相关信息。
-
Example: 示例:
def process_query(query):
    # Use NLP to extract key information from the user's query
    processed_query = nlp(query)
    return processed_query
-
-
User Feedback Integration:用户反馈集成:
-
收集用户对所提供建议的反馈,并利用它来调整未来的相关性评估。
-
Example: 示例:
def adjust_based_on_feedback(feedback, items):
    for item in items:
        if item['name'] in feedback['liked']:
            item['relevance'] += 1
        if item['name'] in feedback['disliked']:
            item['relevance'] -= 1
    return items
-
示例:评估旅行代理的相关性
Example: Evaluating Relevancy in Travel Agent
这里有一个实际例子,展示了旅行代理如何评估旅行建议的相关性:
class Travel_Agent:
    def __init__(self):
        self.user_preferences = {}
        self.experience_data = []

    def gather_preferences(self, preferences):
        self.user_preferences = preferences

    def retrieve_information(self):
        flights = search_flights(self.user_preferences)
        hotels = search_hotels(self.user_preferences)
        attractions = search_attractions(self.user_preferences)
        return flights, hotels, attractions

    def generate_recommendations(self):
        flights, hotels, attractions = self.retrieve_information()
        ranked_hotels = self.filter_and_rank(hotels, self.user_preferences)
        itinerary = create_itinerary(flights, ranked_hotels, attractions)
        return itinerary

    def filter_and_rank(self, items, query):
        ranked_items = sorted(items, key=lambda item: self.relevance_score(item, query), reverse=True)
        return ranked_items[:10]  # Return top 10 relevant items

    def relevance_score(self, item, query):
        score = 0
        if item['category'] in query['interests']:
            score += 1
        if item['price'] <= query['budget']:
            score += 1
        if item['location'] == query['destination']:
            score += 1
        return score

    def adjust_based_on_feedback(self, feedback, items):
        for item in items:
            if item['name'] in feedback['liked']:
                item['relevance'] += 1
            if item['name'] in feedback['disliked']:
                item['relevance'] -= 1
        return items

# Example usage
travel_agent = Travel_Agent()
preferences = {
    "destination": "Paris",
    "dates": "2025-04-01 to 2025-04-10",
    "budget": "moderate",
    "interests": ["museums", "cuisine"]
}
travel_agent.gather_preferences(preferences)
itinerary = travel_agent.generate_recommendations()
print("Suggested Itinerary:", itinerary)
feedback = {"liked": ["Louvre Museum"], "disliked": ["Eiffel Tower (too crowded)"]}
updated_items = travel_agent.adjust_based_on_feedback(feedback, itinerary['hotels'])
print("Updated Itinerary with Feedback:", updated_items)
3.7 意图搜索
Search with Intent
带意图的搜索涉及理解和解释用户查询背后潜在的目的或目标,以获取和生成最相关和最有用的信息。这种方法超越了简单地匹配关键词,专注于把握用户的实际需求和上下文。
3.7.1意图搜索中的关键概念
(1)理解用户意图:Understanding User Intent:
用户意图可以分为三种主要类型:信息性informational、导航性navigational和交易性transactional。
-
Informational Intent:
信息意图:用户寻求关于某个主题的信息(例如,“巴黎最好的博物馆有哪些?”)。
-
Navigational Intent:
导航意图:用户希望导航到特定的网站或页面(例如,“卢浮宫博物馆官方网站”)。
-
Transactional Intent:
交易意图:用户旨在执行交易,例如预订航班或进行购买(例如,“预订前往巴黎的航班”)。
(2)上下文感知:Context Awareness
分析用户查询的上下文有助于准确识别其意图。这包括考虑之前的交互、用户偏好以及当前查询的具体细节。
(3)自然语言处理:Natural Language Processing (NLP)
采用自然语言处理技术来理解和解释用户提供自然语言查询。这包括实体识别、情感分析和查询解析等任务。
(4)个性化:Personalization
根据用户的浏览历史、偏好和反馈来个性化搜索结果,可以提高检索信息的关联性。
实际案例:旅行代理中的意图搜索
Practical Example: Searching with Intent in Travel Agent
以旅行代理为例,看看如何实现意图搜索
1、收集用户偏好:Gathering User Preferences
class Travel_Agent:
    def __init__(self):
        self.user_preferences = {}

    def gather_preferences(self, preferences):
        self.user_preferences = preferences
2、理解用户意图:Understanding User Intent
def identify_intent(query):
    if "book" in query or "purchase" in query:
        return "transactional"
    elif "website" in query or "official" in query:
        return "navigational"
    else:
        return "informational"
3、上下文感知:Context Awareness
def analyze_context(query, user_history):
    # Combine current query with user history to understand context
    context = {
        "current_query": query,
        "user_history": user_history
    }
    return context
4、搜索与个性化结果:Search and Personalize Results
def search_with_intent(query, preferences, user_history):
    intent = identify_intent(query)
    context = analyze_context(query, user_history)
    if intent == "informational":
        search_results = search_information(query, preferences)
    elif intent == "navigational":
        search_results = search_navigation(query)
    elif intent == "transactional":
        search_results = search_transaction(query, preferences)
    personalized_results = personalize_results(search_results, user_history)
    return personalized_results

def search_information(query, preferences):
    # Example search logic for informational intent
    results = search_web(f"best {preferences['interests']} in {preferences['destination']}")
    return results

def search_navigation(query):
    # Example search logic for navigational intent
    results = search_web(query)
    return results

def search_transaction(query, preferences):
    # Example search logic for transactional intent
    results = search_web(f"book {query} to {preferences['destination']}")
    return results

def personalize_results(results, user_history):
    # Example personalization logic
    personalized = [result for result in results if result not in user_history]
    return personalized[:10]  # Return top 10 personalized results
5、示例用法:Example Usage
travel_agent = Travel_Agent()
preferences = {
    "destination": "Paris",
    "interests": ["museums", "cuisine"]
}
travel_agent.gather_preferences(preferences)
user_history = ["Louvre Museum website", "Book flight to Paris"]
query = "best museums in Paris"
results = search_with_intent(query, preferences, user_history)
print("Search Results:", results)

Agent 垂直技术社区,欢迎活跃、内容共建。
更多推荐


 32
32 0
0- 0


 已为社区贡献5条内容

所有评论(0)