React Native for OpenHarmony 实战:百分比计算实现
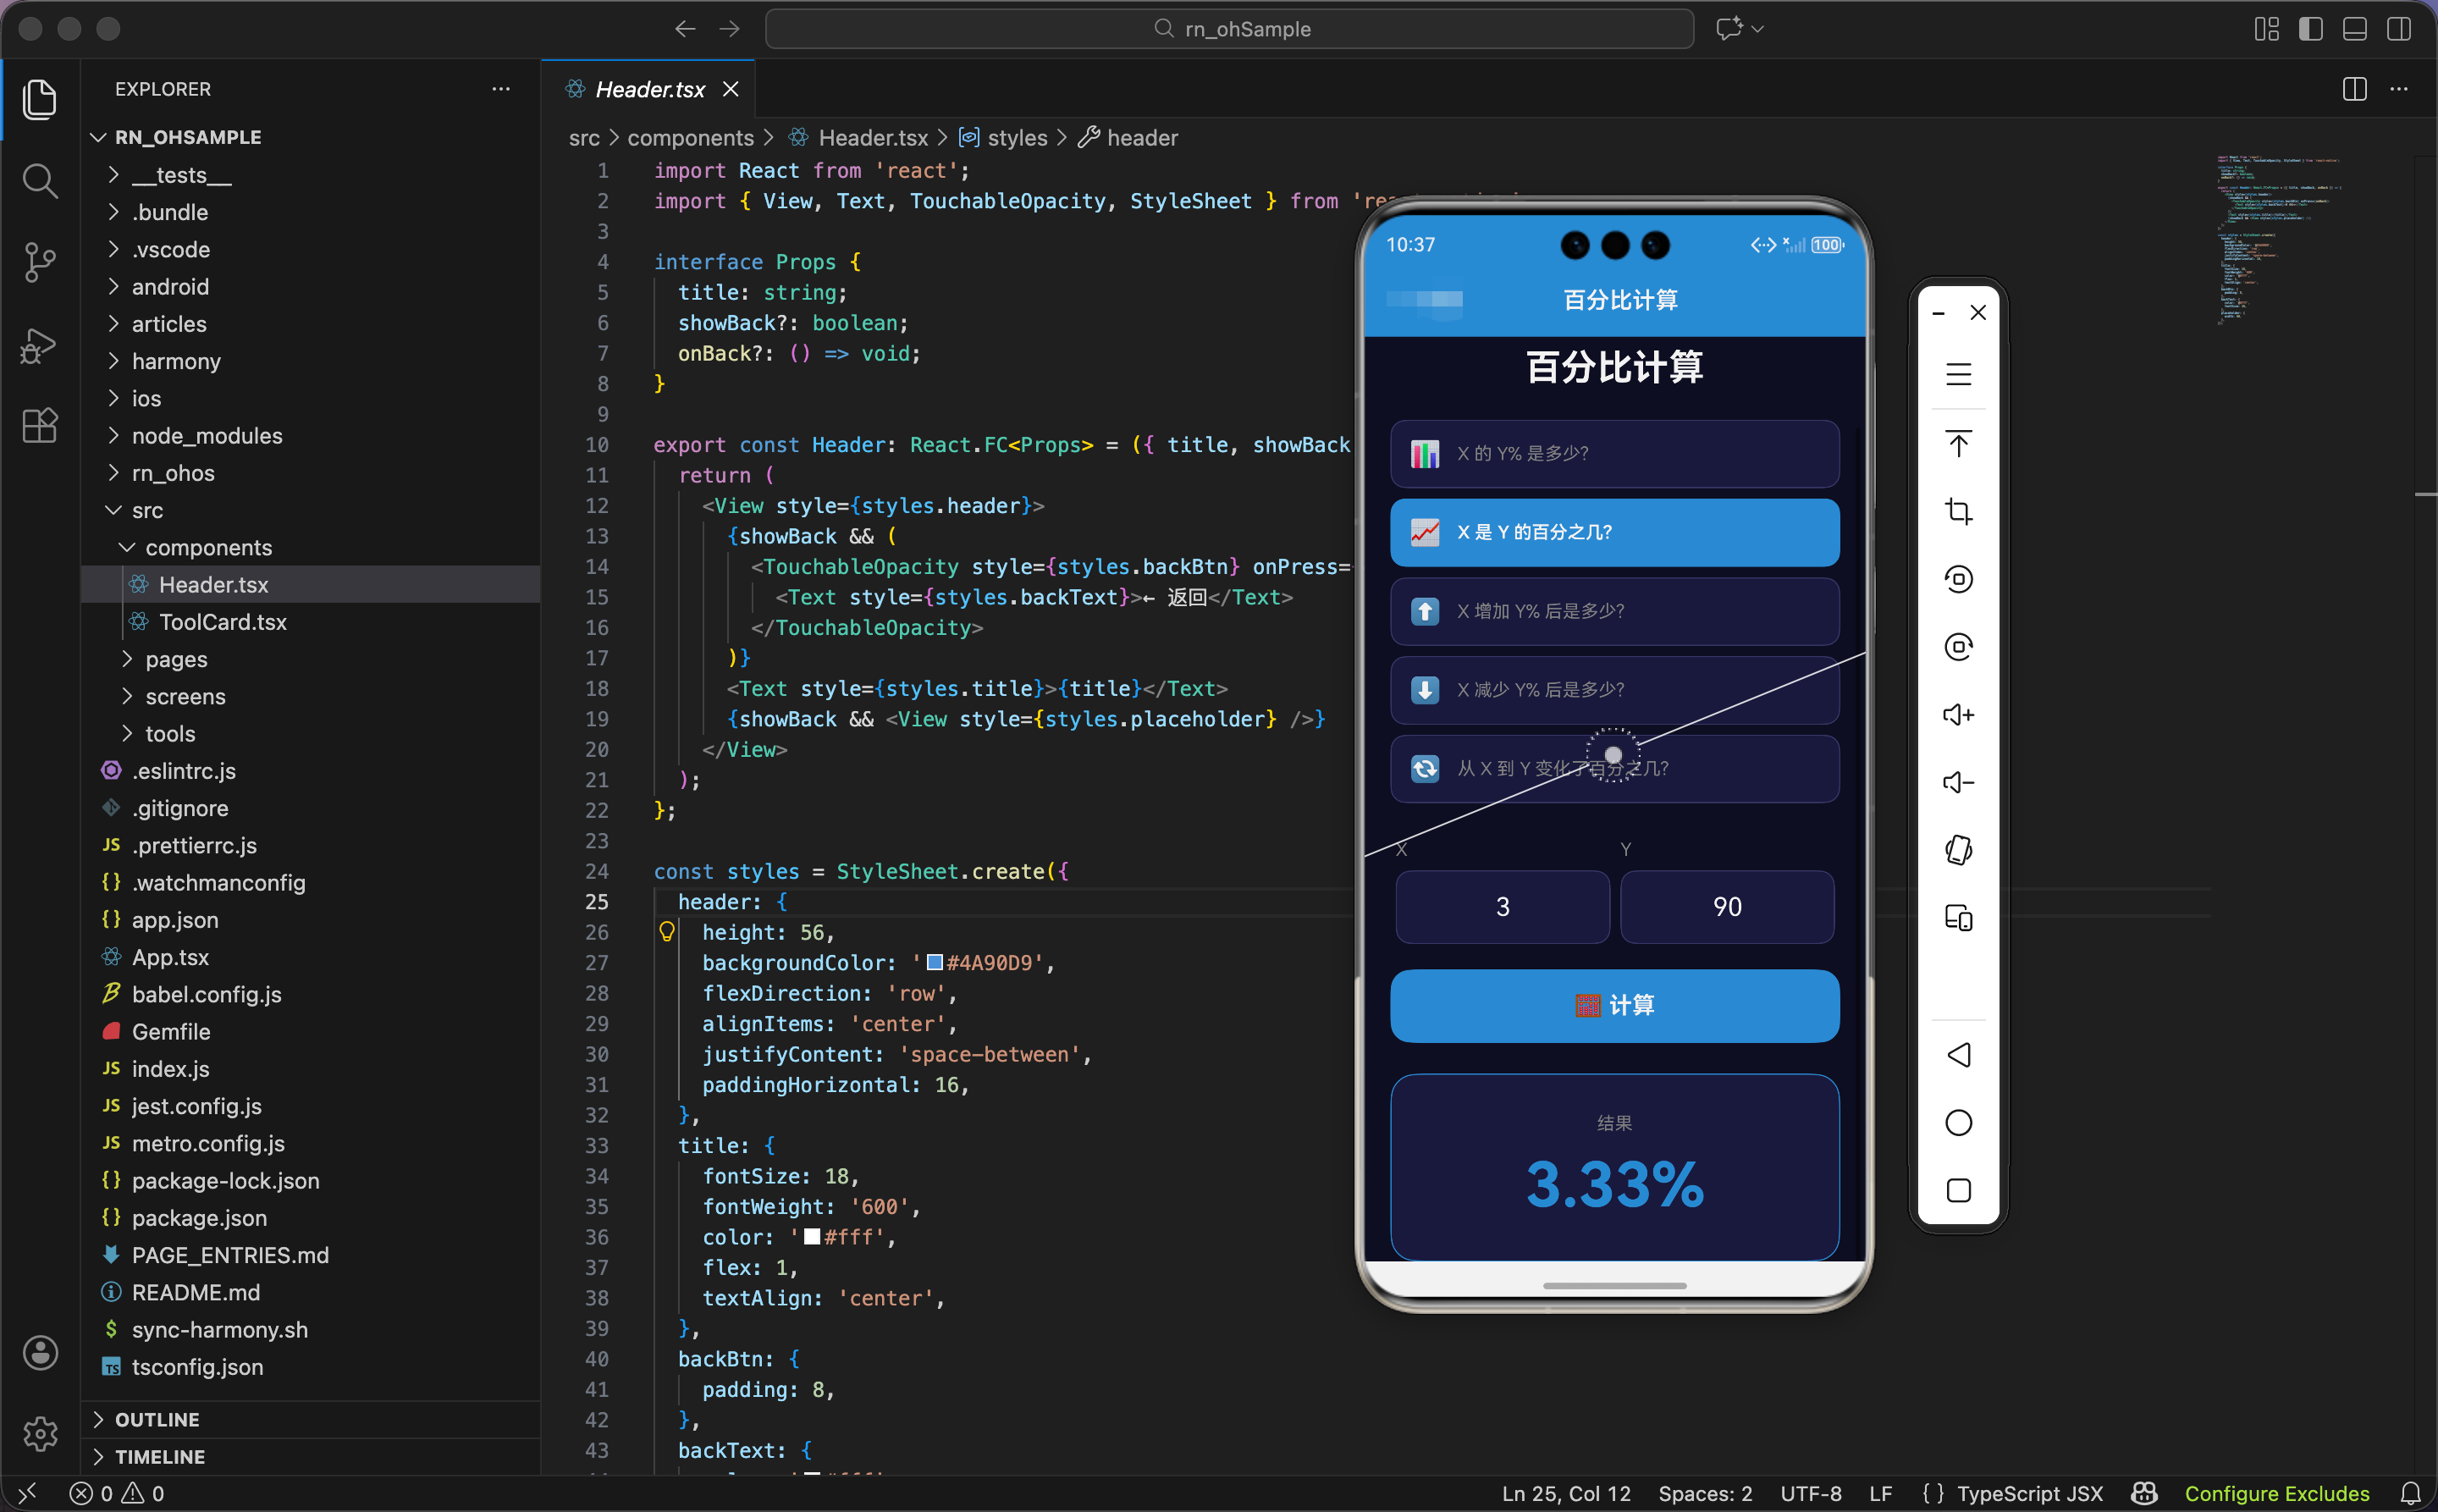
今天我们用 React Native 实现一个百分比计算工具,支持 5 种常见的百分比计算场景。
状态设计
import React, { useState, useRef } from 'react';
import { View, Text, TextInput, TouchableOpacity, StyleSheet, ScrollView, Animated } from 'react-native';

export const PercentCalculator: React.FC = () => {
  const [mode, setMode] = useState(0);
  const [val1, setVal1] = useState('');
  const [val2, setVal2] = useState('');
  const [result, setResult] = useState('');

  const buttonAnim = useRef(new Animated.Value(1)).current;
  const resultAnim = useRef(new Animated.Value(0)).current;
  const modeAnims = useRef(Array(5).fill(0).map(() => new Animated.Value(1))).current;
状态设计包含模式、两个输入值、结果、动画值。
模式:mode 是数字,表示当前选择的计算模式(0-4)。
两个输入值:val1 和 val2 都是字符串类型,存储用户输入的数字。
结果:result 是字符串类型,存储计算结果。
三个动画值:
buttonAnim:按钮的缩放动画resultAnim:结果卡片的缩放和透明度动画modeAnims:模式按钮的动画数组,5 个元素对应 5 种模式
为什么模式用数字?因为模式是固定的 5 种,用数字索引最简单。0 表示第一种模式,1 表示第二种,依次类推。
为什么结果用字符串?因为结果可能包含百分号(比如"25%"),用字符串存储更灵活。
模式配置
  const modes = [
    { title: 'X 的 Y% 是多少?', icon: '📊', labels: ['X', 'Y%'], calc: (a: number, b: number) => (a * b / 100).toFixed(2) },
    { title: 'X 是 Y 的百分之几?', icon: '📈', labels: ['X', 'Y'], calc: (a: number, b: number) => ((a / b) * 100).toFixed(2) + '%' },
    { title: 'X 增加 Y% 后是多少?', icon: '⬆️', labels: ['X', 'Y%'], calc: (a: number, b: number) => (a * (1 + b / 100)).toFixed(2) },
    { title: 'X 减少 Y% 后是多少?', icon: '⬇️', labels: ['X', 'Y%'], calc: (a: number, b: number) => (a * (1 - b / 100)).toFixed(2) },
    { title: '从 X 到 Y 变化了百分之几?', icon: '🔄', labels: ['X', 'Y'], calc: (a: number, b: number) => (((b - a) / a) * 100).toFixed(2) + '%' },
  ];
模式配置数组,每个模式包含标题、图标、标签、计算函数。
5 种模式:
- X 的 Y% 是多少?比如 100 的 20% 是 20
- X 是 Y 的百分之几?比如 20 是 100 的 20%
- X 增加 Y% 后是多少?比如 100 增加 20% 后是 120
- X 减少 Y% 后是多少?比如 100 减少 20% 后是 80
- 从 X 到 Y 变化了百分之几?比如从 100 到 120 变化了 20%
每个模式的属性:
title:标题,描述计算场景icon:图标,视觉标识labels:输入框标签,比如 [‘X’, ‘Y%’]calc:计算函数,接收两个数字,返回结果字符串
为什么用配置数组?因为 5 种模式的结构相同,只是标题、图标、计算公式不同。用配置数组可以避免重复代码,添加新模式也很方便。
计算函数解析:
(a * b / 100).toFixed(2):a 乘以 b%,保留 2 位小数((a / b) * 100).toFixed(2) + '%':a 除以 b 再乘以 100,加上百分号(a * (1 + b / 100)).toFixed(2):a 乘以 (1 + b%)(a * (1 - b / 100)).toFixed(2):a 乘以 (1 - b%)(((b - a) / a) * 100).toFixed(2) + '%':(b - a) 除以 a 再乘以 100,加上百分号
为什么用 toFixed(2)?因为百分比计算经常产生小数,保留 2 位小数让结果更易读。比如 100 的 33% 是 33.00,而不是 33.333333…。
模式切换
  const handleModeChange = (i: number) => {
    Animated.sequence([
      Animated.timing(modeAnims[i], { toValue: 0.95, duration: 100, useNativeDriver: true }),
      Animated.spring(modeAnims[i], { toValue: 1, friction: 3, useNativeDriver: true }),
    ]).start();
    setMode(i);
    setResult('');
  };
模式切换函数触发动画,设置模式,清空结果。
按钮动画:序列动画,先缩小到 95%(100ms),再弹回到 100%。营造"按下"的感觉。
设置模式:setMode(i) 设置当前模式为 i。
清空结果:setResult('') 清空结果,因为切换模式后,旧的结果不再有效。
为什么要清空结果?因为不同模式的计算公式不同,旧的结果对新模式没有意义。比如用户在模式 1 计算了"100 的 20% 是 20",切换到模式 2 后,这个结果就不对了。清空结果避免混淆。
计算函数
  const calculate = () => {
    Animated.sequence([
      Animated.timing(buttonAnim, { toValue: 0.9, duration: 100, useNativeDriver: true }),
      Animated.spring(buttonAnim, { toValue: 1, friction: 3, useNativeDriver: true }),
    ]).start();

    const a = parseFloat(val1);
    const b = parseFloat(val2);
    if (isNaN(a) || isNaN(b)) return;

    resultAnim.setValue(0);
    Animated.spring(resultAnim, { toValue: 1, friction: 4, useNativeDriver: true }).start();

    setResult(modes[mode].calc(a, b));
  };
计算按钮点击时,触发动画,验证输入,调用计算函数。
按钮动画:序列动画,先缩小到 90%(100ms),再弹回到 100%。营造"按下"的感觉。
解析数字:parseFloat() 把字符串转成浮点数。
验证输入:如果 a 或 b 不是数字(NaN),直接返回,不执行计算。
结果动画:重置动画值为 0,然后弹簧动画到 1。结果卡片从小到大弹出。
调用计算函数:modes[mode].calc(a, b) 调用当前模式的计算函数,传入两个数字,返回结果字符串。
为什么用 parseFloat 而不是 parseInt?因为百分比计算可能涉及小数。比如"100 的 33.5% 是多少",如果用 parseInt,33.5 会变成 33,结果错误。用 parseFloat 可以正确处理小数。
界面渲染:头部和模式选择
  return (
    <ScrollView style={styles.container}>
      <View style={styles.header}>
        <Text style={styles.headerIcon}>📊</Text>
        <Text style={styles.headerTitle}>百分比计算</Text>
      </View>

      <View style={styles.modeSelector}>
        {modes.map((m, i) => (
          <Animated.View key={i} style={{ transform: [{ scale: modeAnims[i] }] }}>
            <TouchableOpacity style={[styles.modeBtn, mode === i && styles.modeBtnActive]} onPress={() => handleModeChange(i)} activeOpacity={0.7}>
              <Text style={styles.modeIcon}>{m.icon}</Text>
              <Text style={[styles.modeText, mode === i && styles.modeTextActive]}>{m.title}</Text>
            </TouchableOpacity>
          </Animated.View>
        ))}
      </View>
头部显示标题,模式选择器显示 5 种模式。
头部:
- 图标:📊 柱状图
- 标题:百分比计算
模式选择器:
- 遍历
modes数组,生成 5 个按钮 - 每个按钮应用缩放动画
- 当前模式的按钮用蓝色背景(
modeBtnActive) - 按钮包含图标和标题
为什么用不同图标?因为图标能快速传达模式的含义。📊 表示"计算百分比",📈 表示"比例",⬆️ 表示"增加",⬇️ 表示"减少",🔄 表示"变化"。用户看到图标就知道是什么模式。
输入区域
      <View style={styles.inputSection}>
        <View style={styles.inputGroup}>
          <Text style={styles.label}>{modes[mode].labels[0]}</Text>
          <View style={styles.inputWrapper}>
            <TextInput style={styles.input} value={val1} onChangeText={setVal1} keyboardType="numeric" placeholderTextColor="#666" />
          </View>
        </View>
        <View style={styles.inputGroup}>
          <Text style={styles.label}>{modes[mode].labels[1]}</Text>
          <View style={styles.inputWrapper}>
            <TextInput style={styles.input} value={val2} onChangeText={setVal2} keyboardType="numeric" placeholderTextColor="#666" />
          </View>
        </View>
      </View>
输入区域包含两个输入组,每个输入组有标签和输入框。
横向布局:两个输入组并排,各占 50% 宽度。
标签:根据当前模式显示不同的标签。比如模式 0 的标签是 [‘X’, ‘Y%’],模式 1 的标签是 [‘X’, ‘Y’]。
输入框:
keyboardType="numeric":弹出数字键盘textAlign: 'center':居中对齐
为什么标签根据模式变化?因为不同模式的输入含义不同。模式 0 是"X 的 Y% 是多少",标签是 [‘X’, ‘Y%’]。模式 1 是"X 是 Y 的百分之几",标签是 [‘X’, ‘Y’]。动态标签让用户清楚"应该输入什么"。
按钮和结果
      <Animated.View style={{ transform: [{ scale: buttonAnim }] }}>
        <TouchableOpacity style={styles.btn} onPress={calculate} activeOpacity={0.8}>
          <Text style={styles.btnText}>🧮 计算</Text>
        </TouchableOpacity>
      </Animated.View>

      {result && (
        <Animated.View style={[styles.result, { transform: [{ scale: resultAnim }], opacity: resultAnim }]}>
          <Text style={styles.resultLabel}>结果</Text>
          <Text style={styles.resultValue}>{result}</Text>
        </Animated.View>
      )}
    </ScrollView>
  );
};
按钮触发计算,结果卡片显示计算结果。
按钮:
- 应用缩放动画,点击时缩小再弹回
- 图标:🧮 算盘
- 文字:计算
结果卡片:
- 条件渲染:只有
result不为空时才显示 - 动画:缩放和透明度从 0 到 1
- 标签:灰色小字"结果"
- 数值:蓝色大字,字号 48,加粗
- 蓝色边框
为什么结果字号这么大?因为结果是用户最关心的信息,大字号让结果更醒目。用户计算完成后,第一眼就能看到结果。
鸿蒙 ArkTS 对比:百分比计算
@State mode: number = 0
@State val1: string = ''
@State val2: string = ''
@State result: string = ''

modes = [
  { title: 'X 的 Y% 是多少?', icon: '📊', labels: ['X', 'Y%'],
    calc: (a: number, b: number) => (a * b / 100).toFixed(2) },
  { title: 'X 是 Y 的百分之几?', icon: '📈', labels: ['X', 'Y'],
    calc: (a: number, b: number) => ((a / b) * 100).toFixed(2) + '%' },
  // ... 其他模式
]

calculate() {
  const a = parseFloat(this.val1)
  const b = parseFloat(this.val2)
  if (isNaN(a) || isNaN(b)) return

  this.result = this.modes[this.mode].calc(a, b)
}

build() {
  Column() {
    Text('百分比计算')
      .fontSize(28)
      .fontWeight(FontWeight.Bold)

    ForEach(this.modes, (m: any, i: number) => {
      Button() {
        Row() {
          Text(m.icon).fontSize(20)
          Text(m.title).fontSize(14)
        }
      }
      .backgroundColor(this.mode === i ? '#4A90D9' : '#1a1a3e')
      .onClick(() => {
        this.mode = i
        this.result = ''
      })
    })

    Row() {
      Column() {
        Text(this.modes[this.mode].labels[0])
        TextInput({ text: this.val1 })
          .type(InputType.Number)
          .onChange((value: string) => {
            this.val1 = value
          })
      }

      Column() {
        Text(this.modes[this.mode].labels[1])
        TextInput({ text: this.val2 })
          .type(InputType.Number)
          .onChange((value: string) => {
            this.val2 = value
          })
      }
    }

    Button('🧮 计算')
      .onClick(() => {
        this.calculate()
      })

    if (this.result) {
      Column() {
        Text('结果')
          .fontSize(14)
          .fontColor('#888')
        Text(this.result)
          .fontSize(48)
          .fontWeight(FontWeight.Bold)
          .fontColor('#4A90D9')
      }
    }
  }
}
ArkTS 中的百分比计算逻辑完全一样。核心是配置数组 + 计算函数。parseFloat()、isNaN()、toFixed() 都是标准 JavaScript API,跨平台通用。
为什么算法跨平台通用?因为百分比计算是纯数学运算,不涉及 UI、动画、平台 API。只要语言支持浮点数运算,就能实现百分比计算。
样式定义
const styles = StyleSheet.create({
  container: { flex: 1, backgroundColor: '#0f0f23', padding: 20 },
  header: { alignItems: 'center', marginBottom: 24 },
  headerIcon: { fontSize: 50, marginBottom: 8 },
  headerTitle: { fontSize: 28, fontWeight: '700', color: '#fff' },
  modeSelector: { marginBottom: 20 },
  modeBtn: { backgroundColor: '#1a1a3e', padding: 14, borderRadius: 12, marginBottom: 8, flexDirection: 'row', alignItems: 'center', borderWidth: 1, borderColor: '#3a3a6a' },
  modeBtnActive: { backgroundColor: '#4A90D9', borderColor: '#4A90D9' },
  modeIcon: { fontSize: 20, marginRight: 12 },
  modeText: { color: '#888', flex: 1 },
  modeTextActive: { color: '#fff', fontWeight: '600' },
  inputSection: { flexDirection: 'row', marginBottom: 20 },
  inputGroup: { flex: 1, marginHorizontal: 4 },
  label: { fontSize: 14, color: '#888', marginBottom: 8 },
  inputWrapper: { backgroundColor: '#1a1a3e', borderRadius: 12, borderWidth: 1, borderColor: '#3a3a6a' },
  input: { padding: 16, fontSize: 20, color: '#fff', textAlign: 'center' },
  btn: { backgroundColor: '#4A90D9', padding: 18, borderRadius: 16, alignItems: 'center', marginBottom: 24 },
  btnText: { color: '#fff', fontSize: 18, fontWeight: '700' },
  result: { backgroundColor: '#1a1a3e', padding: 30, borderRadius: 20, alignItems: 'center', borderWidth: 1, borderColor: '#4A90D9' },
  resultLabel: { color: '#888', marginBottom: 12, fontSize: 14 },
  resultValue: { fontSize: 48, fontWeight: '700', color: '#4A90D9' },
});
容器用深蓝黑色背景。模式按钮横向布局,图标在左,标题在右。激活的按钮用蓝色背景和白色文字。输入区域横向布局,两个输入组各占 50%。结果卡片居中对齐,蓝色边框,结果字号 48。
小结
这个百分比计算工具展示了配置驱动的实现。用配置数组定义 5 种模式,每个模式包含标题、图标、标签、计算函数。动态标签根据模式变化,让用户清楚输入含义。
欢迎加入开源鸿蒙跨平台社区:https://openharmonycrossplatform.csdn.net

Agent 垂直技术社区,欢迎活跃、内容共建。
更多推荐


 9
9 0
0- 0


 已为社区贡献3条内容

所有评论(0)