DeepSeek-R1-Distill-Llama-8B多模态扩展实践
DeepSeek-R1-Distill-Llama-8B多模态扩展实践:让语言模型看懂世界
你有没有想过,一个擅长推理和数学的语言模型,如果还能看懂图片、分析图表,那会是什么样子?今天我们就来聊聊如何给DeepSeek-R1-Distill-Llama-8B这个推理小能手加上“眼睛”,让它从纯文本模型变成能处理图像的多模态助手。
想象一下这样的场景:你上传一张商品图片,模型不仅能识别出这是什么商品,还能分析它的特点、给出营销建议;或者你给一张数据图表,模型能解读趋势、发现规律。这就是多模态扩展的魅力——让AI不只是“听”你说,还能“看”你展示的内容。
1. 为什么需要多模态能力?
DeepSeek-R1-Distill-Llama-8B本身是个很不错的模型,在数学推理、代码生成方面表现突出。但现实世界的信息不只是文字,图片、图表、文档截图到处都是。如果模型只能处理文字,就像一个人闭着眼睛听世界,虽然能理解描述,但永远看不到真实的画面。
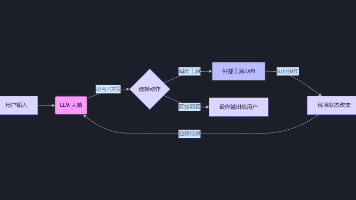
多模态扩展的核心思路很简单:给语言模型配一个“视觉助手”。这个助手负责把图片转换成模型能理解的“语言描述”,然后模型基于这些描述来回答问题、进行分析。听起来是不是有点像给盲人配了一个导盲犬?
2. 视觉模型的选择与集成
要给语言模型加上视觉能力,我们需要一个靠谱的“翻译官”——视觉编码器。目前市面上有几个不错的选择,我们来简单对比一下:
2.1 CLIP:全能型选手
CLIP是OpenAI推出的视觉-语言预训练模型,它的特点是能理解图片和文字之间的关系。你可以把它想象成一个既懂看图又懂读文的双语专家。
from transformers import CLIPProcessor, CLIPModel
import torch
from PIL import Image

# 加载CLIP模型
model = CLIPModel.from_pretrained("openai/clip-vit-base-patch32")
processor = CLIPProcessor.from_pretrained("openai/clip-vit-base-patch32")

# 处理图片
image = Image.open("product.jpg")
inputs = processor(text=["a photo of a product", "an advertisement"], images=image, return_tensors="pt", padding=True)

# 获取特征
with torch.no_grad():
    outputs = model(**inputs)
    image_features = outputs.image_embeds
    text_features = outputs.text_embeds
CLIP的优势在于通用性强,什么类型的图片都能处理。但它的“描述”比较抽象,主要是特征向量,需要额外处理才能变成语言模型能用的文本描述。
2.2 BLIP-2:专业描述生成
如果你想要更详细的图片描述,BLIP-2是个好选择。它专门训练来生成自然语言的图片描述,就像有个专业的解说员。
from transformers import Blip2Processor, Blip2ForConditionalGeneration
import torch
from PIL import Image

processor = Blip2Processor.from_pretrained("Salesforce/blip2-opt-2.7b")
model = Blip2ForConditionalGeneration.from_pretrained("Salesforce/blip2-opt-2.7b", torch_dtype=torch.float16)

device = "cuda" if torch.cuda.is_available() else "cpu"
model.to(device)

image = Image.open("chart.png")
inputs = processor(images=image, return_tensors="pt").to(device, torch.float16)

# 生成图片描述
generated_ids = model.generate(**inputs, max_length=100)
description = processor.batch_decode(generated_ids, skip_special_tokens=True)[0]
print(f"图片描述:{description}")
BLIP-2生成的描述更自然、更详细,直接可以作为文本输入给语言模型。但它的计算开销相对大一些。
2.3 轻量级方案:MobileViT
如果你的资源有限,或者需要快速响应,可以考虑轻量级的视觉模型。MobileViT在保持不错效果的同时,计算量小很多。
from transformers import MobileViTImageProcessor, MobileViTForImageClassification
from PIL import Image
import torch

processor = MobileViTImageProcessor.from_pretrained("apple/mobilevit-small")
model = MobileViTForImageClassification.from_pretrained("apple/mobilevit-small")

image = Image.open("object.jpg")
inputs = processor(images=image, return_tensors="pt")

with torch.no_grad():
    outputs = model(**inputs)
    logits = outputs.logits
    predicted_class_idx = logits.argmax(-1).item()

print(f"预测类别:{model.config.id2label[predicted_class_idx]}")
3. 实际集成方案
理论说完了,我们来看看具体怎么把视觉模型和DeepSeek-R1-Distill-Llama-8B结合起来。这里我提供两种实用的方案。
3.1 方案一:描述拼接法
这是最简单直接的方法。先用视觉模型生成图片描述,然后把描述和用户的问题一起送给语言模型。
import torch
from PIL import Image
from transformers import pipeline, AutoTokenizer, AutoModelForCausalLM

class MultimodalAssistant:
    def __init__(self):
        # 视觉模型:生成图片描述
        self.image_captioner = pipeline("image-to-text", model="Salesforce/blip2-opt-2.7b")

        # 语言模型:DeepSeek-R1-Distill-Llama-8B
        self.tokenizer = AutoTokenizer.from_pretrained("deepseek-ai/DeepSeek-R1-Distill-Llama-8B")
        self.model = AutoModelForCausalLM.from_pretrained(
            "deepseek-ai/DeepSeek-R1-Distill-Llama-8B",
            torch_dtype=torch.float16,
            device_map="auto"
        )

    def process_image(self, image_path):
        """处理图片并生成描述"""
        image = Image.open(image_path)
        caption = self.image_captioner(image)[0]['generated_text']
        return caption

    def answer_question(self, image_path, question):
        """结合图片和问题生成回答"""
        # 获取图片描述
        image_description = self.process_image(image_path)

        # 构建提示词
        prompt = f"""图片内容:{image_description}

用户问题:{question}

请基于图片内容回答用户的问题。"""

        # 生成回答
        inputs = self.tokenizer(prompt, return_tensors="pt").to(self.model.device)

        with torch.no_grad():
            outputs = self.model.generate(
                **inputs,
                max_new_tokens=500,
                temperature=0.6,
                do_sample=True,
                top_p=0.95
            )

        answer = self.tokenizer.decode(outputs[0], skip_special_tokens=True)
        return answer

# 使用示例
assistant = MultimodalAssistant()
answer = assistant.answer_question("product.jpg", "这个产品有什么特点?适合什么人群?")
print(answer)
这种方法的好处是简单易懂,不需要修改模型结构。但缺点是图片描述可能不够准确,或者遗漏重要细节。
3.2 方案二:特征融合法
更高级的做法是把图片特征和文本特征融合在一起。这需要一些额外的工程工作,但效果通常更好。
import torch
import torch.nn as nn
from PIL import Image
from transformers import (
    AutoTokenizer, AutoModelForCausalLM,
    CLIPModel, CLIPProcessor
)

class MultimodalFusionModel(nn.Module):
    def __init__(self):
        super().__init__()

        # 视觉编码器
        self.vision_model = CLIPModel.from_pretrained("openai/clip-vit-base-patch32")
        self.vision_processor = CLIPProcessor.from_pretrained("openai/clip-vit-base-patch32")

        # 语言模型
        self.language_model = AutoModelForCausalLM.from_pretrained(
            "deepseek-ai/DeepSeek-R1-Distill-Llama-8B",
            torch_dtype=torch.float16
        )
        self.tokenizer = AutoTokenizer.from_pretrained("deepseek-ai/DeepSeek-R1-Distill-Llama-8B")

        # 融合层
        self.fusion_layer = nn.Linear(512 + 4096, 4096)  # CLIP特征 + 文本特征

    def encode_image(self, image):
        """编码图片"""
        inputs = self.vision_processor(images=image, return_tensors="pt")
        with torch.no_grad():
            image_features = self.vision_model.get_image_features(**inputs)
        return image_features

    def forward(self, image, text):
        """前向传播"""
        # 编码图片
        image_features = self.encode_image(image)

        # 编码文本
        text_inputs = self.tokenizer(text, return_tensors="pt")
        text_outputs = self.language_model(**text_inputs, output_hidden_states=True)
        text_features = text_outputs.hidden_states[-1][:, -1, :]  # 取最后一个token的特征

        # 融合特征
        combined_features = torch.cat([image_features, text_features], dim=-1)
        fused_features = self.fusion_layer(combined_features)

        # 生成回答
        # 这里需要根据融合后的特征生成文本,具体实现略复杂
        return fused_features

# 简化版使用示例
def simple_multimodal_qa(image_path, question):
    """简化的多模态问答"""
    from transformers import pipeline

    # 加载模型
    vqa_pipeline = pipeline("visual-question-answering", model="dandelin/vilt-b32-finetuned-vqa")

    # 处理
    image = Image.open(image_path)
    result = vqa_pipeline(image=image, question=question)

    return result['answer']

# 测试
answer = simple_multimodal_qa("chart.png", "这张图显示了什么趋势?")
print(f"回答:{answer}")
特征融合法的效果更好,因为模型能同时“看到”图片特征和文本信息。但实现起来复杂,需要更多的计算资源。
4. 实际应用场景
多模态能力到底有什么用?我们来看几个具体的例子。
4.1 电商商品分析
假设你是个电商卖家,每天要处理大量商品图片。传统做法是人工写描述、分析特点,费时费力。用多模态模型可以自动化这个过程。
def analyze_product(image_path):
    """分析商品图片"""
    assistant = MultimodalAssistant()

    questions = [
        "这是什么商品?",
        "这个商品的主要特点是什么?",
        "适合什么年龄段的人群?",
        "价格区间大概是多少?",
        "写一段吸引人的商品描述"
    ]

    results = {}
    for q in questions:
        answer = assistant.answer_question(image_path, q)
        results[q] = answer
        print(f"问题:{q}")
        print(f"回答:{answer}\n")

    return results

# 分析一件T恤
analysis = analyze_product("tshirt.jpg")
模型能识别出这是件纯棉T恤,分析它的款式、颜色、适用场景,甚至帮你写营销文案。原来需要半小时的工作,现在几秒钟就完成了。
4.2 数据图表解读
工作中经常遇到各种数据图表,快速理解图表含义是个重要技能。多模态模型能帮你秒懂图表。
def analyze_chart(image_path):
    """分析数据图表"""
    assistant = MultimodalAssistant()

    analysis_prompt = """请详细分析这张数据图表:
1. 图表类型是什么?
2. 展示了什么数据?
3. 主要趋势是什么?
4. 有哪些关键发现?
5. 基于数据给出建议"""

    analysis = assistant.answer_question(image_path, analysis_prompt)

    # 还可以让模型生成总结
    summary_prompt = "用一句话总结这个图表的核心信息"
    summary = assistant.answer_question(image_path, summary_prompt)

    return {
        "详细分析": analysis,
        "一句话总结": summary
    }

# 分析销售数据图表
chart_insights = analyze_chart("sales_chart.png")
print(chart_insights["一句话总结"])
对于复杂的折线图、柱状图,模型能准确识别坐标轴、数据系列,分析趋势变化,甚至发现异常点。
4.3 文档内容提取
有时候你需要从扫描的文档、截图中提取信息。传统OCR只能识别文字,但多模态模型能理解上下文。
def extract_document_info(image_path):
    """从文档图片中提取信息"""
    assistant = MultimodalAssistant()

    # 先让模型描述文档内容
    description = assistant.process_image(image_path)

    # 然后基于描述提取特定信息
    extraction_prompt = f"""基于以下文档描述:
{description}

请提取:
1. 文档标题
2. 关键日期
3. 涉及的主要人物/机构
4. 核心内容摘要
5. 行动项(如果有)"""

    info = assistant.answer_question(image_path, extraction_prompt)
    return info

# 提取合同关键信息
contract_info = extract_document_info("contract.jpg")
这对于处理发票、合同、报告等文档特别有用,能大大提升信息处理效率。
5. 优化技巧与注意事项
实际使用中,有几个技巧能让多模态扩展效果更好:
5.1 提示词工程
好的提示词能让模型发挥更好。对于多模态任务,可以这样设计提示词:
def build_multimodal_prompt(image_description, user_question):
    """构建多模态提示词"""
    prompt = f"""你是一个多模态AI助手,能够理解图片内容并回答问题。

图片内容描述:
{image_description}

用户的问题:
{user_question}

请基于图片内容,详细、准确地回答用户的问题。如果图片中没有相关信息,请如实说明。

回答时请注意:
1. 只基于图片内容回答,不要编造信息
2. 如果图片模糊或不清晰,说明限制
3. 回答要具体、有用
4. 如果适用,可以给出建议或下一步行动

现在开始回答:"""
    return prompt
5.2 温度设置
DeepSeek-R1系列模型对温度比较敏感。官方建议设置在0.5-0.7之间,我实际用下来0.6效果不错。
# 推荐的生成参数
generation_config = {
    "max_new_tokens": 500,
    "temperature": 0.6,  # 关键参数
    "top_p": 0.95,
    "do_sample": True,
    "repetition_penalty": 1.1
}
5.3 错误处理
多模态处理可能遇到各种问题,好的错误处理能让体验更顺畅。
class RobustMultimodalAssistant:
    def __init__(self):
        self.assistant = MultimodalAssistant()

    def safe_answer(self, image_path, question, max_retries=3):
        """带错误处理的安全回答"""
        for attempt in range(max_retries):
            try:
                # 检查图片文件
                if not os.path.exists(image_path):
                    return "错误:图片文件不存在"

                # 检查图片格式
                try:
                    Image.open(image_path).verify()
                except:
                    return "错误:图片文件损坏或格式不支持"

                # 处理图片(限制大小)
                img = Image.open(image_path)
                if img.size[0] * img.size[1] > 4000 * 4000:
                    img.thumbnail((2000, 2000))
                    temp_path = "temp_resized.jpg"
                    img.save(temp_path)
                    image_path = temp_path

                # 生成回答
                answer = self.assistant.answer_question(image_path, question)

                # 清理临时文件
                if 'temp_resized.jpg' in image_path:
                    os.remove(image_path)

                return answer

            except Exception as e:
                if attempt == max_retries - 1:
                    return f"处理失败:{str(e)}"
                time.sleep(1)  # 等待后重试

        return "处理超时,请稍后重试"
6. 性能考虑与资源优化
多模态扩展会增加计算开销,特别是同时运行视觉模型和语言模型时。这里有几个优化建议:
6.1 模型量化
如果资源紧张,可以考虑量化。8位或4位量化能大幅减少内存使用。
from transformers import BitsAndBytesConfig
import torch

# 4位量化配置
bnb_config = BitsAndBytesConfig(
    load_in_4bit=True,
    bnb_4bit_compute_dtype=torch.float16,
    bnb_4bit_use_double_quant=True,
    bnb_4bit_quant_type="nf4"
)

# 加载量化模型
model = AutoModelForCausalLM.from_pretrained(
    "deepseek-ai/DeepSeek-R1-Distill-Llama-8B",
    quantization_config=bnb_config,
    device_map="auto"
)
6.2 缓存机制
对于相同的图片,没必要每次都重新处理。可以加个缓存。
from functools import lru_cache
import hashlib

class CachedMultimodalAssistant:
    def __init__(self):
        self.assistant = MultimodalAssistant()
        self.image_cache = {}

    def get_image_hash(self, image_path):
        """计算图片哈希值用于缓存"""
        with open(image_path, 'rb') as f:
            return hashlib.md5(f.read()).hexdigest()

    @lru_cache(maxsize=100)
    def get_cached_description(self, image_hash):
        """缓存图片描述"""
        # 这里简化处理,实际需要根据image_hash找到图片
        pass

    def answer_with_cache(self, image_path, question):
        """使用缓存的回答"""
        image_hash = self.get_image_hash(image_path)

        # 检查缓存
        cache_key = f"{image_hash}_{question}"
        if cache_key in self.image_cache:
            return self.image_cache[cache_key]

        # 生成新回答
        answer = self.assistant.answer_question(image_path, question)

        # 更新缓存
        self.image_cache[cache_key] = answer

        return answer
6.3 异步处理
对于Web应用或API服务,异步处理能提升并发能力。
import asyncio
from concurrent.futures import ThreadPoolExecutor

class AsyncMultimodalAssistant:
    def __init__(self, max_workers=2):
        self.executor = ThreadPoolExecutor(max_workers=max_workers)
        self.assistant = MultimodalAssistant()

    async def answer_async(self, image_path, question):
        """异步回答"""
        loop = asyncio.get_event_loop()

        # 在线程池中运行阻塞操作
        answer = await loop.run_in_executor(
            self.executor,
            self.assistant.answer_question,
            image_path,
            question
        )

        return answer

# 使用示例
async def handle_multiple_requests():
    assistant = AsyncMultimodalAssistant()

    tasks = [
        assistant.answer_async("image1.jpg", "这是什么?"),
        assistant.answer_async("image2.jpg", "分析这个图表"),
        assistant.answer_async("image3.jpg", "描述场景")
    ]

    results = await asyncio.gather(*tasks)
    return results
7. 总结
给DeepSeek-R1-Distill-Llama-8B加上多模态能力,就像给一个聪明的分析师配上了眼睛。原本只能在文字世界里推理的模型,现在能看懂图片、分析图表、理解视觉信息。
从技术实现上看,我们主要有两种路径:简单的描述拼接法和更高级的特征融合法。对于大多数应用场景,描述拼接法已经足够好用,实现简单、效果不错。如果追求极致效果,可以考虑特征融合,但要做好应对复杂性和资源消耗的准备。
实际用下来,这种多模态扩展在电商、数据分析、文档处理等场景特别有用。原本需要人工仔细查看、分析的工作,现在模型能快速给出初步分析,人类只需要做最后的审核和决策。
不过也要注意,现在的多模态扩展还不是真正的“端到端”多模态模型。视觉模型和语言模型是分开训练、拼接使用的,中间会有信息损失。未来如果能有真正的多模态大模型,效果应该会更好。
如果你正在考虑给自己的应用加上多模态能力,建议先从简单的方案开始,用CLIP或BLIP-2生成图片描述,然后拼接给语言模型。这个方案门槛低、见效快,能快速验证需求。等需求明确、效果满意后,再考虑更复杂的方案。
技术总是在进步,今天的扩展方案可能明天就有更好的替代。但核心思路不变:让AI更好地理解我们的世界,无论是文字还是图像。DeepSeek-R1-Distill-Llama-8B加上多模态能力,只是这个方向上的一个小尝试,期待未来有更多、更好的多模态模型出现。
获取更多AI镜像
想探索更多AI镜像和应用场景?访问 CSDN星图镜像广场,提供丰富的预置镜像,覆盖大模型推理、图像生成、视频生成、模型微调等多个领域,支持一键部署。

Agent 垂直技术社区,欢迎活跃、内容共建。
更多推荐
 13
13 0
0- 0


 已为社区贡献26条内容

所有评论(0)