MegaTTS3 目前效果最好的文本转语音模型 在openi启智社区平台部署实践
MegaTTS3是目前效果领先的文本转语音模型。本文详细介绍了在启智社区平台部署该模型的完整流程:从创建云脑任务、下载模型代码(支持GitHub和GitCode源)、通过HuggingFace或镜像站获取模型文件,到实际推理操作(包含参数调整技巧)。特别说明了如何使用自己的语音文件(需上传WAV至指定链接获取对应NPY文件),并解决了常见的ffprobe报错问题。实测显示模型能精准模拟不同口音,生
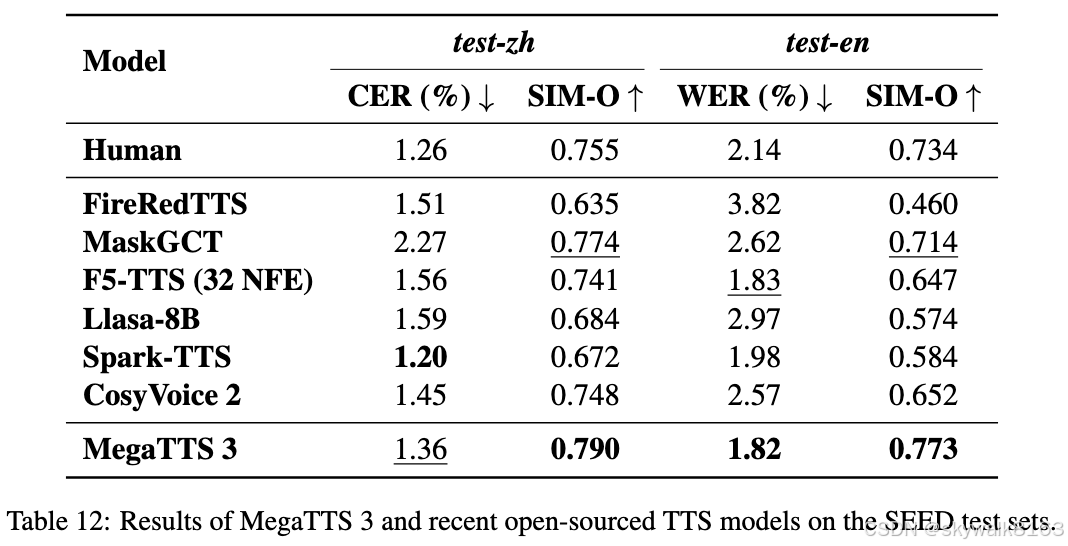
MegaTTS3 大约是目前效果最好的文本转语音模型,截止到项目发布2025.3.22日
项目地址:项目首页 - MegaTTS3 - GitCode
模型地址:ByteDance/MegaTTS3 · HF Mirror
MegaTTS3 文本转语音效果真的那么好吗?
让我们到openi启智社区平台部署实践一下吧!
进入启智社区平台AI调试环境
启智社区平台:OpenI - 启智AI开源社区提供普惠算力!
点击“开始使用”,然后创建“新建云脑(AI)任务:” ,这里我们选择英伟达T4环境即可。可以选
启动云脑服务后,就可以开始我们的部署实践之旅了!打开一个终端,进行下面的操作:
下载MegaTTS3模型代码
先下载模型代码
# Clone the repository
git clone https://github.com/bytedance/MegaTTS3
cd MegaTTS3
或者用gitcode的源
git clone https://gitcode.com/gh_mirrors/me/MegaTTS3下载MegaTTS3模型
进入到MegaTTS3目录进行下面的操作。
到huggingface下载模型。国内可以到镜像站下载。
huggingface-cli 是 Hugging Face 官方提供的命令行工具,自带完善的下载功能。
1. 安装依赖
pip install -U huggingface_hub
2. 设置环境变量
Linux
export HF_ENDPOINT=https://hf-mirror.com
Windows Powershell
$env:HF_ENDPOINT = "https://hf-mirror.com"
建议将上面这一行写入 ~/.bashrc。
3.1 下载模型
使用huggingface-cli download语句来下载模型,比如:
huggingface-cli download --resume-download gpt2 --local-dir gpt2
对MegaTTS3 模型,使用这句来下载:
huggingface-cli download ByteDance/MegaTTS3 --local-dir ./checkpoints --local-dir-use-symlinks False
可以添加 --local-dir-use-symlinks False 参数禁用文件软链接,这样下载路径下所见即所得,详细解释请见上面提到的教程。
下载需要一段时间,请稍等片刻。
项目中提到Please download them and put them to ./checkpoints/xxx.
也就是需要下载到./checkpoints/ 目录下。
使用镜像下载
如果无法从官网下载,可以使用huggingface的镜像站来下载,只需要加一条镜像的环境变量:
export HF_ENDPOINT=https://hf-mirror.com然后再下载即可
huggingface-cli download ByteDance/MegaTTS3 --local-dir ./checkpoints --local-dir-use-symlinks False
开始推理
设定执行路径,在启智社区,我们的工作路径在/tmp/code ,因此路径为:/tmp/code/MegaTTS3
# export PYTHONPATH="/path/to/MegaTTS3:$PYTHONPATH"
export PYTHONPATH="/tmp/code/MegaTTS3:$PYTHONPATH"
推理
# When p_w (intelligibility weight) ≈ 1.0, the generated audio closely retains the speaker’s original accent. As p_w increases, it shifts toward standard pronunciation.
# t_w (similarity weight) is typically set 0–3 points higher than p_w for optimal results.
# Useful for accented TTS or solving the accent problems in cross-lingual TTS.
python tts/infer_cli.py --input_wav 'assets/English_prompt.wav' --input_text '这是一条有口音的音频。' --output_dir ./gen --p_w 1.0 --t_w 3.0

python tts/infer_cli.py --input_wav 'assets/English_prompt.wav' --input_text '这条音频的发音标准一些了吗?' --output_dir ./gen --p_w 2.5 --t_w 2.5
每条推理大约38秒,主要是热机事件长,大约需要36秒吧,真正的推理大约是秒级的。
效果真的很不错啊,这是用的英语的发音文件,来发的中文的音,听着果然就是外国人说中文的调调,神了嘿!
python tts/infer_cli.py --input_wav 'assets/English_prompt.wav' --input_text '这条音频的发音标准一些了吗?效果真的很不错啊,这是用的英语的发音文件,来发的中文的音,听着果然就是外国人说中文的调调,神了嘿!' --output_dir ./gen --p_w 2.5 --t_w 2.5像这样的长句也是可以的。
换个中文发音的例子,是男声:
python tts/infer_cli.py --input_wav 'assets/Chinese_prompt.wav' --input_text '这条音频的发音标准一些了吗?效果真的很不错啊,这是用的英语的发音文件,来发的中文的音,听着果然就是外国人说中文的调调,神了嘿!' --output_dir ./gen --p_w 2.5 --t_w 2.5属于项目可接受的语音质量,基本可以满足普通的的背景音工作。
配置自己的音频wav和npy文件
我怎么配置自己的MegaTTS3的语音文件,也就是怎么获取"A.wav" and "A.npy" 。
For security issues, we do not upload the parameters of WaveVAE encoder to the above links. You can only use the pre-extracted latents from link1 for inference. If you want to synthesize speech for speaker A, you need "A.wav" and "A.npy" in the same directory. If you have any questions or suggestions for our model, please email us.
将自己的wav文件上传到链接2中的语音请求队列(每个片段在24秒内)。在验证上传的声音没有安全问题后,官方将尽快将其npy文件上传到link1。
link2地址:https://drive.google.com/drive/folders/1gCWL1y_2xu9nIFhUX_OW5MbcFuB7J5Cl?usp=sharing
link1地址:https://drive.google.com/drive/folders/1QhcHWcy20JfqWjgqZX1YM3I6i9u4oNlr?usp=sharing
获得自己的wav和npy文件后,比如叫news.wav news.npy,放入项目的assets目录即可。调用的时候用参数:--input_wav 'assets/news.wav' 即可。
附录:
huggingface加速镜像
Linux下
export HF_ENDPOINT=https://hf-mirror.comgitee镜像站
怎么配置自己的MegaTTS3的语音文件
我怎么配置自己的MegaTTS3的语音文件,也就是怎么获取"A.wav" and "A.npy" 。 For security issues, we do not upload the parameters of WaveVAE encoder to the above links. You can only use the pre-extracted latents from link1 for inference. If you want to synthesize speech for speaker A, you need "A.wav" and "A.npy" in the same directory. If you have any questions or suggestions for our model, please email us.
获取方法在这里:
该项目主要用于学术目的。对于需要评估的学术数据集,您可以将其上传到链接2中的语音请求队列(每个片段在24秒内)。在验证您上传的声音没有安全问题后,我们将尽快将其潜在文件上传到link1。
link2地址:https://drive.google.com/drive/folders/1gCWL1y_2xu9nIFhUX_OW5MbcFuB7J5Cl?usp=sharing
link1地址:https://drive.google.com/drive/folders/1QhcHWcy20JfqWjgqZX1YM3I6i9u4oNlr?usp=sharing
发现现在上传到link2的语音条目呈现出爆炸性增长,估计官方已经快来不及输出新的npy文件了。
调试
报错FileNotFoundError: [Errno 2] No such file or directory: 'ffprobe'
/usr/local/lib/python3.10/dist-packages/pydub/utils.py:198: RuntimeWarning: Couldn't find ffprobe or avprobe - defaulting to ffprobe, but may not work
  warn("Couldn't find ffprobe or avprobe - defaulting to ffprobe, but may not work", RuntimeWarning)
Traceback (most recent call last):
  File "/tmp/code/MegaTTS3/tts/infer_cli.py", line 273, in <module>
    resource_context = infer_ins.preprocess(file_content, latent_file=wav_path.replace('.wav', '.npy'))
  File "/tmp/code/MegaTTS3/tts/infer_cli.py", line 164, in preprocess
    wav_bytes = convert_to_wav_bytes(audio_bytes)
  File "/tmp/code/MegaTTS3/tts/utils/audio_utils/io.py", line 75, in convert_to_wav_bytes
    audio = AudioSegment.from_file(io.BytesIO(audio_binary))
  File "/usr/local/lib/python3.10/dist-packages/pydub/audio_segment.py", line 728, in from_file
    info = mediainfo_json(orig_file, read_ahead_limit=read_ahead_limit)
  File "/usr/local/lib/python3.10/dist-packages/pydub/utils.py", line 274, in mediainfo_json
    res = Popen(command, stdin=stdin_parameter, stdout=PIPE, stderr=PIPE)
  File "/usr/lib/python3.10/subprocess.py", line 971, in __init__
    self._execute_child(args, executable, preexec_fn, close_fds,
  File "/usr/lib/python3.10/subprocess.py", line 1863, in _execute_child
    raise child_exception_type(errno_num, err_msg, err_filename)
FileNotFoundError: [Errno 2] No such file or directory: 'ffprobe'
Couldn't find ffprobe or avprobe - defaulting to ffprobe, but may not work。这表明pydub库在尝试使用ffprobe或avprobe来获取媒体文件信息时未能找到它们,因此默认使用ffprobe,但可能存在兼容性问题。
解决方法是安装ppmpeg
sudo apt update
sudo apt install ffmpeg
这里要表扬一下启智社区,它可以使用apt来安装软件。在启智社区,因为已经是root账户,直接安装
apt update
apt install ffmpeg

Agent 垂直技术社区,欢迎活跃、内容共建。
更多推荐


 47
47 0
0- 0


 已为社区贡献45条内容

所有评论(0)