android碎片fragment的使用
fragment依赖activity生存,activity与fragment的关系是一对多的关系。
基本概念
fragment依赖activity生存,activity与fragment的关系是一对多的关系

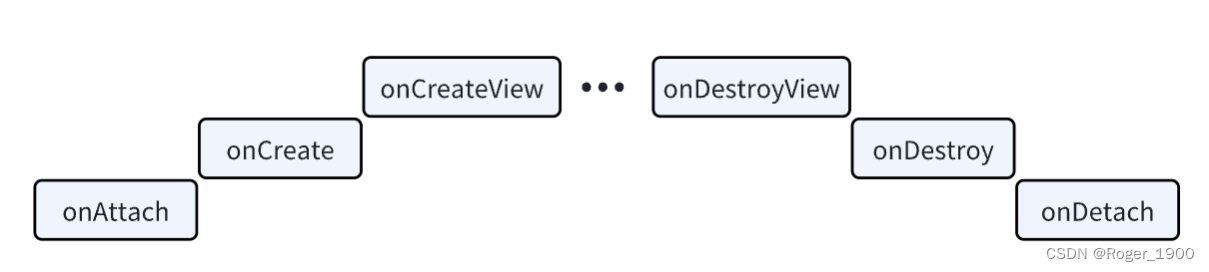
fragment的生命周期
activity加载fragment的时候,onAttach->onCreate->onCreatView->onActivityCreated->onStart->onResume
跳转新的页面的时候,activity不可见,fragment会被隐藏,onPause
返回fragment所在的activity时,fragment重新启动,onStart->onResume
退出activity的时候,fragment会完全停止,进入销毁,onPause->onStop->onDestroyView->onDestroy->onDetach

fragment的加载
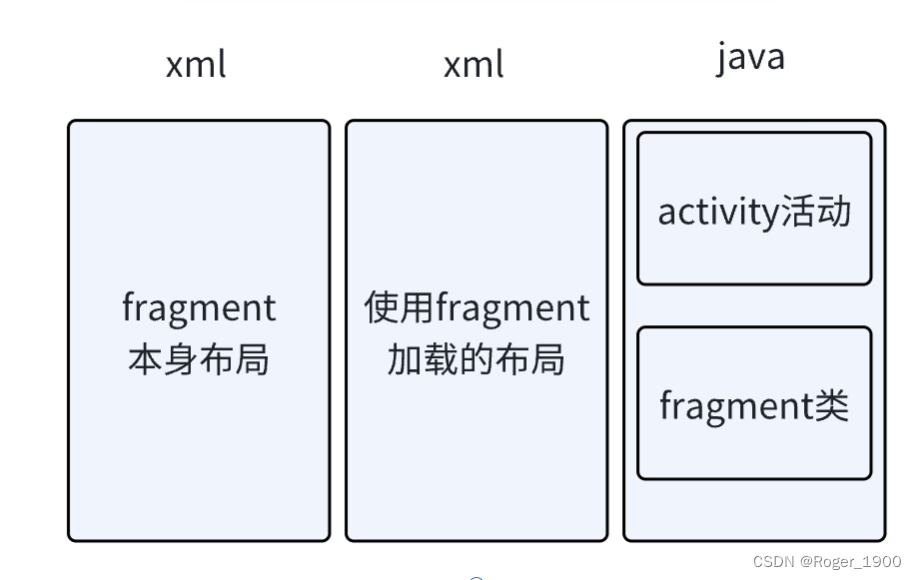
静态加载
xml布局文件(fragment本身布局)
定义xml布局文件,构建fragment的布局
Java文件(fragment类文件)
自定义fragment类,extends(继承)自fragment或其子类
实现onCreateActivity()方法
在方法中通过inflater.inflate(碎片布局,根视图,bundle)加载布局
返回view
xml布局文件(存放fragment的布局/Activty再次加载的界面)
将<fragment中的name属性改为fragment的包名(全限定类名)
java文件(activity活动文件)
在activity中调用setContentView() 方法加载布局即可
对应的代码
public class Fragmentone extends Fragment {
    @Override
    public View onCreateView(LayoutInflater inflater, ViewGroup container,
            Bundle savedInstanceState) {
        View view = inflater.inflate(R.layout.fragment1, container,false);
                                   //碎片布局             根视图
                                   //            (若为null则加载的页面自动包裹内容,即不会按照根视图的格式加载)
        return view;
    }
}
<fragment
    android:id="@+id/fragment1"
    android:name="com.jay.example.fragmentdemo.Fragmentone"  #属性是全限定类名,就是要包含Fragment的包名
    android:layout_width="match_parent"
    android:layout_height="0dp"
    android:layout_weight="1" />
完整代码
activity_main.xml
<?xml version="1.0" encoding="utf-8"?>
<LinearLayout xmlns:android="http://schemas.android.com/apk/res/android"
    xmlns:app="http://schemas.android.com/apk/res-auto"
    xmlns:tools="http://schemas.android.com/tools"
    android:layout_width="match_parent"
    android:layout_height="match_parent"
    tools:context=".MainActivity"
    android:orientation="vertical">

    <Button
        android:layout_width="match_parent"
        android:layout_height="match_parent"
        android:layout_weight="1"
        android:text="nonono"
        />
    <fragment
        android:id="@+id/fragment"
        android:name="com.example.test_fragment.MyFragment"
        android:layout_width="match_parent"
        android:layout_height="match_parent"
        android:layout_weight="1"
        />
</LinearLayout>
MainActivity.java
package com.example.test_fragment;

import androidx.appcompat.app.AppCompatActivity;
import androidx.fragment.app.Fragment;

import android.os.Bundle;

public class MainActivity extends AppCompatActivity {

    @Override
    protected void onCreate(Bundle savedInstanceState) {
        super.onCreate(savedInstanceState);
        setContentView(R.layout.activity_main);
    }
}
MyFragment.java
package com.example.test_fragment;

import android.os.Bundle;
import android.view.LayoutInflater;
import android.view.View;
import android.view.ViewGroup;

import androidx.fragment.app.Fragment;

public class MyFragment extends Fragment  {

    @Override
    public View onCreateView(LayoutInflater inflater, ViewGroup container, Bundle savedInstanceState){
        View view=inflater.inflate(R.layout.fagment,container,false);
        return view;
    }
}
fagment.xml
<?xml version="1.0" encoding="utf-8"?>
<LinearLayout xmlns:android="http://schemas.android.com/apk/res/android"
    android:layout_width="match_parent"
    android:layout_height="match_parent"
    android:orientation="horizontal"
    android:id="@+id/fragment">
    <ImageView
        android:layout_width="match_parent"
        android:layout_height="match_parent"
        android:layout_weight="1"
        android:src="@android:color/background_dark"/>
    <Button
        android:layout_width="match_parent"
        android:layout_height="match_parent"
        android:layout_weight="1"
        android:text="nonono"/>
</LinearLayout>
动态加载
fragmentManager新建(片段管理)
getFragmentManager();
fragmentTransaction新建(片段事务)
beginTransaction();
fragment加载 add()/remove()
add(装入的容器,fragment对象);
提交事务commit()
commit();
对应代码
Fragment1 f1 = new Fragment1();
getFragmentManager().beginTransaction().replace(R.id.LinearLayout1, f1).commit();
public class MainActivity extends Activity {
@Override
protected void onCreate(Bundle savedInstanceState) {
super.onCreate(savedInstanceState);
setContentView(R.layout.activity_main);
Display dis = getWindowManager().getDefaultDisplay();
if(dis.getWidth() > dis.getHeight())
{
Fragment1 f1 = new Fragment1();
getFragmentManager().beginTransaction().replace(R.id.LinearLayout1, f1).commit();
}
else
{
Fragment2 f2 = new Fragment2();
getFragmentManager().beginTransaction().replace(R.id.LinearLayout1, f2).commit();
}
}
}
动态加载各个组件的使用和关系
FragmentManager <-> FragmentTransaction
FragmentManager
findFragmentById()获取指定的fragment
popBackStack()弹出后台的fragment
addToBackSrack(null)加入栈
addOnBackStackChangeListener 监听后台栈的变化
FragmentTransaction
FragmentTransaction对fragment进行增删替换
commit()提交事务(一定要记得!)
组件获取
fragment获取Activity中的组件
getActivity().findViewById(R.id.list)
Activity获取Fragment中的组件
getFragmentManager.findFragmentById(R.id.fragment1);
数据传递
Fragement传给Activity
在fragment类中定义一个内部回调接口
在使用该fragment的Activity中实现这个接口 (fragment就可以通过回调接口进行数据传输了)
Activity传给Fragment
Activity中创建Bundle数据包
调用Fragment实例的setArguments(bundle) (从而将Bundle数据包传给Fragment)
致敬与感谢:【Android】Fragment使用_android fragment使用-CSDN博客
本文参照学习此文章后总结而得。

Agent 垂直技术社区,欢迎活跃、内容共建。
更多推荐

 22
22 0
0- 0


 已为社区贡献1条内容

所有评论(0)