使用 Google 的 A2A 协议、ADK 和 MCP 构建多智能体 AI 应用(二)
继续上一篇文章,开始进行下半部分翻译 关注AI、关注LLM大语言模型。问题或建议,请公众号留言。
使用 Google 的 A2A 协议、ADK 和 MCP 构建多智能体 AI 应用
架构
我们将使用与“旅行计划器”相同的架构,并扩展A2A + MCP协议。
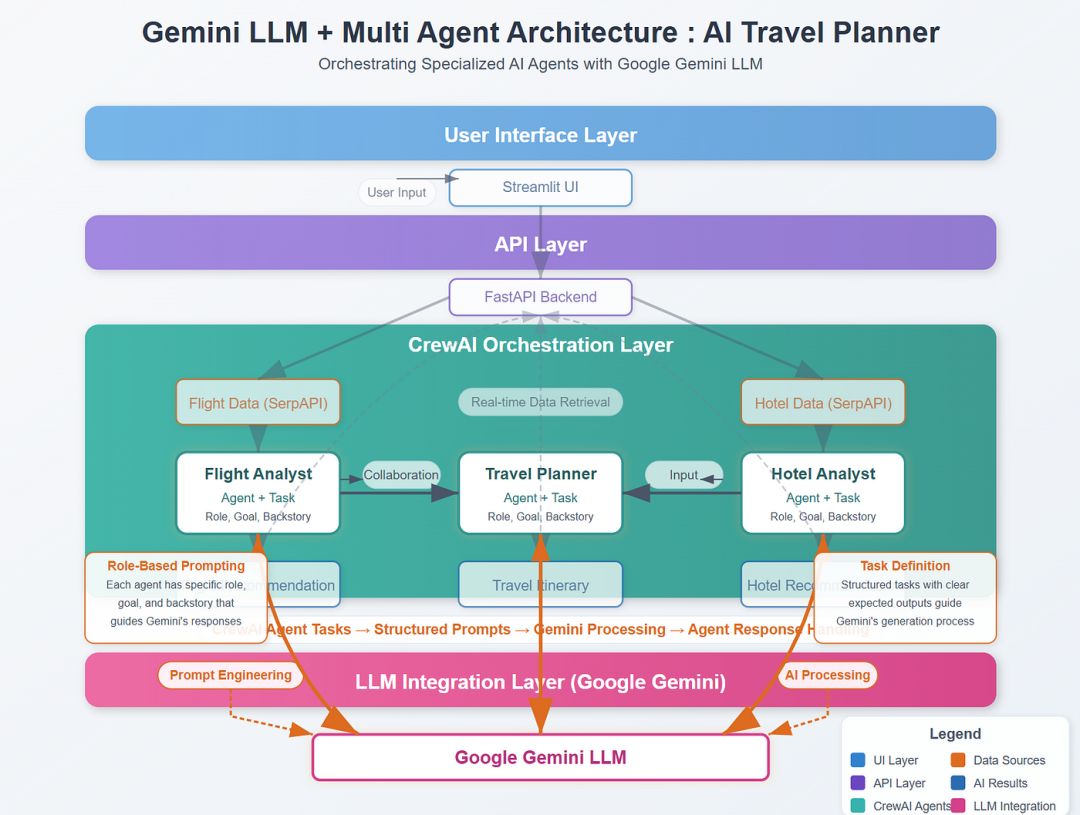
旅行计划器架构图
以下演示仅用于说明如何理解多代理之间的 A2A 协议。
上述架构采用模块化多智能体 AI 系统,每个智能体均可独立部署,并使用 Google 的 A2A(Agent-to-Agent)协议进行通信。
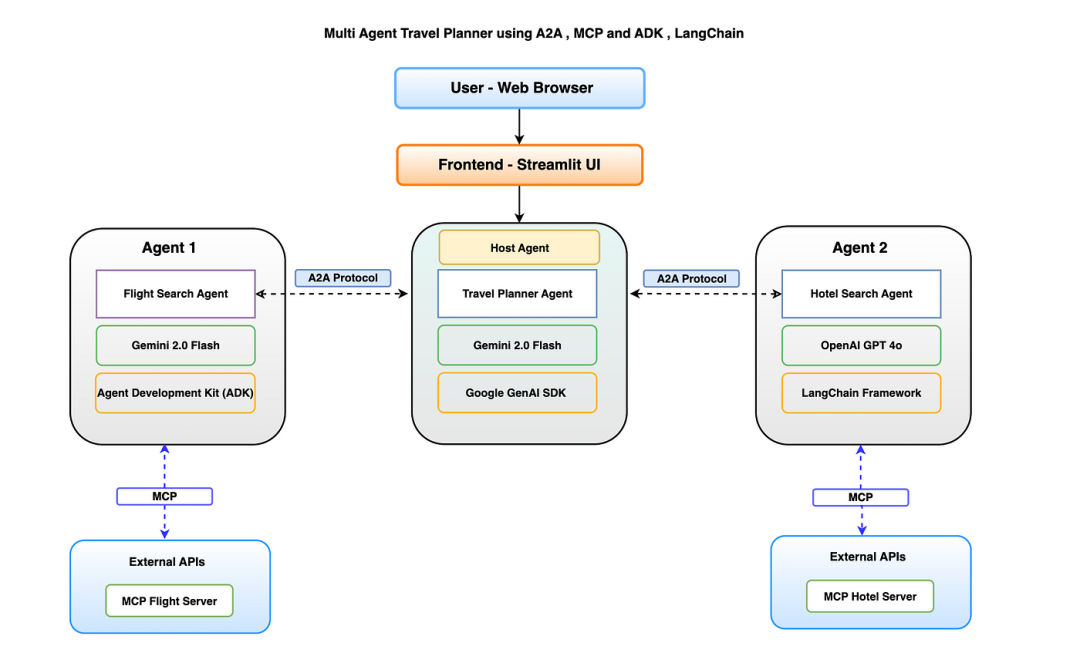
上述架构的核心组件
- 用户界面层 - 向前端服务器发送 HTTP 请求
- 代理层 - 协调主机代理、代理 1 和代理 2
- 协议层 - 代理之间的 A2A 协议通信
- 外部数据层 - 使用 MCP 访问外部 API
代理角色:
- 行程规划代理 - 充当中央协调器 - 主机代理,协调用户与专业代理之间的交互。
- 航班搜索代理 - 负责根据用户输入获取航班选项的专用代理
- 酒店搜索代理 - 负责获取符合用户偏好的酒店住宿的专用代理
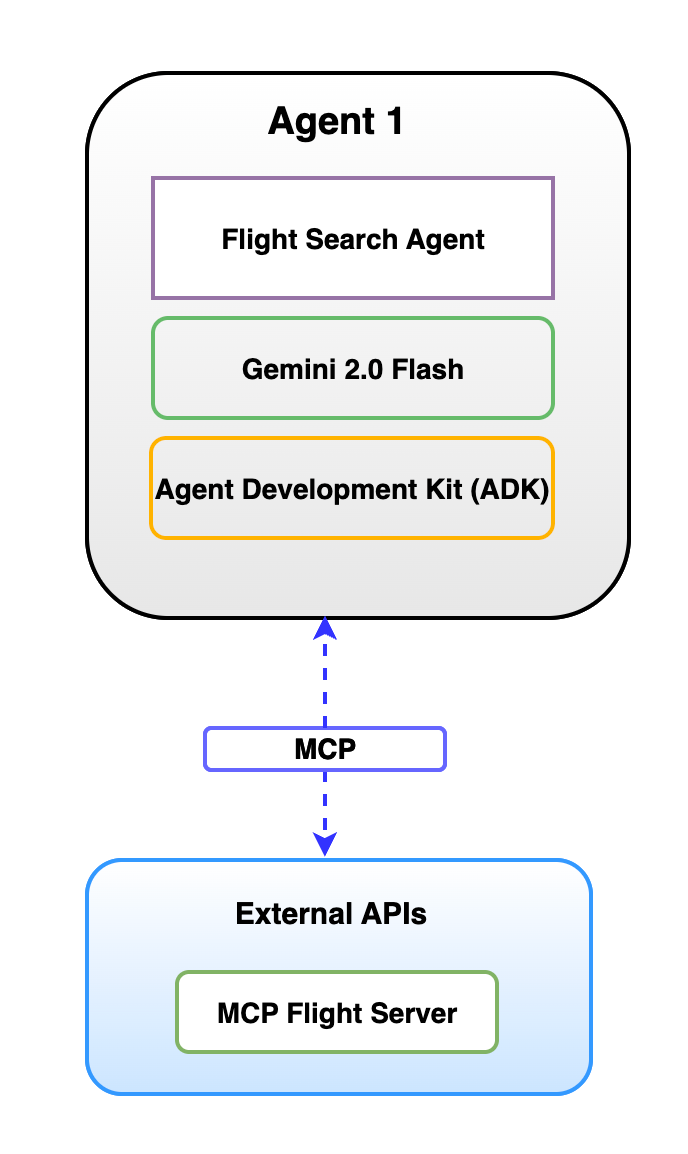
本项目中的 MCP 实现:
航班搜索 MCP 服务器
- 连接:航班搜索(代理 1)连接到 MCP 航班服务器
- 功能:连接到航班预订 API 和数据库
酒店搜索 MCP 服务器
- 连接:酒店搜索(代理 2)连接到 MCP 酒店服务器
- 功能:连接到酒店预订系统和聚合器
代理通信流程
- 用户通过 Streamlit UI 提交旅行查询
- 旅行计划器解析查询以提取关键信息
- 旅行计划器向航班搜索代理请求航班信息
- 航班搜索代理通过调用 MCP 服务器返回可用航班
- 旅行计划器提取目的地详情
- 旅行计划器向酒店搜索代理请求酒店信息
- 酒店搜索代理返回住宿选项
- 旅行计划器将所有数据整合成一份完整的行程
实现
让我们深入探讨如何使用 ADK + MCP + Gemini AI 构建这个多智能体,并分解为几个关键的实现步骤。
先决条件
- 安装 Python 3.11 及以上版本
- 通过 API 密钥访问 Google Gemini 生成式 AI
- 有效的 SerpAPI 密钥
- 有效的 OpenAI GPT 密钥
项目文件夹结构
├── common│├── __init__.py│├── client││├── __init__.py││├── card_resolver.py││└── client.py│├── server││├── __init__.py││├── server.py││├── task_manager.py││└── utils.py│├── types.py│└── utils│├── in_memory_cache.py│└── push_notification_auth.py├── flight_search_app│├── a2a_agent_card.json│├── agent.py│├── main.py│├──static││└──.well-known││└── agent.json│└── streamlit_ui.py├── hotel_search_app│├── README.md│├── a2a_agent_card.json│├── langchain_agent.py│├── langchain_server.py│├── langchain_streamlit.py│├──static││└──.well-known││└── agent.json│└── streamlit_ui.py└── itinerary_planner├── __init__.py├── a2a│├── __init__.py│└── a2a_client.py├── a2a_agent_card.json├── event_log.py├── itinerary_agent.py├── itinerary_server.py├── run_all.py├──static│└──.well-known│└── agent.json└── streamlit_ui.py
步骤 1:设置虚拟环境
安装依赖项
#Setup virtual envpython -n venv .venv#Activate venvsource .venv/bin/activate#Install dependanciespip install fastapi uvicorn streamlit httpx python-dotenv pydanticpip install google-generativeai google-adk langchain langchain-openai
步骤 2:安装 MCP 服务器包
mcp 酒店服务器 — https://pypi.org/project/mcp-hotel-search/ mcp 航班服务器 — https://pypi.org/project/mcp-hotel-search/
#Install mcp search hotelpip install mcp-hotel-search#Install mcp flight searchpip install mcp-flight-search
步骤 3:为 Gemini、OpenAI 和 SerpAI 设置环境变量
根据上述先决条件设置环境变量
GOOGLE_API_KEY=your_google_api_keyOPENAI_API_KEY=your_openai_api_keySERP_API_KEY=your_serp_api_key
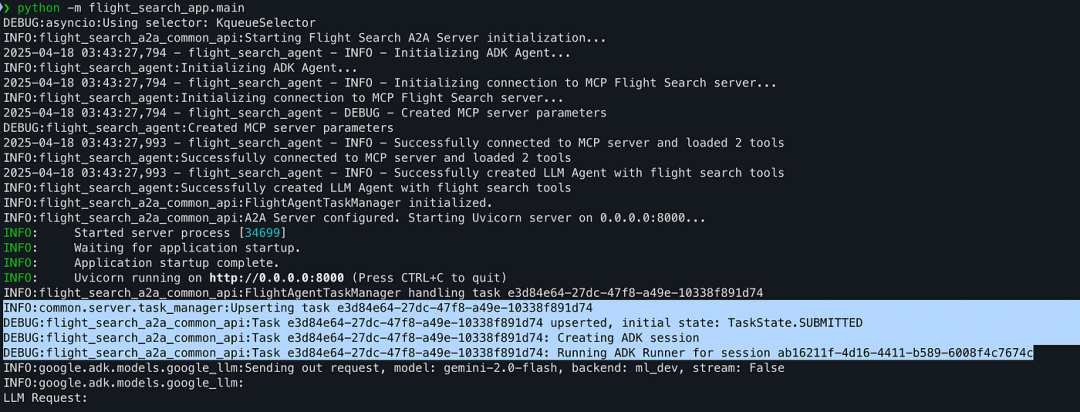
步骤 4:使用 ADK 作为 MCP 客户端,使用 Gemini 2.0 Flash 设置航班搜索(代理)
以下设置与上一篇使用 ADK 的文章相同,但添加了 A2A 协议并使用了https://github.com/google/A2A/tree/main/samples/python/common 中的可复用模块
├── common/# Shared A2A protocol components│├── __init__.py│├── client/# Client implementations││├── __init__.py││└── client.py # Base A2A client│├── server/# Server implementations││├── __init__.py││├── server.py # A2A Server implementation││└── task_manager.py # Task management utilities│└── types.py # Shared type definitions for A2A
├── flight_search_app/# Flight Search Agent (Agent 1)│├── __init__.py│├── a2a_agent_card.json # Agent capabilities declaration│├── agent.py # ADK agent implementation│├── main.py # ADK Server entry point Gemini LLM│└──static/# Static files│└──.well-known/# Agent discovery directory│└── agent.json # Standardized agent discovery file
4.1 ADK 代理实现作为 MCP 客户端从 MCP 服务器获取工具
from google.adk.agents.llm_agent importLlmAgentfrom google.adk.tools.mcp_tool.mcp_toolset importMCPToolset,StdioServerParameters....# Fetch tools from MCP Serverserver_params =StdioServerParameters(command="mcp-flight-search",args=["--connection_type","stdio"],env={"SERP_API_KEY": serp_api_key},)tools, exit_stack =awaitMCPToolset.from_server(connection_params=server_params)....
4.2 使用常见的 A2A 服务器组件和类型以及 google ADK 运行器、会话和代理的 ADK 服务器入口点定义
from google.adk.runners importRunnerfrom google.adk.sessions importInMemorySessionServicefrom google.adk.agents importAgentfrom.agent import get_agent_async# Import common A2A server components and typesfrom common.server.server import A2AServerfrom common.server.task_manager importInMemoryTaskManagerfrom common.types import(AgentCard,SendTaskRequest,SendTaskResponse,Task,TaskStatus,Message,TextPart,TaskState,)# --- Custom Task Manager for Flight Search ---classFlightAgentTaskManager(InMemoryTaskManager):"""Task manager specific to the ADK Flight Search agent."""def __init__(self, agent:Agent, runner:Runner, session_service:InMemorySessionService):super().__init__()self.agent = agentself.runner = runnerself.session_service = session_servicelogger.info("FlightAgentTaskManager initialized.")......
4.3 使用 Agent Card 创建 A2A 服务器实例
# --- Main Execution Block ---asyncdef run_server():"""Initializes services and starts the A2AServer."""logger.info("Starting Flight Search A2A Server initialization...")session_service =Noneexit_stack =Nonetry:session_service =InMemorySessionService()agent, exit_stack =await get_agent_async()runner =Runner(app_name='flight_search_a2a_app',agent=agent,session_service=session_service,)# Create the specific task managertask_manager =FlightAgentTaskManager(agent=agent,runner=runner,session_service=session_service)# Define Agent Cardport =int(os.getenv("PORT","8000"))host = os.getenv("HOST","localhost")listen_host ="0.0.0.0"agent_card =AgentCard(name="Flight Search Agent (A2A)",description="Provides flight information based on user queries.",url=f"http://{host}:{port}/",version="1.0.0",defaultInputModes=["text"],defaultOutputModes=["text"],capabilities={"streaming":False},skills=[{"id":"search_flights","name":"Search Flights","description":"Searches for flights based on origin, destination, and date.","tags":["flights","travel"],"examples":["Find flights from JFK to LAX tomorrow"]}])# Create the A2AServer instancea2a_server = A2AServer(agent_card=agent_card,task_manager=task_manager,host=listen_host,port=port)# Configure Uvicorn programmaticallyconfig = uvicorn.Config(app=a2a_server.app,# Pass the Starlette app from A2AServerhost=listen_host,port=port,log_level="info")server = uvicorn.Server(config)......
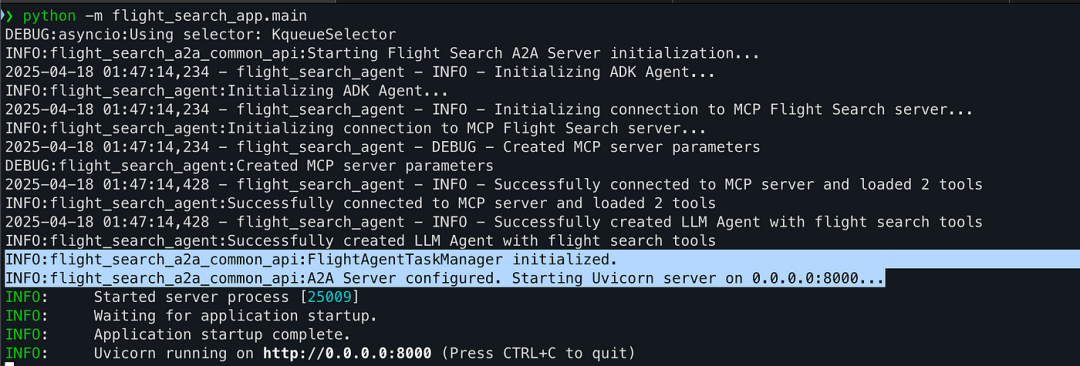
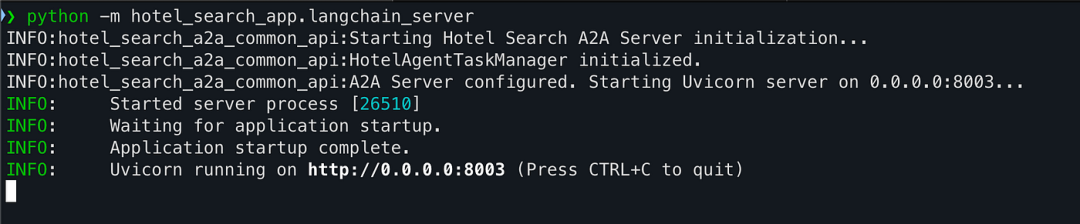
4.4 启动航班搜索应用程序
步骤 5:使用 LangChain 作为 MCP 客户端并使用 OpenAI(GPT-4o)作为 LLM 配置酒店搜索代理
├── hotel_search_app/# Hotel Search Agent (Agent 2)│├── __init__.py│├── a2a_agent_card.json # Agent capabilities declaration│├── langchain_agent.py # LangChain agent implementation│├── langchain_server.py # Server entry point│└──static/# Static files│└──.well-known/# Agent discovery directory│└── agent.json # Standardized agent discovery file
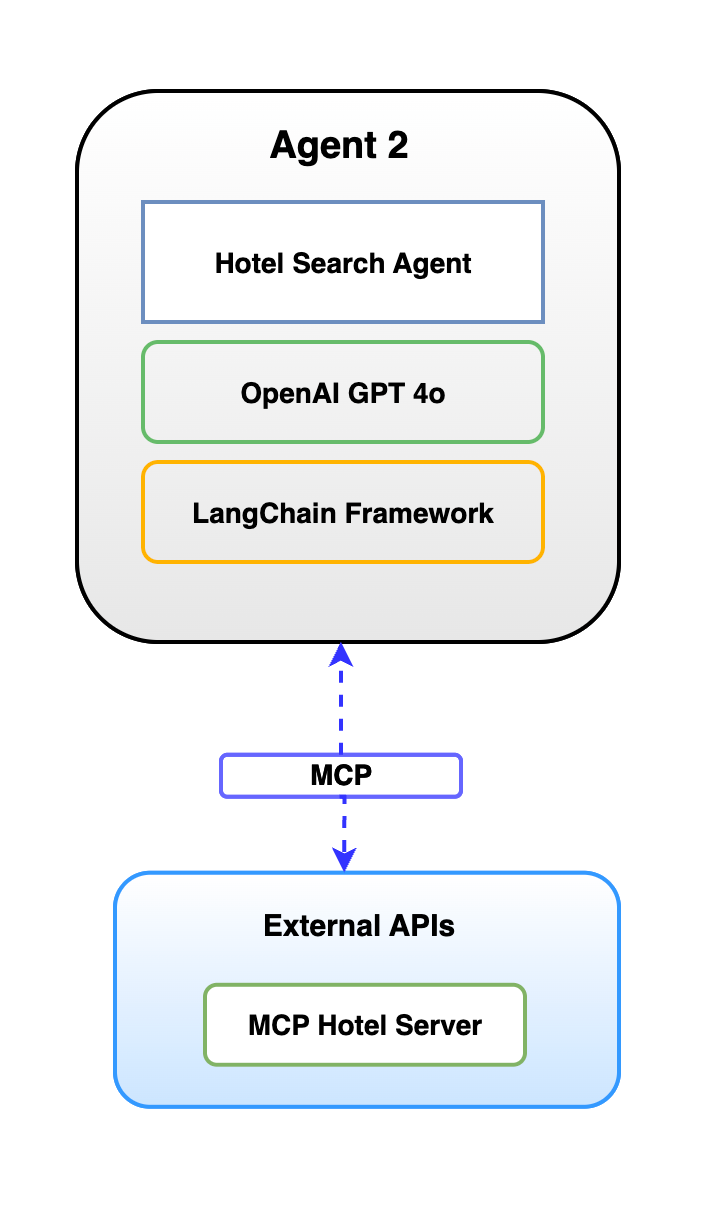
5.1. 使用 OpenAI LLM 实现 LangChain Agent 作为 MCP 客户端
from langchain_openai importChatOpenAIfrom langchain.agents importAgentExecutor, create_openai_functions_agentfrom langchain.prompts importChatPromptTemplate,MessagesPlaceholderfrom langchain_mcp_adapters.client importMultiServerMCPClient# MCP client configurationMCP_CONFIG ={"hotel_search":{"command":"mcp-hotel-search","args":["--connection_type","stdio"],"transport":"stdio","env":{"SERP_API_KEY": os.getenv("SERP_API_KEY")},}}classHotelSearchAgent:"""Hotel search agent using LangChain MCP adapters."""def __init__(self):self.llm =ChatOpenAI(model="gpt-4o", temperature=0)def _create_prompt(self):"""Create a prompt template with our custom system message."""system_message ="""You are a helpful hotel search assistant."""returnChatPromptTemplate.from_messages([("system", system_message),("human","{input}"),MessagesPlaceholder(variable_name="agent_scratchpad"),])....asyncdef process_query(self, query):...# Create MCP client for this queryasyncwithMultiServerMCPClient(MCP_CONFIG)as client:# Get tools from this client instancetools = client.get_tools()# Create a promptprompt =self._create_prompt()# Create an agent with these toolsagent = create_openai_functions_agent(llm=self.llm,tools=tools,prompt=prompt)# Create an executor with these toolsexecutor =AgentExecutor(agent=agent,tools=tools,verbose=True,handle_parsing_errors=True,)
5.2 使用常见的 A2A 服务器组件和类型创建 A2AServer 实例
# Use the underlying agent directlyfrom hotel_search_app.langchain_agent import get_agent,HotelSearchAgent# Import common A2A server components and typesfrom common.server.server import A2AServerfrom common.server.task_manager importInMemoryTaskManagerfrom common.types import(AgentCard,SendTaskRequest,SendTaskResponse,Task,TaskStatus,Message,TextPart,TaskState)....classHotelAgentTaskManager(InMemoryTaskManager):"""Task manager specific to the Hotel Search agent."""def __init__(self, agent:HotelSearchAgent):super().__init__()self.agent = agent # The HotelSearchAgent instancelogger.info("HotelAgentTaskManager initialized.")asyncdef on_send_task(self, request:SendTaskRequest)->SendTaskResponse:"""Handles the tasks/send request by calling the agent's process_query."""task_params = request.paramstask_id = task_params.iduser_message_text =Nonelogger.info(f"HotelAgentTaskManager handling task {task_id}")# --- Main Execution Block ---asyncdef run_server():"""Initializes services and starts the A2AServer for hotels."""logger.info("Starting Hotel Search A2A Server initialization...")agent_instance:Optional[HotelSearchAgent]=Nonetry:agent_instance =await get_agent()ifnot agent_instance:raiseRuntimeError("Failed to initialize HotelSearchAgent")# Create the specific task managertask_manager =HotelAgentTaskManager(agent=agent_instance)# Define Agent Cardport =int(os.getenv("PORT","8003"))# Default port 8003host = os.getenv("HOST","localhost")listen_host ="0.0.0.0"agent_card =AgentCard(name="Hotel Search Agent (A2A)",description="Provides hotel information based on location, dates, and guests.",url=f"http://{host}:{port}/",version="1.0.0",defaultInputModes=["text"],defaultOutputModes=["text"],capabilities={"streaming":False},skills=[{"id":"search_hotels","name":"Search Hotels","description":"Searches for hotels based on location, check-in/out dates, and number of guests.","tags":["hotels","travel","accommodation"],"examples":["Find hotels in London from July 1st to July 5th for 2 adults"]}])# Create the A2AServer instance WITHOUT endpoint parametera2a_server = A2AServer(agent_card=agent_card,task_manager=task_manager,host=listen_host,port=port)config = uvicorn.Config(app=a2a_server.app,# Pass the Starlette app from A2AServerhost=listen_host,port=port,log_level="info")
5.3 让我们启动酒店搜索应用程序(Langchain)作为调用 MCP 服务器的入口点
步骤 6:使用 A2A 协议实现主机代理作为代理之间的协调器
行程规划器是上述旅行规划的核心组成部分,使用航班和酒店服务之间的 A2A 协议。
├── itinerary_planner/# Travel Planner Host Agent (Agent 3)│├── __init__.py│├── a2a/# A2A client implementations││├── __init__.py││└── a2a_client.py # Clients for flight and hotel agents│├── a2a_agent_card.json # Agent capabilities declaration│├── event_log.py # Event logging utilities│├── itinerary_agent.py # Main planner implementation│├── itinerary_server.py # FastAPI server│├── run_all.py # Script to run all components│├──static/# Static files││└──.well-known/# Agent discovery directory││└── agent.json # Standardized agent discovery file│└── streamlit_ui.py # Main user interface
6.1 使用航班和酒店 API URL 实现 A2A 协议
- 包含与其他服务通信的客户端代码
- 实现 Agent-to-Agent 协议
- 包含用于调用航班和酒店搜索服务的模块
# Base URLs for the A2A compliant agent APIsFLIGHT_SEARCH_API_URL = os.getenv("FLIGHT_SEARCH_API_URL","http://localhost:8000")HOTEL_SEARCH_API_URL = os.getenv("HOTEL_SEARCH_API_URL","http://localhost:8003")class A2AClientBase:"""Base client for communicating with A2A-compliant agents via the root endpoint."""asyncdef send_a2a_task(self, user_message: str, task_id:Optional[str]=None, agent_type: str ="generic")->Dict[str,Any]:.......# Construct the JSON-RPC payload with the A2A method and corrected params structurepayload ={"jsonrpc":"2.0","method":"tasks/send","params":{"id": task_id,"taskId": task_id,"message":{"role":"user","parts":[{"type":"text","text": user_message}]}},"id": task_id}
6.2 行程规划器代理卡JSON 元数据文件,描述代理的功能、端点、身份验证要求和技能。用于 A2A 协议中的服务发现
{"name":"Travel Itinerary Planner","displayName":"Travel Itinerary Planner","description":"An agent that coordinates flight and hotel information to create comprehensive travel itineraries","version":"1.0.0","contact":"code.aicloudlab@gmail.com","endpointUrl":"http://localhost:8005","authentication":{"type":"none"},"capabilities":["streaming"],"skills":[{"name":"createItinerary","description":"Create a comprehensive travel itinerary including flights and accommodations","inputs":[{"name":"origin","type":"string","description":"Origin city or airport code"},{"name":"destination","type":"string","description":"Destination city or area"},{"name":"departureDate","type":"string","description":"Departure date in YYYY-MM-DD format"},{"name":"returnDate","type":"string","description":"Return date in YYYY-MM-DD format (optional)"},{"name":"travelers","type":"integer","description":"Number of travelers"},{"name":"preferences","type":"object","description":"Additional preferences like budget, hotel amenities, etc."}],"outputs":[{"name":"itinerary","type":"object","description":"Complete travel itinerary with flights, hotels, and schedule"}]}]}
6.3 使用 Google-GenAI SDK 的行程代理
为了简化演示,我们使用 GenAI SDK(可以使用 ADK、CrewAI 或其他框架)。
行程代理充当系统的中央主机代理,负责协调与航班和酒店搜索服务的通信,并使用语言模型解析自然语言请求。
import google.generativeai as genai # Use direct SDK....from itinerary_planner.a2a.a2a_client importFlightSearchClient,HotelSearchClient# Configure the Google Generative AI SDKgenai.configure(api_key=api_key)classItineraryPlanner:"""A planner that coordinates between flight and hotel search agents to create itineraries using the google.generativeai SDK."""def __init__(self):"""Initialize the itinerary planner."""logger.info("Initializing Itinerary Planner with google.generativeai SDK")self.flight_client =FlightSearchClient()self.hotel_client =HotelSearchClient()# Create the Gemini model instance using the SDKself.model = genai.GenerativeModel(model_name="gemini-2.0-flash",)....
6.4 行程服务器——FastAPI 服务器为行程规划器公开端点,处理传入的 HTTP 请求并将请求路由到行程代理
from fastapi importFastAPI,HTTPException,Requestfrom itinerary_planner.itinerary_agent importItineraryPlanner@app.post("/v1/tasks/send")asyncdef send_task(request:TaskRequest):"""Handle A2A tasks/send requests."""global plannerifnot planner:raiseHTTPException(status_code=503, detail="Planner not initialized")try:task_id = request.taskId# Extract the message from the useruser_message =Nonefor part in request.message.get("parts",[]):if"text"in part:user_message = part["text"]breakifnot user_message:raiseHTTPException(status_code=400, detail="No text message found in request")# Generate an itinerary based on the queryitinerary =await planner.create_itinerary(user_message)# Create the A2A responseresponse ={"task":{"taskId": task_id,"state":"completed","messages":[{"role":"user","parts":[{"text": user_message}]},{"role":"agent","parts":[{"text": itinerary}]}],"artifacts":[]}}return response
6.5 Streamlit_ui使用 Streamlit 构建的用户界面,提供旅行计划表格并以用户友好的格式显示结果
......# API endpointAPI_URL ="http://localhost:8005/v1/tasks/send"def generate_itinerary(query: str):"""Send a query to the itinerary planner API."""try:task_id ="task-"+ datetime.now().strftime("%Y%m%d%H%M%S")payload ={"taskId": task_id,"message":{"role":"user","parts":[{"text": query}]}}# Log the user query and the request to the event loglog_user_query(query)log_itinerary_request(payload)response = requests.post(API_URL,json=payload,headers={"Content-Type":"application/json"})response.raise_for_status()result = response.json()# Extract the agent's response messageagent_message =Nonefor message in result.get("task",{}).get("messages",[]):if message.get("role")=="agent":for part in message.get("parts",[]):if"text"in part:agent_message = part["text"]breakif agent_message:break.......
步骤 7:最终演示
在每个终端中,我们启动服务器代理,如下所示,正如我们在下面的演示中看到的那样
# Start Flight Search Agent - 1 Port 8000python -m flight_search_app.main# Start Hotel Search Agent - 2 Port 8003python -m hotel_search_app.langchain_server# Start Itinerary Host Agent - Port 8005python -m itinerary_planner.itinerary_server# Start frontend UI - Port 8501streamlit run itinerary_planner/streamlit_ui.py
带有主机代理发起的任务ID的航班搜索日志

包含由主机代理发起的任务的酒店搜索日志


行程规划师——负责所有请求/响应的接待代理
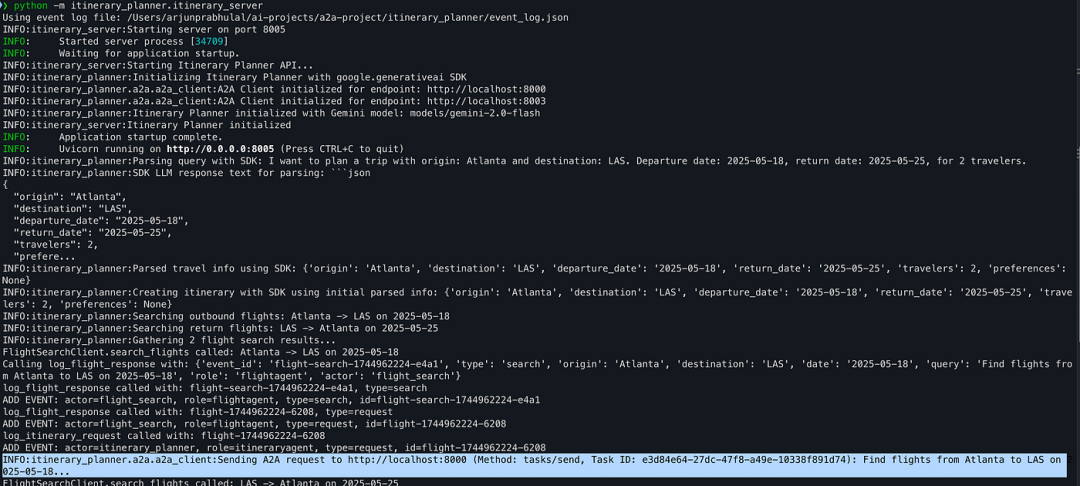
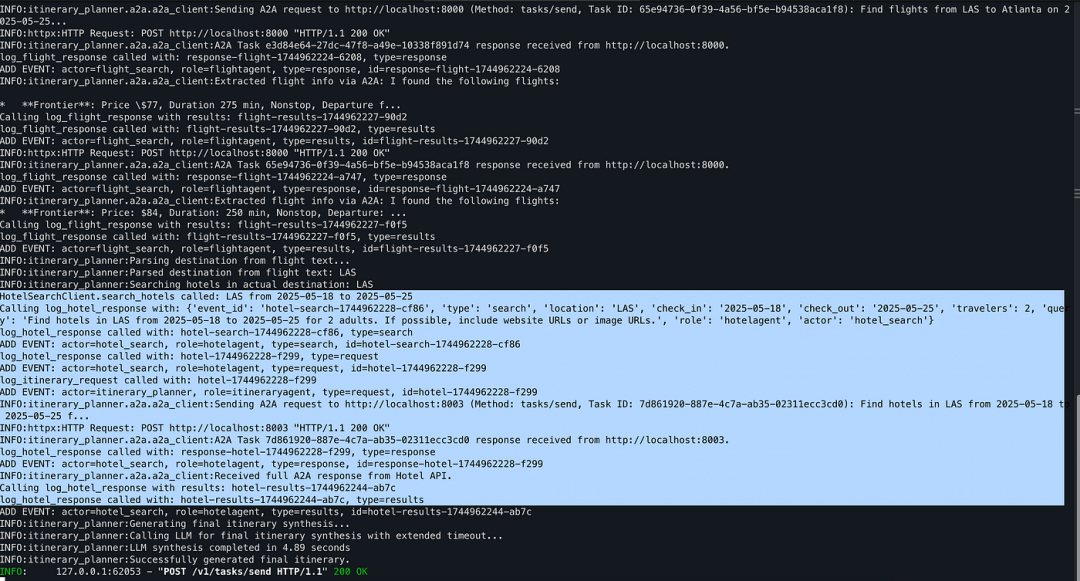
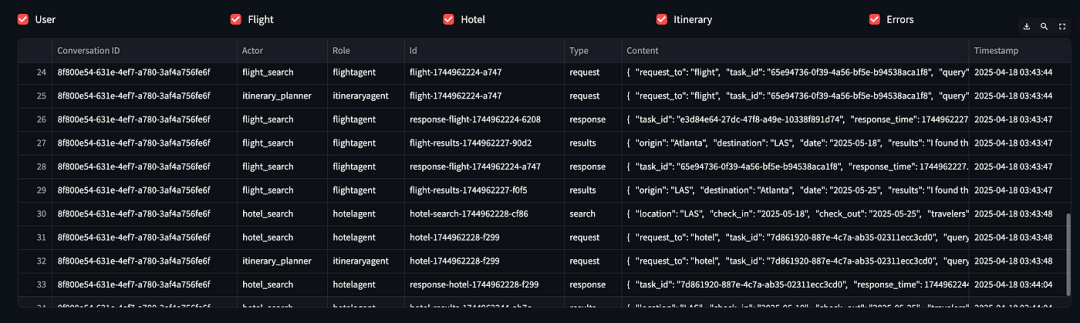
代理事件日志
此演示实现了 Google A2A 协议的核心原则,使代理能够以结构化、可互操作的方式进行通信。上述演示中已完整实现了这些组件。
- AgentCard - 所有代理均公开 .well-known/agent.json 文件以供发现。
- A2A 服务器 - 每个代理都作为 A2A 服务器运行:flightsearchapp、hotelsearchapp 和 itinerary_planner
- A2A 客户端 - itinerary_planner 包含专用于航班和酒店代理的 A2A 客户端。
- 任务管理 - 每个请求/响应都被建模为一个 A2A 任务,并具有已提交、正在处理和已完成等状态。
- 消息结构 - 使用标准 JSON-RPC 格式,包含角色(用户/代理)和部分(主要为 TextPart)。
以下组件在我们的演示中尚未实现,但可以扩展为企业级代理。
- Streaming (SSE) -A2A 支持服务器发送事件用于长时间运行的任务,但我们的演示使用了简单的请求/响应,耗时不到 3-5 秒。
- 推送通知 - 尚未使用 Web-hook 更新机制。
- 复杂部分 - 仅使用 TextPart。可以添加对 DataPart、FilePart 等的支持,以实现更丰富的负载。
- 高级发现 - 已实现基本的 .well-known/agent.json 文件,但未实现高级身份验证、JWKS 或授权流程。
总结
本文探讨了如何在旅行规划场景中使用可复用的 A2A 组件、ADK、LangChain 和 MCP 构建功能齐全的多智能体系统。通过结合这些开源工具和框架,我们的智能体能够:
- 使用 A2A 动态地发现和调用彼此
- 通过 MCP 以模型友好的方式连接到外部 API
- 利用 ADK 和 LangChain 等现代框架
- 以清晰的任务生命周期和结构化结果进行异步通信
相同的原则可以扩展到更多领域,例如零售、客户服务自动化、运营工作流和 AI 辅助企业工具。
如何系统的去学习大模型LLM ?
大模型时代,火爆出圈的LLM大模型让程序员们开始重新评估自己的本领。 “AI会取代那些行业?”“谁的饭碗又将不保了?”等问题热议不断。
事实上,抢你饭碗的不是AI,而是会利用AI的人。
继科大讯飞、阿里、华为等巨头公司发布AI产品后,很多中小企业也陆续进场!超高年薪,挖掘AI大模型人才! 如今大厂老板们,也更倾向于会AI的人,普通程序员,还有应对的机会吗?
与其焦虑……
不如成为「掌握AI工具的技术人」,毕竟AI时代,谁先尝试,谁就能占得先机!
但是LLM相关的内容很多,现在网上的老课程老教材关于LLM又太少。所以现在小白入门就只能靠自学,学习成本和门槛很高。
基于此,我用做产品的心态来打磨这份大模型教程,深挖痛点并持续修改了近70次后,终于把整个AI大模型的学习门槛,降到了最低!
在这个版本当中:
第一您不需要具备任何算法和数学的基础
第二不要求准备高配置的电脑
第三不必懂Python等任何编程语言
您只需要听我讲,跟着我做即可,为了让学习的道路变得更简单,这份大模型教程已经给大家整理并打包,现在将这份 LLM大模型资料 分享出来:包括LLM大模型书籍、640套大模型行业报告、LLM大模型学习视频、LLM大模型学习路线、开源大模型学习教程等, 😝有需要的小伙伴,可以 扫描下方二维码领取🆓↓↓↓

一、LLM大模型经典书籍
AI大模型已经成为了当今科技领域的一大热点,那以下这些大模型书籍就是非常不错的学习资源。

二、640套LLM大模型报告合集
这套包含640份报告的合集,涵盖了大模型的理论研究、技术实现、行业应用等多个方面。无论您是科研人员、工程师,还是对AI大模型感兴趣的爱好者,这套报告合集都将为您提供宝贵的信息和启示。(几乎涵盖所有行业)
三、LLM大模型系列视频教程

四、LLM大模型开源教程(LLaLA/Meta/chatglm/chatgpt)

五、AI产品经理大模型教程

LLM大模型学习路线 ↓
阶段1:AI大模型时代的基础理解
-
目标:了解AI大模型的基本概念、发展历程和核心原理。
-
内容:
- L1.1 人工智能简述与大模型起源
- L1.2 大模型与通用人工智能
- L1.3 GPT模型的发展历程
- L1.4 模型工程
- L1.4.1 知识大模型
- L1.4.2 生产大模型
- L1.4.3 模型工程方法论
- L1.4.4 模型工程实践
- L1.5 GPT应用案例
阶段2:AI大模型API应用开发工程
-
目标:掌握AI大模型API的使用和开发,以及相关的编程技能。
-
内容:
- L2.1 API接口
- L2.1.1 OpenAI API接口
- L2.1.2 Python接口接入
- L2.1.3 BOT工具类框架
- L2.1.4 代码示例
- L2.2 Prompt框架
- L2.3 流水线工程
- L2.4 总结与展望
阶段3:AI大模型应用架构实践
-
目标:深入理解AI大模型的应用架构,并能够进行私有化部署。
-
内容:
- L3.1 Agent模型框架
- L3.2 MetaGPT
- L3.3 ChatGLM
- L3.4 LLAMA
- L3.5 其他大模型介绍
阶段4:AI大模型私有化部署
-
目标:掌握多种AI大模型的私有化部署,包括多模态和特定领域模型。
-
内容:
- L4.1 模型私有化部署概述
- L4.2 模型私有化部署的关键技术
- L4.3 模型私有化部署的实施步骤
- L4.4 模型私有化部署的应用场景
这份 LLM大模型资料 包括LLM大模型书籍、640套大模型行业报告、LLM大模型学习视频、LLM大模型学习路线、开源大模型学习教程等, 😝有需要的小伙伴,可以 扫描下方二维码领取🆓↓↓↓

Agent 垂直技术社区,欢迎活跃、内容共建。
更多推荐

 17
17 0
0- 0


 已为社区贡献79条内容

所有评论(0)