微信小程序 —— 上传文件到服务器(例:上传图片到服务器)
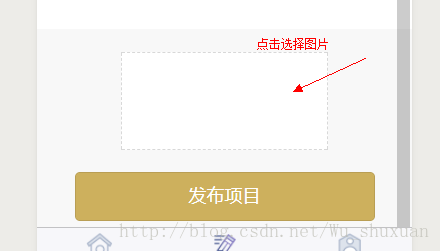
上传图片到服务器:1.先在前端写一个选择图片的区域来触发wx.chooseImage接口并用wx.setStorage接口把图片路径存起来。-wxml<view class="shangchuan" bindtap="choose"><image style="width:100%;height:100%;" src="{{tempFilePaths}}"></image><
·
上传图片到服务器:
1.先在前端写一个选择图片的区域来触发wx.chooseImage接口并用wx.setStorage接口把图片路径存起来。
-wxml
  <view class="shangchuan" bindtap="choose">
    <image style="width:100%;height:100%;" src="{{tempFilePaths}}"></image>
  </view>

  <button formType='submit' class="fabu">发布项目</button>
/**选择图片 */
choose: function () {
var that = this
wx.chooseImage({
count: 1,
sizeType: ['original', 'compressed'], // 可以指定是原图还是压缩图,默认二者都有
sourceType: ['album', 'camera'], // 可以指定来源是相册还是相机,默认二者都有
success: function (res) {
var tempFilePaths = res.tempFilePaths
that.setData({
tempFilePaths: res.tempFilePaths
})
console.log(res.tempFilePaths)
wx.setStorage({ key: "card", data: tempFilePaths[0] })
}
})
},2.使用wx.uploadFile将刚才上传的图片上传到服务器上
  formSubmit2: function (e) {
        var that = this
        var card = wx.getStorageSync('card')
        wx.uploadFile({
          url: app.globalData.create_funds,
          filePath: card,

          name: 'card',
          formData: {
            'user_id': app.globalData.user_id,
            'person': e.detail.value.person,
            'company': e.detail.value.company,
          },
          success: function (res) {
            console.log(res)
          }
        })
      }
    }
  },
Agent 垂直技术社区,欢迎活跃、内容共建。
更多推荐
 4
4 0
0- 0


 已为社区贡献2条内容

所有评论(0)